


之前讲了项目搭建,生命周期,前后端数据交互,以及路由和vuex传值
那么这一节会讲经常用到的父子组件传值
我们在vue2中常用的传值方法是子组件使用props接受父组件的值,子组件使用this.$emit向父组件传值,这里不做多余的举例子了
在vue3中我们是这样传值的:
我们继续使用上一节介绍生命周期使用的路由,删掉多余的代码
一,父组件向子组件传值
父组件:
//view/home.vue
<script setup>
import Child from "@/components/Child.vue";
import { ref } from "vue";

const msg = ref("我是父组件要传递的信息");
</script>

<template>
  欢迎来到首页
  <hr />
  <h2>父级组件</h2>
  <hr />
  <child :msg="msg" />
</template>

<style></style>
子组件:
//components/Child.vue
<script setup>
const props = defineProps({
  msg: {
    type: String,
    required: true,
  },
});
</script>

<template>
  <div>子级组件</div>
  <h4>接受父组件传递的信息:{{ msg }}</h4>
</template>

<style></style>
页面效果:
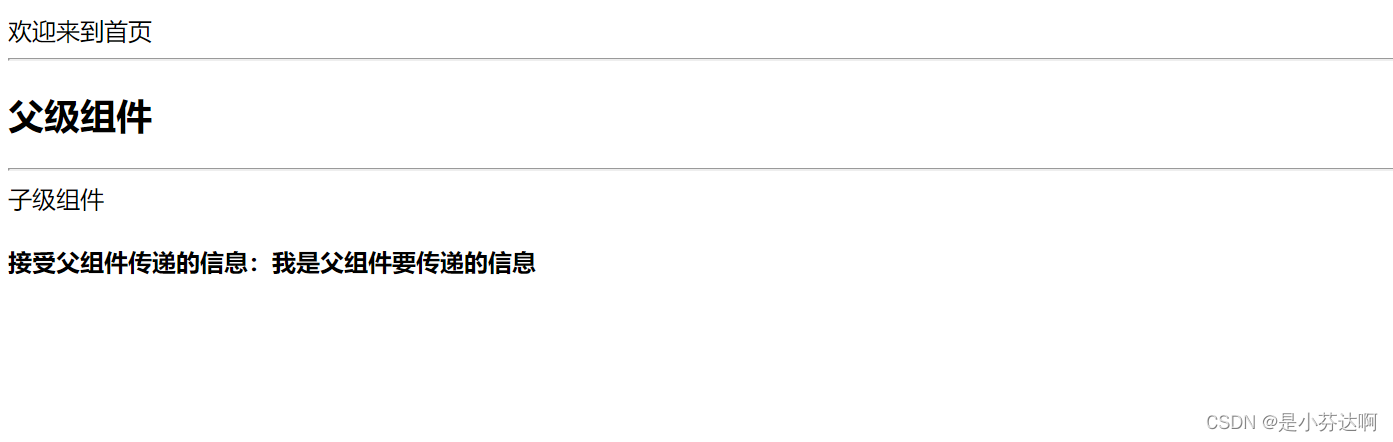
这边可以看到我们使用props接受了参数,现在使用组合式 API 的编译时语法糖可以直接这样使用,不需要格外引人defineProps
二,子组件向父组件传值
父组件
//view/home.vue
<script setup>
import Child from "@/components/Child.vue";
import { ref } from "vue";

const msg = ref("我是父组件要传递的信息");

const n = ref(0);
const addNum = (el) => {
  n.value = el;
};
</script>

<template>
  欢迎来到首页
  <hr />
  <h2>父级组件</h2>
  <h3>我是子组件要传递的值:{{ n }}</h3>
  <hr />
  <child :msg="msg" :n="n" @addNum="addNum" />
</template>

<style></style>
子组件
//components/Child.vue
<script setup>
import { ref } from "vue";
const props = defineProps({
  msg: {
    type: String,
    required: true,
  },
  n: {
    type: Number,
    required: true,
    default: 0,
  },
});

const num = ref(0);
const emit = defineEmits(["addNum"]);
const add = () => {
  num.value = props.n;
  num.value++;
  emit("addNum", num.value);
};
</script>

<template>
  <div>子级组件</div>
  <h4>接受父组件传递的信息:{{ msg }}</h4>
  <button @click="add">给父组件传值</button>
</template>

<style></style>
页面效果
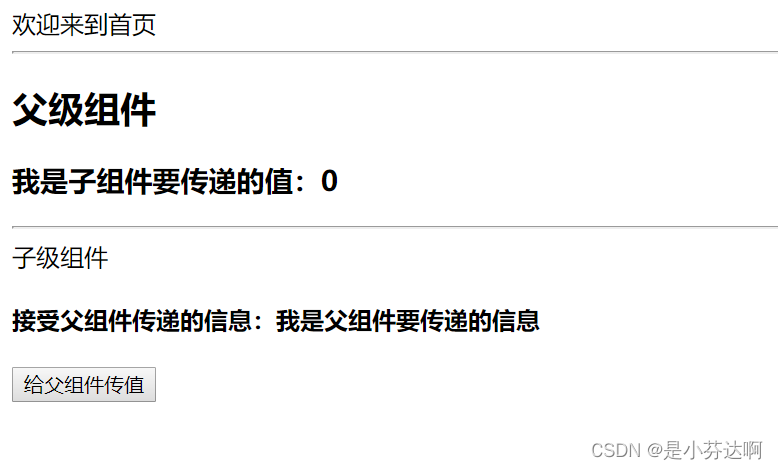
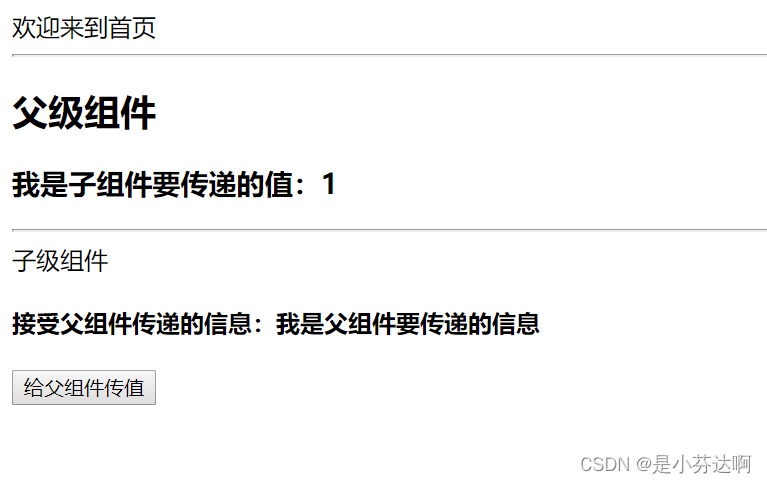
可以看到子组件使用defineEmits,emit传递参数,父组件的写法和vue2基本一致


 673
673

 被折叠的 条评论
为什么被折叠?
被折叠的 条评论
为什么被折叠?
 到【灌水乐园】发言


