


Spring Security
- Spring是非常流行和成功的应用开发框架,Spring Security是Spring家族的成员,基于Spring提供的一套Web应用安全性的解决方案
- 正如你可能知道的关于安全方面的两个区域是
认证和授权(或者访问控制),一般来说WEB应用的安全性包括,用户认证(Authentication)和用户授权(Authonization)两个部分,这两点也是SpringSecurity的重要核心功能
SpringSecurity的简单使用
- pom
<?xml version="1.0" encoding="UTF-8"?>
<project xmlns="http://maven.apache.org/POM/4.0.0"
         xmlns:xsi="http://www.w3.org/2001/XMLSchema-instance"
         xsi:schemaLocation="http://maven.apache.org/POM/4.0.0 http://maven.apache.org/xsd/maven-4.0.0.xsd">
    <modelVersion>4.0.0</modelVersion>

    <groupId>org.example</groupId>
    <artifactId>SpringSecurcityDemo</artifactId>
    <version>1.0-SNAPSHOT</version>
    <parent>
        <groupId>org.springframework.boot</groupId>
        <artifactId>spring-boot-starter-parent</artifactId>
        <version>2.3.6.RELEASE</version>        <!-- 1.5.1-->
    </parent>
    <dependencies>
        <dependency>
            <groupId>org.springframework.boot</groupId>
            <artifactId>spring-boot-starter-web</artifactId>
        </dependency>
        <!--security -->
        <dependency>
            <groupId>org.springframework.boot</groupId>
            <artifactId>spring-boot-starter-security</artifactId>
        </dependency>

        <dependency>
            <groupId>org.springframework.boot</groupId>
            <artifactId>spring-boot-starter-test</artifactId>
            <scope>test</scope>
        </dependency>
    </dependencies>

</project>
package com.rj.bd.Conction;
import org.springframework.http.MediaType;
import org.springframework.web.bind.annotation.*;
/**
* @author LXY
* @desc
* @time 2023--04--15--10:42
*/
@RestController
@RequestMapping("/api")
public class TestConction {
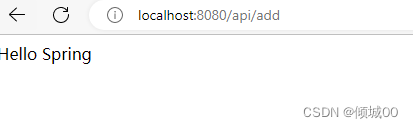
@GetMapping("/add")
public String queryaccessRoompages() {
return "Hello Spring";
}
}
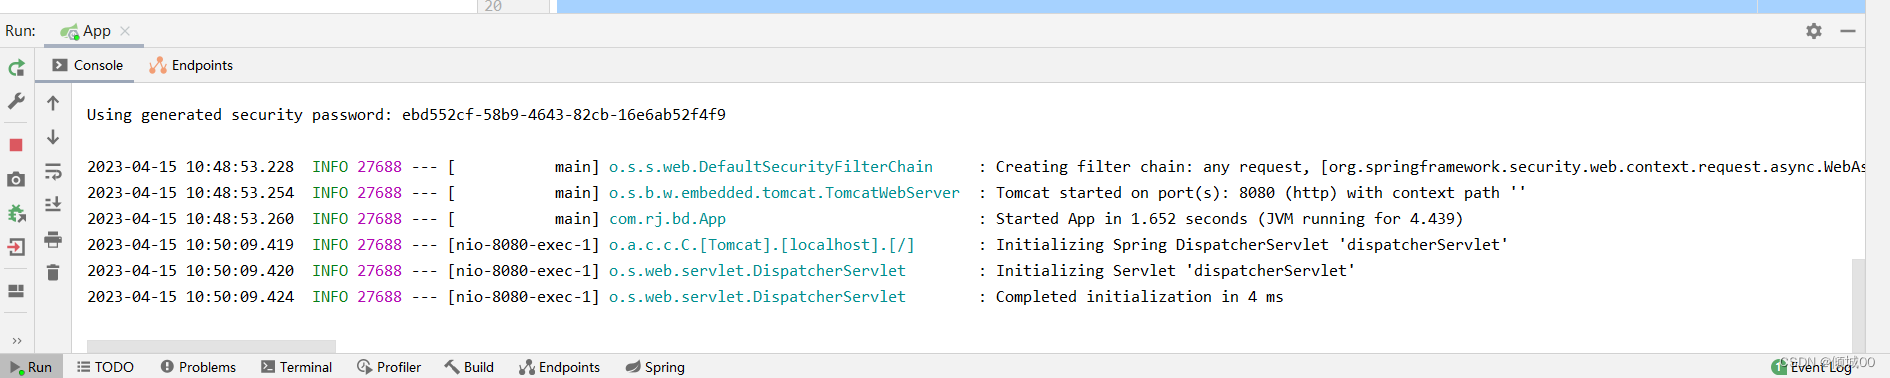
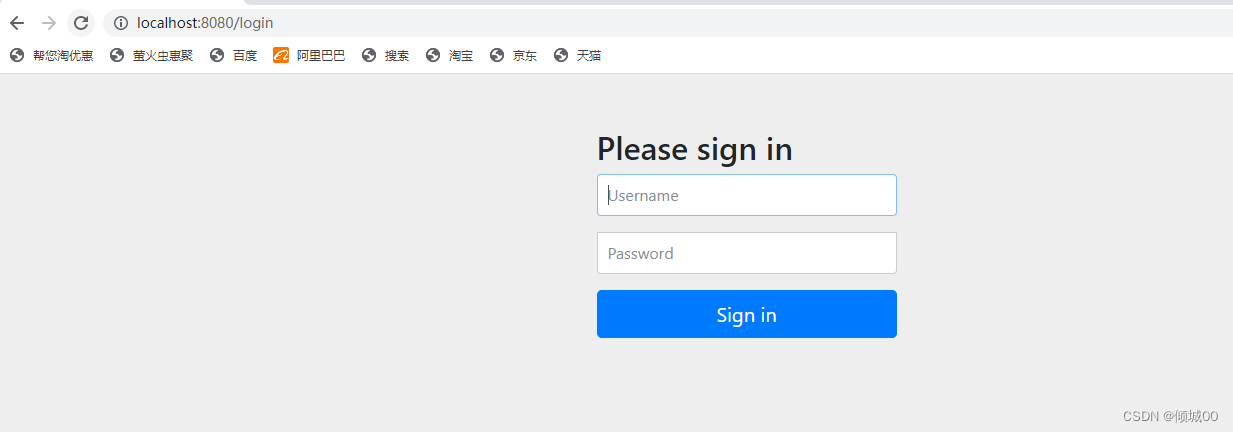
- 访问接口的时候会内置弹出登录权限效验,是security内置的一个登录效验,通常情况下,访问add接口是直接返回数据的,加上了security直接跳转了
- 默认账号是user,密码是控制台输入的
用户认证,自定义账号密码
Web权限解决方案:
设置登录的用户名和密码:1.通过配置文件,2.通过配置类,3.自定义编写配置类
- 第一种方式,通过配置文件
spring:
  security:
    user:
      name: lxy
      password: 123

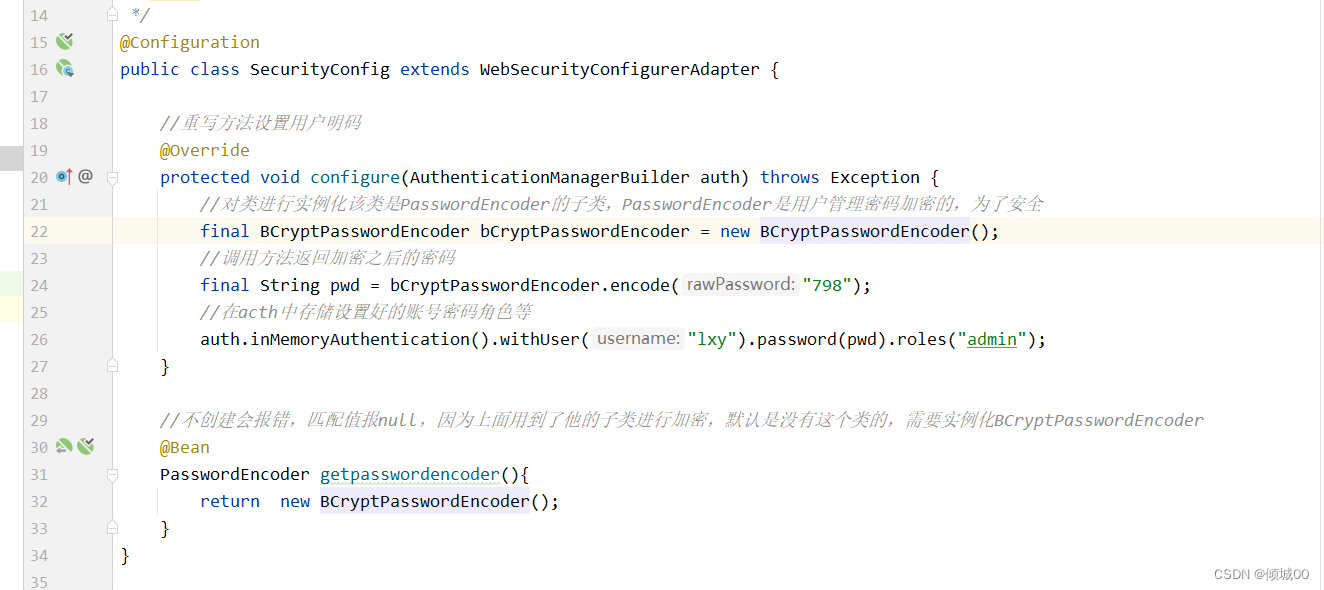
- 通过配置类
package com.rj.bd.Config;

import org.springframework.context.annotation.Bean;
import org.springframework.context.annotation.Configuration;
import org.springframework.security.config.annotation.authentication.builders.AuthenticationManagerBuilder;
import org.springframework.security.config.annotation.web.configuration.WebSecurityConfigurerAdapter;
import org.springframework.security.crypto.bcrypt.BCryptPasswordEncoder;
import org.springframework.security.crypto.password.PasswordEncoder;

/**
 * @author LXY
 * @desc
 * @time 2023--04--16--15:20
 */
@Configuration
public class SecurityConfig extends WebSecurityConfigurerAdapter {

    //重写方法设置用户明码
    @Override
    protected void configure(AuthenticationManagerBuilder auth) throws Exception {
        //对类进行实例化该类是PasswordEncoder的子类,PasswordEncoder是用户管理密码加密的,为了安全
        final BCryptPasswordEncoder bCryptPasswordEncoder = new BCryptPasswordEncoder();
        //调用方法返回加密之后的密码
        final String pwd = bCryptPasswordEncoder.encode("798");
        //在acth中存储设置好的账号密码角色等
        auth.inMemoryAuthentication().withUser("lxy").password(pwd).roles("admin");
    }

    //不创建会报错,匹配值报null,因为上面用到了他的子类进行加密,默认是没有这个类的,需要实例化BCryptPasswordEncoder
    @Bean
    PasswordEncoder getpasswordencoder(){
        return  new BCryptPasswordEncoder();
    }
}
- 自定义配置类
- 自定义实现UserDetailsService接口,实现里面的方法,注入账号和加密的密码,权限,
- SecurityConfigTest 在将自定义实现的类注入进去
package com.rj.bd.Config;

import org.springframework.beans.factory.annotation.Autowired;
import org.springframework.context.annotation.Bean;
import org.springframework.context.annotation.Configuration;
import org.springframework.security.config.annotation.authentication.builders.AuthenticationManagerBuilder;
import org.springframework.security.config.annotation.web.configuration.WebSecurityConfigurerAdapter;
import org.springframework.security.core.userdetails.UserDetailsService;
import org.springframework.security.crypto.bcrypt.BCryptPasswordEncoder;
import org.springframework.security.crypto.password.PasswordEncoder;

/**
 * @author LXY
 * @desc
 * @time 2023--04--16--15:41
 */
@Configuration
public class SecurityConfigTest extends WebSecurityConfigurerAdapter {

    @Autowired
   public UserDetailsService userDetailsService;

    //重写方法设置用户明码
    @Override
    protected void configure(AuthenticationManagerBuilder auth) throws Exception {
        //装入UserDetailsService的实现类,自定义的饿实现类,后面加上PasswordEncoder的加密实现类
        auth.userDetailsService(userDetailsService).passwordEncoder(getpasswordencoder());
    }

    //不创建会报错,匹配值报null,因为上面用到了他的子类进行加密,默认是没有这个类的,需要实例化BCryptPasswordEncoder
    @Bean
    PasswordEncoder getpasswordencoder(){
        return  new BCryptPasswordEncoder();
    }

}
package com.rj.bd.Config;
import org.springframework.security.access.annotation.Secured;
import org.springframework.security.core.GrantedAuthority;
import org.springframework.security.core.authority.AuthorityUtils;
import org.springframework.security.core.userdetails.User;
import org.springframework.security.core.userdetails.UserDetails;
import org.springframework.security.core.userdetails.UserDetailsService;
import org.springframework.security.core.userdetails.UsernameNotFoundException;
import org.springframework.security.crypto.bcrypt.BCryptPasswordEncoder;
import org.springframework.stereotype.Service;
import java.util.List;
/**
* @author LXY
* @desc
* @time 2023--04--16--15:44
*/
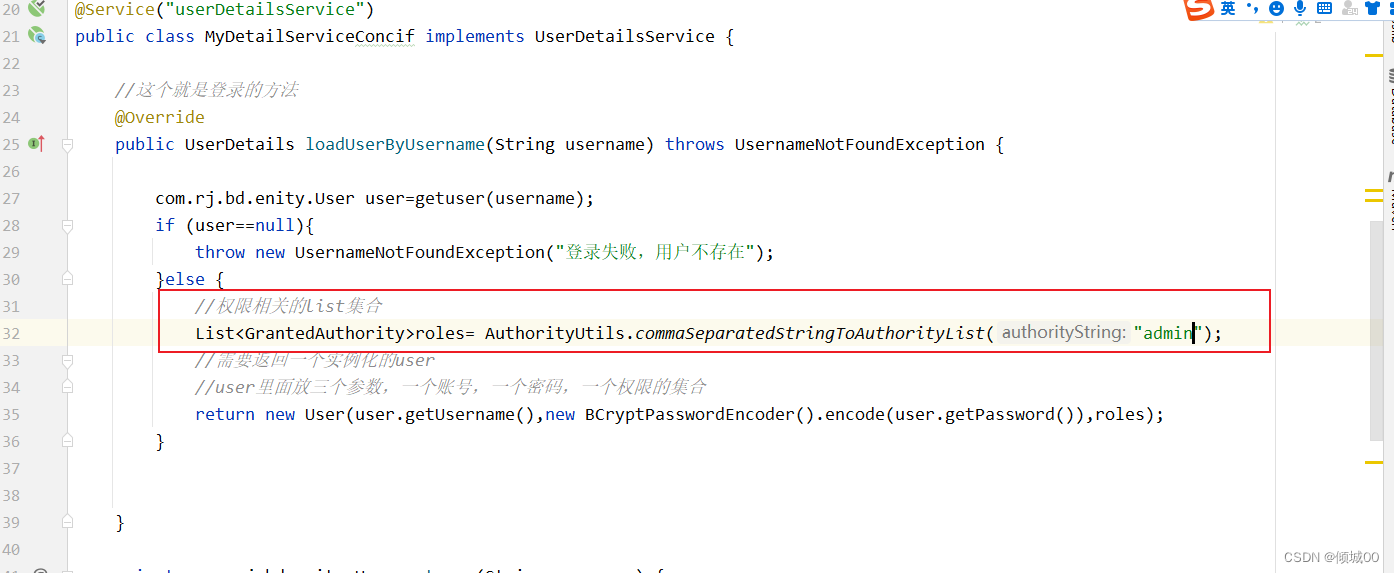
@Service("userDetailsService")
public class MyDetailServiceConcif implements UserDetailsService {
//这个就是登录的方法
@Override
public UserDetails loadUserByUsername(String s) throws UsernameNotFoundException {
//权限相关的list集合
List<GrantedAuthority>roles= AuthorityUtils.commaSeparatedStringToAuthorityList("admin");
//需要返回一个实例化的user
//user里面放三个参数,一个账号,一个密码,一个权限的集合
return new User("lll",new BCryptPasswordEncoder().encode("789"),roles);
}
}
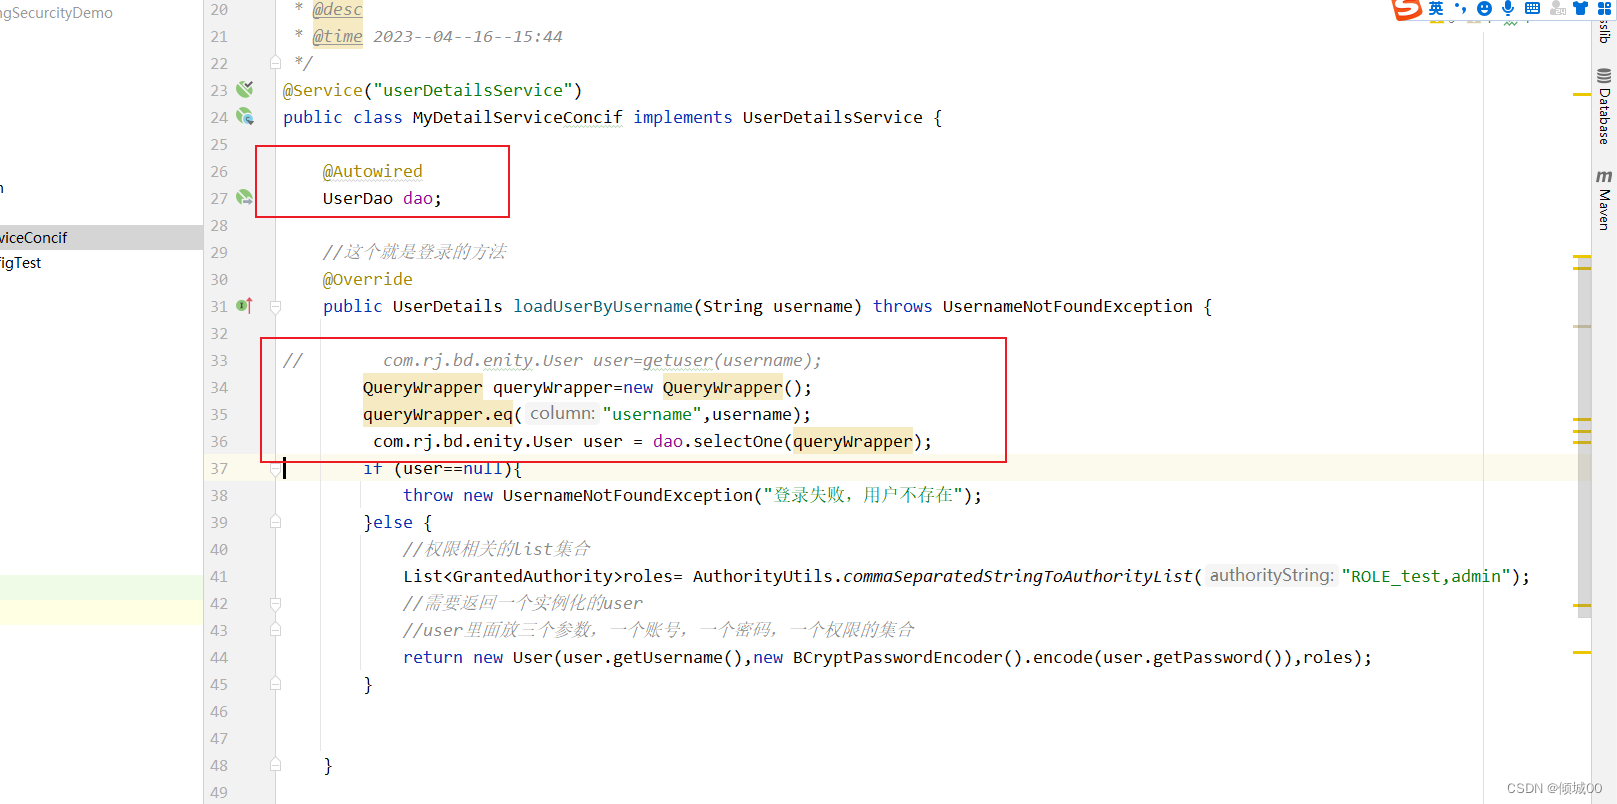
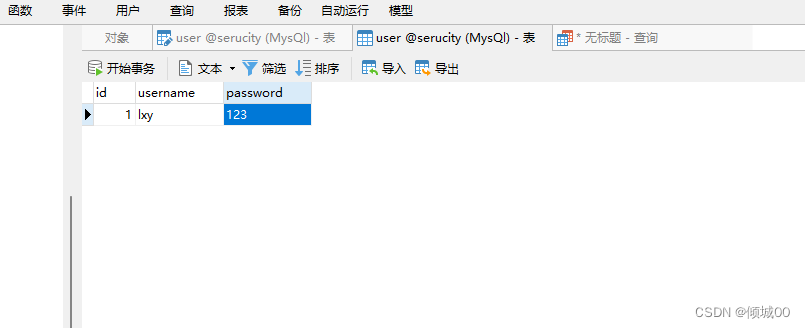
数据库查询账号密码
- 模拟一个数据库查询数据的方法,从里面获取数据,创建了一个实体类
- 套路还是一样的,如果账号正确直接返回,如果账号错误,抛异常就算登录失败。完成了数据库查询账号密码
package com.rj.bd.Config;

import org.springframework.security.access.annotation.Secured;
import org.springframework.security.core.GrantedAuthority;
import org.springframework.security.core.authority.AuthorityUtils;
import org.springframework.security.core.userdetails.User;
import org.springframework.security.core.userdetails.UserDetails;
import org.springframework.security.core.userdetails.UserDetailsService;
import org.springframework.security.core.userdetails.UsernameNotFoundException;
import org.springframework.security.crypto.bcrypt.BCryptPasswordEncoder;
import org.springframework.stereotype.Service;

import java.util.List;

/**
 * @author LXY
 * @desc
 * @time 2023--04--16--15:44
 */
@Service("userDetailsService")
public class MyDetailServiceConcif implements UserDetailsService {

    //这个就是登录的方法
    @Override
    public UserDetails loadUserByUsername(String username) throws UsernameNotFoundException {

        com.rj.bd.enity.User user=getuser(username);
        if (user==null){
            throw new UsernameNotFoundException("登录失败,用户不存在");
        }else {
            //权限相关的list集合
            List<GrantedAuthority>roles= AuthorityUtils.commaSeparatedStringToAuthorityList("admin");
            //需要返回一个实例化的user
            //user里面放三个参数,一个账号,一个密码,一个权限的集合
            return new User(user.getUsername(),new BCryptPasswordEncoder().encode(user.getPassword()),roles);
        }


    }

    private com.rj.bd.enity.User getuser(String username) {

        if (username.equals("lxy")){
            com.rj.bd.enity.User user=new com.rj.bd.enity.User();
            user.setId(001);
            user.setUsername("lxy");
            user.setPassword("789");
            return user;
        }else {
            return  null;
        }
    }

}
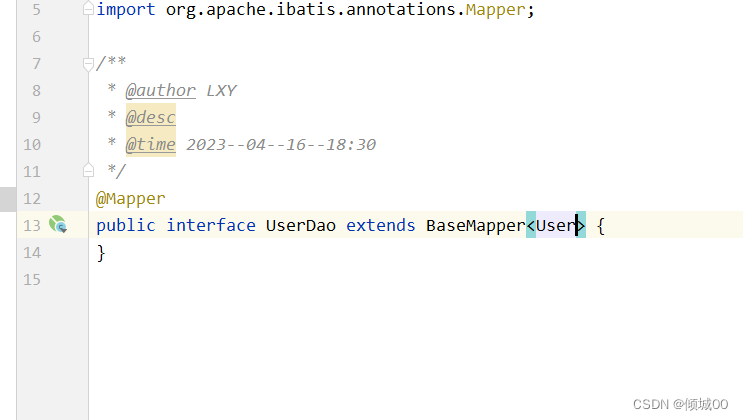
- 实体类
package com.rj.bd.enity;

/**
 * @author LXY
 * @desc
 * @time 2023--04--16--15:59
 */
public class User {

    private Integer id;
    private String username;
    private String password;

    public Integer getId() {
        return id;
    }

    public void setId(Integer id) {
        this.id = id;
    }

    public String getUsername() {
        return username;
    }

    public void setUsername(String username) {
        this.username = username;
    }

    public String getPassword() {
        return password;
    }

    public void setPassword(String password) {
        this.password = password;
    }
}
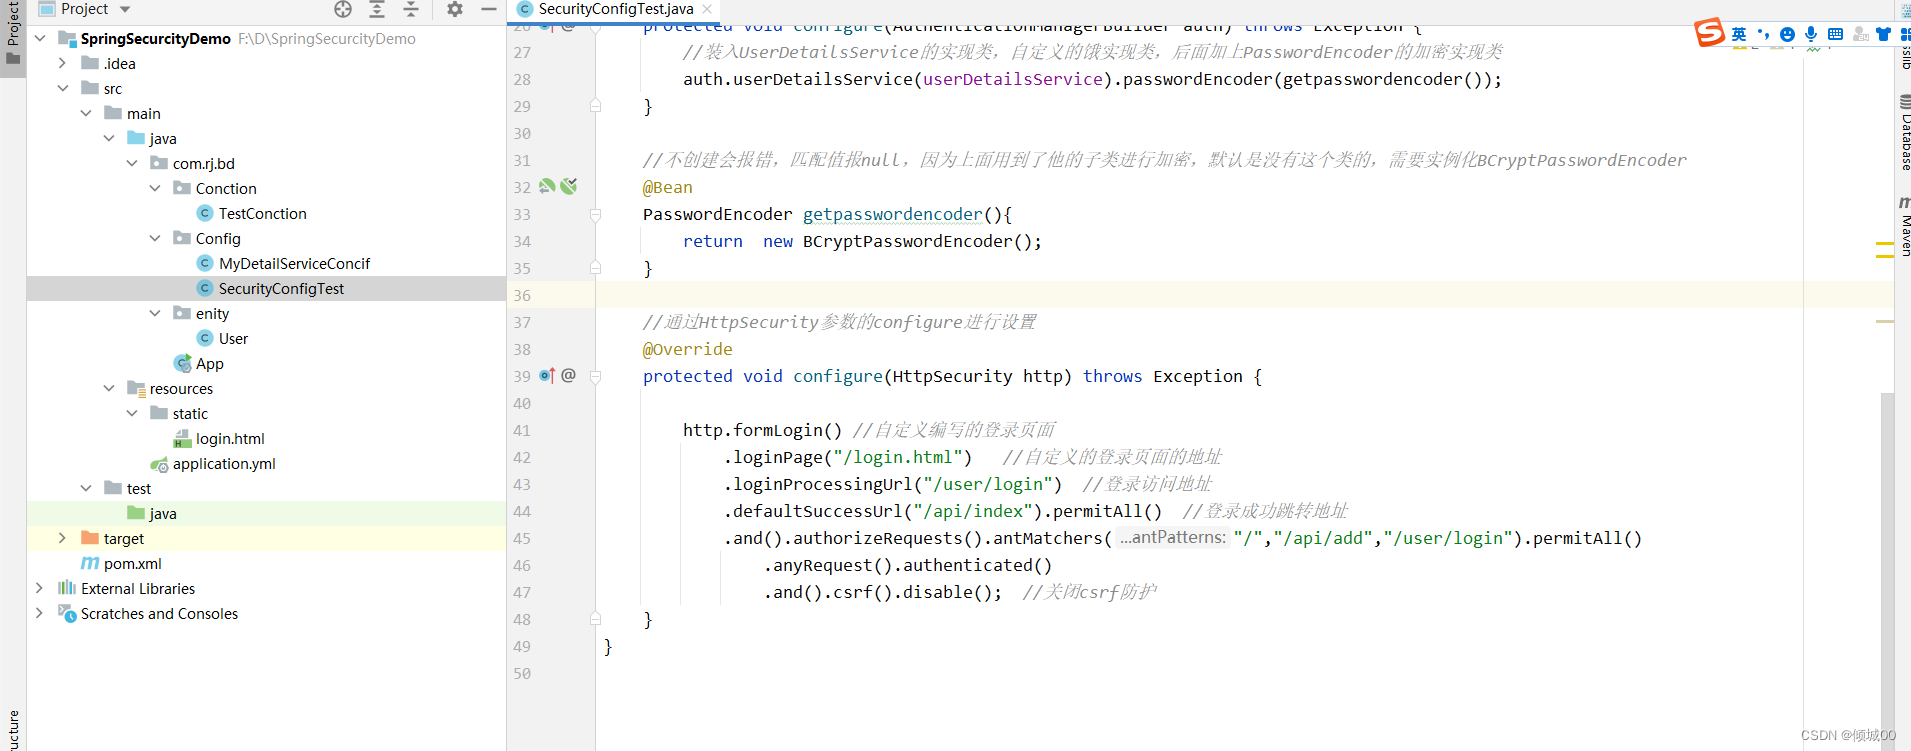
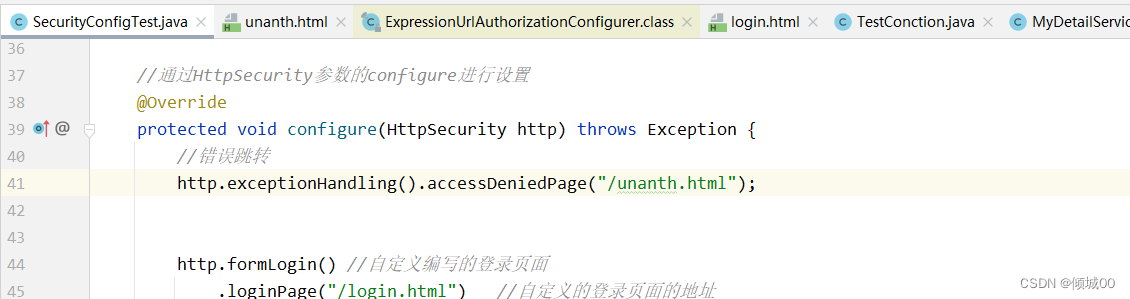
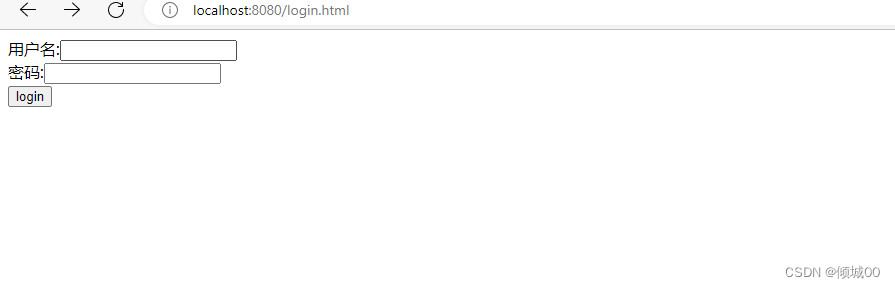
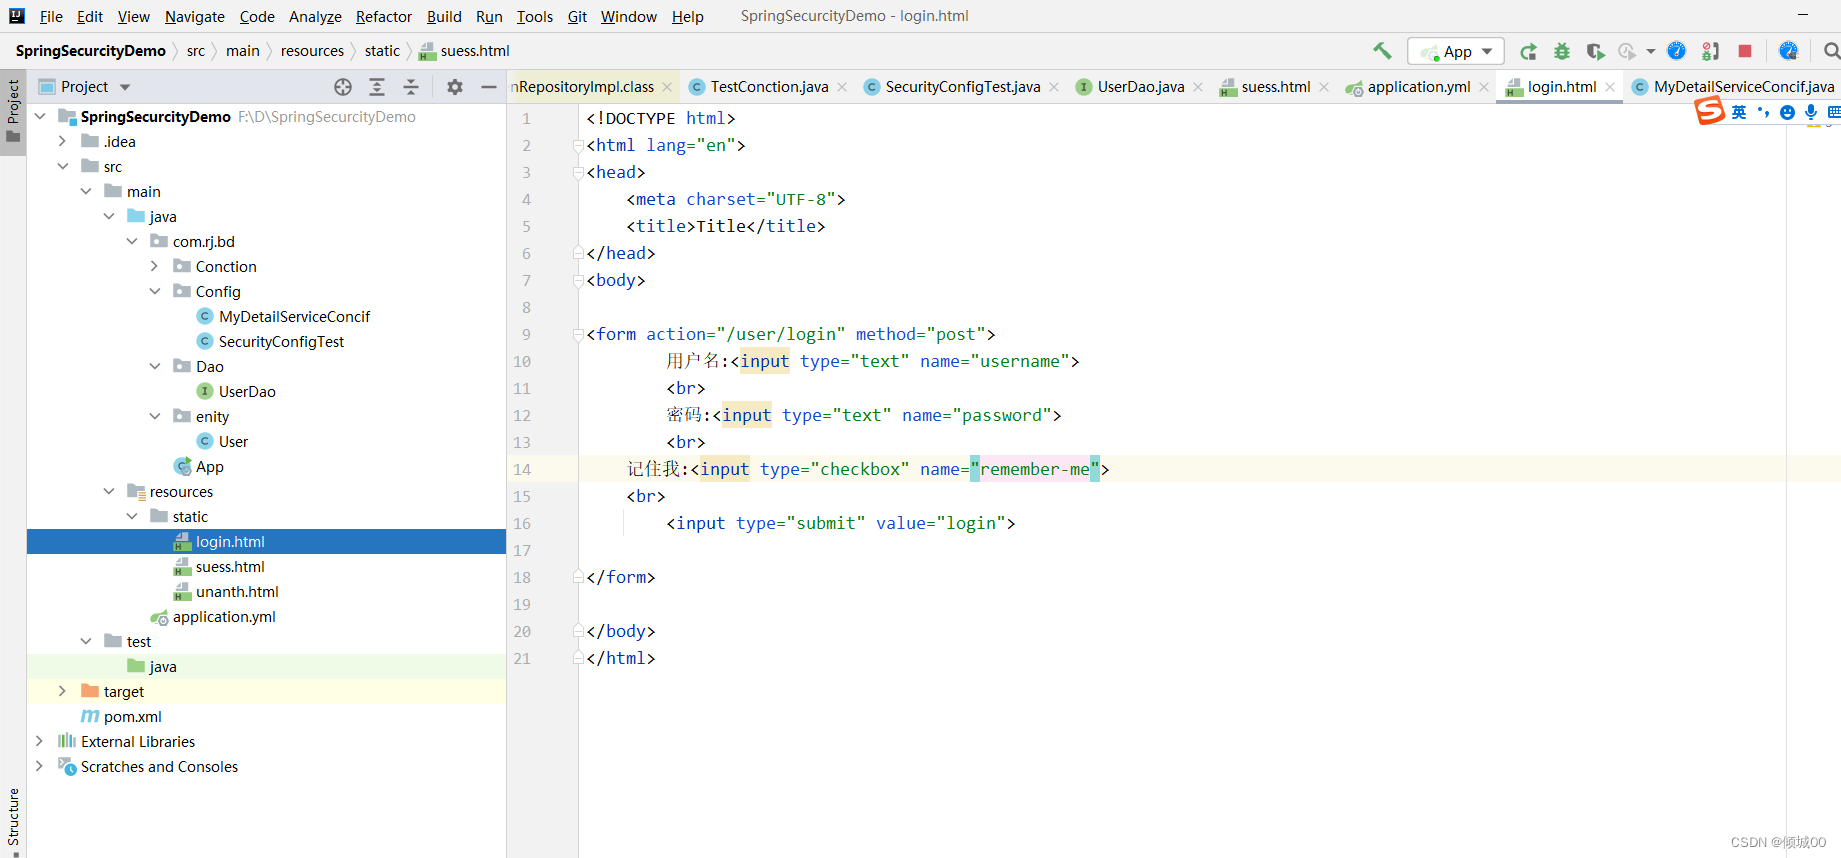
自定义登录页面
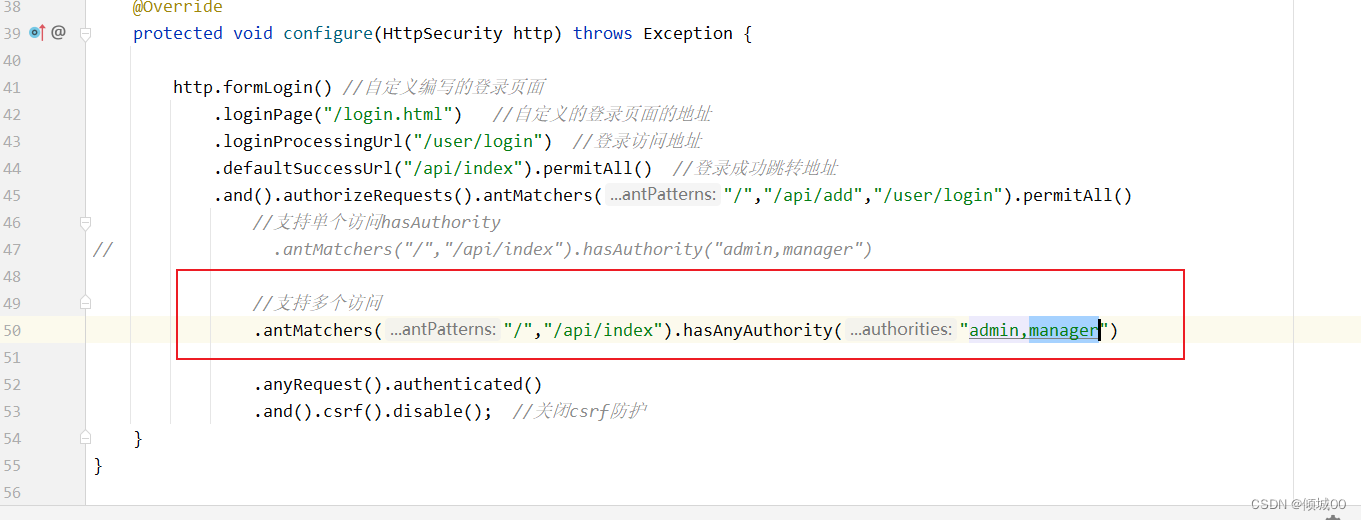
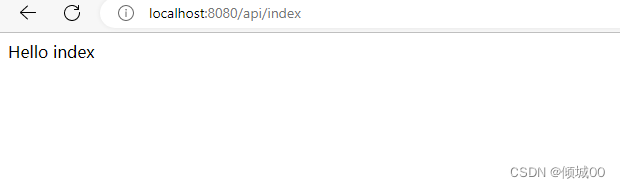
- 自定义登录页面 通过重写configure(HttpSecurity http)方法,可以设置自定义的登录页面和指定哪些页面不需要登录就可以跳转,设置的是/api/add和/user/logi不需要认证,直接访问就可以进去
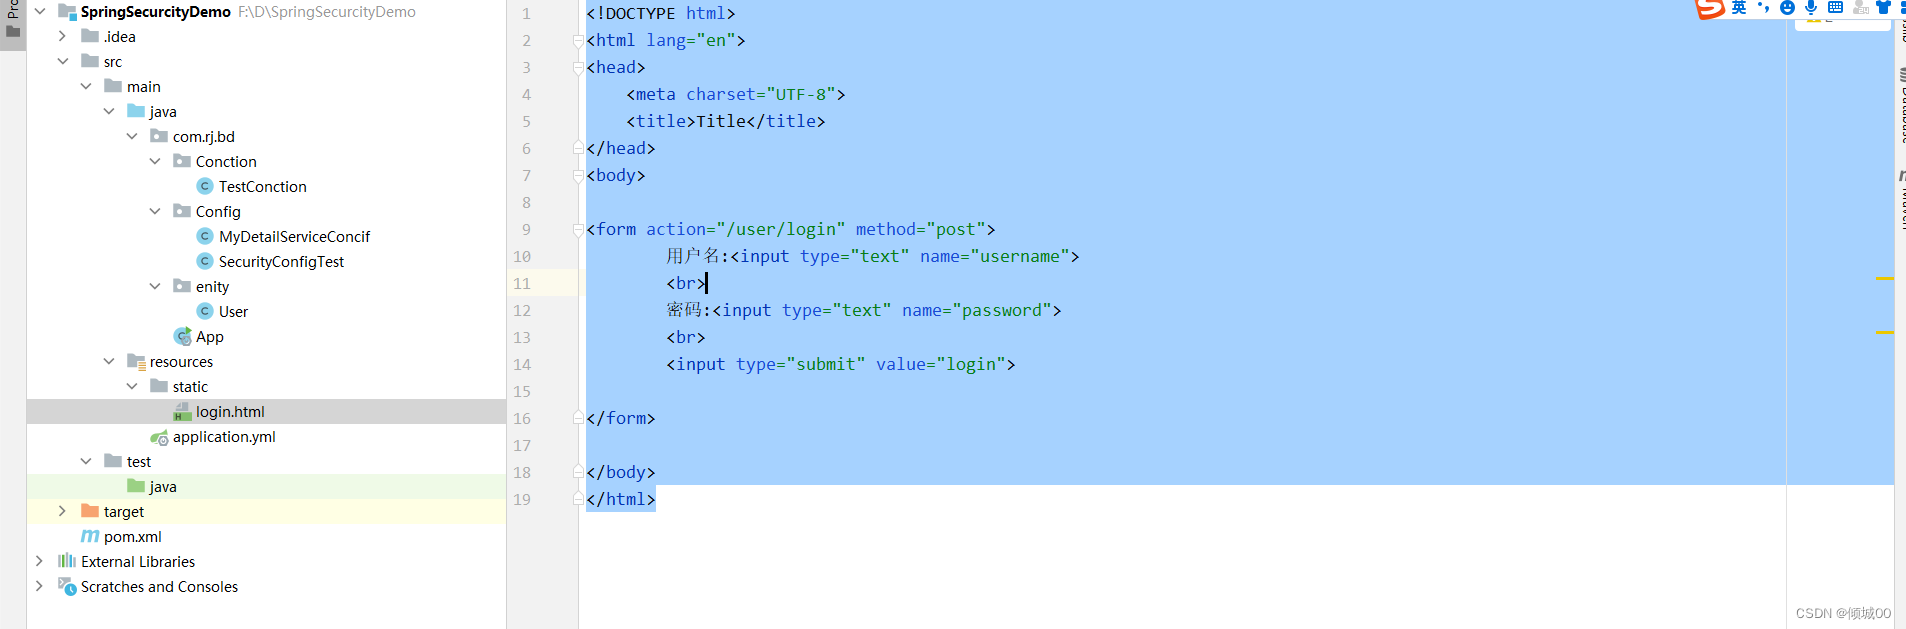
/login.html作为登录的地址,action=“/user/login” method="post"是必须的
用户名username和密码password是源码写好了name不对接不到参数
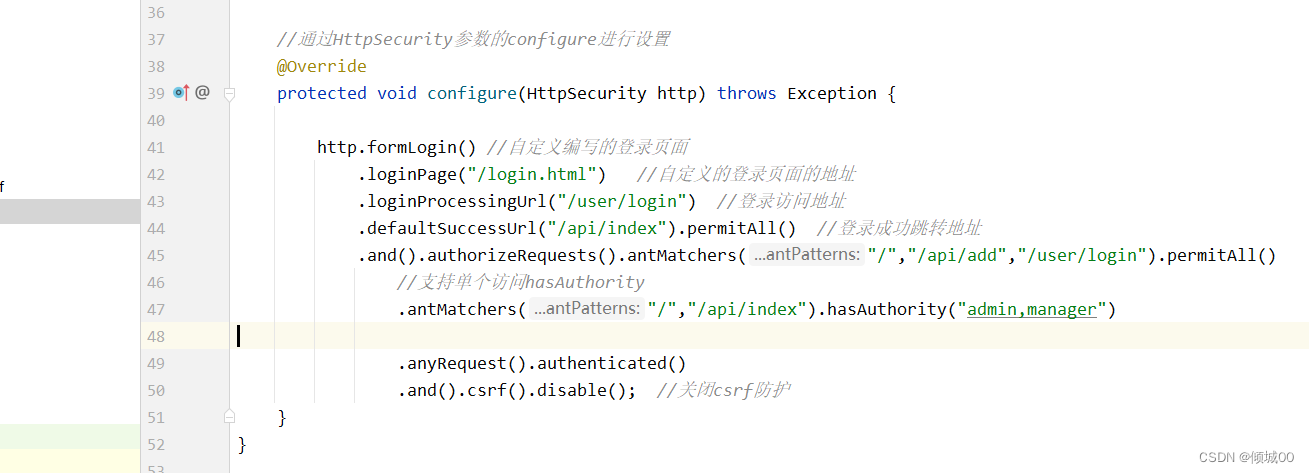
  //通过HttpSecurity参数的configure进行设置
    @Override
    protected void configure(HttpSecurity http) throws Exception {

        http.formLogin() //自定义编写的登录页面
            .loginPage("/login.html")   //自定义的登录页面的地址
            .loginProcessingUrl("/user/login")  //登录访问地址
            .defaultSuccessUrl("/api/index").permitAll()  //登录成功跳转地址
            .and().authorizeRequests().antMatchers("/","/api/add","/user/login").permitAll()
                .anyRequest().authenticated()
                .and().csrf().disable();  //关闭csrf防护
    }
<!DOCTYPE html>
<html lang="en">
<head>
    <meta charset="UTF-8">
    <title>Title</title>
</head>
<body>

<form action="/user/login" method="post">
        用户名:<input type="text" name="username">
        <br>
        密码:<input type="text" name="password">
        <br>
        <input type="submit" value="login">

</form>

</body>
</html>
    @GetMapping("/index")
    public String index() {

        return  "Hello index";
    }

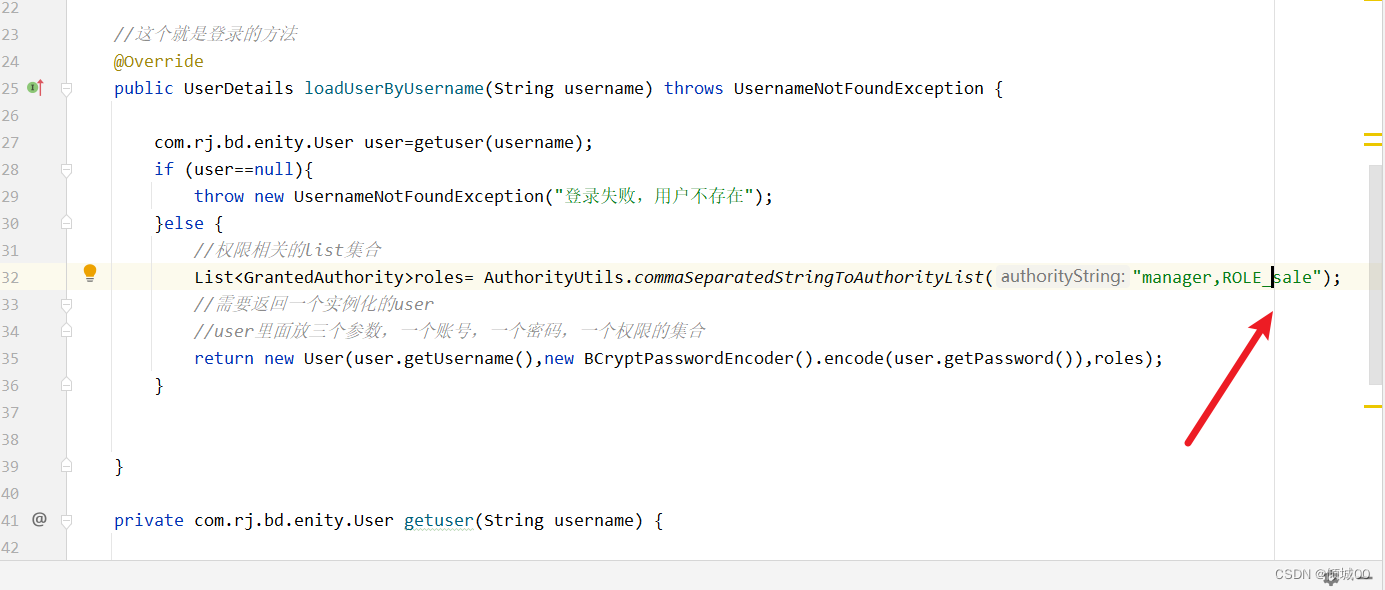
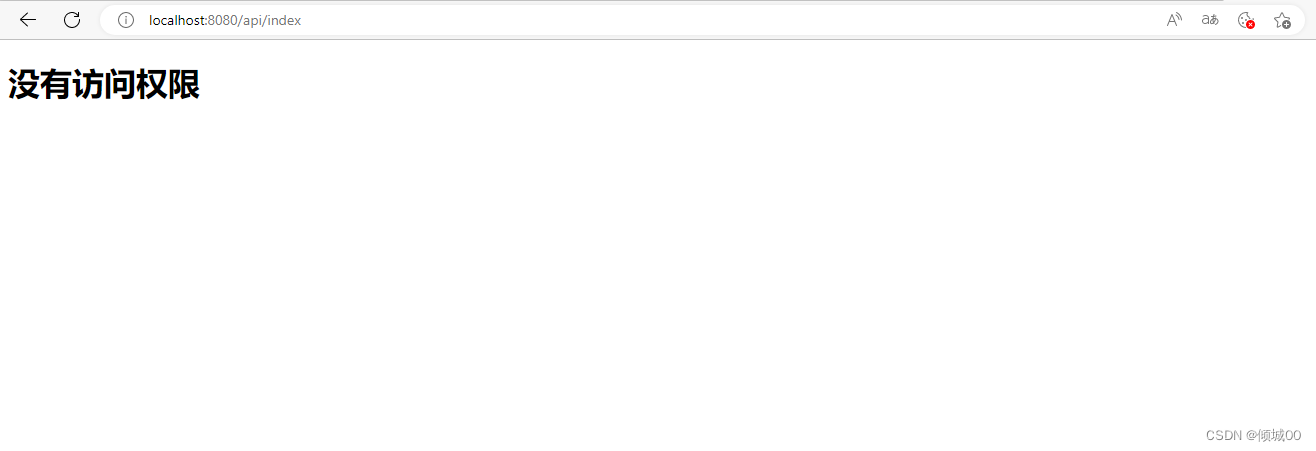
权限访问
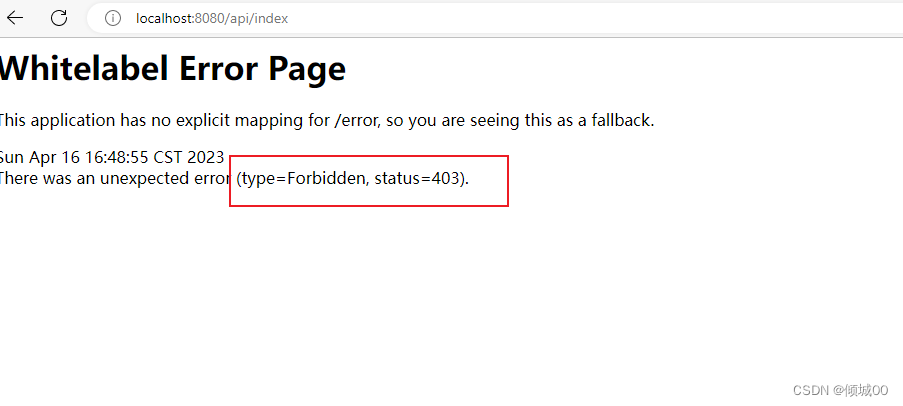
- 对于权限都不陌生,有些东西只有管理员才能访问,有些东西全部都能访问,
hasAuthority()
如果当前的主题具有指定的权限则返回true,否则就返回false,有缺陷,只能有一个权限,不能设置多个权限
-
下面的代码是通过hasAnyAuthority()去给/api/index 接口去设定权限,只有admin权限的人才可以访问,其他的不能访问
-
登录账号的时候,有一个List< GrantedAuthority > 后面跟的是admin,如果不是admin就会出错
-
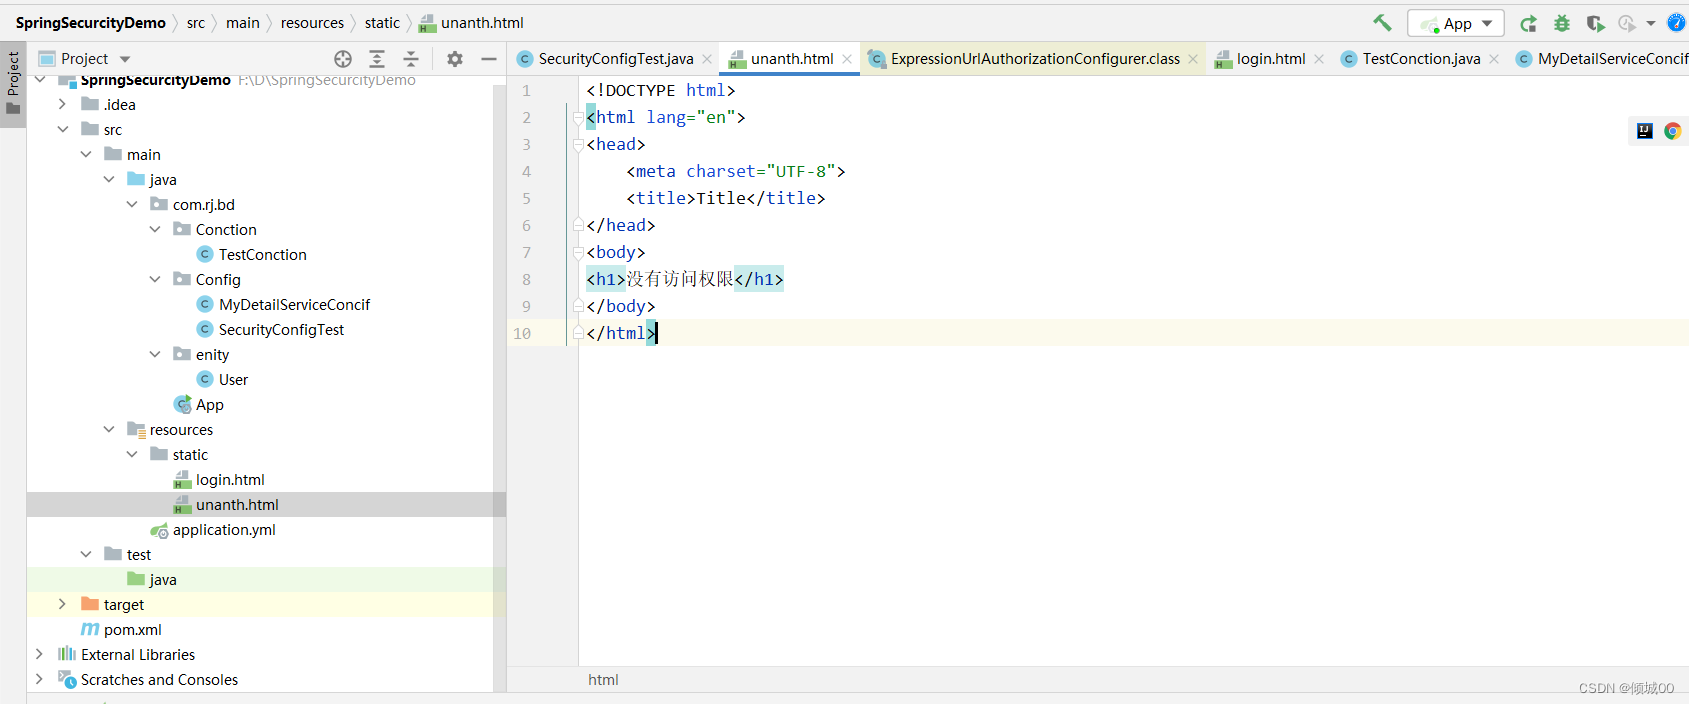
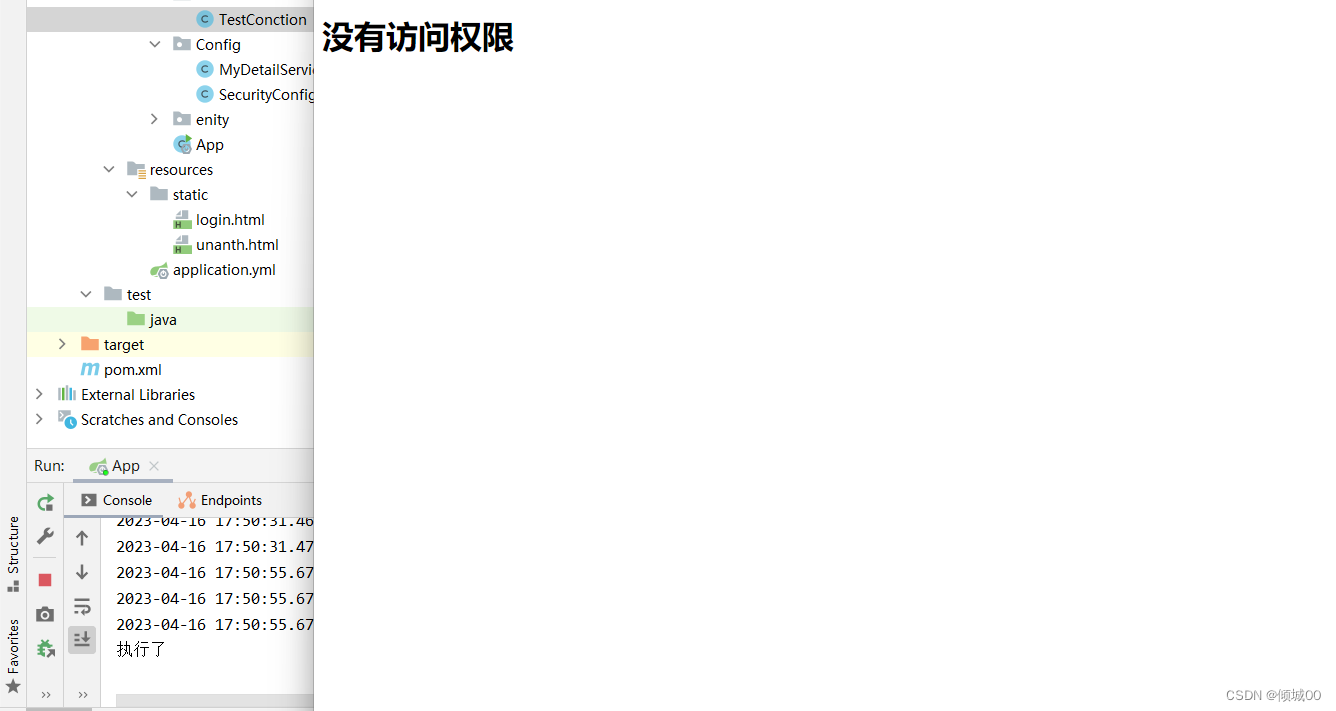
出错页面:
-
代码演示:
hasAnyAuthority()
- 这个是支持多个访问,只要一个权限对应就可访问
hasRole()
- hasRole返回的数据是有一个前缀功能的,如果没有前缀就会出错,这个也只能设置一个权限

自定义无权限返回页面
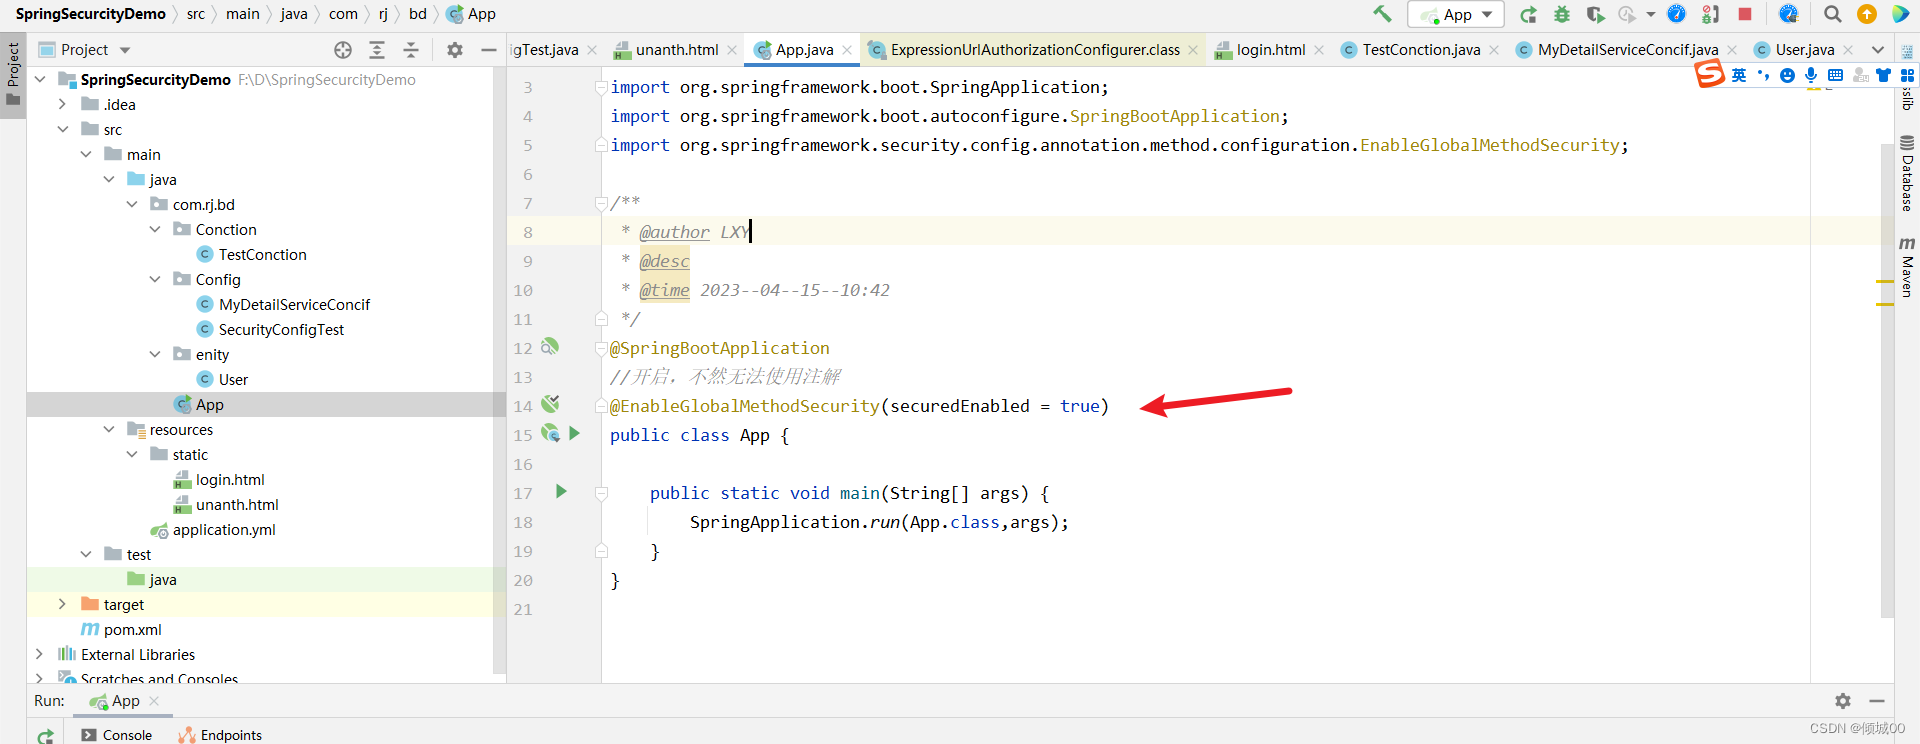
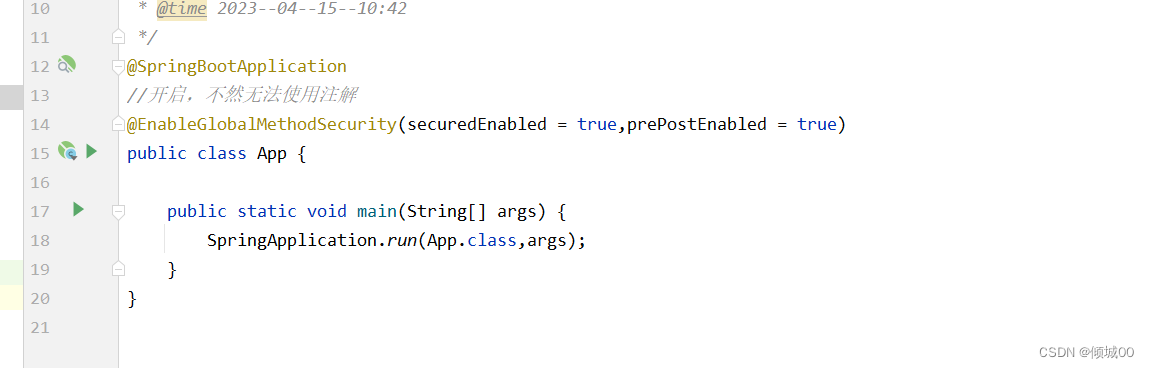
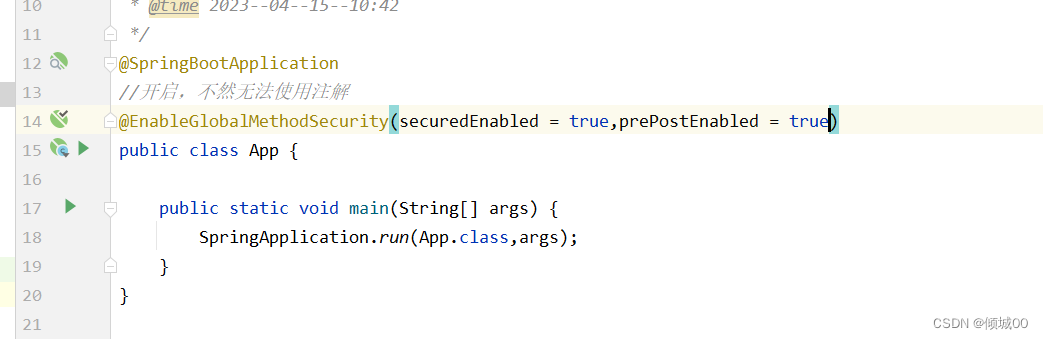
注解的使用
-
第一步是在启动类上添加注解的支持
-
- 修改用户权限

- 修改用户权限
-
- 启动类上添加注解
-
@Secured注解的功能是当用户拥有某个角色就可以继续访问

-
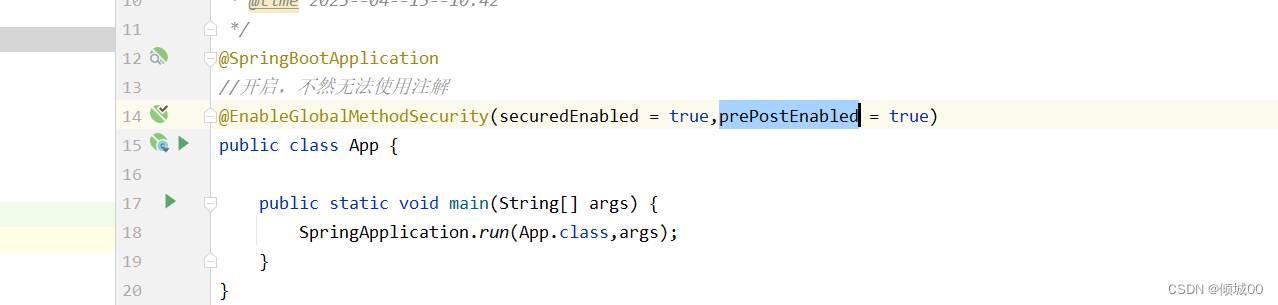
第二个注解是PreAuthorize
首先添加对注解的支持,这个也是登录之前对身份进行效验


- @PostAuthorize注解,是先执行在效验,适合有返回值的方法,用的比较少
- 虽然最后还是没有权限,但是方法中执行了
使用 @PreFilter 和 @PostFilter 可以对集合类型的参数或返回值进行过滤。使用 @PreFilter 和 @PostFilter 时,Spring Security 将移除使对应表达式的结果为 false 的元素。
 @PostFilter("filterObject.id%2==0")
  public List<User> findAll() {
      List<User> userList = new ArrayList<User>();
      User user;
      for (int i=0; i<10; i++) {
         user = new User();
         user.setId(i);
         userList.add(user);
      }
      return userList;
   }
代码表示对返回结果中 id 不为偶数的 user 进行移除。filterObject 是使用 @PreFilter 和 @PostFilter 时的一个内置表达式,表示集合中的当前对象。当 @PreFilter 标注的方法拥有多个集合类型的参数时,需要通过 @PreFilter 的 filterTarget 属性指定当前 @PreFilter 是针对哪个参数进行过滤的
如下面代码就通过 filterTarget 指定了当前 @PreFilter 是用来过滤参数 ids 的。
@PreFilter(filterTarget="ids", value="filterObject%2==0")
public void delete(List<Integer> ids, List<String> usernames) {
      ...
}
用户登出
- 用户登出之后是不能访问网页的,来设置一下


- 试验:
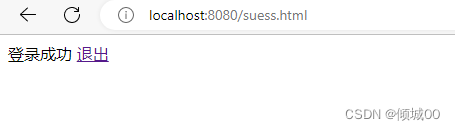
- 现在访问的时候不需要权限验证了,点击退出之后在访问接口就没有权限了,这样就成功了
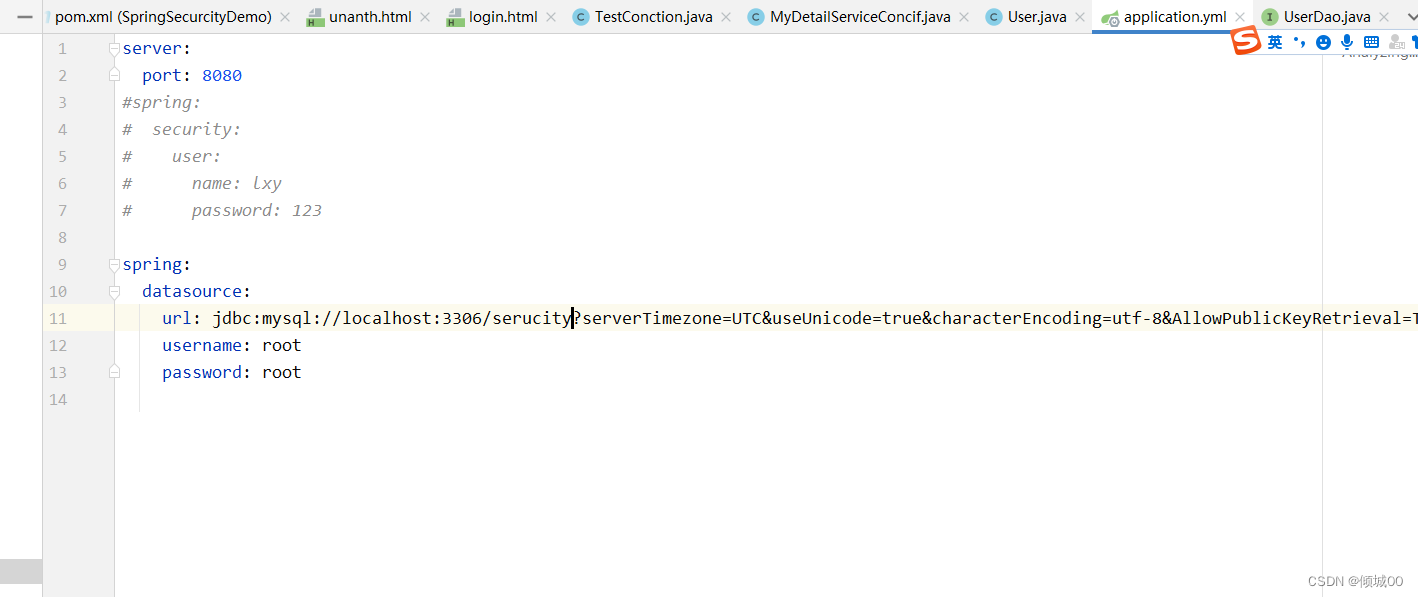
更改请求为mysql查询
        <dependency>
            <groupId>mysql</groupId>
            <artifactId>mysql-connector-java</artifactId>
            <scope>runtime</scope>
        </dependency>
        <dependency>
            <groupId>com.baomidou</groupId>
            <artifactId>mybatis-plus-boot-starter</artifactId>
            <version>3.5.1</version>
        </dependency>
server:
  port: 8080
#spring:
#  security:
#    user:
#      name: lxy
#      password: 123

spring:
  datasource:
    url: jdbc:mysql://localhost:3306/serucity?serverTimezone=UTC&useUnicode=true&characterEncoding=utf-8&AllowPublicKeyRetrieval=True
    username: root
    password: root
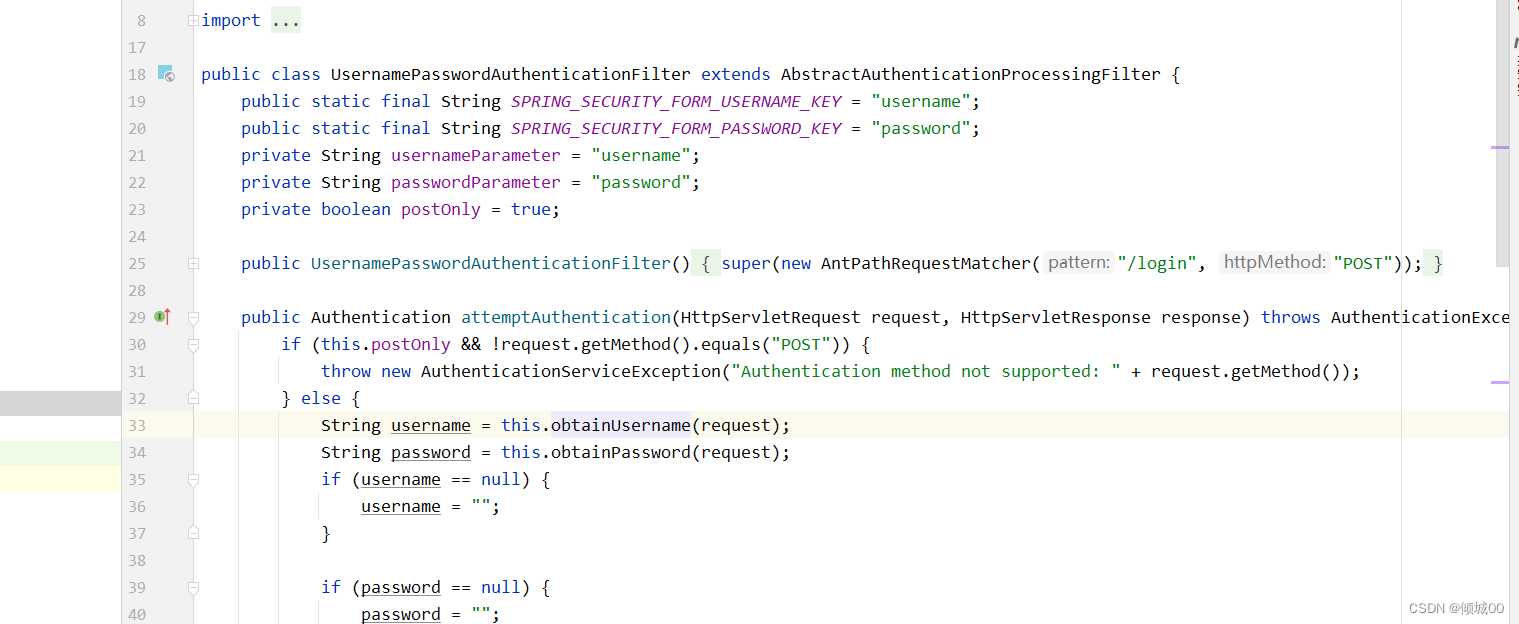
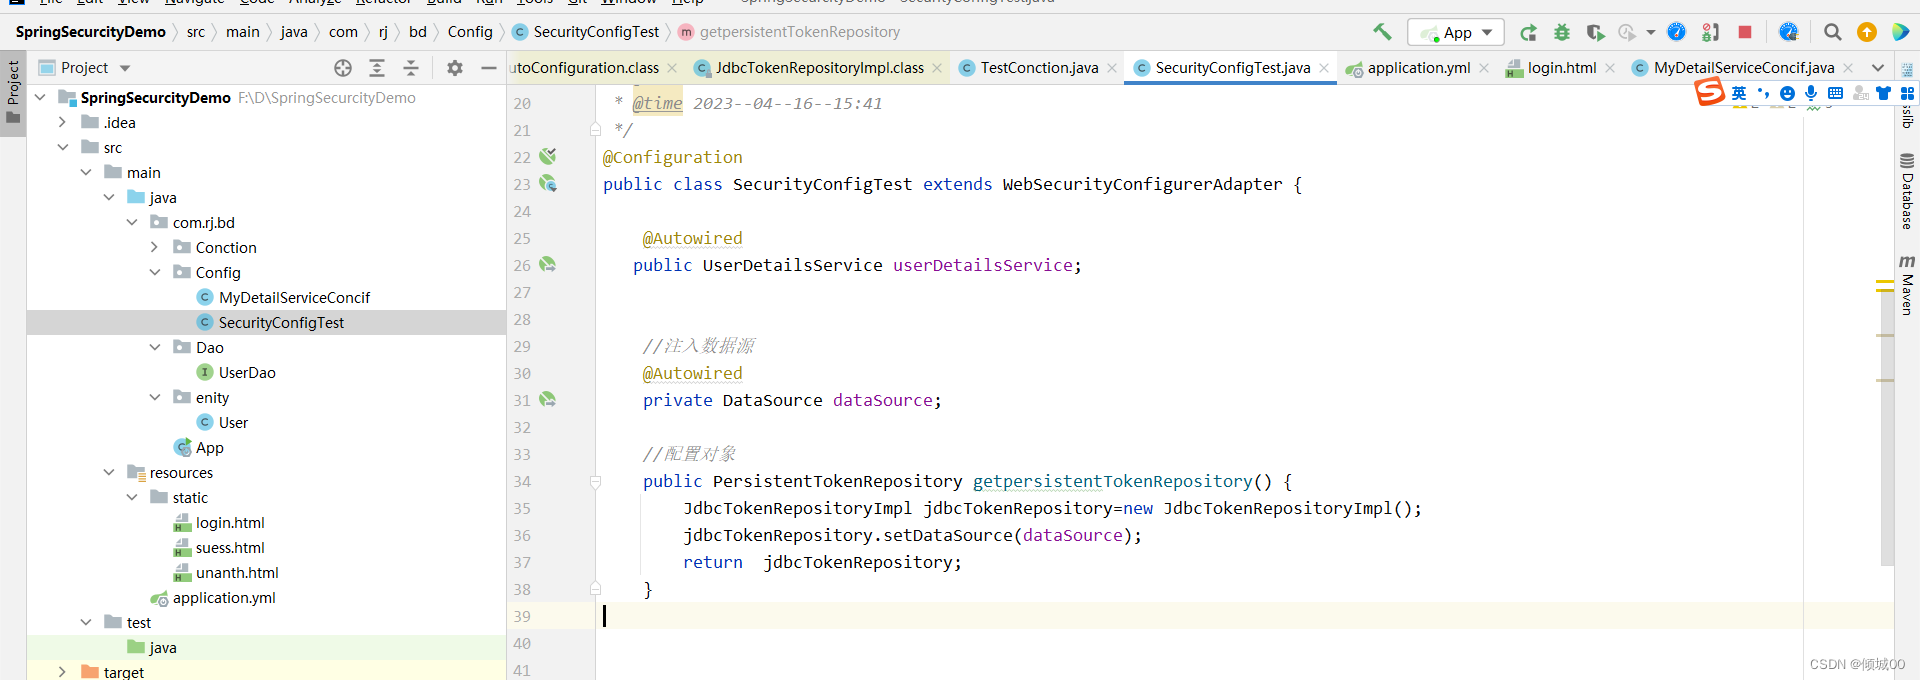
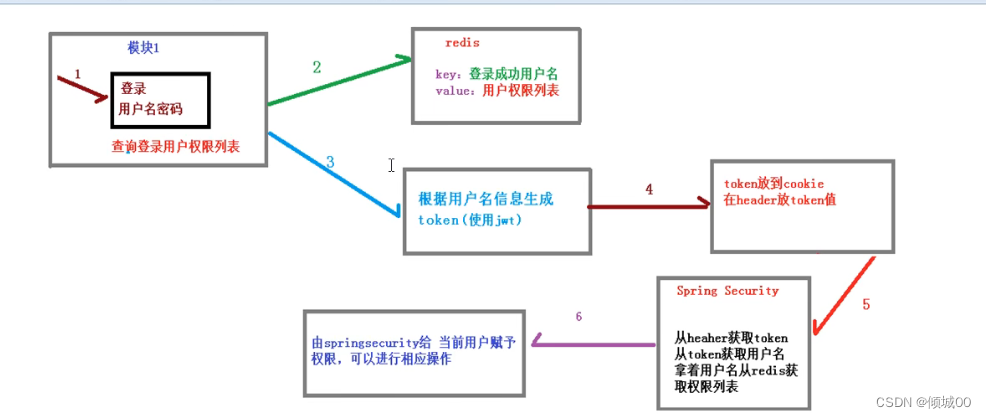
自动登录
-
用户登录之后关掉浏览器,在打开还可以实现自动登录
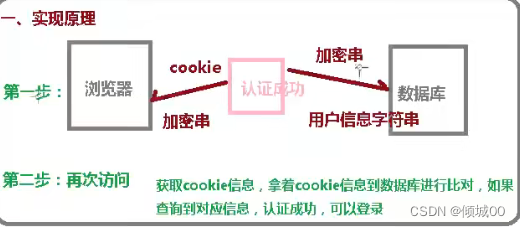
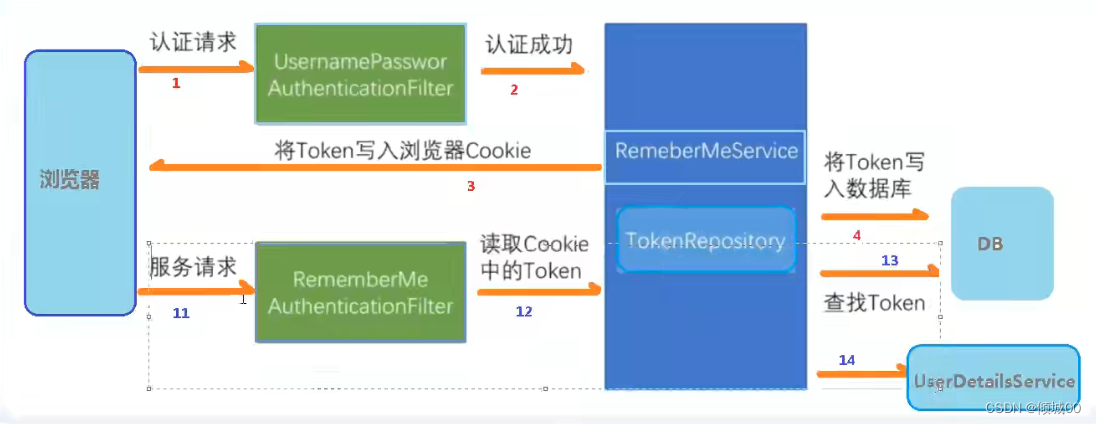
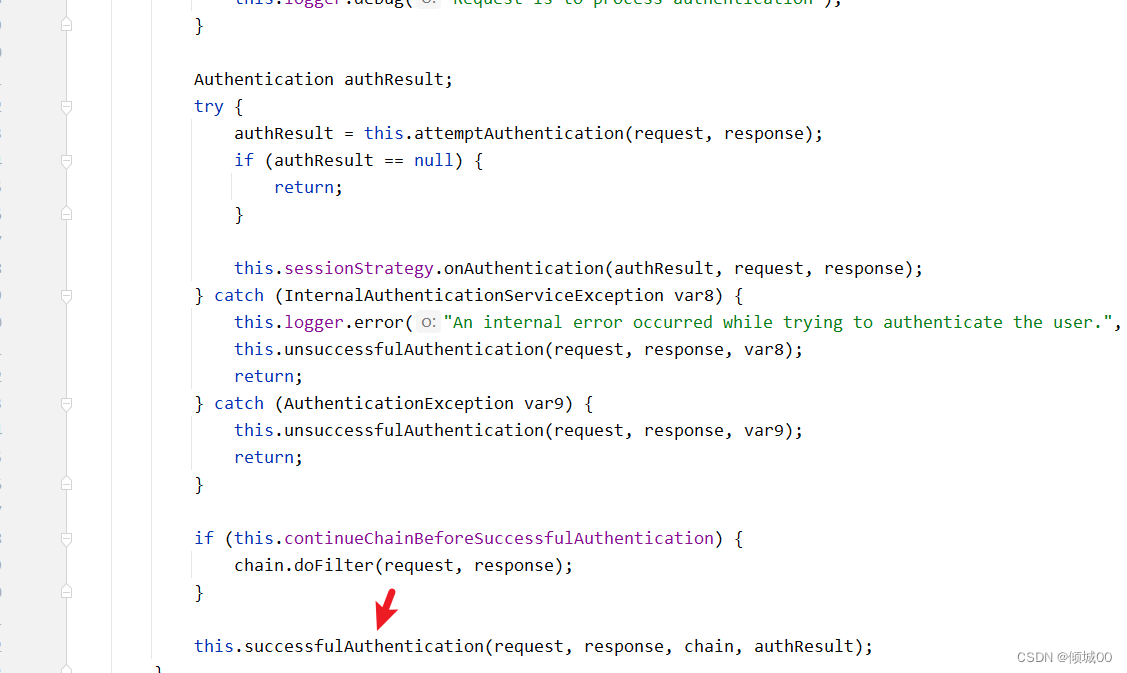
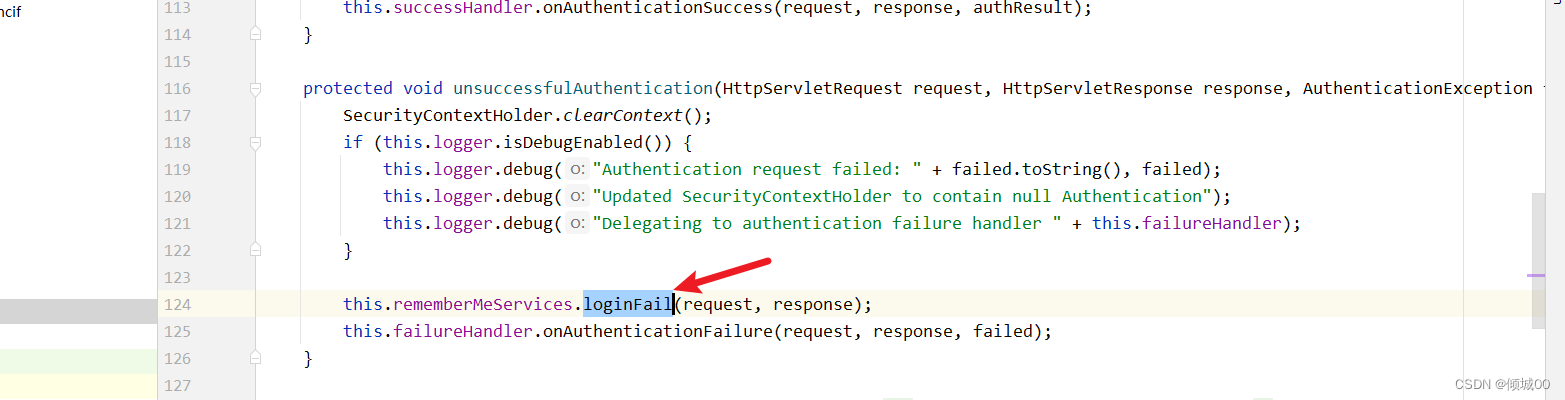
-
他的父类中认证成功会调用一个成功的方法
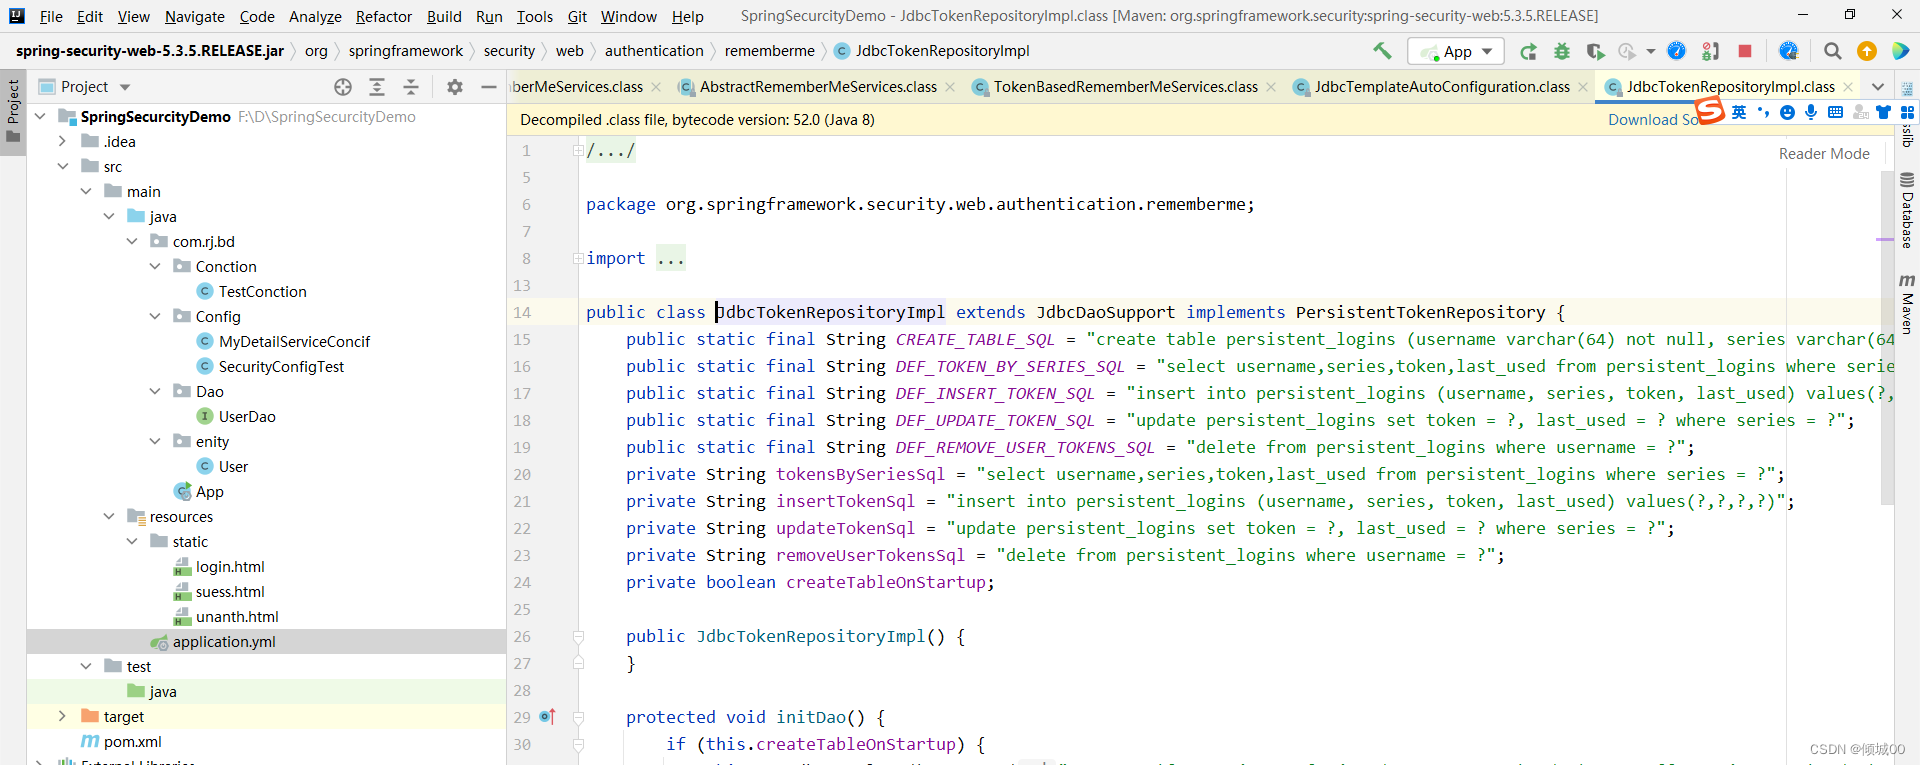
-
这个类就是用来操作mysql的自带的类,存放token对toke
-
首先新建Mysql
-- ---------------
-- 自动登录
-- ---------------
CREATE TABLE `persistent_logins` (
    `series` VARCHAR(64) NOT NULL DEFAULT '' COMMENT '主键',
    `username` VARCHAR(64) NOT NULL DEFAULT '' COMMENT '用户名',
    `token` VARCHAR(64) NOT NULL DEFAULT '' COMMENT 'token',
    `last_used` timestamp NOT NULL DEFAULT CURRENT_TIMESTAMP COMMENT '最后使用时间',
    PRIMARY KEY (`series`)
)
- 然后注入数据源,security已经封装好了,所以需要将JdbcTokenRepositoryImpl 的数据源注入过去
    //注入数据源
    @Autowired
    private DataSource dataSource;

    //配置对象
    public PersistentTokenRepository getpersistentTokenRepository() {
        JdbcTokenRepositoryImpl jdbcTokenRepository=new JdbcTokenRepositoryImpl();
        jdbcTokenRepository.setDataSource(dataSource);
        return  jdbcTokenRepository;
    }
  .and().rememberMe().tokenRepository(getpersistentTokenRepository())  //将getpersistentTokenRepository()注入开启自动登录
                .tokenValiditySeconds(60)//保存市场以秒为单位
                .userDetailsService(userDetailsService)   //将userDetailsService注入进来
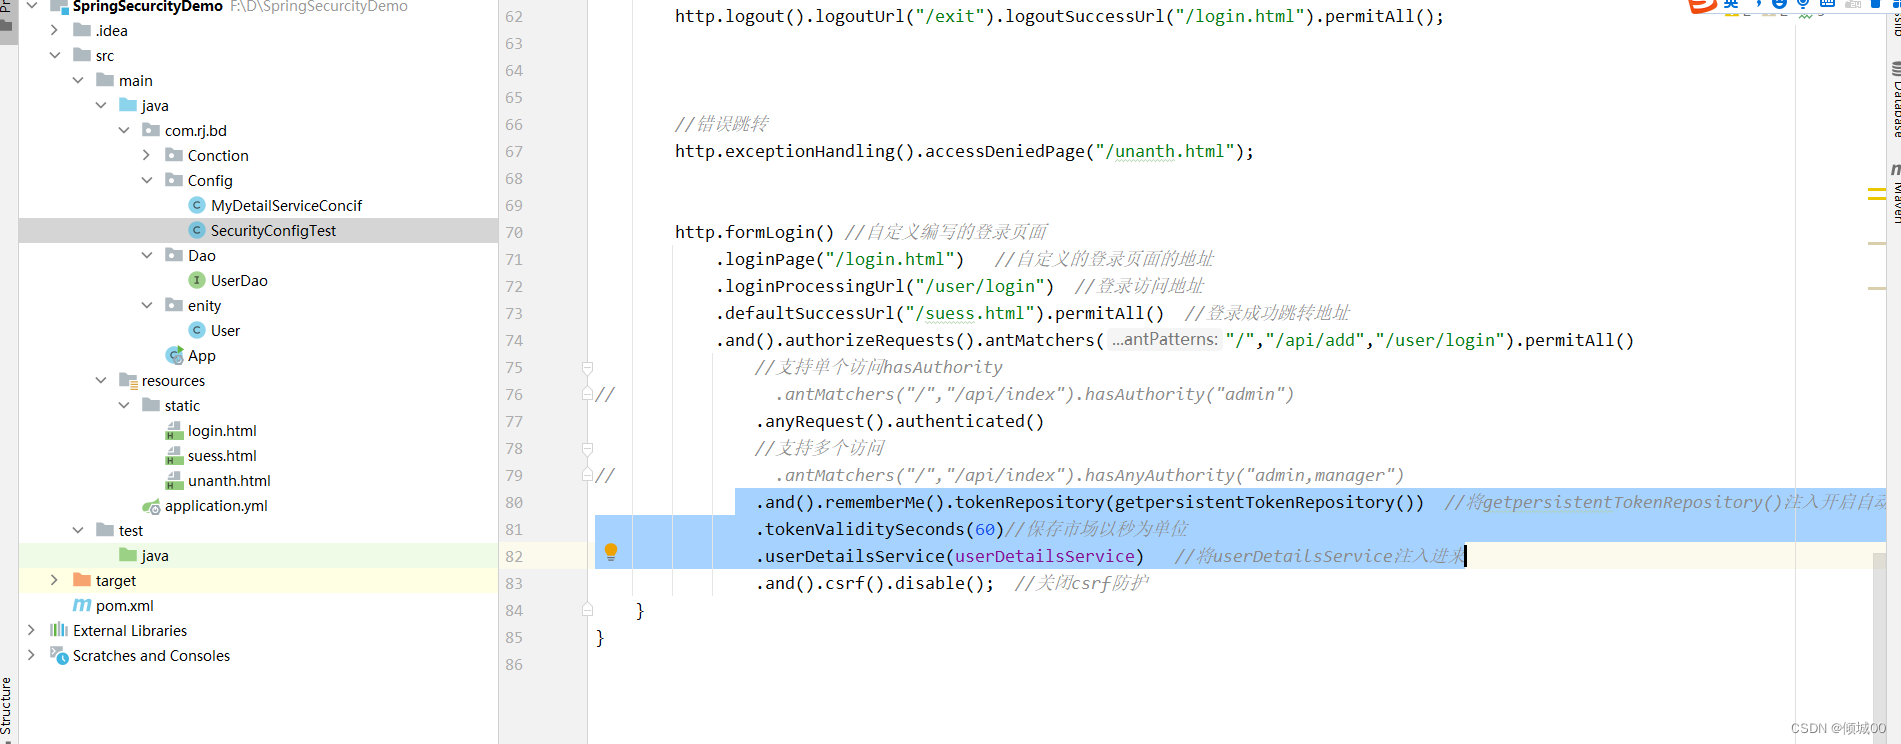
- 最后一步,选一个复选框,要用指定的name,不然无法获取到


 5万+
5万+

 被折叠的 条评论
为什么被折叠?
被折叠的 条评论
为什么被折叠?
 到【灌水乐园】发言


