


SpringBoot
一 、学前准备
环境要求
- Java8及以上
- Maven 3.3及以上:https://docs.spring.io/spring-boot/docs/current/reference/html/getting-started.html#getting-started-system-requirements
学习资料
-
视频地址: http://www.gulixueyuan.com/
-
源码地址:https://gitee.com/leifengyang/springboot2
官网地址
https://spring.io/projects/spring-boot
Maven配置
## 使用阿里仓库
<mirrors>
      <mirror>
        <id>nexus-aliyun</id>
        <mirrorOf>central</mirrorOf>
        <name>Nexus aliyun</name>
        <url>http://maven.aliyun.com/nexus/content/groups/public</url>
      </mirror>
  </mirrors>
 ## 使用jdk1.8进行编译
  <profiles>
         <profile>
              <id>jdk-1.8</id>
              <activation>
                <activeByDefault>true</activeByDefault>
                <jdk>1.8</jdk>
              </activation>
              <properties>
                <maven.compiler.source>1.8</maven.compiler.source>
                <maven.compiler.target>1.8</maven.compiler.target>
                <maven.compiler.compilerVersion>1.8</maven.compiler.compilerVersion>
              </properties>
         </profile>
  </profiles>
二、 SpringBoot2入门
-
创建项目添加依赖

<parent> <groupId>org.springframework.boot</groupId> <artifactId>spring-boot-starter-parent</artifactId> <version>2.3.4.RELEASE</version> </parent> <dependencies> <dependency> <groupId>org.springframework.boot</groupId> <artifactId>spring-boot-starter-web</artifactId> </dependency> <dependency> <groupId>org.projectlombok</groupId> <artifactId>lombok</artifactId> </dependency> <dependency> <groupId>org.springframework.boot</groupId> <artifactId>spring-boot-devtools</artifactId> <optional>true</optional> </dependency> </dependencies> -
创建启动主类

/**
 * 主程序类
 * @SpringBootApplication:这是一个SpringBoot应用
 */
@SpringBootApplication
public class MainApplication {

    public static void main(String[] args) {
        SpringApplication.run(MainApplication.class,args);
    }
}
- 编写controller

@RestController
public class HelloController {
    @RequestMapping("/hello")
    public String handle01(){
        return "Hello, Spring Boot 2!";
    }
}
- 启动主类访问localhost:8080/hello地址

- SpringBoot简化配置
在resources文件夹下面创建application.properties文件在里面填写配置就ok了


官方也给了相关的配置信息Application Properties

-
打包部署

 <build>
      <plugins>
          <plugin>
              <groupId>org.springframework.boot</groupId>
              <artifactId>spring-boot-maven-plugin</artifactId>
          </plugin>
      </plugins>
  </build>
使用maven install 之后在target文件夹就能看到一个jar的文件就可以直接 java -jar 文件名就可以运行了
三 、spring自动配置
1、SpringBoot特点
1.1、依赖管理
- 父项目做依赖管理
依赖管理
<parent>
        <groupId>org.springframework.boot</groupId>
        <artifactId>spring-boot-starter-parent</artifactId>
        <version>2.3.4.RELEASE</version>
</parent>

他的父项目
 <parent>
    <groupId>org.springframework.boot</groupId>
    <artifactId>spring-boot-dependencies</artifactId>
    <version>2.3.4.RELEASE</version>
  </parent>

几乎声明了所有开发中常用的依赖的版本号,自动版本仲裁机制,如果我们需要使用 mysql-connector 我们直接引入即可,spingboot这个府项目中帮我们做了依赖管理,如果没有在添加版本管理
- 开发导入starter场景启动器
start是一组的依赖描述,他会帮我们引入这个功能场景所需要的所有依赖,官方使用spring-boot-starter-*表述
1、见到很多 spring-boot-starter-* : *就某种场景
2、只要引入starter,这个场景的所有常规需要的依赖我们都自动引入
3、SpringBoot所有支持的场景
4、见到的 *-spring-boot-starter: 第三方为我们提供的简化开发的场景启动器。
5、所有场景启动器最底层的依赖
<dependency>
  <groupId>org.springframework.boot</groupId>
  <artifactId>spring-boot-starter</artifactId>
  <version>2.3.4.RELEASE</version>
  <scope>compile</scope>
</dependency>
- 无需关注版本号,自动版本仲裁
1、引入依赖默认都可以不写版本
2、引入非版本仲裁的jar,要写版本号。
- 可以修改默认版本号

1、查看spring-boot-dependencies里面规定当前依赖的版本 用的 key。
2、在当前项目里面重写配置
    <properties>
        <mysql.version>5.1.43</mysql.version>
    </properties>
1.2、自动配置
-
自动配好Tomcat
-
- 引入Tomcat依赖。
- 配置Tomcat(我们引入了web场景,web场景里面有tomact场景依赖)
<dependency>
  <groupId>org.springframework.boot</groupId>
  <artifactId>spring-boot-starter-tomcat</artifactId>
  <version>2.3.4.RELEASE</version>
  <scope>compile</scope>
</dependency>
-
自动配好SpringMVC(和tomact场景一样都是由web场景引入
- 引入SpringMVC全套组件
- 自动配好SpringMVC常用组件(功能)
-
自动配好Web常见功能,如:字符编码问题
- SpringBoot帮我们配置好了所有web开发的常见场景
-
默认的包结构
- 主程序所在包及其下面的所有子包里面的组件都会被默认扫描进来
- 无需以前的包扫描配置
- 想要改变扫描路径,@SpringBootApplication(scanBasePackages=“com.atguigu”)
- 或者@ComponentScan 指定扫描路径

@SpringBootApplication
等同于(因为@SpringBootApplication注解上面有这些注解)
@SpringBootConfiguration
@EnableAutoConfiguration
@ComponentScan("com.atguigu.boot")
- 各种配置拥有默认值
-
- 默认配置最终都是映射到某个类上,如:MultipartProperties

- 配置文件的值最终会绑定每个类上,这个类会在容器中创建对象
- 默认配置最终都是映射到某个类上,如:MultipartProperties
- 按需加载所有自动配置项
-
- 非常多的starter
- 引入了哪些场景这个场景的自动配置才会开启
- SpringBoot所有的自动配置功能都在 spring-boot-autoconfigure 包里面

- 只有引入了才会开启配置,按需加载
2、容器功能
2.1、组件添加
1、@Configuration
Full模式与Lite模式
- Full模式: 配置类组件之间有依赖关系,方法会被调用得到之前单实例组件,用Full模式
- Lite模式: 配置类组件之间无依赖关系用Lite模式加速容器启动过程,减少判断
@Data
@AllArgsConstructor
@NoArgsConstructor
public class Pet {
    private String p_name;
}

@AllArgsConstructor
@NoArgsConstructor
@Data
public class User {
    private String u_name;
    private Integer u_age;
    private Pet u_pet;

    public User(String u_name, Integer u_age) {
        this.u_name = u_name;
        this.u_age = u_age;
    }
}
/**
 * @author Wanghn
 * @date 2024/1/11 16:46
 * 1、配置类里面使用@Bean标注在方法上给容器注册组件,默认也是单实例的
 * 2、配置类本身也是组件
 * 3、proxyBeanMethods:代理bean的方法
 *      Full(proxyBeanMethods = true)、【保证每个@Bean方法被调用多少次返回的组件都是单实例的】
 *      Lite(proxyBeanMethods = false)【每个@Bean方法被调用多少次返回的组件都是新创建的】
 *      组件依赖必须使用Full模式默认。其他默认是否Lite模式
 */
@Configuration(proxyBeanMethods = true)
public class MyConfig {
    /**
     * Full:外部无论对配置类中的这个组件注册方法调用多少次获取的都是之前注册容器中的单实例对象
     * @return
     */
    @Bean("user01") //给容器中添加组件。以方法名作为组件的id。返回类型就是组件类型。返回的值,就是组件在容器中的实例
    public User user01(){
        User zhangsan = new User("zhangsan", 18);
        //user组件依赖了Pet组件
        zhangsan.setU_pet(tomcatPet());
        return zhangsan;
    }
    @Bean("pet")
    public Pet tomcatPet(){
        return new Pet("tomcat");
    }
}


################################@Configuration测试代码如下########################################
@SpringBootConfiguration
@EnableAutoConfiguration
@ComponentScan("com.whn")
public class MainApplication {

    public static void main(String[] args) {
        ConfigurableApplicationContext run = SpringApplication.run(MainApplication.class, args);
        // 获取容器中的组件的名字
        String[] names = run.getBeanDefinitionNames();
        for (String name : names) {
            System.out.println(name);
        }
        String[] beanDefinitionNames = run.getBeanDefinitionNames();
        for (String beanDefinitionName : beanDefinitionNames) {
            System.out.println(beanDefinitionName);
        }
        //3、从容器中获取组件

        Pet tom01 = run.getBean("tom", Pet.class);

        Pet tom02 = run.getBean("tom", Pet.class);

        System.out.println("组件:"+(tom01 == tom02));


        //4、com.atguigu.boot.config.MyConfig$$EnhancerBySpringCGLIB$$51f1e1ca@1654a892
        MyConfig bean = run.getBean(MyConfig.class);
        System.out.println(bean);

        //如果@Configuration(proxyBeanMethods = true)代理对象调用方法。SpringBoot总会检查这个组件是否在容器中有。
        //保持组件单实例
        User user = bean.user01();
        User user1 = bean.user01();
        System.out.println(user == user1);


        User user01 = run.getBean("user01", User.class);
        Pet tom = run.getBean("pet", Pet.class);

        System.out.println("用户的宠物:"+(user01.getU_pet() == tom));

    }
}
运行结果

因为存在依赖关系所以必须使用 Full 模式 proxyBeanMethods 为默认即可

2、@Bean、@Component、@Controller、@Service、@Repository
这些注解都被用于组件扫描,注解的目标类或方法通常会被Spring容器实例化和管理,以支持依赖注入。这使得这些组件能够在运行时通过Spring容器获取它们所依赖的其他组件。
@Controller、@Service、@Repository 这三个注解是 @Component 的特化,它们提供了更具体的角色标识,用于更好地组织代码结构。
3、@ComponentScan、@Import
@Import({User.class, DBHelper.class}) 给容器中自动创建出这两个类型的组件、默认组件的名字就是全类名
@Import作用:导入配置中的bean对象,无需显示注入指定类中使用的Bean对象
注意:Import注解**只能隐式的注入配置类中的Bean对象**
@Configuration(proxyBeanMethods = false) //告诉SpringBoot这是一个配置类 == 配置文件
@Import(MyConfig.class)
// 导入配置MyConfig中的bean对象,无需显示注入MyConfig类中使用的Bean对象
public class AppConfig {

    @Bean("appService")
    public User appService(Pet pet) {
        // 直接引用导入的 MyConfig 配置类中的 pet
        return new User(pet);
    }
}

@Import 高级用法: https://www.bilibili.com/video/BV1gW411W7wy?p=8
4、@Conditional
条件装配:满足Conditional指定的条件,则进行组件注入

=====================测试条件装配==========================
//@ConditionalOnMissingBean(name = "pet")当pet这个bean不存在时添加这个配置
@ConditionalOnMissingBean(name = "pet")
//@Import({AppConfig.class})
@Configuration(proxyBeanMethods = true)
public class TestConditionBeanConfig {
    @Resource(name = "appService")
    User user;
    @Bean("testConditionBeanConfigBean")
    public User appService() {
        // 直接引用导入的 MyConfig 配置类中的 pet
        return user;
    }
}
//测试是否有testConditionBeanConfigBean
System.out.println(run.getBean("testConditionBeanConfigBean", User.class));
因为pet存在所以这个配置不生效所以下面在获取testConditionBeanConfigBean的时候会出错

2.2、原生配置文件引入
1、@ImportResource
<?xml version="1.0" encoding="UTF-8"?>
<beans xmlns="http://www.springframework.org/schema/beans"
       xmlns:xsi="http://www.w3.org/2001/XMLSchema-instance"
       xmlns:context="http://www.springframework.org/schema/context"
       xsi:schemaLocation="http://www.springframework.org/schema/beans
        http://www.springframework.org/schema/beans/spring-beans.xsd
        http://www.springframework.org/schema/context
        https://www.springframework.org/schema/context/spring-context.xsd">

    <bean id="haha" class="com.whn.po.User">
        <property name="u_name" value="zhangSan"/>
        <property name="U_age" value="18"/>
        <property name="u_pet" ref="hehe"/>
    </bean>

    <bean id="hehe" class="com.whn.po.Pet">
        <property name="p_name" value="小小狗"/>
    </bean>
</beans>
@ImportResource("classpath:beans.xml")
public class MyConfig {}

======================启动类测试代码=================
System.out.println(run.getBean("haha", User.class));

2.3、配置绑定
如何使用Java读取到properties文件中的内容,并且把它封装到JavaBean中,以供随时使用;
使用原生代码
/**
 * @author Wanghn
 * @date 2024/1/11 19:00
 * 获取配置文件中的参数封装到类里面
 */
public class GetProperties {
    public static void main(String[] args) throws IOException {
//        类路径下的文件
        ClassPathResource classPathResource = new ClassPathResource("a.properties");
        File file = classPathResource.getFile();
        FileInputStream fileInputStream = new FileInputStream(file);
        Properties pps = new Properties();
//        文件系统路径下的文件
        pps.load(new FileInputStream("a.properties"));
        Enumeration enum1 = pps.propertyNames();//得到配置文件的名字
        while(enum1.hasMoreElements()) {
            String strKey = (String) enum1.nextElement();
            String strValue = pps.getProperty(strKey);
            System.out.println(strKey + ":" + strValue);
            //封装到JavaBean。
        }
    }
}

1、@Component + @ConfigurationProperties
/**
 * 只有在容器中的组件,才会拥有SpringBoot提供的强大功能
 */
@Component
@ConfigurationProperties(prefix="car")
@Data
@AllArgsConstructor
@NoArgsConstructor
public class Car {
    private String brand;
    private String price;
}
=========================application.yml=================
server:
  port: 8000
car:
  brand: xiaomi
  price: 15w
============================启动类测试======================
System.out.println(run.getBean("car", Car.class));

2、@EnableConfigurationProperties + @ConfigurationProperties
@ConfigurationProperties(prefix = "mycar")//指定properties数据绑定
public class Car {
    private String brand;
    private Integer price;
}
使用了 @EnableConfigurationProperties 注解之后该实体类就不需要加上 @Component 注解了,但是使用@EnableConfigurationProperties注解的类需要被容器管理
@Configuration(proxyBeanMethods = true)
@EnableConfigurationProperties(Car.class)
//1、开启Car配置绑定功能
//2、把这个Car这个组件自动注册到容器中
public class MyConfig {
}
3、自动配置原理入门
3.1、引导加载自动配置类
@SpringBootConfiguration
@EnableAutoConfiguration
@ComponentScan(excludeFilters = { @Filter(type = FilterType.CUSTOM, classes = TypeExcludeFilter.class),
		@Filter(type = FilterType.CUSTOM, classes = AutoConfigurationExcludeFilter.class) })
public @interface SpringBootApplication{}


======================
1、@SpringBootConfiguration
@Configuration。代表当前是一个配置类
2、@ComponentScan
指定扫描哪些,Spring注解;
3、@EnableAutoConfiguration
@AutoConfigurationPackage
@Import(AutoConfigurationImportSelector.class)
public @interface EnableAutoConfiguration {}
1、@AutoConfigurationPackage
自动配置包?指定了默认的包规则
@Import(AutoConfigurationPackages.Registrar.class)  //给容器中导入一个组件
public @interface AutoConfigurationPackage {}

//利用Registrar给容器中导入一系列组件
//将指定的一个包下的所有组件导入进来?MainApplication 所在包下。
2、@Import(AutoConfigurationImportSelector.class)
1、利用getAutoConfigurationEntry(annotationMetadata);给容器中批量导入一些组件
2、调用List<String> configurations = getCandidateConfigurations(annotationMetadata, attributes)获取到所有需要导入到容器中的配置类
3、利用工厂加载 Map<String, List<String>> loadSpringFactories(@Nullable ClassLoader classLoader);得到所有的组件
4、从META-INF/spring.factories位置来加载一个文件。
	默认扫描我们当前系统里面所有META-INF/spring.factories位置的文件
    spring-boot-autoconfigure-2.3.4.RELEASE.jar包里面也有META-INF/spring.factories

文件里面写死了spring-boot一启动就要给容器中加载的所有配置类
spring-boot-autoconfigure-2.3.4.RELEASE.jar/META-INF/spring.factories
# Auto Configure
org.springframework.boot.autoconfigure.EnableAutoConfiguration=\
org.springframework.boot.autoconfigure.admin.SpringApplicationAdminJmxAutoConfiguration,\
org.springframework.boot.autoconfigure.aop.AopAutoConfiguration,\
org.springframework.boot.autoconfigure.amqp.RabbitAutoConfiguration,\
org.springframework.boot.autoconfigure.batch.BatchAutoConfiguration,\
org.springframework.boot.autoconfigure.cache.CacheAutoConfiguration,\
org.springframework.boot.autoconfigure.cassandra.CassandraAutoConfiguration,\
...
3.2、按需开启自动配置项
虽然我们127个场景的所有自动配置启动的时候默认全部加载。xxxxAutoConfiguration
按照条件装配规则(@Conditional),最终会按需配置。
3.3、修改默认配置
        @Bean
		@ConditionalOnBean(MultipartResolver.class)  //容器中有这个类型组件
		@ConditionalOnMissingBean(name = DispatcherServlet.MULTIPART_RESOLVER_BEAN_NAME) //容器中没有这个名字 multipartResolver 的组件
		public MultipartResolver multipartResolver(MultipartResolver resolver) {
            //给@Bean标注的方法传入了对象参数,这个参数的值就会从容器中找。
            //SpringMVC multipartResolver。防止有些用户配置的文件上传解析器不符合规范
			// Detect if the user has created a MultipartResolver but named it incorrectly
			return resolver;
		}
给容器中加入了文件上传解析器;
SpringBoot默认会在底层配好所有的组件。但是如果用户自己配置了以用户的优先
@Bean
	@ConditionalOnMissingBean
	public CharacterEncodingFilter characterEncodingFilter() {
    }
总结:
- SpringBoot先加载所有的自动配置类 xxxxxAutoConfiguration
- 每个自动配置类按照条件进行生效,默认都会绑定配置文件指定的值。xxxxProperties里面拿。xxxProperties和配置文件进行了绑定
- 生效的配置类就会给容器中装配很多组件
- 只要容器中有这些组件,相当于这些功能就有了
- 定制化配置
- 用户直接自己@Bean替换底层的组件
- 用户去看这个组件是获取的配置文件什么值就去修改。
xxxxxAutoConfiguration —> 组件 —> xxxxProperties里面拿值 ----> application.properties
4、开发小技巧
4.1、Lombok
简化JavaBean开发
        <dependency>
            <groupId>org.projectlombok</groupId>
            <artifactId>lombok</artifactId>
        </dependency>


idea中搜索安装lombok插件
===============================简化JavaBean开发===================================
@NoArgsConstructor
//@AllArgsConstructor
@Data
@ToString
@EqualsAndHashCode
public class User {

    private String name;
    private Integer age;

    private Pet pet;

    public User(String name,Integer age){
        this.name = name;
        this.age = age;
    }


}


================================简化日志开发===================================
@Slf4j
@RestController
public class HelloController {
    @RequestMapping("/hello")
    public String handle01(@RequestParam("name") String name){

        log.info("请求进来了....");

        return "Hello, Spring Boot 2!"+"你好:"+name;
    }
}
4.2、dev-tools
        <dependency>
            <groupId>org.springframework.boot</groupId>
            <artifactId>spring-boot-devtools</artifactId>
            <optional>true</optional>
        </dependency>
项目或者页面修改以后:Ctrl+F9;
4.3、Spring Initailizr(项目初始化向导)
1、选择我们需要的开发场景

1、自动依赖引入

2、自动创建项目结构

3、自动编写好主配置类
四、yaml配置文件
- yaml简介
YAML 是 “YAML Ain’t Markup Language”(YAML 不是一种标记语言)的递归缩写。在开发的这种语言时,YAML 的意思其实是:“Yet Another Markup Language”(仍是一种标记语言)。
-
语法
- key: value;kv之间有空格
- 大小写敏感
- 使用缩进表示层级关系
- 缩进不允许使用tab,只允许空格
- 缩进的空格数不重要,只要相同层级的元素左对齐即可
- '#'表示注释
- 字符串无需加引号,如果要加,''与""表示字符串内容 会被 转义/不转义
-
数据类型
- 字面量:单个的、不可再分的值。date、boolean、string、number、null
k: v
- 对象:键值对的集合。map、hash、set、object
行内写法:  k: {k1:v1,k2:v2,k3:v3}
#或
k:
  k1: v1
  k2: v2
  k3: v3
- 数组:一组按次序排列的值。array、list、queue
行内写法:  k: [v1,v2,v3]
#或者
k:
 - v1
 - v2
 - v3
- 示例
实体对象
@Data
public class Person {

	private String userName;
	private Boolean boss;
	private Date birth;
	private Integer age;
	private Pet pet;
	private String[] interests;
	private List<String> animal;
	private Map<String, Object> score;
	private Set<Double> salarys;
	private Map<String, List<Pet>> allPets;
}

@Data
public class Pet {
	private String name;
	private Double weight;
}
配置文件
# yaml表示以上对象
person:
  userName: zhangsan
  boss: false
  birth: 2019/12/12 20:12:33
  age: 18
  pet:
    name: tomcat
    weight: 23.4
  interests: [篮球,游泳]
  animal:
    - jerry
    - mario
  score:
    english:
      first: 30
      second: 40
      third: 50
    math: [131,140,148]
    chinese: {first: 128,second: 136}
  salarys: [3999,4999.98,5999.99]
  allPets:
    sick:
      - {name: tom}
      - {name: jerry,weight: 47}
    health: [{name: mario,weight: 47}]
- 自定义配置显示
自定义的类和配置文件绑定一般没有提示。
<dependency>
    <groupId>org.springframework.boot</groupId>
    <artifactId>spring-boot-configuration-processor</artifactId>
    <optional>true</optional>
</dependency>

 <build>
        <plugins>
            <plugin>
                <groupId>org.springframework.boot</groupId>
                <artifactId>spring-boot-maven-plugin</artifactId>
                <configuration>
                    <excludes>
                        <exclude>
                            <groupId>org.springframework.boot</groupId>
                            <artifactId>spring-boot-configuration-processor</artifactId>
                        </exclude>
                    </excludes>
                </configuration>
            </plugin>
        </plugins>
    </build>
配置之后可以使用ctrl键显示出来,并跳转到使用的地方

五、Web开发
静态资源访问
只要静态资源放在类路径下: calsspath:
/staticor/publicor/resourcesor/META-INF/resources访问 : 当前项目根路径/ + 静态资源名
原理: 请求进来,先去找Controller看能不能处理。不能处理的所有请求又都交给静态资源处理器。静态资源也找不到则响应404页面
示例
创建项目helloword_2启动主类和结构

=========================application.yml======================
server:
  port: 8001
=========================index.html======================
<!DOCTYPE html>
<html lang="en">
<head>
    <meta charset="UTF-8">
    <title>Title</title>
</head>
<body>
<h1>欢迎来到我的主页</h1>
</body>
</html>
==============================pom.xml====================
和上一个项目一样
==========================banner.txt=====================
               ii.                                         ;9ABH,
              SA391,                                    .r9GG35&G
              &#ii13Gh;                               i3X31i;:,rB1
              iMs,:,i5895,                         .5G91:,:;:s1:8A
               33::::,,;5G5,                     ,58Si,,:::,sHX;iH1
                Sr.,:;rs13BBX35hh11511h5Shhh5S3GAXS:.,,::,,1AG3i,GG
                .G51S511sr;;iiiishS8G89Shsrrsh59S;.,,,,,..5A85Si,h8
               :SB9s:,............................,,,.,,,SASh53h,1G.
            .r18S;..,,,,,,,,,,,,,,,,,,,,,,,,,,,,,....,,.1H315199,rX,
          ;S89s,..,,,,,,,,,,,,,,,,,,,,,,,....,,.......,,,;r1ShS8,;Xi
        i55s:.........,,,,,,,,,,,,,,,,.,,,......,.....,,....r9&5.:X1
       59;.....,.     .,,,,,,,,,,,...        .............,..:1;.:&s
      s8,..;53S5S3s.   .,,,,,,,.,..      i15S5h1:.........,,,..,,:99
      93.:39s:rSGB@A;  ..,,,,.....    .SG3hhh9G&BGi..,,,,,,,,,,,,.,83
      G5.G8  9#@@@@@X. .,,,,,,.....  iA9,.S&B###@@Mr...,,,,,,,,..,.;Xh
      Gs.X8 S@@@@@@@B:..,,,,,,,,,,. rA1 ,A@@@@@@@@@H:........,,,,,,.iX:
     ;9. ,8A#@@@@@@#5,.,,,,,,,,,... 9A. 8@@@@@@@@@@M;    ....,,,,,,,,S8
     X3    iS8XAHH8s.,,,,,,,,,,...,..58hH@@@@@@@@@Hs       ...,,,,,,,:Gs
    r8,        ,,,...,,,,,,,,,,.....  ,h8XABMMHX3r.          .,,,,,,,.rX:
   :9, .    .:,..,:;;;::,.,,,,,..          .,,.               ..,,,,,,.59
  .Si      ,:.i8HBMMMMMB&5,....                    .            .,,,,,.sMr
  SS       :: h@@@@@@@@@@#; .                     ...  .         ..,,,,iM5
  91  .    ;:.,1&@@@@@@MXs.                            .          .,,:,:&S
  hS ....  .:;,,,i3MMS1;..,..... .  .     ...                     ..,:,.99
  ,8; ..... .,:,..,8Ms:;,,,...                                     .,::.83
   s&: ....  .sS553B@@HX3s;,.    .,;13h.                            .:::&1
    SXr  .  ...;s3G99XA&X88Shss11155hi.                             ,;:h&,
     iH8:  . ..   ,;iiii;,::,,,,,.                                 .;irHA
      ,8X5;   .     .......                                       ,;iihS8Gi
         1831,                                                 .,;irrrrrs&@
           ;5A8r.                                            .:;iiiiirrss1H
             :X@H3s.......                                .,:;iii;iiiiirsrh
              r#h:;,...,,.. .,,:;;;;;:::,...              .:;;;;;;iiiirrss1
             ,M8 ..,....,.....,,::::::,,...         .     .,;;;iiiiiirss11h
             8B;.,,,,,,,.,.....          .           ..   .:;;;;iirrsss111h
            i@5,:::,,,,,,,,.... .                   . .:::;;;;;irrrss111111
            9Bi,:,,,,......                        ..r91;;;;;iirrsss1ss1111
效果

修改默认地址并添加访问前缀
- 修改application.yml
server:
  port: 8001
spring:
  mvc:
    static-path-pattern: /res/** # 默认无前缀
  resources:
    static-locations: [classpath:/myStatic/] #设置calsspath 静态资源的路径
- 在resource文件下创建
myStatic文件夹 并赋值index.html进去修改样式参数(发现并没有访问到之前的index.html)

请求方式和映射
创建一个ControllerLearn 类
下面使用了基本的四种请求 post, get, put, delete 并在最后列出了两种其他常见的请求方式,如请求体数据,响应体数据,和文件上传,文件上传携参等
@RestController
@RequestMapping("/learn")
public class ControllerLearn {
    /**
     * 接收POST请求,用于添加数据
     * @param user
     * @return
     */
    @PostMapping("/post")
    public SimpleResponse post(@RequestBody User user){
        return SimpleResponse.success(user);
    }

    /**
     * 接收GET请求,用于根据id获取数据
     * @param user
     * @return
     */
    @GetMapping("/get/{id}")
    public SimpleResponse get(@PathVariable("id") String user){
        return SimpleResponse.success("传入:"+user);
    }

    /**
     * 接收DELETE请求,用于删除数据
     * @param string
     * @return
     */
    @DeleteMapping("/del")
    public SimpleResponse del(@RequestParam("string") String string){
        return SimpleResponse.success("删除:"+string);
    }

    /**
     * 接收PUT请求,用于更新数据
     * @param user
     * @return
     */
    @PutMapping("/put")
    public SimpleResponse put(@RequestBody User user){
        return SimpleResponse.success(user);
    }

    /**
     * 在请求中可以又很多的参数 HttpServletRequest 和 HttpServletResponse 是请求体和响应体不需要手动传入我们可以用来做很多事情
     * 当然还可以获取header中的cookie中的·
     * @param userAgent
     * @param request
     * @param response
     * @return
     */
    @PostMapping("/response")
    public SimpleResponse responseParams(@RequestHeader("User-Agent") String userAgent, HttpServletRequest request, HttpServletResponse response){ // 获取请求头信息、请求和响应对象,返回SimpleResponse对象
        // 创建存储结果的HashMap对象
        HashMap<String, Object> result = new HashMap<>();
        result.put("User-Agent", userAgent);
        result.put("request", request.toString());
        result.put("response", response.toString());
        return SimpleResponse.success(result);
    }

    @PostMapping("/fileParam")
    public SimpleResponse responseParams(@RequestParam("file") MultipartFile[] file, User user){
        //请求格式应该是Content-Type:multipart/form-data
        // 创建存储结果的HashMap对象
        HashMap<String, Object> result = new HashMap<>();
        result.put("file", file.length);
        result.put("request", user);
        return SimpleResponse.success(result);
    }
}

内容协商
- 添加依赖
        <dependency>
            <groupId>com.fasterxml.jackson.dataformat</groupId>
            <artifactId>jackson-dataformat-xml</artifactId>
        </dependency>
- 然后在请求的时候修改
Header中的Accept

拦截器
添加 fastjson 依赖将 Object 转换成 Json
        <dependency>
            <groupId>com.alibaba</groupId>
            <artifactId>fastjson</artifactId>
            <version>2.0.12</version>
        </dependency>
创建拦截器类
@Slf4j
public class LoginInterceptor implements HandlerInterceptor {

    /**
     * 目标方法执行之前
     *
     * @param request
     * @param response
     * @param handler
     * @return
     * @throws Exception
     */
    @Override
    public boolean preHandle(HttpServletRequest request, HttpServletResponse response, Object handler) throws Exception {

        String requestURI = request.getRequestURI();
        String method = request.getMethod();
        Map<String, Object> allRequestParams = getAllRequestParams(request);
        JSONObject jsonObject = new JSONObject(allRequestParams);
        log.info("preHandle拦截的请是{},的{}请求,请求参数为:{}", requestURI, method, jsonObject);

        //登录检查逻辑
        String loginUser =(String) request.getHeader("Authorization");

        log.info("loginUser:"+loginUser);
        if (!StringUtils.isEmpty(loginUser)) {
            //放行
            return true;
        }

        //拦截住。未登录。跳转到登录页
        request.setAttribute("msg", "请先登录");
//        re.sendRedirect("/");
        request.getRequestDispatcher("/").forward(request, response);
        return false;
    }

    /**
     * 目标方法执行完成以后
     *
     * @param request
     * @param response
     * @param handler
     * @param modelAndView
     * @throws Exception
     */
    @Override
    public void postHandle(HttpServletRequest request, HttpServletResponse response, Object handler, ModelAndView modelAndView) throws Exception {
        log.info("postHandle执行{}", modelAndView);
    }

    /**
     * 页面渲染以后
     *
     * @param request
     * @param response
     * @param handler
     * @param ex
     * @throws Exception
     */
    @Override
    public void afterCompletion(HttpServletRequest request, HttpServletResponse response, Object handler, Exception ex) throws Exception {
        log.info("afterCompletion执行异常{}", ex);
    }

    /**
     * 获取请求参数信息
     * @param request
     * @return
     */

    public Map<String, Object> getAllRequestParams(HttpServletRequest request) {
        Map<String, Object> paramsMap = new HashMap<>();
        // 获取所有参数名称
        Enumeration<String> paramNames = request.getParameterNames();
        // 遍历参数名称,并获取对应的所有值(可能有多个)
        while (paramNames.hasMoreElements()) {
            String paramName = paramNames.nextElement();
            paramsMap.put(paramName, request.getParameterValues(paramName));
        }

        return paramsMap;
    }
}
配置拦截器及规则
/**
 * @Author: WangHn
 * @Date: 2024/1/12 15:44
 * @Description: 配置拦截
 * 1、编写一个拦截器实现HandlerInterceptor接口
 * 2、拦截器注册到容器中(实现WebMvcConfigurer的addInterceptors)
 * 3、指定拦截规则【如果是拦截所有,静态资源也会被拦截】
 */
@Configuration
public class AdminWebConfig implements WebMvcConfigurer {

    @Override
    public void addInterceptors(InterceptorRegistry registry) {
        registry.addInterceptor(new LoginInterceptor())
                .addPathPatterns("/**")  //所有请求都被拦截包括静态资源
                .excludePathPatterns("/login","/src/**","/css/**","/fonts/**","/images/**","/js/**"); //放行的请求
    }
}
1、根据当前请求,找到HandlerExecutionChain【可以处理请求的handler以及handler的所有 拦截器】
2、先来顺序执行所有拦截器的 preHandle方法
- 1、如果当前拦截器prehandler返回为true。则执行下一个拦截器的preHandle
- 2、如果当前拦截器返回为false。直接 倒序执行所有已经执行了的拦截器的 afterCompletion;
3、如果任何一个拦截器返回false。直接跳出不执行目标方法
4、所有拦截器都返回True。执行目标方法
5、倒序执行所有拦截器的postHandle方法。
6、前面的步骤有任何异常都会直接倒序触发 afterCompletion
7、页面成功渲染完成以后,也会倒序触发 afterCompletion

过滤器
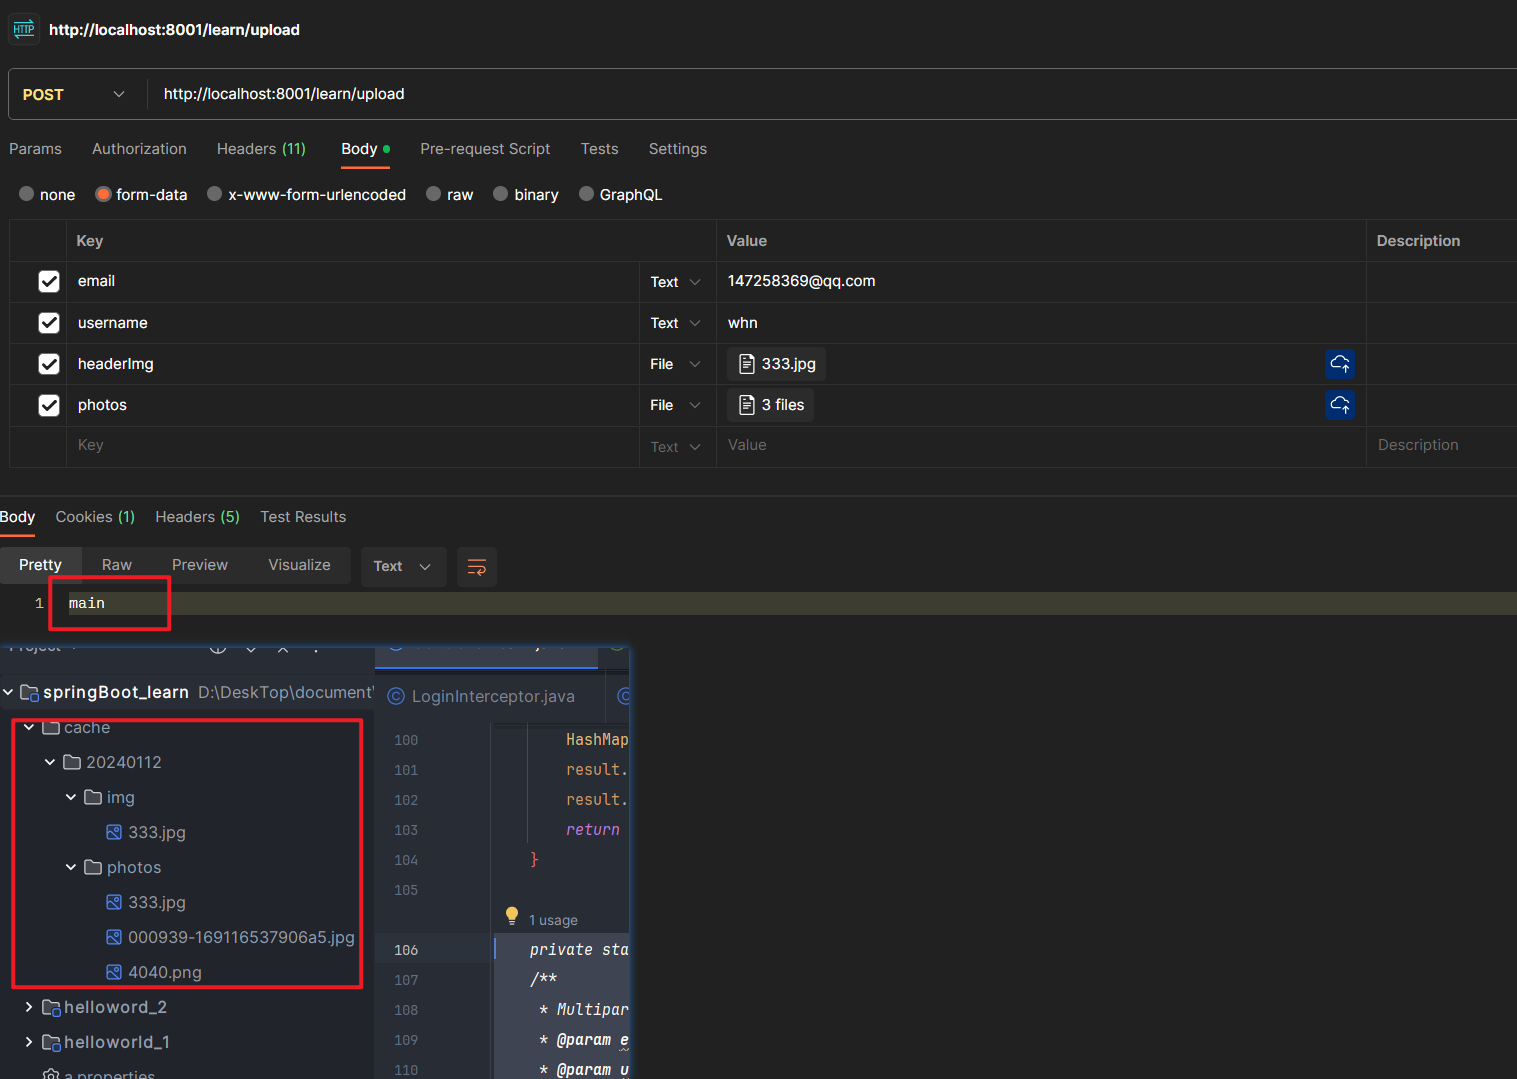
文件上传
    private static final String CACHE =System.getProperty("user.dir")+ File.separator+"cache"+File.separator;
    /**
     * MultipartFile 自动封装上传过来的文件
     * @param email
     * @param username
     * @param headerImg
     * @param photos
     * @return
     */
    @PostMapping("/upload")
    public String upload(@RequestParam("email") String email,
                         @RequestParam("username") String username,
                         @RequestPart("headerImg") MultipartFile headerImg,
                         @RequestPart("photos") MultipartFile[] photos) throws IOException {

        log.info("上传的信息:email={},username={},headerImg={},photos={}",
                email,username,headerImg.getSize(),photos.length);
        // 创建一个LocalDateTime对象
        LocalDateTime now = LocalDateTime.now();
        // 创建日期时间格式器
        DateTimeFormatter formatter = DateTimeFormatter.ofPattern("yyyyMMdd");
        //在文件系统下存放文件模拟上传
        String path = CACHE + now.format(formatter) + File.separator;
        if(!headerImg.isEmpty()){
            //保存到文件服务器,OSS服务器
            transferFile(headerImg, path, "img");
        }
        for (MultipartFile photo : photos) {
            transferFile(photo, path, "photos");
        }
        return "main";
    }

    private void transferFile(MultipartFile photo, String path, String photos) throws IOException {
        if (!photo.isEmpty()) {
            String originalFilename = photo.getOriginalFilename();
            String savePath = path + photos + File.separator + originalFilename;
            File file = new File(savePath);
            file.getParentFile().mkdirs();
            file.createNewFile();
            photo.transferTo(file);
        }
    }
注意上一步测试的拦截器的规则
统一异常处理
自定义异常类
public class CustomException extends RuntimeException{

    private static final long serialVersionUID = 1L;

    /**
     * 错误码
     */
    protected String errorCode;
    /**
     * 错误信息
     */
    protected String errorMsg;

    public CustomException() {
        super();
    }

    public CustomException(String errorMsg) {
        super(errorMsg);
        this.errorMsg = errorMsg;
    }

    public CustomException(String errorCode, String errorMsg) {
        super(errorCode);
        this.errorCode = errorCode;
        this.errorMsg = errorMsg;
    }

    public CustomException(String errorCode, String errorMsg, Throwable cause) {
        super(errorCode, cause);
        this.errorCode = errorCode;
        this.errorMsg = errorMsg;
    }

    @Override
    public Throwable fillInStackTrace() {
        return this;
    }
}
统一异常处理
@ControllerAdvice
@Slf4j
public class GlobalExceptionHandler {

    /**
     * 处理自定义的业务异常
     * @param req
     * @param e
     * @return
     */
    @ExceptionHandler(value = CustomException.class)
    @ResponseBody
    public SimpleResponse bizExceptionHandler(HttpServletRequest req, CustomException e){
        log.error("发生业务异常!原因是:{}",e);
        return SimpleResponse.failure("发生业务异常");
    }

    /**
     * 处理空指针的异常
     * @param req
     * @param e
     * @return
     */
    @ExceptionHandler(value =NullPointerException.class)
    @ResponseBody
    public SimpleResponse exceptionHandler(HttpServletRequest req, NullPointerException e){
        log.error("发生空指针异常!原因是:",e);
        return SimpleResponse.failure("发生空指针异常");
    }

    /**
     * 处理其他异常
     * @param req
     * @param e
     * @return
     */
    @ExceptionHandler(value =Exception.class)
    @ResponseBody
    public SimpleResponse exceptionHandler(HttpServletRequest req, Exception e){
        log.error("未知异常!原因是:",e);
        return SimpleResponse.failure("未知异常");
    }
}
  /**
     * 接收GET请求,用于根据id获取数据
     * @param user
     * @return
     */
    @GetMapping("/getException")
    public SimpleResponse getException(){
        ArrayList<Object> objects = null;
        return SimpleResponse.success("传入:"+objects.get(1));
    }

六、单元测试
Spring Boot 2.2.0 版本开始引入 JUnit 5 作为单元测试默认库
作为最新版本的JUnit框架,JUnit5与之前版本的Junit框架有很大的不同。由三个不同子项目的几个不同模块组成。
JUnit 5 = JUnit Platform + JUnit Jupiter + JUnit Vintage
JUnit Platform: Junit Platform是在JVM上启动测试框架的基础,不仅支持Junit自制的测试引擎,其他测试引擎也都可以接入。
JUnit Jupiter: JUnit Jupiter提供了JUnit5的新的编程模型,是JUnit5新特性的核心。内部 包含了一个测试引擎,用于在Junit Platform上运行。
JUnit Vintage: 由于JUint已经发展多年,为了照顾老的项目,JUnit Vintage提供了兼容JUnit4.x,Junit3.x的测试引擎。

注意:
SpringBoot 2.4 以上版本移除了默认对 Vintage 的依赖。如果需要兼容junit4需要自行引入(不能使用junit4的功能 @Test)
<dependency>
    <groupId>org.junit.vintage</groupId>
    <artifactId>junit-vintage-engine</artifactId>
    <scope>test</scope>
    <exclusions>
        <exclusion>
            <groupId>org.hamcrest</groupId>
            <artifactId>hamcrest-core</artifactId>
        </exclusion>
    </exclusions>
</dependency>

JUnit 5’s Vintage Engine Removed from spring-boot-starter-test,如果需要继续兼容junit4需要自行引入vintage
使用测试
- 加依赖
<dependency>
  <groupId>org.springframework.boot</groupId>
  <artifactId>spring-boot-starter-test</artifactId>
  <scope>test</scope>
</dependency>
- 使用
在测试类上添加
@SpringBootTest它用来指示一个类是一个集成测试或系统测试类,并告诉
Spring Boot需要为此测试类创建一个“全面”的ApplicationContext(应用上下文)。这个注解会自动配置并搜索与被测试类相关的beans,从而为测试提供一个真实的运行环境。 使用 @SpringBootTest 注解时,它可以加载应用程序的所有配置,并根据需要扫描组件、数据库连接、缓存和其他基础设施。这意味着测试可以完全模拟实际运行环境的行为,包括依赖注入和Spring AOP代理等。
Junit5使用方法:
@SpringBootTest
class Boot05WebAdminApplicationTests {
    @Test
    void contextLoads() {

    }
}
Junit4使用方法:
@SpringBootTest
@RunWith(SpringRunner.class)
class Boot05WebAdminApplicationTests {
    @Test
    void contextLoads() {

    }
}
在**helloworld_1**服务中进行测试演示

常用测试注解
JUnit5的注解与JUnit4的注解有所变化
https://junit.org/junit5/docs/current/user-guide/#writing-tests-annotations
- **@Test 😗*表示方法是测试方法。但是与JUnit4的@Test不同,他的职责非常单一不能声明任何属性,拓展的测试将会由Jupiter提供额外测试
- **@ParameterizedTest 😗*表示方法是参数化测试,下方会有详细介绍
- **@RepeatedTest 😗*表示方法可重复执行,下方会有详细介绍
- **@DisplayName 😗*为测试类或者测试方法设置展示名称
- **@BeforeEach 😗*表示在每个单元测试之前执行
- **@AfterEach 😗*表示在每个单元测试之后执行
- **@BeforeAll 😗*表示在所有单元测试之前执行
- **@AfterAll 😗*表示在所有单元测试之后执行
- **@Tag 😗*表示单元测试类别,类似于JUnit4中的@Categories
- **@Disabled 😗*表示测试类或测试方法不执行,类似于JUnit4中的@Ignore
- **@Timeout 😗*表示测试方法运行如果超过了指定时间将会返回错误
- **@ExtendWith 😗*为测试类或测试方法提供扩展类引用
断言
断言(assertions)是测试方法中的核心部分,用来对测试需要满足的条件进行验证。这些断言方法都是 org.junit.jupiter.api.Assertions 的静态方法。JUnit 5 内置的断言可以分成如下几个类别:
检查业务逻辑返回的数据是否合理。
所有的测试运行结束以后,会有一个详细的测试报告;
| 方法 | 说明 |
|---|---|
| assertEquals | 判断两个对象或两个原始类型是否相等 |
| assertNotEquals | 判断两个对象或两个原始类型是否不相等 |
| assertSame | 判断两个对象引用是否指向同一个对象 |
| assertNotSame | 判断两个对象引用是否指向不同的对象 |
| assertTrue | 判断给定的布尔值是否为 true |
| assertFalse | 判断给定的布尔值是否为 false |
| assertNull | 判断给定的对象引用是否为 null |
| assertNotNull | 判断给定的对象引用是否不为 null |
自定义函数式接口
计算接口想到了函数式接口,正好练习一下
@FunctionalInterface //函数式接口
public interface MyFunction {
    public double getValue(double a,double b);
}
接口类
public interface ComputerService {

    /**
     *  计算方法加
     * @param a
     * @param b
     * @return
     */
    double add(double a, double b);

    /**
     * 计算方法减
     * @param a
     * @param b
     * @return
     */
    double subtract(double a, double b);

    /**
     * 计算方法乘
     * @param a
     * @param b
     * @return
     */
    double multiply(double a, double b);

    /**
     * 计算方法除
     * @param a
     * @param b
     * @return
     */
    double divide(double a, double b);
}
实现类
@Service
public class ComputerServiceImpl implements ComputerService {
    @Override
    public double add(double a, double b) {
        return computer(a,b,(x,y)->x+y );
    }

    @Override
    public double subtract(double a, double b) {
        return computer(a,b,(x,y)->x-y );
    }

    @Override
    public double multiply(double a, double b) {
        return computer(a,b,(x,y)->x*y );
    }

    @Override
    public double divide(double a, double b) {
        return computer(a,b,(x,y)->x/y );
    }

    private double computer(double a, double b, MyFunction function){
        return function.getValue(a, b);
    }
}
测试类
@SpringBootTest
class ComputerServiceTest {

    @Autowired
    private ComputerService computerService;
    @Test
    @DisplayName("加法测试")
    void add() {
        //运行结果要一致才通过测试
        assertEquals(computerService.add(1, 2),3);
    }

    @Test
    @DisplayName("减法测试")
    void subtract() {
        //运行结果要不一致通过测试
        assertNotEquals(computerService.add(2, 2),3);
    }

    @Test
    @DisplayName("乘法测试")
    void multiply() {
        double multiply = computerService.multiply(1, 1);
        boolean equals = Double.valueOf(multiply).equals(1.0);
        //运行结果为True通过测试
        Assertions.assertTrue(false);
    }

    @Test
    @DisplayName("除法测试")
    void divide() {
        System.out.println(computerService.divide(10, 5));
        //运行结果不为null通过测试
        assertNotNull(computerService.divide(10, 5));
    }
}
运行结果

七、指标监控
未来每一个微服务在云上部署以后,我们都需要对其进行监控、追踪、审计、控制等。SpringBoot就抽取了Actuator场景,使得我们每个微服务快速引用即可获得生产级别的应用监控、审计等功能。
使用
- 添加依赖
<dependency>
    <groupId>org.springframework.boot</groupId>
    <artifactId>spring-boot-starter-actuator</artifactId>
</dependency>
- 设置对外暴露信息
management:
  endpoints:
    enabled-by-default: true #暴露所有端点信息
    web:
      exposure:
        include: '*'  #以web方式暴露
- 启动项目输入地址
http://localhost:8001/actuator便能看到可以查看信息的接口地址

常用端点
| ID | 描述 |
|---|---|
auditevents | 暴露当前应用程序的审核事件信息。需要一个AuditEventRepository组件。 |
beans | 显示应用程序中所有Spring Bean的完整列表。 |
caches | 暴露可用的缓存。 |
conditions | 显示自动配置的所有条件信息,包括匹配或不匹配的原因。 |
configprops | 显示所有@ConfigurationProperties。 |
env | 暴露Spring的属性ConfigurableEnvironment |
flyway | 显示已应用的所有Flyway数据库迁移。 需要一个或多个Flyway组件。 |
health | 显示应用程序运行状况信息。 |
httptrace | 显示HTTP跟踪信息(默认情况下,最近100个HTTP请求-响应)。需要一个HttpTraceRepository组件。 |
info | 显示应用程序信息。 |
integrationgraph | 显示Spring integrationgraph 。需要依赖spring-integration-core。 |
loggers | 显示和修改应用程序中日志的配置。 |
liquibase | 显示已应用的所有Liquibase数据库迁移。需要一个或多个Liquibase组件。 |
metrics | 显示当前应用程序的“指标”信息。 |
mappings | 显示所有@RequestMapping路径列表。 |
scheduledtasks | 显示应用程序中的计划任务。 |
sessions | 允许从Spring Session支持的会话存储中检索和删除用户会话。需要使用Spring Session的基于Servlet的Web应用程序。 |
shutdown | 使应用程序正常关闭。默认禁用。 |
startup | 显示由ApplicationStartup收集的启动步骤数据。需要使用SpringApplication进行配置BufferingApplicationStartup。 |
threaddump | 执行线程转储。 |
可视化
GitHub地址:https://github.com/codecentric/spring-boot-admin
添加可视化服务端
注意:版本号与SpringBoot的版本保持一致 如:这里使用的SpringBoot 是2.3.4.RELEASE 所以使用的可视化服务版本也是2.3开头的
- 添加依赖
<!--    版本号与SpringBoot的版本保持一致 如:这里使用的SpringBoot 是2.3.4.RELEASE 所以使用的可视化服务版本也是2.3开头的-->
<dependency>
    <groupId>de.codecentric</groupId>
    <artifactId>spring-boot-admin-starter-server</artifactId>
    <version>2.3.1</version>
</dependency>
<dependency>
    <groupId>org.springframework.boot</groupId>
    <artifactId>spring-boot-starter-web</artifactId>
</dependency>
- 配置启动类
@SpringBootApplication
@EnableAdminServer// 启动可视化服务
public class Main {
    public static void main(String[] args) {
        SpringApplication.run(Main.class, args);
    }
}
- 写配置
yml
server:
  port: 8002
配置客户端
- 添加依赖
<!--        监控可视化-->
<dependency>
    <groupId>de.codecentric</groupId>
    <artifactId>spring-boot-admin-starter-client</artifactId>
    <version>2.3.1</version>
</dependency>
- 写配置
yaml
server:
  port: 8001
spring:
  application:
    name: helloword_2
  mvc:
    static-path-pattern: /res/** # 默认无前缀
  resources:
    static-locations: [classpath:/myStatic/] #设置calsspath 静态资源的路径
  boot:
    admin:
      client:
        url: http://localhost:8002 #可视化服务端口
management:
  info:
    env:
      enabled: true
  endpoints:
    enabled-by-default: true #暴露所有端点信息
    web:
      exposure:
        include: '*'  #以web方式暴露
- 展示:
输入可视化服务urlhttp://localhost:8002/


 被折叠的 条评论
为什么被折叠?
被折叠的 条评论
为什么被折叠?
 到【灌水乐园】发言


