


 本文详细介绍了一个Spring MVC项目的搭建过程,包括项目结构、配置pom.xml、mybatis-config.xml、spring配置文件等。还阐述了后端代码的编写,如建表、实体类、dao接口等,以及前端页面的实现。此外,重点讲解了MyBatis映射文件中的动态SQL技术,可提升SQL灵活性和可维护性。
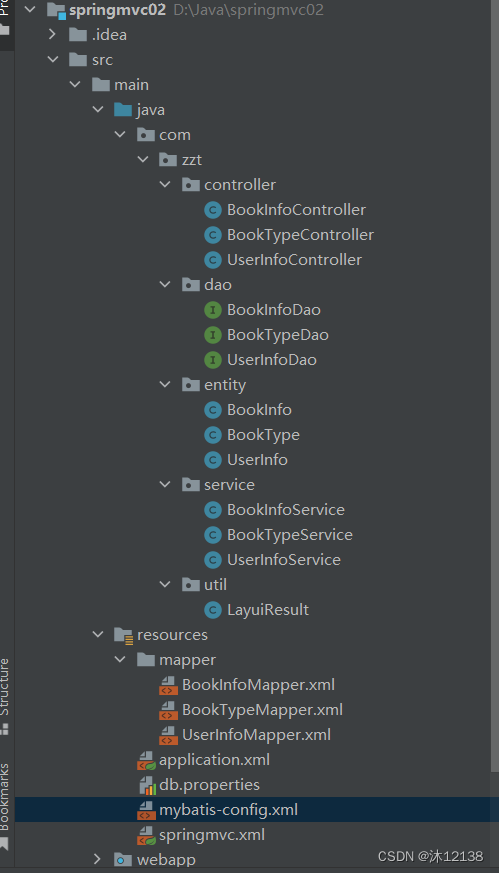
一、项目结构
二、配置pom.xml文件,导入依赖包
<!--  Spring MVC-->
  <dependency>
   <groupId>org.springframework</groupId>
   <artifactId>spring-webmvc</artifactId>
   <version>5.3.30</version>
  </dependency>
<!--  spring 集成其它数据库访问框架需要的包-->
  <dependency>
   <groupId>org.springframework</groupId>
   <artifactId>spring-jdbc</artifactId>
   <version>5.3.30</version>
  </dependency>
<!--  mybatis 与spring集成的包-->
  <dependency>
   <groupId>org.mybatis</groupId>
   <artifactId>mybatis-spring</artifactId>
   <version>2.1.1</version>
  </dependency>
<!--  mybatis核心-->
  <dependency>
   <groupId>org.mybatis</groupId>
   <artifactId>mybatis</artifactId>
   <version>3.5.13</version>
  </dependency>
<!--  阿里巴巴的数据源-->
  <dependency>
   <groupId>com.alibaba</groupId>
   <artifactId>druid</artifactId>
   <version>1.2.19</version>
  </dependency>
<!--  mysql 的JDBC驱动包-->
  <dependency>
   <groupId>mysql</groupId>
   <artifactId>mysql-connector-java</artifactId>
   <version>8.0.29</version>
  </dependency>
三、mybatis-config.xml配置文件
1、配置控制台打印日志,能在页面报错时检测是否获取数据,使用动态SQL时也能查看sql语句是否符合规范
2、驼峰命名自动映射,启用时可以省略BookTypeMapper.xml的映射文件
<?xml version="1.0" encoding="UTF-8" ?>
<!DOCTYPE configuration
        PUBLIC "-//mybatis.org//DTD Config 3.0//EN"
        "https://mybatis.org/dtd/mybatis-3-config.dtd">
<configuration>
<settings>
<!--    控制台打印日志-->
    <setting name="logImpl" value="STDOUT_LOGGING"/>
<!--    驼峰命名自动映射-->

    <setting name="mapUnderscoreToCamelCase" value="true"/>
</settings>
    <!--    mybatis分页查询拦截器-->
    <plugins>
        <plugin interceptor="com.github.pagehelper.PageInterceptor"></plugin>
    </plugins>
</configuration>
3、BookTypeMapper.xml,注解部分为mybatis-config.xml中未使用驼峰命名自动映射
<?xml version="1.0" encoding="UTF-8" ?>
<!DOCTYPE mapper
PUBLIC "-//mybatis.org//DTD Mapper 3.0//EN"
"https://mybatis.org/dtd/mybatis-3-mapper.dtd">
<!--namespace 是接口类-->
<mapper namespace="com.zzt.dao.BookTypeDao">
<!-- 字段与实体类的属性的映射关系-->
<!-- id是自命名-->
<!-- type是实体类名-->
<!-- <resultMap id="baseMap" type="com.zzt.entity.BookType">-->
<!--<!– id标签用于主键字段映射,其他字段使用resul标签-->
<!-- property是实体类属性名-->
<!-- column是字段名-->
<!--–>-->
<!-- <id property="typeId" column="type_id"></id>-->
<!-- <result property="typeName" column="type_name"></result>-->
<!-- </resultMap>-->
<!-- SQL语句-->
<!-- dao接口中每一个查询方法对应一个select
id为方法的名字
resultMap 指定字段余属性的对应关系
<select id="selectAll" resultMap="com.zzt.entity.BookType">
select * from book_type
</select>
-->
<!-- mybatis-config.xml启用了 <setting name="mapUnderscoreToCamelCase" value="true"/>,将resultMap改为resultType-->
<select id="selectAll" resultType="com.zzt.entity.BookType">
select * from book_type
</select>
</mapper>
四、spring的配置 application.xml
1、spring根包路径
<context:component-scan base-package="com.zzt"></context:component-scan>
2、数据源
 <!--加载properties文件-->
    <context:property-placeholder location="classpath:db.properties"></context:property-placeholder>
    <!--   数据源-->
    <bean id="dataSource" class="com.alibaba.druid.pool.DruidDataSource">
        <property name="driverClassName" value="${DB_DRIVER_CLASS_NAME}"></property>
        <property name="url" value="${DB_URL}"></property>
        <property name="username" value="${DB_USERNAME}"></property>
        <property name="password" value="${DB_PASSWORD}"></property>
    </bean>
db.properties文件,=左边自命名,=右边为连接MySQL的driver,url,username,password
DB_DRIVER_CLASS_NAME=com.mysql.cj.jdbc.Driver
DB_URL=jdbc:mysql://localhost:3306/db_book?serverTimezone=Asia/Shanghai
DB_USERNAME=root
DB_PASSWORD=123456
3、sqlSession工厂类
<!--    myBatis session工厂类-->
    <bean id="sqlSession" class="org.mybatis.spring.SqlSessionFactoryBean">
        <property name="dataSource" ref="dataSource"></property>
<!--        mybatis配置文件的路径和文件名-->
        <property name="configLocation" value="classpath:mybatis-config.xml"></property>
<!--        映射文件的目录-->
        <property name="mapperLocations" value="classpath:mapper/*.xml"></property>
    </bean>
4、mapper接口扫描包
<!--  mapper接口包路径-->
  <bean class="org.mybatis.spring.mapper.MapperScannerConfigurer">
<!--    指定sqlSession工厂-->
    <property name="sqlSessionFactoryBeanName" value="sqlSessionFactory">
</property>
<!--    mapper接口所在的包路径-->
    <property name="basePackage" value="com.zzt.dao"></property>
  </bean>
5、application.xml完整代码
<?xml version="1.0" encoding="UTF-8"?>
<beans xmlns="http://www.springframework.org/schema/beans"
       xmlns:xsi="http://www.w3.org/2001/XMLSchema-instance"
       xmlns:context="http://www.springframework.org/schema/context"
       xmlns:aop="http://www.springframework.org/schema/aop"
       xsi:schemaLocation="http://www.springframework.org/schema/beans
        https://www.springframework.org/schema/beans/spring-beans.xsd
        http://www.springframework.org/schema/context
        https://www.springframework.org/schema/context/spring-context.xsd
        http://www.springframework.org/schema/aop
        https://www.springframework.org/schema/aop/spring-aop.xsd">
    <!--    springmvc只扫描controller层-->
    <context:component-scan base-package="com.zzt"></context:component-scan>
    <!--加载properties文件-->
    <context:property-placeholder location="classpath:db.properties"></context:property-placeholder>

    <!--   数据源-->
    <bean id="dataSource" class="com.alibaba.druid.pool.DruidDataSource">
        <property name="driverClassName" value="${DB_DRIVER_CLASS_NAME}"></property>
        <property name="url" value="${DB_URL}"></property>
        <property name="username" value="${DB_USERNAME}"></property>
        <property name="password" value="${DB_PASSWORD}"></property>
    </bean>
<!--    myBatis session工厂类-->
    <bean id="sqlSession" class="org.mybatis.spring.SqlSessionFactoryBean">
        <property name="dataSource" ref="dataSource"></property>
        <property name="configLocation" value="classpath:mybatis-config.xml"></property>
        <property name="mapperLocations" value="classpath:mapper/*.xml"></property>
    </bean>
    <bean class="org.mybatis.spring.mapper.MapperScannerConfigurer">
        <property name="sqlSessionFactoryBeanName" value="sqlSession"></property>
        <property name="basePackage" value="com.zzt.dao"></property>
    </bean>
</beans>
五、spring mvc的配置文件
- 控制层包扫描路径
- 视图解析器
- 静态资源映射
<?xml version="1.0" encoding="UTF-8"?>
<beans xmlns="http://www.springframework.org/schema/beans"
       xmlns:xsi="http://www.w3.org/2001/XMLSchema-instance"
       xmlns:context="http://www.springframework.org/schema/context"
       xmlns:aop="http://www.springframework.org/schema/aop"
       xmlns:mvc="http://www.springframework.org/schema/mvc"
       xsi:schemaLocation="http://www.springframework.org/schema/beans
        https://www.springframework.org/schema/beans/spring-beans.xsd
        http://www.springframework.org/schema/context
        https://www.springframework.org/schema/context/spring-context.xsd
        http://www.springframework.org/schema/aop
        https://www.springframework.org/schema/aop/spring-aop.xsd
        http://www.springframework.org/schema/mvc
        https://www.springframework.org/schema/mvc/spring-mvc.xsd">
    <!--扫描路径-->
    <context:component-scan base-package="com.zzt"></context:component-scan>
    <!--     视图解析器-->
    <bean class="org.springframework.web.servlet.view.InternalResourceViewResolver">
        <property name="prefix" value="/WEB-INF/pages/"></property>
        <property name="suffix" value=".jsp"></property>
    </bean>

    <!--    映射静态资源,以便能够访问(DispatcherServlet映射为/后,web的静态资源不能被访问)-->
    <mvc:resources mapping="/static/**" location="/static/"></mvc:resources>
    <mvc:annotation-driven></mvc:annotation-driven>
</beans>
六、web.xml配置
- 加载spring配置文件
- 加载spring mvc配置文件
- 中文乱码的过滤器
<?xml version="1.0" encoding="UTF-8"?>
<web-app xmlns="http://xmlns.jcp.org/xml/ns/javaee"
         xmlns:xsi="http://www.w3.org/2001/XMLSchema-instance"
         xsi:schemaLocation="http://xmlns.jcp.org/xml/ns/javaee http://xmlns.jcp.org/xml/ns/javaee/web-app_4_0.xsd"
         version="4.0">
    <listener>
        <!--    启动spring容器-->
        <listener-class>org.springframework.web.context.ContextLoaderListener</listener-class>
    </listener>
    <!--    参数的配置,指定文件的路径和名称-->
    <context-param>
        <!--        参数名不变-->
        <param-name>contextConfigLocation</param-name>
        <!--        文件路径-->
        <param-value>classpath:application.xml</param-value>
    </context-param>
    <servlet>
        <servlet-name>springmvc</servlet-name>
        <!--        启动springmvc容器-->
        <servlet-class>org.springframework.web.servlet.DispatcherServlet</servlet-class>
        <init-param>
            <!--            参数名固定不变-->
            <param-name>contextConfigLocation</param-name>
            <param-value>classpath:springmvc.xml</param-value>
        </init-param>
    </servlet>
    <servlet-mapping>
        <servlet-name>springmvc</servlet-name>
        <!--        映射方式1,/ 2,*.do-->
        <!--        / 拦截所有请求-->
        <!--        *.do只会拦截后缀名为.do的请求-->
        <url-pattern>/</url-pattern>
    </servlet-mapping>

<!--    解决中文乱码问题-->
    <filter>
        <filter-name>encodingFilter</filter-name>
        <filter-class>org.springframework.web.filter.CharacterEncodingFilter</filter-class>
        <init-param>
            <param-name>encoding</param-name>
            <param-value>utf-8</param-value>
        </init-param>
    </filter>
    <filter-mapping>
        <filter-name>encodingFilter</filter-name>
        <url-pattern>/*</url-pattern>
    </filter-mapping>

</web-app>
七、后端代码
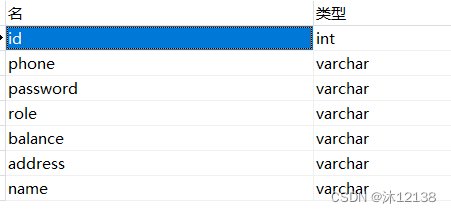
1、建表
2、实体类(entity)
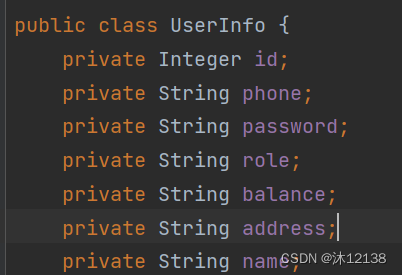
实现setter和getter方法就行
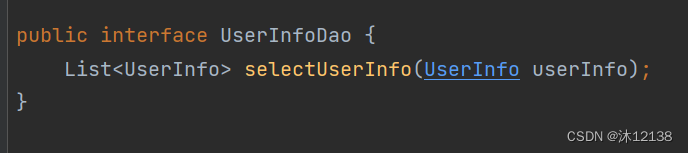
3、dao接口
4、service类
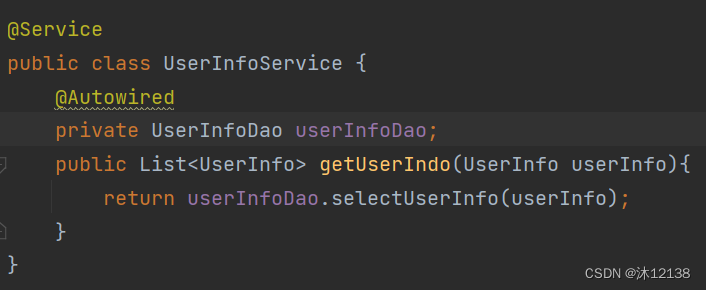
5、controller类
@Controller
@RequestMapping("/userinfo")
public class UserInfoController {
    @Autowired
    private UserInfoService userInfoService;
    @GetMapping("/getUserInfo")
    @ResponseBody
    public LayuiResult<UserInfo> getUserInfo(
            @RequestParam(defaultValue = "1") Integer page,
            @RequestParam(defaultValue = "10") Integer limit,
            UserInfo userInfo){
        //执行分页
        PageHelper.startPage(page, limit);
        List<UserInfo> list = userInfoService.getUserIndo(userInfo);
        PageInfo<UserInfo> pageInfo = new PageInfo<>(list);
        long total = pageInfo.getTotal(); //返回表的总记录数
        return LayuiResult.ok(total, list);
    }
这段代码是一个Spring MVC的控制器类,名为UserInfoController。它使用了`@Controller`注解来标识它是一个控制器,并使用`@RequestMapping("/userinfo")`注解来指定映射的URL路径。
这个控制器类依赖于`UserInfoService`服务类,通过`@Autowired`注解进行自动注入。
在这个控制器类中定义了一个`getUserInfo`方法,它是一个处理GET请求并返回数据的方法。它使用了`@GetMapping("/getUserInfo")`注解来指定映射的URL路径,该方法接受了三个参数:
- `page`:表示当前页数,默认值为1。
- `limit`:表示每页显示的记录数,默认值为10。
- `userInfo`:表示用户信息对象,使用了`@RequestParam`注解来接收参数。
在方法体内,首先使用了`PageHelper.startPage(page, limit)`方法来执行分页操作,后续的查询操作都会进行分页查询。然后调用`userInfoService.getUserIndo(userInfo)`方法来获取符合条件的用户信息列表,并将结果存储在`list`列表中。
接下来,使用`PageInfo`类将列表包装成分页对象,获取总记录数并赋值给`total`变量。最后,调用`LayuiResult.ok(total, list)`方法来返回一个成功的LayuiResult对象,其中`total`表示总记录数,`list`表示当前页的数据列表。
这样,在前端调用`/userinfo/getUserInfo`接口时,会返回分页数据的LayuiResult对象。
LayuiResult
public class LayuiResult<T> {
    private Integer code; //后台返回的状态,0为成功
    private String msg; //后台返回错误信息
    private long count; //数据表的记录总数
    private List<T> data; //当前页的数据

    public static <T> LayuiResult ok(long count,List<T> data){
        LayuiResult<T> result=new LayuiResult<>();
        result.setCode(0);
        result.setCount(count);
        result.setData(data);
        return result;
    }
这段代码是一个Java类,名为LayuiResult,代表了一个用于返回数据的结果对象。它包含了以下几个成员变量:
- `code`:后台返回的状态,0表示成功。
- `msg`:后台返回的错误信息。
- `count`:数据表的记录总数。
- `data`:当前页的数据,以泛型`T`表示。
这四个属性是根据layui需要json格式定义的
代码中定义了一个静态方法`ok`,用于返回一个成功的LayuiResult对象。这个方法接受两个参数:`count`表示数据表的记录总数,`data`表示当前页的数据列表。在方法中,它创建了一个LayuiResult对象,并设置`code`为0表示成功,`count`为传入的记录总数,`data`为传入的数据列表,最后返回这个对象。
这段代码通过LayuiResult对象来统一封装后台返回的数据,方便前端进行处理和展示。
##前端返回json数据需要添加依赖包
<!-- 支持JSON与Java对象互转的包-->
  <dependency>
   <groupId>com.fasterxml.jackson.core</groupId>
   <artifactId>jackson-databind</artifactId>
   <version>2.15.2</version>
  </dependency>
八、前端页面
<!DOCTYPE html>
<html lang="en">
<head>
    <meta charset="UTF-8">
    <title>Title</title>
    <link rel="stylesheet" href="./layui/css/layui.css">
</head>
<body>
<div class="layui-form-item">
    <div class="layui-inline">
        <label class="layui-form-label">电话</label>
        <div class="layui-input-inline">
            <input type="number" id="phone" placeholder="请输入电话" class="layui-input">
        </div>
    </div>
    <div class="layui-inline">
        <label class="layui-form-label">姓名</label>
        <div class="layui-input-inline">
            <input type="text" id="name" placeholder="请输入姓名" class="layui-input">
        </div>
    </div>
    <div class="layui-inline">
        <label class="layui-form-label">地址</label>
        <div class="layui-input-inline">
            <input type="text" id="address" placeholder="请输入地址" class="layui-input">
        </div>
    </div>
    <div class="layui-inline">
        <div class="layui-input-inline">
            <button type="button" id="search" class="layui-btn layui-btn-normal">搜索</button>
        </div>
    </div>
</div>


<table class="layui-hide" id="test"></table>

<script src="./layui/layui.js"></script>
<script>
    layui.use(['table','jquery'], function (){
        var table = layui.table;
        var $ = layui.jquery;

        table.render({
            elem: '#test'
            ,url: 'http://localhost:8080/springmvc02_war_exploded/userinfo/getUserInfo'
            ,cellMinWidth: 80
            ,page:true
            ,cols: [[
                //字段中'name'与'name '有一个空格之分,多个空格会被识别成另一个字段
                {field:'id', width:80, title: 'id'}
                ,{field:'phone', width:160, title: '电话'}
                ,{field:'password', width:80, title: '密码'}
                ,{field:'role', width:80, title: '权限'}
                ,{field:'balance', title: '价格',width: 80}
                ,{field:'address', title: '地址', width: 80}
                ,{field:'name', title: '姓名', width: 80}
            ]]
        });
//以上部分代码参考官网,按需修改
        $('#search').click(function () {
            var phone = $('#phone').val();
            var name = $('#name').val();
            var address = $('#address').val();
            table.reload('test', {
                page: {
                    curr: 1 //重新从第 1 页开始
                }
                , where: {
                    phone: phone,
                    name: name,
                    address: address
                }
            });
        })
    })
</script>
</body>
</html>
其中jQuery代码是一段使用了layui库的前端代码,它通过jQuery选择器和事件绑定实现了一个点击事件。
首先,`$('#search')`选择器选中了id为`search`的元素,它是一个按钮。然后,通过调用`click`方法,为该按钮绑定了一个点击事件。
当点击按钮时,会执行事件处理函数。在事件处理函数中,首先通过`$('#phone').val()`、`$('#name').val()`和`$('#address').val()`分别获取了id为`phone`、`name`和`address`的输入框的值,并将它们分别赋值给`phone`、`name`和`address`变量。
接下来,通过调用`table.reload('test', {...})`方法来重新加载名为`test`的表格。该方法接受一个对象作为参数,其中`page`表示重新加载后表格所在的页数,这里设置为1表示重新从第一页开始。`where`表示传递给后台的查询条件,其中`phone: phone`、`name: name`和`address: address`分别表示传递`phone`、`name`和`address`变量的值给后台进行查询。
这样,当点击按钮时,会重新加载表格数据,并将用户输入的查询条件传递给后台进行查询操作。
九、Userinfomapper.xml配置
<?xml version="1.0" encoding="UTF-8" ?>
<!DOCTYPE mapper
        PUBLIC "-//mybatis.org//DTD Mapper 3.0//EN"
        "https://mybatis.org/dtd/mybatis-3-mapper.dtd">
<!--namespace 是接口类-->
<mapper namespace="com.zzt.dao.UserInfoDao">
    <select id="selectUserInfo" resultType="com.zzt.entity.UserInfo" parameterType="com.zzt.entity.UserInfo">
        select * from userinfo
        <where>
            <if test="phone != null and phone != ''">
                and phone=#{phone}
            </if>
            <if test="name != null and name !=''">
                and name like '%${name}%'
            </if>
            <if test="address != null">
                and address like '%${address}%'
            </if>
        </where>

    </select>
</mapper>
这段代码是一个MyBatis的映射文件,用于定义数据库操作语句。该文件使用了XML格式,并包含了以下内容:
- 在文件的第一行定义了XML版本和编码,指定为`1.0`和`UTF-8`。
- 紧接着是一个DOCTYPE声明,指定了Mapper的DTD文件来验证XML的正确性。
- 在`<mapper>`标签中使用`namespace`属性指定了映射文件对应的接口类路径,这里是`com.zzt.dao.UserInfoDao`。
- 在`<select>`标签中定义了一个查询语句,使用了`id`属性指定语句的唯一标识为`selectUserInfo`。
- `resultType`属性指定了查询结果的映射对象类型为`com.zzt.entity.UserInfo`。
- `parameterType`属性指定了查询参数的类型也为`com.zzt.entity.UserInfo`。
- 查询语句为`select * from userinfo`,表示查询`userinfo`表的所有字段。
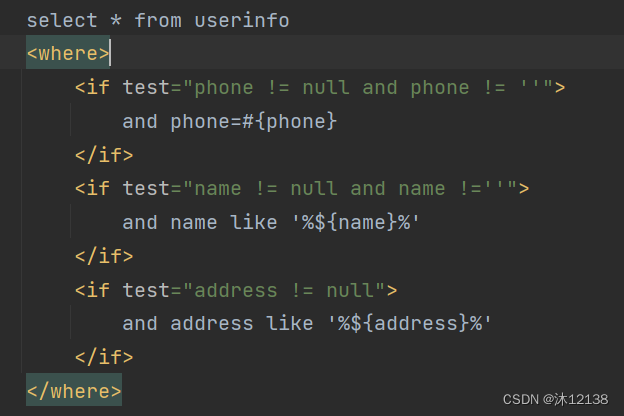
- 使用`<where>`标签来组合查询条件,可以根据传入的参数动态生成查询条件。
- 使用`<if>`标签对不同的参数进行判断和处理。
- 当`phone`参数不为空时,会拼接`and phone=#{phone}`作为查询条件。
- 当`name`参数不为空时,会拼接`and name like '%${name}%'`作为查询条件。
- 当`address`参数不为空时,会拼接`and address like '%${address}%'`作为查询条件。
这个映射文件定义了一个名为`selectUserInfo`的查询语句,使用了动态条件拼接,可以根据传入的`phone`、`name`和`address`参数进行查询。
动态SQL
动态SQL是一种在SQL语句中根据不同条件动态拼接和生成SQL语句的技术。它可以根据不同的条件、逻辑判断和循环等,在运行时动态地构建和调整SQL语句,从而实现灵活的数据库操作。
动态SQL通常用于满足不同的查询需求或者根据不同的条件执行不同的数据库操作。它可以帮助我们避免写重复的SQL语句,以及减少在应用程序中进行多个版本的SQL字符串拼接的工作。
常见的动态SQL技术有:
1. 条件判断语句:使用各种条件判断语句(如IF、CHOOSE、WHEN、OTHERWISE等)根据不同的情况执行不同的逻辑。
2. 迭代循环语句:使用迭代循环语句(如FOREACH)对集合进行遍历,并在循环过程中动态拼接SQL语句的一部分。
3. SQL片段的引用:使用SQL片段引用来重用已经定义好的SQL片段,避免重复编写相同的SQL代码。
4. 动态的SQL函数和表达式:使用动态生成的函数和表达式来组装SQL语句。
5. 动态的连接条件:根据不同的情况动态生成连接条件,实现不同的关联查询。
使用动态SQL可以有效地提升SQL语句的灵活性和可维护性,减少冗余的代码,并且可以根据不同的业务需求生成不同的SQL语句,提高数据库操作的效率。在许多持久层框架(如MyBatis)中,动态SQL都得到了广泛的支持和应用。


 751
751

 被折叠的 条评论
为什么被折叠?
被折叠的 条评论
为什么被折叠?
 到【灌水乐园】发言


