


同一个事件处理程序不可能绑定多个函数的,绑定多个的话会被覆盖掉
而addEventListener('mouseout',Show,false);可以设置多个函数,第一个参数是事件处理名称,第二个是函数名,第三个是否捕获时处理函数,不是冒泡是处理
例子:一个按钮两个事件
<!DOCTYPE html PUBLIC "-//W3C//DTD XHTML 1.0 Transitional//EN" "http://www.w3.org/TR/xhtml1/DTD/xhtml1-transitional.dtd">
<html xmlns="http://www.w3.org/1999/xhtml">
<head>
<meta http-equiv="Content-Type" content="text/html; charset=utf-8" />
<title></title>
<style type="text/css">

</style>
</head>

<body>
<button id="but" type="button">OK</button>
<script>
	var but=document.getElementById('but');
	but.addEventListener('mouseout',Show,false);
	but.addEventListener('mouseover',shown,false);
	function Show(){
		alert('鼠标移出事件');
	}
	function shown(){
		alert('鼠标移入事件');
	}
</script>
</body>
</html>
例子:从多个事件中取消一个事件
<!DOCTYPE html PUBLIC "-//W3C//DTD XHTML 1.0 Transitional//EN" "http://www.w3.org/TR/xhtml1/DTD/xhtml1-transitional.dtd">
<html xmlns="http://www.w3.org/1999/xhtml">
<head>
<meta http-equiv="Content-Type" content="text/html; charset=utf-8" />
<title></title>
<style type="text/css">

</style>
</head>

<body>
<button id="but" type="button">OK</button>
<script>
	var but=document.getElementById('but');
	but.addEventListener('mouseout',Show,false);
	but.addEventListener('mouseover',shown,false);
	but.removeEventListener('mouseover',shown,false);//取消鼠标移入事件
	function Show(){
		alert('鼠标移出事件');
	}
	function shown(){
		alert('鼠标移入事件');
	}
</script>
</body>
</html>
例子:鼠标移入时文字变白,背景变红,移出时恢复(用DOM创建)
<!DOCTYPE html PUBLIC "-//W3C//DTD XHTML 1.0 Transitional//EN" "http://www.w3.org/TR/xhtml1/DTD/xhtml1-transitional.dtd">
<html xmlns="http://www.w3.org/1999/xhtml">
<head>
<meta http-equiv="Content-Type" content="text/html; charset=utf-8" />
<title></title>
<style type="text/css">
.red{
	color:white;
	background-color: red;
}
p{
	padding: 5px;
	margin: 2px;
	background-color: #FF9;
	border: 1px solid #093;
}
</style>
</head>

<body>
<script>
	for(var i=0;i<5;i++){
		var p=document.createElement('p');
		p.onmouseover=function(){//鼠标移入
			this.className='red';
		}
		p.onmouseout=function(){//鼠标移出
			this.className='';
		}
		var text=document.createTextNode('行内元素'+i);
		p.appendChild(text);
		document.body.appendChild(p);
	}
</script>
</body>
</html>

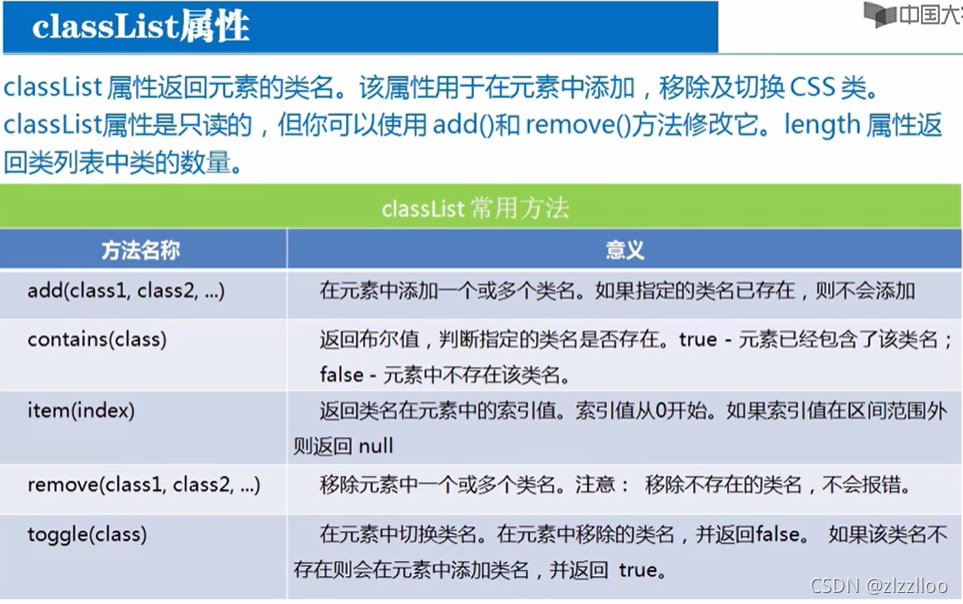
classList例子
<!DOCTYPE html PUBLIC "-//W3C//DTD XHTML 1.0 Transitional//EN" "http://www.w3.org/TR/xhtml1/DTD/xhtml1-transitional.dtd">
<html xmlns="http://www.w3.org/1999/xhtml">
<head>
<meta http-equiv="Content-Type" content="text/html; charset=utf-8" />
<title></title>
<style type="text/css">
</style>
</head>

<body>
<button onclick="show()">show</button>
<div id="div1" class="aa bb cc dd ee ff"></div>
<script>
	function show(){
		var div1=document.getElementById('div1');
		alert(div1.classList);//获取class列表
		div1.classList.add('gg');//增加class为gg的样式
		alert(div1.classList);
		div1.classList.remove('aa');//增加class为aa样式
		alert(div1.classList);
		alert(div1.classList.contains('bb'));//判断是否有bb
		alert(div1.classList.toggle('cc'));//判断有无cc,有删除并返回false无添加并返回true
		alert(div1.classList);
	}
</script>
</body>
</html>
实现相册功能
<!DOCTYPE html PUBLIC "-//W3C//DTD XHTML 1.0 Transitional//EN" "http://www.w3.org/TR/xhtml1/DTD/xhtml1-transitional.dtd">
<html xmlns="http://www.w3.org/1999/xhtml">
<head>
<meta http-equiv="Content-Type" content="text/html; charset=utf-8" />
<title></title>
<style type="text/css">
#image li{
	display:inline;
	list-style:none;
}
#image img{
	width:auto;
	height:100px;
}
</style>
</head>
<body>
<h1>张家相册</h1>
<ul id="image">
	<li>
    	<a href="img/另10.jpg" title="张瑞湾">
        	<img src="img/另10.jpg" alt="张瑞湾" />
        </a>
    </li>
    <li>
    	<a href="img/另11呀.jpg" title="刘云">
        	<img src="img/另11呀.jpg" alt="刘云" />
        </a>
    </li>
    <li>
    	<a href="img/另13(b).jpg" title="赵小贞">
        	<img src="img/另13(b).jpg" alt="赵小贞" />
        </a>
    </li>
    <li>
    	<a href="img/另13(c).jpg" title="张紫琪">
        	<img src="img/另13(c).jpg" alt="张紫琪" />
        </a>
    </li>
</ul>
<img id="bigimage" src="img/另10.jpg" alt="张家相册" width="400px" height="auto" />
<p id="ppp">选择你喜欢的图片</p>
<script>
	function showpic(whichpic){
		var source=whichpic.getAttribute('href');
		var bigimage=document.getElementById('bigimage');
		bigimage.setAttribute('src',source);
		var text=whichpic.getAttribute('title');
		var ppp=document.getElementById('ppp');
		ppp.firstChild.nodeValue=text;
	}
	window.onload=function(){
		var image=document.getElementById('image');
		var alink=document.getElementsByTagName('a');
		for(i=0;i<alink.length;i++){
			alink[i].onclick=function(){
				showpic(this);
				return false;//取消默认跳转,不会另打开页面
			}
		}
	}
</script>
</body>
</html>

本地存储
在HTML5中,本地存储Web Storage是一个window的属性,包括localStorage和sessionStorage,前者是一直存在本地的,后者只是伴随着session,窗口一旦关闭就没了,因此 sessionStorage 不是一种持久化的本地存储,仅仅是会话级别的存储。localStorage 用于持久化的本地存储,除非主动删除数据,否则数据是永远不会过期的。二者用法完全相同
例子:web计数存储
<!DOCTYPE html PUBLIC "-//W3C//DTD XHTML 1.0 Transitional//EN" "http://www.w3.org/TR/xhtml1/DTD/xhtml1-transitional.dtd">
<html xmlns="http://www.w3.org/1999/xhtml">
<head>
<meta http-equiv="Content-Type" content="text/html; charset=utf-8" />
<title></title>
<style type="text/css">
</style>
</head>
<body>
<p><button onclick="counter()">点击计数!</button></p>
<p><button onclick="del()">点击清零!</button></p>
<div id="result"></div>
<script>
	function counter(){
		if(localStorage.clickcount){//判断是否为0
			localStorage.clickcount=Number(localStorage.clickcount)+1;//不为0就+1
		}else{
			localStorage.clickcount=1;//为0就让其变成1
		}
		document.getElementById('result').innerHTML='你已点击按钮'+localStorage.clickcount+'次';
	}
	function del(){
		localStorage.removeItem('clickcount');//计数清零
		document.getElementById('result').innerHTML='计数清零';
	}
</script>
</body>
</html>


 被折叠的 条评论
为什么被折叠?
被折叠的 条评论
为什么被折叠?
 到【灌水乐园】发言


