


竞态条件
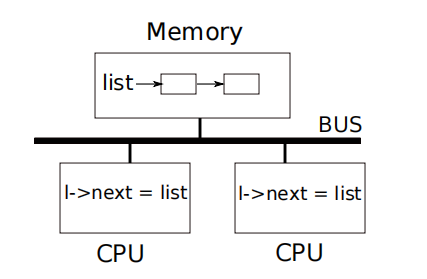
竞争是一种同时访问内存位置且至少一次访问是写入的情况。竞争通常是错误的迹象,要么是更新丢失(如果访问是写入),要么是读取未完全更新的数据结构。竞争的结果取决于编译器生成的机器代码、所涉及的两个 CPU的时序以及内存系统如何排序它们的内存操作,这可能会使竞争引起的错误难以重现和调试。
避免竞争的常用方法是使用锁。锁确保 mutual exclusion (互斥)。
锁
xv6有两种类型的锁:自旋锁和睡眠锁。
自旋锁
最重要的字段是locked
// Mutual exclusion lock.
struct spinlock {
  uint locked;       // Is the lock held?

  // For debugging:
  char *name;        // Name of lock.
  struct cpu *cpu;   // The cpu holding the lock.
};
逻辑上,应该通过执行类似下述代码获取锁
void
accquir(struct spinlock *lk)
{
  for(;;){
  	if(lk->locked==0){
  	  lk->locked = 1;
  	  break;
  	}
  }
}
事实上必须使得判断和复制这两部操作作为原子操作,多核处理器通常实现原子版本的该操作的指令,xv6使用可移植C库调用__sync_lock_test_and_set,归结为amoswap指令;__sync_lock_test_and_set返回值为旧的内容(lk->locked)
// 获取锁
// 循环直到获取到锁(自旋)
void
acquire(struct spinlock *lk)
{
  push_off(); // disable interrupts to avoid deadlock.
  if(holding(lk))
    panic("acquire");

  // On RISC-V, sync_lock_test_and_set turns into an atomic swap:
  //   a5 = 1
  //   s1 = &lk->locked
  //   amoswap.w.aq a5, a5, (s1)
  while(__sync_lock_test_and_set(&lk->locked, 1) != 0)
    ;

  // 告诉C编译器和处理器不要移动加载或存储
  // 超过这一点,以确保关键部分的内存
  // 引用严格发生在获取锁之后。
  // 在RISC-V上,这会发出fence指令。
  __sync_synchronize();

  // Record info about lock acquisition for holding() and debugging.
  lk->cpu = mycpu();
}
// Release the lock.
void
release(struct spinlock *lk)
{
  if(!holding(lk))
    panic("release");

  lk->cpu = 0;

  // 内存屏障,防止重排
  // 在 RISC-V 上,这会发出一个 fence 指令。
  __sync_synchronize();

  // Release the lock, equivalent to lk->locked = 0.
  // This code doesn't use a C assignment, since the C standard
  // implies that an assignment might be implemented with
  // multiple store instructions.
  // On RISC-V, sync_lock_release turns into an atomic swap:
  //   s1 = &lk->locked
  //   amoswap.w zero, zero, (s1)
  __sync_lock_release(&lk->locked);

  pop_off();
}
可重入锁
re-entrant locks也称为recursive locks,可重入就是说某个线程已经获得某个锁,可以再次获取锁而不会出现死锁,可重入所需要修改acquire才能注意到该所当前由调用线程持有,还必须向spinlock添加嵌套获取的计数。
睡眠锁
睡眠锁,在等待获取时让出CPU,并且在持有锁时允许让出锁。
Xv6 以以下形式提供此类锁 sleep-locks 。acquiresleep (kernel/sleeplock.c:22) 在等待时使用 CPU调度。在较高级别上,睡眠锁具有由自旋锁保护的locked 字段,以及 acquiresleep ’ 调用 sleep 以原子方式让出 CPU 并释放自旋锁。结果是其他线程可以执行 while acquiresleep 等待。
由于睡眠锁使中断保持启用状态,因此它们不能在中断处理程序中使用。因为acquiresleep 可能会占用 CPU,睡眠锁不能在自旋锁关键部分内使用(尽管自旋锁可以在睡眠锁关键部分内使用)。
自旋锁最适合短临界区,因为等待它们会浪费 CPU 时间;睡眠锁非常适合长时间操作。
RCU
RCU(Read-Copy Update)是一种能让多个读进程对链表进行同时读取,并让一个写进程同时对链表进行写入修改操作的机制,这种机制避免了进程进行读/写操作都需要获取锁而造成的锁竞争问题,适用于大量进程同时对链表结构进行读取的操作。
更多可以参考Linux 内核:RCU机制与使用
Lab 8 lock
In this lab you’ll gain experience in re-designing code to increase parallelism. A common symptom of poor parallelism on multi-core machines is high lock contention. Improving parallelism often involves changing both data structures and locking strategies in order to reduce contention. You’ll do this for the xv6 memory allocator and block cache.
在本实验中,您将获得重新设计代码以提高并行性的经验。多核机器上并行性差的一个常见症状是高锁争用。提高并行性通常涉及更改数据结构和锁定策略,以减少争用。您将为xv6内存分配器和块缓存执行此操作。
Memory allocator
The program user/kalloctest stresses xv6’s memory allocator: three processes grow and shrink their address spaces, resulting in many calls to kalloc and kfree. kalloc and kfree obtain kmem.lock. kalloctest prints (as “#fetch-and-add”) the number of loop iterations in acquire due to attempts to acquire a lock that another core already holds, for the kmem lock and a few other locks. The number of loop iterations in acquire is a rough measure of lock contention. The output of kalloctest looks similar to this before you complete the lab:
程序kalloctest压力测试了xv6的内存分配器:三个进程会增长和缩小它们的地址空间,从而导致对kalloc和kfree的多次调用。kalloc和kfree得到kmem.lock。kalloctest打印(作为“#fetch and add”)由于尝试获取另一个内核已经持有的锁而导致的获取中的循环迭代次数,包括kmem锁和其他一些锁。捕获中的循环迭代次数是锁争用的粗略度量。在您完成实验之前,kalloctest的输出看起来与此类似:
$ kalloctest
start test1
test1 results:
--- lock kmem/bcache stats
lock: kmem: #fetch-and-add 83375 #acquire() 433015
lock: bcache: #fetch-and-add 0 #acquire() 1260
--- top 5 contended locks:
lock: kmem: #fetch-and-add 83375 #acquire() 433015
lock: proc: #fetch-and-add 23737 #acquire() 130718
lock: virtio_disk: #fetch-and-add 11159 #acquire() 114
lock: proc: #fetch-and-add 5937 #acquire() 130786
lock: proc: #fetch-and-add 4080 #acquire() 130786
tot= 83375
test1 FAIL
Your job is to implement per-CPU freelists, and stealing when a CPU’s free list is empty. You must give all of your locks names that start with “kmem”. That is, you should call initlock for each of your locks, and pass a name that starts with “kmem”. Run kalloctest to see if your implementation has reduced lock contention. To check that it can still allocate all of memory, run usertests sbrkmuch. Your output will look similar to that shown below, with much-reduced contention in total on kmem locks, although the specific numbers will differ. Make sure all tests in usertests pass. make grade should say that the kalloctests pass.
你的工作是实现每个CPU的空闲列表,并在CPU的空闲表为空时进行窃取。您必须为所有以“kmem”开头的锁命名。也就是说,您应该为每个锁调用initlock,并传递一个以“kmem”开头的名称。运行kalloctest,查看您的实现是否减少了锁争用。要检查它是否仍然可以分配所有内存,请运行usertests sbrkmuch。您的输出将与下图所示相似,kmem锁上的争用总数大大减少,尽管具体数字会有所不同。确保用户测试中的所有测试都通过。Make grade应该说kalloctests通过了。
acquire maintains, for each lock, the count of calls to acquire for that lock, and the number of times the loop in acquire tried but failed to set the lock. kalloctest calls a system call that causes the kernel to print those counts for the kmem and bcache locks (which are the focus of this lab) and for the 5 most contended locks. If there is lock contention the number of acquire loop iterations will be large. The system call returns the sum of the number of loop iterations for the kmem and bcache locks.
For this lab, you must use a dedicated unloaded machine with multiple cores. If you use a machine that is doing other things, the counts that kalloctest prints will be nonsense. You can use a dedicated Athena workstation, or your own laptop, but don’t use a dialup machine.
The root cause of lock contention in kalloctest is that kalloc() has a single free list, protected by a single lock. To remove lock contention, you will have to redesign the memory allocator to avoid a single lock and list. The basic idea is to maintain a free list per CPU, each list with its own lock. Allocations and frees on different CPUs can run in parallel, because each CPU will operate on a different list. The main challenge will be to deal with the case in which one CPU’s free list is empty, but another CPU’s list has free memory; in that case, the one CPU must “steal” part of the other CPU’s free list. Stealing may introduce lock contention, but that will hopefully be infrequent.
acquire为每个锁维护该锁的调用计数,以及acquire中的循环尝试但未能设置锁的次数。kalloctest调用一个系统调用,使内核打印kmem和bcache锁(这是本实验的重点)以及5个竞争最激烈的锁的计数。如果存在锁争用,则获取循环迭代的次数将很大。系统调用返回kmem和bcache锁的循环迭代次数之和。
对于这个实验,您必须使用具有多个内核的专用无负载机器。如果你使用一台正在做其他事情的机器,kalloctest打印的计数将是无稽之谈。您可以使用专用的Athena工作站或自己的笔记本电脑,但不要使用拨号机。
kalloctest中锁争用的根本原因是kalloc()有一个自由列表,由一个锁保护。为了消除锁争用,您必须重新设计内存分配器,以避免出现单个锁和列表。基本思想是为每个CPU维护一个空闲列表,每个列表都有自己的锁。不同CPU上的分配和释放可以并行运行,因为每个CPU将在不同的列表上运行。主要的挑战将是处理一个CPU的空闲列表为空,但另一个CPU列表有空闲内存的情况;在这种情况下,一个CPU必须“窃取”另一个CPU的空闲列表的一部分。窃取可能会引入锁争用,但希望这种情况很少发生。
提示:
- 使用param.h中常量
NCPU - 当cpu运行freerange函数,让其给出所有free内存
- cpuid函数返回当前核心id,但是仅仅当中断关闭时使用才是安全的,用push_off函数和pop_off函数启用或关闭中断
- snprinf帮助以kmem开始命名lock
根据提示
- 首先给每个CPU一个kmem,初始化时初始化对应的锁
// kalloc.c
struct {
  struct spinlock lock;
  struct run *freelist;
} kmem[NCPU];
void
kinit()
{
  char buf[16];
  for (int i = 0; i < NCPU; i++)
  {
    initlock(&kmem[i].lock, "kmem");
  }
  // initlock(&kmem.lock, "kmem");
  freerange(end, (void*)PHYSTOP);
}
- 修改kfree,这里均分地址空间,根据地址空间范围加入到对应CPU的
kmem[cpu_id].freelist链表
void
kfree(void *pa)
{
  struct run *r;

  if(((uint64)pa % PGSIZE) != 0 || (char*)pa < end || (uint64)pa >= PHYSTOP)
    panic("kfree");

  // Fill with junk to catch dangling refs.
  memset(pa, 1, PGSIZE);

  r = (struct run*)pa;
  uint64 size = (PHYSTOP-(uint64)end) / NCPU;
  uint64 cpu_id = ((uint64)pa - (uint64)end) / size;

  acquire(&kmem[cpu_id].lock);
  r->next = kmem[cpu_id].freelist;
  kmem[cpu_id].freelist = r;
  release(&kmem[cpu_id].lock);
}
- 最后这里如果出现某个核心的空闲物理内存不够用,则需要从其他的cpu的空闲内存窃取一部分,所以需要修改kalloc
void *
kalloc(void)
{
  struct run *r;
  push_off();
  int cpu_id = cpuid();
  acquire(&kmem[cpu_id].lock);
  r = kmem[cpu_id].freelist;
  if(r)
    kmem[cpu_id].freelist = r->next;
  release(&kmem[cpu_id].lock);

  if(!r){
    // steal other cpu's freelist
    for (int i = 0; i < NCPU; i++) {
      if (i == cpu_id) continue;
      acquire(&kmem[i].lock);
      r = kmem[i].freelist;
      if (r) {
        kmem[i].freelist = r->next;
        release(&kmem[i].lock);
        break;
      }
      release(&kmem[i].lock);
    }
  }
  pop_off();


  if(r)
    memset((char*)r, 5, PGSIZE); // fill with junk
  return (void*)r;
}
Buffer cache
This half of the assignment is independent from the first half; you can work on this half (and pass the tests) whether or not you have completed the first half.
If multiple processes use the file system intensively, they will likely contend for bcache.lock, which protects the disk block cache in kernel/bio.c. bcachetest creates several processes that repeatedly read different files in order to generate contention on bcache.lock; its output looks like this (before you complete this lab):
这一半的任务独立于前一半;无论你是否完成了前半部分,你都可以完成这一半(并通过测试)。
如果多个进程密集地使用文件系统,它们可能会争夺bcache.lock,后者保护kernel/bio.c中的磁盘块缓存。bcachetest创建了多个重复读取不同文件的进程,以在bcache.loock上产生争用;其输出如下(在您完成本实验之前):
$ bcachetest
start test0
test0 results:
--- lock kmem/bcache stats
lock: kmem: #fetch-and-add 0 #acquire() 33035
lock: bcache: #fetch-and-add 16142 #acquire() 65978
--- top 5 contended locks:
lock: virtio_disk: #fetch-and-add 162870 #acquire() 1188
lock: proc: #fetch-and-add 51936 #acquire() 73732
lock: bcache: #fetch-and-add 16142 #acquire() 65978
lock: uart: #fetch-and-add 7505 #acquire() 117
lock: proc: #fetch-and-add 6937 #acquire() 73420
tot= 16142
test0: FAIL
start test1
test1 OK
If you look at the code in kernel/bio.c, you’ll see that bcache.lock protects the list of cached block buffers, the reference count (b->refcnt) in each block buffer, and the identities of the cached blocks (b->dev and b->blockno).
Modify the block cache so that the number of acquire loop iterations for all locks in the bcache is close to zero when running bcachetest. Ideally the sum of the counts for all locks involved in the block cache should be zero, but it’s OK if the sum is less than 500. Modify bget and brelse so that concurrent lookups and releases for different blocks that are in the bcache are unlikely to conflict on locks (e.g., don’t all have to wait for bcache.lock). You must maintain the invariant that at most one copy of each block is cached. When you are done, your output should be similar to that shown below (though not identical). Make sure usertests still passes. make grade should pass all tests when you are done.
如果你查看kernel/bio.c中的代码,你会看到bcache.lock保护缓存块缓冲区的列表、每个块缓冲区中的引用计数(b->refcnt)以及缓存块的标识(b->dev和b->blockno)。
修改块缓存,以便在运行bcachetest时,bcache中所有锁的获取循环迭代次数接近零。理想情况下,块缓存中涉及的所有锁的计数之和应为零,但如果总和小于500,则可以。修改bget和brelse,这样bcache中不同块的并发查找和释放就不太可能在锁上发生冲突(例如,不必都等待bcache.lock)。您必须保持不变,即每个块最多缓存一个副本。
Reducing contention in the block cache is more tricky than for kalloc, because bcache buffers are truly shared among processes (and thus CPUs). For kalloc, one could eliminate most contention by giving each CPU its own allocator; that won’t work for the block cache. We suggest you look up block numbers in the cache with a hash table that has a lock per hash bucket.
There are some circumstances in which it’s OK if your solution has lock conflicts:
- When two processes concurrently use the same block number. bcachetest test0 doesn’t ever do this.
- When two processes concurrently miss in the cache, and need to find an unused block to replace. bcachetest test0 doesn’t ever do this.
- When two processes concurrently use blocks that conflict in whatever scheme you use to partition the blocks and locks; for example, if two processes use blocks whose block numbers hash to the same slot in a hash table. bcachetest test0 might do this, depending on your design, but you should try to adjust your scheme’s details to avoid conflicts (e.g., change the size of your hash table).
bcachetest’s test1 uses more distinct blocks than there are buffers, and exercises lots of file system code paths.
减少块缓存中的争用比kalloc更棘手,因为bcache缓冲区真正在进程(以及CPU)之间共享。对于kalloc,可以通过给每个CPU分配自己的分配器来消除大部分争用;这对块缓存不起作用。我们建议您使用每个哈希桶都有锁的哈希表在缓存中查找块号。
在某些情况下,如果您的解决方案存在锁冲突,这是可以的:
- 当两个进程同时使用相同的块号时。bcachetest test0从不这样做。
- 当两个进程同时在缓存中丢失时,需要找到一个未使用的块进行替换。bcachetest test0从不这样做。
- 当两个进程同时使用在您用于划分块和锁的任何方案中冲突的块时;例如,如果两个进程使用块号哈希到哈希表中相同槽位的块。bcachetesttest0可能会这样做,具体取决于您的设计,但您应该尝试调整方案的细节以避免冲突(例如,更改哈希表的大小)。
bcachetest的test1使用了比缓冲区更多的不同块,并测试了大量的文件系统代码路径。
提示:
- 阅读xv6书中关于块缓存的描述(第8.1-8.3节)。
- 使用固定数量的bucket并且不动态调整哈希表的大小是可以的。使用素数桶(例如13)来降低哈希冲突的可能性。
- 在哈希表中搜索buf,并在找不到buf时为该buf分配条目,必须是原子性的。
- 删除所有buf(bcache.head等)的列表,改用使用上次使用时间的时间戳缓冲区(即在kernel/trap.c中使用tick)。通过此更改,brelse不需要获取bcache锁,bget可以根据时间戳选择最近使用最少的块。
- 在bget中序列化驱逐是可以的(即,当缓存中的查找失败时,bget中选择要重用的缓冲区的部分)。
- 在某些情况下,您的解决方案可能需要持有两把锁;例如,在驱逐过程中,您可能需要持有bcache锁和每个bucket一个锁。确保你避免死锁。
- 替换块时,您可能会将结构buf从一个bucket移动到另一个buckets,因为新块哈希到不同的bucket。你可能会遇到一个棘手的情况:新区块可能会哈希到与旧块相同的桶中。在这种情况下,一定要避免陷入死锁。
- 一些调试技巧:实现桶锁,但在bget的开始/结束处保留全局bcache.lock acquire/release,以序列化代码。一旦您确定它在没有竞争条件的情况下是正确的,请删除全局锁并处理并发问题。您还可以运行make CPUS=1 qemu来测试一个内核。
根据xv6book的8.3节,buf cache是buf的双向链表。main (kernel/main.c:27)调用函数binit ,使用静态数组 buf (kernel/bio.c:43-52) 中的 NBUF 缓冲区初始化列表。对缓冲区高速缓存的所有其他访问都通过bcache.head 引用链表,而不是 buf 数组。这里减少锁争用,就要把这个链表拆分成几个链表,减小锁的粒度。
- 修改bcache结构体及其初始化,并且根据提示在buf结构体添加字段used和timestamp,注意这里双向循环列表的初始化,为了简单直接把所有的buf放到bucket0中。
// buf.h
struct buf {
  int valid;   // has data been read from disk?
  int disk;    // does disk "own" buf?
  uint dev;
  uint blockno;
  struct sleeplock lock;
  uint refcnt;
  struct buf *prev; // LRU cache list
  struct buf *next;
  uchar data[BSIZE];
  uint64 timestamp;
};
// bio.c
#define NBUCKET (13)
#define HASH(dev, blockno) ((((dev)<<27)|(blockno))%NBUCKET)
struct {
  struct spinlock lock;
  struct buf buf[NBUF];

  // Linked list of all buffers, through prev/next.
  // Sorted by how recently the buffer was used.
  // head.next is most recent, head.prev is least.
  struct buf head[NBUCKET];
  struct spinlock locks[NBUCKET];
} bcache;
void
binit(void)
{
  struct buf *b;

  for (int i = 0; i < NBUCKET; i++)
  {
    initlock(&bcache.locks[i], "bucket");
  }
  initlock(&bcache.lock, "bcache");

  for (int i = 0; i < NBUCKET; i++)
  {
    bcache.head[i].next = &bcache.head[i];
    bcache.head[i].prev = &bcache.head[i];
  }
  for (int i = 0; i < NBUF; i++)
  {
    b = &bcache.buf[i];
    b->next = bcache.head[0].next;
    b->prev = &bcache.head[0];
    bcache.head[0].next = b;
    b->next->prev = b;
  }
}
- 需要修改bget函数,当查找不到对应的块的时候,需要去别的bucket中按照LRU算法查找buf,并且加入到目前需要的bucket中,这里因为涉及到修改不同的bucket,所以可能会出现死锁的问题,参考[mit6.s081] 笔记 Lab8: Locks | 锁优化中的思路,在驱逐buf的时候设置全局锁,保证驱逐只有一个CPU可以执行。但这里还有一个问题存疑(注释处)。
// bio.c
static struct buf*
bget(uint dev, uint blockno)
{
  struct buf *b;
  int id = HASH(dev, blockno);
  acquire(&bcache.locks[id]);
  for(b = bcache.head[id].next; b != &bcache.head[id]; b = b->next){
    if(b->blockno == blockno && b->dev == dev){
      b->refcnt++;
      release(&bcache.locks[id]);
      acquiresleep(&b->lock);
      return b;
    }
  }
  release(&bcache.locks[id]);

  acquire(&bcache.lock);
  acquire(&bcache.locks[id]);
  for(b = bcache.head[id].next; b != &bcache.head[id]; b = b->next){
    if(b->dev == dev && b->blockno == blockno){
      b->refcnt++;
      release(&bcache.locks[id]);
      release(&bcache.lock);
      acquiresleep(&b->lock);
      return b;
    }
  }
  release(&bcache.locks[id]);

  struct buf *least = 0;
  int hold_bucket = -1;
  for (int i = 0; i < NBUCKET; i++)
  {
    acquire(&bcache.locks[i]);
    int new = 0;
    for(b = bcache.head[i].next; b != &bcache.head[i]; b = b->next){
      if (b->refcnt == 0 && (least == 0 || b->timestamp < least->timestamp))
      {
        least = b;
        new = 1;
      }
    }
    if (new == 0)
    {
      release(&bcache.locks[i]);
    }
    else{
      if(hold_bucket != -1){

        release(&bcache.locks[hold_bucket]);
      }
      hold_bucket = i;
    }
  }
  if(least==0)
    panic("bget: no buffers");

  if(hold_bucket != id){
    // list delete and insert
    least->prev->next = least->next;
    least->next->prev = least->prev;
    release(&bcache.locks[hold_bucket]);
    acquire(&bcache.locks[id]);
    least->next = bcache.head[id].next;
    least->prev = &bcache.head[id];
    bcache.head[id].next = least;
    least->next->prev = least;
  }

  least->dev = dev;
  least->blockno = blockno;
  least->refcnt++; // 直接赋值为1则会造成 panic: freeing free block, why
  least->valid = 0;
  release(&bcache.locks[id]);
  release(&bcache.lock);
  acquiresleep(&least->lock);
  return least;

  panic("bget: no buffers");
}
- 修改其他操作bucket的函数,减小锁的粒度
// bio.c
void
brelse(struct buf *b)
{
  if(!holdingsleep(&b->lock))
    panic("brelse");

  releasesleep(&b->lock);

  int id = HASH(b->dev, b->blockno);
  acquire(&bcache.locks[id]);
  b->refcnt--;
  if (b->refcnt == 0) {
    b->timestamp = ticks;
  }
  release(&bcache.locks[id]);
}

void
bpin(struct buf *b) {
  int id = HASH(b->dev, b->blockno);
  acquire(&bcache.locks[id]);
  b->refcnt++;
  release(&bcache.locks[id]);
}

void
bunpin(struct buf *b) {
  int id = HASH(b->dev, b->blockno);
  acquire(&bcache.locks[id]);
  b->refcnt--;
  release(&bcache.locks[id]);
}
总结
死锁条件
- 互斥(一个资源在任何时候只能属于一个线程)
- 请求保持(线程在拿着一个锁的情况下,去申请另一个锁)
- 不剥夺(外力不强制剥夺一个线程已经拥有的资源)
- 环路等待(请求资源的顺序形成了一个环)
锁和中断的交互也可能造成死锁。比如当sys_sleep拥有tickslock时,发生定时器中断,定时器中断的handler也需要acquire(tickslock),就会等待sys_sleep释放,但是因为在中断里面,只要不从中断返回sys_sleep就永远无法释放,因此造成了死锁。对这种死锁的解决方法是:如果一个中断中需要获取某个特定的spinlock,那么当CPU获得了这个spinlock之后,该中断必须被禁用。xv6的机制则更加保守:当CPU获取了任意一个lock之后,将禁用掉这个CPU上的所有中断(其他CPU的中断保持原样)。当CPU不再拥有spinlock时,将通过pop_off重新使能中断


 被折叠的 条评论
为什么被折叠?
被折叠的 条评论
为什么被折叠?
 到【灌水乐园】发言


