


title: .NET6
categories: .NET
tags:
- 后端开发
- EF
abbrlink: a4240b94
date: 2024-09-30 15:30:16
.Net Core 6
本文章的目的是对于有基础的程序员快速上手.Net 6
推荐优先学习c#语法与.NET 特性
ASP.NET特性:https://www.cnblogs.com/JohnTang/category/1387684.html
本文章不推荐0基础阅读
第一个ASP.NET MVC程序
Step1:建一个ASP.NET MVC程序,添加一个控制器
using Microsoft.AspNetCore.Mvc;

namespace Advanced.NET.Controllers
{
    public class FirstController : Controller
    {
        public IActionResult Index()
        {
            ViewBag.User1 = "张三";
            ViewBag.User2 = "李四";
            TempData["User3"] = "王五";
            HttpContext.Session.SetString("User4", "赵六");
            object User5 = "田七";
            return View(User5);
        }
    }
}
此处右键Index可以选择创建视图
然后再创建一个视图
@*
For more information on enabling MVC for empty projects, visit https://go.microsoft.com/fwlink/?LinkID=397860
*@
@{
// ViewBag["Title"] = "Index";
}
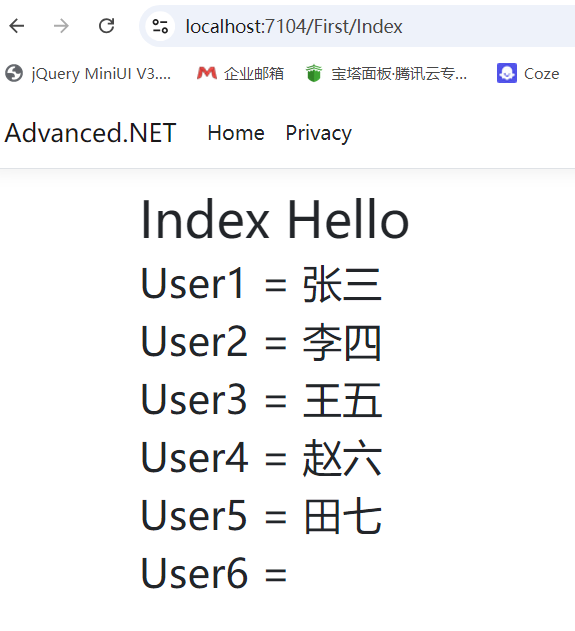
<h1>Index Hello</h1>
<h2>User1 = @ViewBag.User1</h2>
<h2>User2 = @ViewData["User2"]</h2>
<h2>User3 = @TempData["User3"]</h2>
<h2>User4 = @Context.Session.GetString("User4")</h2>
<h2>User5 = @Model</h2>
<h2>User6 = </h2>
在启动项配置中加入Session,因为上面有一个用Session的
var builder = WebApplication.CreateBuilder(args);

// Add services to the container.
builder.Services.AddControllersWithViews();
{
    builder.Services.AddSession();
}

var app = builder.Build();

// Configure the HTTP request pipeline.
if (!app.Environment.IsDevelopment())
{
    app.UseExceptionHandler("/Home/Error");
    // The default HSTS value is 30 days. You may want to change this for production scenarios, see https://aka.ms/aspnetcore-hsts.
    app.UseHsts();
}

app.UseSession();

app.UseHttpsRedirection();

app.UseStaticFiles();

app.UseRouting();

app.UseAuthorization();

app.MapControllerRoute(
    name: "default",
    pattern: "{controller=Home}/{action=Index}/{id?}");

app.Run();
运行即可
Nuget程序包
安装以及管理依赖所用
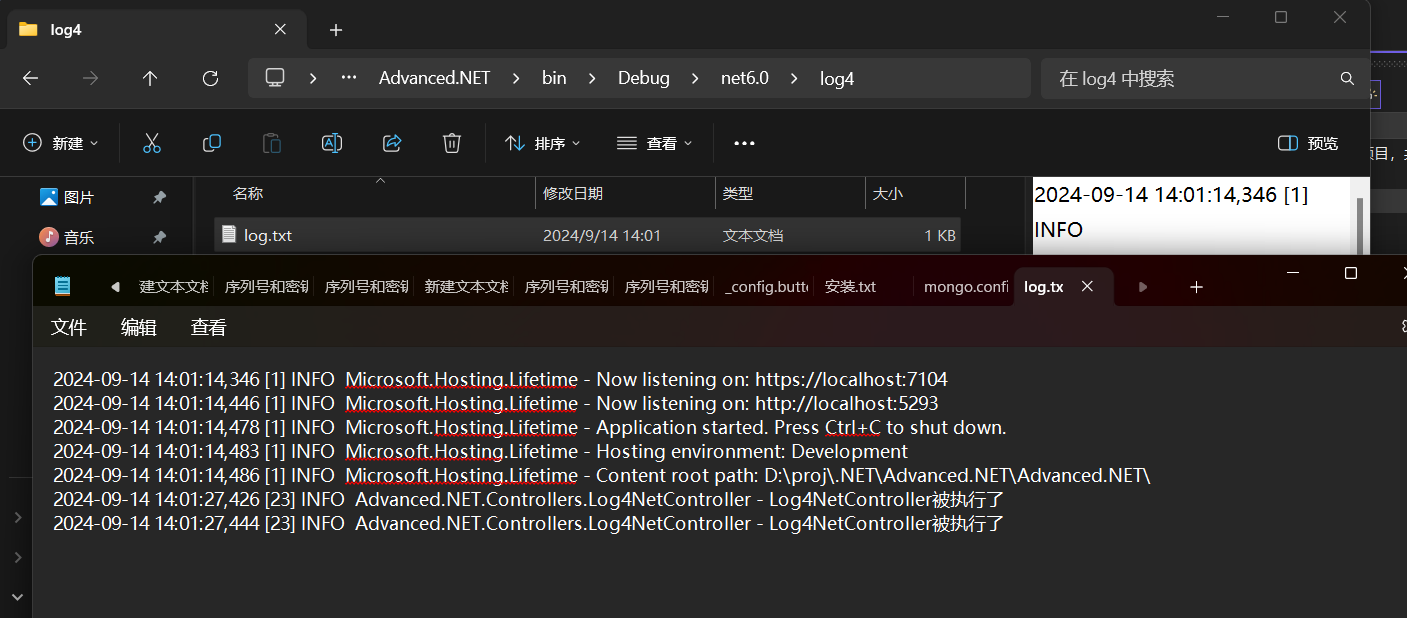
下面以安装log4net为例
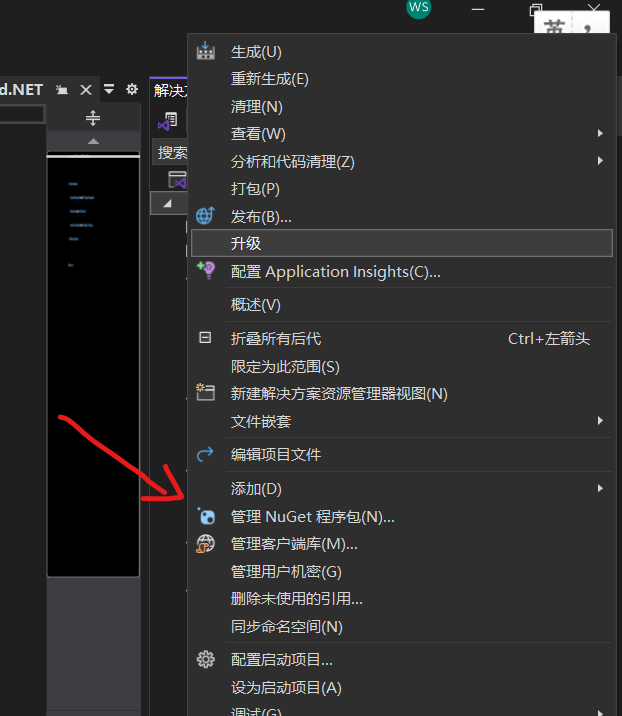
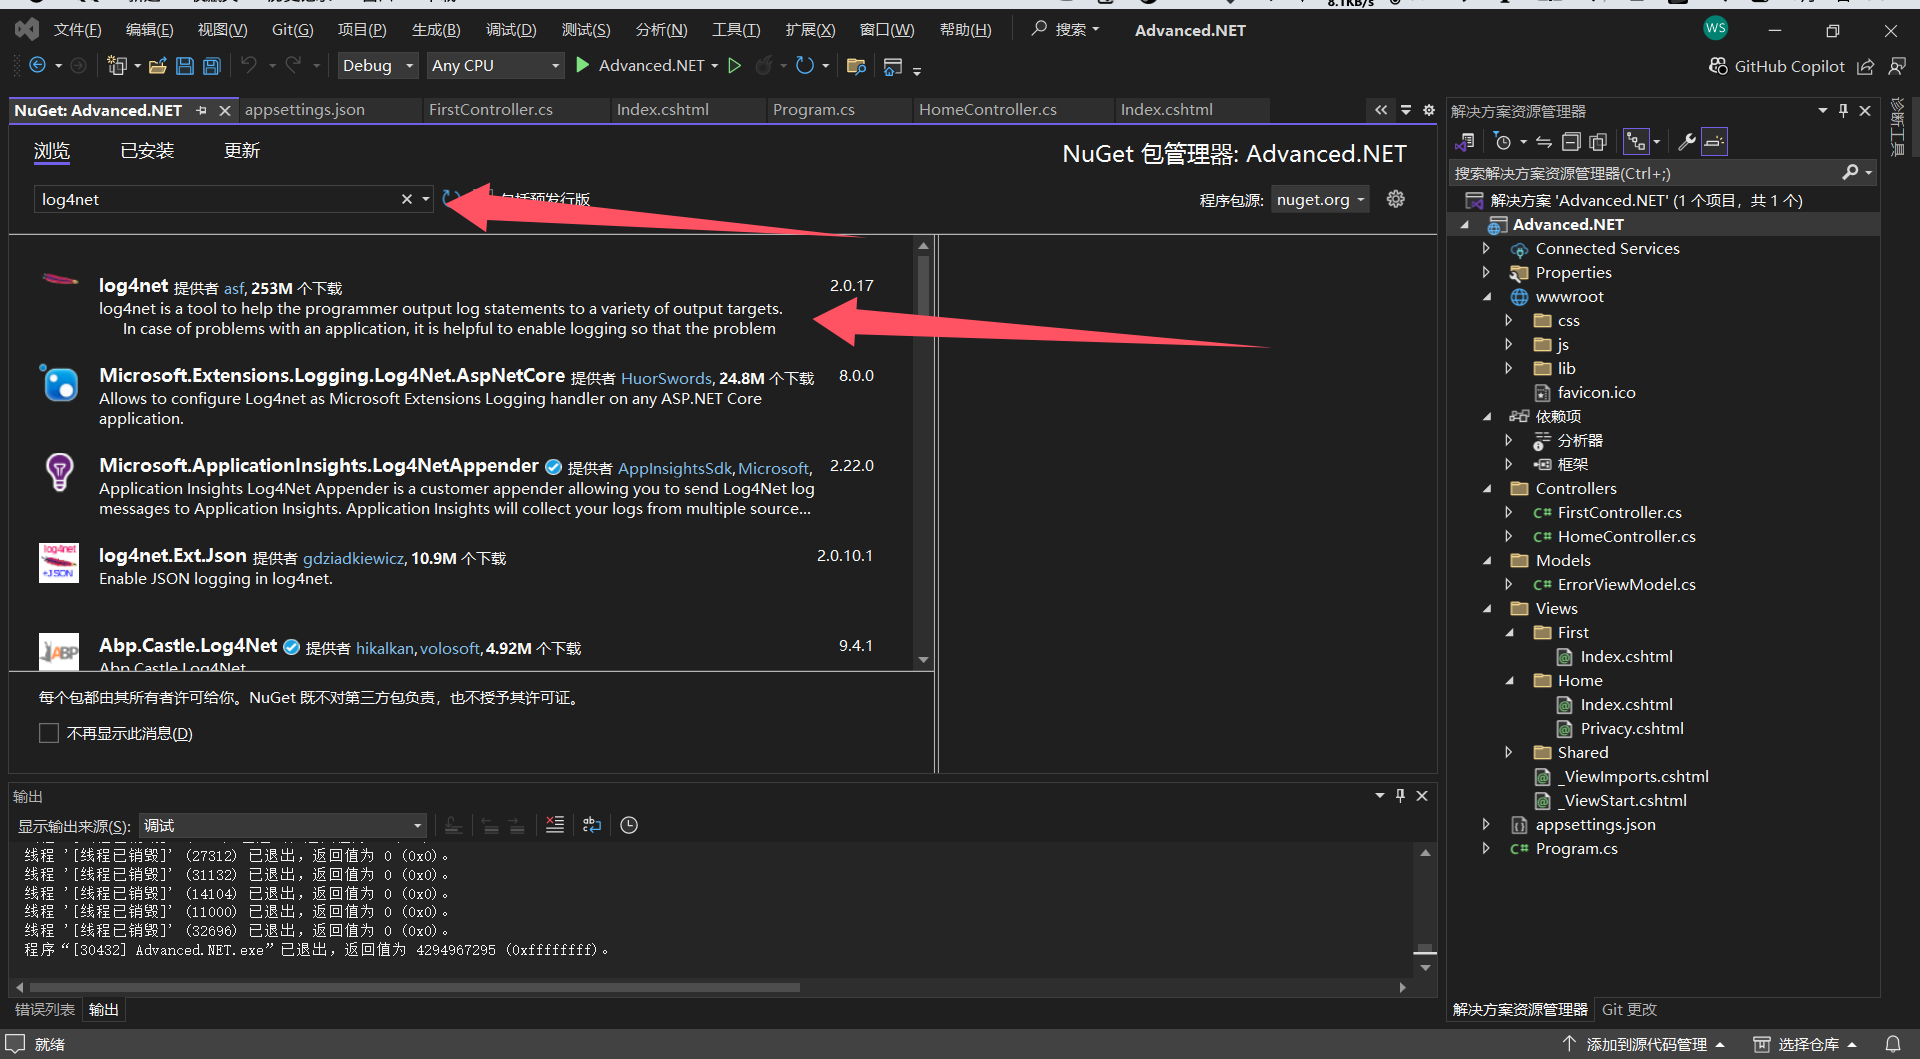
引入log4net
step1: 安装依赖
略
//Nuget引入log4net和Microsoft.Extensions.Logging.Log4Net.AspNetCore
step2: 导入配置文件
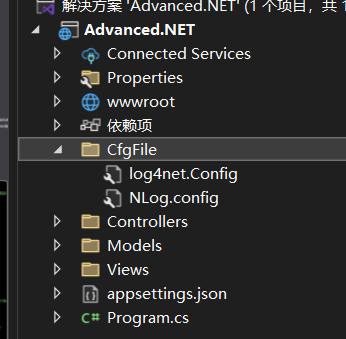
log4net.config
<?xml version="1.0" encoding="utf-8"?>
<log4net>
	<!-- Define some output appenders -->
	<appender name="rollingAppender" type="log4net.Appender.RollingFileAppender">
		<file value="log4\log.txt" />
		<!--追加日志内容-->
		<appendToFile value="true" />

		<!--防止多线程时不能写Log,官方说线程非安全-->
		<lockingModel type="log4net.Appender.FileAppender+MinimalLock" />

		<!--可以为:Once|Size|Date|Composite-->
		<!--Composite为Size和Date的组合-->
		<rollingStyle value="Composite" />

		<!--当备份文件时,为文件名加的后缀-->
		<datePattern value="yyyyMMdd.TXT" />

		<!--日志最大个数,都是最新的-->
		<!--rollingStyle节点为Size时,只能有value个日志-->
		<!--rollingStyle节点为Composite时,每天有value个日志-->
		<maxSizeRollBackups value="20" />

		<!--可用的单位:KB|MB|GB-->
		<maximumFileSize value="3MB" />

		<!--置为true,当前最新日志文件名永远为file节中的名字-->
		<staticLogFileName value="true" />

		<!--输出级别在INFO和ERROR之间的日志-->
		<filter type="log4net.Filter.LevelRangeFilter">
			<param name="LevelMin" value="ALL" />
			<param name="LevelMax" value="FATAL" />
		</filter>
		<layout type="log4net.Layout.PatternLayout">
			<conversionPattern value="%date [%thread] %-5level %logger - %message%newline"/>
		</layout>
	</appender>

	<!--SqlServer形式-->
	<!--log4net日志配置:http://logging.apache.org/log4net/release/config-examples.html -->
	<appender name="AdoNetAppender_SqlServer" type="log4net.Appender.AdoNetAppender">
		<!--日志缓存写入条数 设置为0时只要有一条就立刻写到数据库-->
		<bufferSize value="0" />
		<connectionType value="System.Data.SqlClient.SqlConnection,System.Data.SqlClient, Version=4.6.1.3, Culture=neutral, PublicKeyToken=b03f5f7f11d50a3a" />
		<connectionString value="Data Source=DESKTOP-T2D6ILD;Initial Catalog=LogManager;Persist Security Info=True;User ID=sa;Password=sa123" />
		<commandText value="INSERT INTO Log4Net ([Date],[Thread],[Level],[Logger],[Message],[Exception]) VALUES (@log_date, @thread, @log_level, @logger, @message, @exception)" />
		<parameter>
			<parameterName value="@log_date" />
			<dbType value="DateTime" />
			<layout type="log4net.Layout.RawTimeStampLayout" />
		</parameter>
		<parameter>
			<parameterName value="@thread" />
			<dbType value="String" />
			<size value="255" />
			<layout type="log4net.Layout.PatternLayout">
				<conversionPattern value="%thread" />
			</layout>
		</parameter>
		<parameter>
			<parameterName value="@log_level" />
			<dbType value="String" />
			<size value="50" />
			<layout type="log4net.Layout.PatternLayout">
				<conversionPattern value="%level" />
			</layout>
		</parameter>
		<parameter>
			<parameterName value="@logger" />
			<dbType value="String" />
			<size value="255" />
			<layout type="log4net.Layout.PatternLayout">
				<conversionPattern value="%logger" />
			</layout>
		</parameter>
		<parameter>
			<parameterName value="@message" />
			<dbType value="String" />
			<size value="4000" />
			<layout type="log4net.Layout.PatternLayout">
				<conversionPattern value="%message" />
			</layout>
		</parameter>
		<parameter>
			<parameterName value="@exception" />
			<dbType value="String" />
			<size value="2000" />
			<layout type="log4net.Layout.ExceptionLayout" />
		</parameter>
	</appender>

	<root>

		<!--控制级别,由低到高: ALL|DEBUG|INFO|WARN|ERROR|FATAL|OFF-->
		<!--OFF:0-->
		<!--FATAL:FATAL-->
		<!--ERROR: ERROR,FATAL-->
		<!--WARN: WARN,ERROR,FATAL-->
		<!--INFO: INFO,WARN,ERROR,FATAL-->
		<!--DEBUG: INFO,WARN,ERROR,FATAL-->
		<!--ALL: DEBUG,INFO,WARN,ERROR,FATAL-->
		<priority value="ALL"/>

		<level value="INFO"/>
		<appender-ref ref="rollingAppender" />
		<appender-ref ref="AdoNetAppender_SqlServer" />
	</root>
</log4net>
NLog.config
<?xml version="1.0" encoding="utf-8" ?>
<nlog xmlns="http://www.nlog-project.org/schemas/NLog.xsd"
      xmlns:xsi="http://www.w3.org/2001/XMLSchema-instance"
      xsi:schemaLocation="http://www.nlog-project.org/schemas/NLog.xsd NLog.xsd"
      autoReload="true"
      throwExceptions="false"
      internalLogLevel="Off" internalLogFile="c:\temp\nlog-internal.log">

  <!-- optional, add some variables
  https://github.com/nlog/NLog/wiki/Configuration-file#variables
  -->
  <variable name="myvar" value="myvalue"/>

  <!--
  See https://github.com/nlog/nlog/wiki/Configuration-file
  for information on customizing logging rules and outputs.
   -->
  <targets>
    <!--
    add your targets here
    See https://github.com/nlog/NLog/wiki/Targets for possible targets.
    See https://github.com/nlog/NLog/wiki/Layout-Renderers for the possible layout renderers.
    -->
    <target name="AllDatabase" xsi:type="Database"
          dbProvider="System.Data.SqlClient.SqlConnection, System.Data.SqlClient"
          connectionString="Data Source=DESKTOP-T2D6ILD;Initial Catalog=LogManager;Persist Security Info=True;User ID=sa;Password=sa123"
          commandText="insert into dbo.NLog (Application, Logged, Level, Message,Logger, CallSite, Exception) values (@Application, @Logged, @Level, @Message,@Logger, @Callsite, @Exception);">
              <parameter name="@application" layout="AspNetCoreNlog" />
              <parameter name="@logged" layout="${date}" />
              <parameter name="@level" layout="${level}" />
              <parameter name="@message" layout="${message}" />
              <parameter name="@logger" layout="${logger}" />
              <parameter name="@callSite" layout="${callsite:filename=true}" />
              <parameter name="@exception" layout="${exception:tostring}" />
    </target>

    <target xsi:type="File" name="allfile" fileName="NLog\nlog-all-${shortdate}.log"
            layout="${longdate}|${logger}|${uppercase:${level}}|${message} ${exception}" />
    <!--同样是将文件写入日志中,写入的内容有所差别,差别在layout属性中体现。写入日志的数量有差别,差别在路由逻辑中体现-->
    <target xsi:type="File" name="ownFile-web" fileName="NLog\nlog-my-${shortdate}.log"
             layout="${longdate}|${logger}|${uppercase:${level}}|${message} ${exception}" />
    <target xsi:type="Null" name="blackhole" />
    <!--
    Write events to a file with the date in the filename.
    <target xsi:type="File" name="f" fileName="${basedir}/logs/${shortdate}.log"
            layout="${longdate} ${uppercase:${level}} ${message}" />
    -->
  </targets>

  <rules>
    <logger name="*" minlevel="Trace" writeTo="AllDatabase" />
    <!-- add your logging rules here -->
    <!--路由顺序会对日志打印产生影响。路由匹配逻辑为顺序匹配。-->
    <!--All logs, including from Microsoft-->
    <logger name="*" minlevel="Trace" writeTo="allfile" />
    <!--Skip Microsoft logs and so log only own logs-->
    <!--以Microsoft打头的日志将进入此路由,由于此路由没有writeTo属性,所有会被忽略-->
    <!--且此路由设置了final,所以当此路由被匹配到时。不会再匹配此路由下面的路由。未匹配到此路由时才会继续匹配下一个路由-->
    <logger name="Microsoft.*" minlevel="Trace"  final="true" />
    <!--上方已经过滤了所有Microsoft.*的日志,所以此处的日志只会打印除Microsoft.*外的日志-->
    <logger name="*" minlevel="Trace" writeTo="ownFile-web" />
    <!--
    Write all events with minimal level of Debug (So Debug, Info, Warn, Error and Fatal, but not Trace)  to "f"
    <logger name="*" minlevel="Debug" writeTo="f" />
    -->
  </rules>
</nlog>
step3: 导入启动项与配置
Program.cs
{
    //Nuget引入log4net和Microsoft.Extensions.Logging.Log4Net.AspNetCore
    builder.Logging.AddLog4Net("CfgFile/log4net.Config");
}
这里如果配置文件
step4: 调用并测试
注入得到log4net实例并写日志
新建一个控制器 调用log4net 测试
using Microsoft.AspNetCore.Mvc;

namespace Advanced.NET.Controllers
{
    public class Log4NetController : Controller
    {
        private readonly ILogger<Log4NetController> _Logger;
        private readonly ILoggerFactory _loggerFactory;
        public Log4NetController(ILogger<Log4NetController> logger, ILoggerFactory loggerFactory)
        {
            _Logger = logger;
            this._Logger.LogInformation($"{this.GetType().Name}被执行了");
            _loggerFactory = loggerFactory;
            ILogger<Log4NetController> _logger2 = this._loggerFactory.CreateLogger<Log4NetController>();
            _logger2.LogInformation($"{this.GetType().Name}被执行了");
        }

        public IActionResult Index()
        {
            return View();
        }
    }
}
运行测试
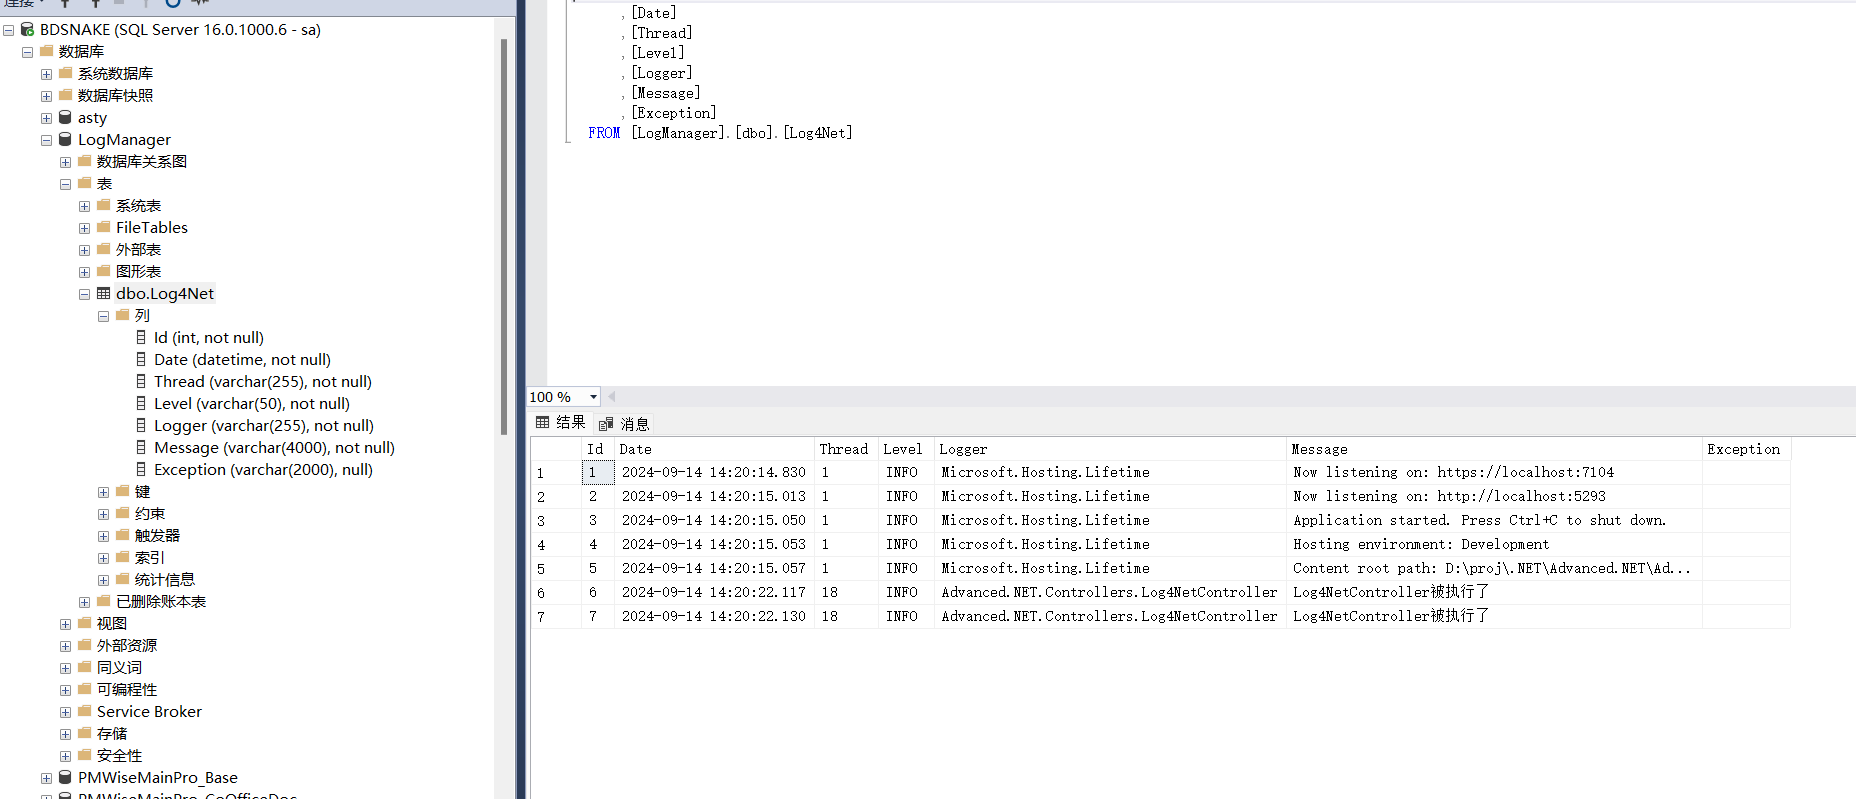
Log4Net写SQL Server
Step1:Nuget引入程序包
System.Data.SqlClient
Step2:修改配置文件:支持写数据库
log4net.Config
sqlserver 配置部分 注意需要建表,且与配置中的Insert语句对应,可自定义
<!--SqlServer形式-->
<!--log4net日志配置:http://logging.apache.org/log4net/release/config-examples.html -->
<appender name="AdoNetAppender_SqlServer" type="log4net.Appender.AdoNetAppender">
	<!--日志缓存写入条数 设置为0时只要有一条就立刻写到数据库-->
	<bufferSize value="0" />
	<connectionType value="System.Data.SqlClient.SqlConnection,System.Data.SqlClient, Version=4.6.1.3, Culture=neutral, PublicKeyToken=b03f5f7f11d50a3a" />
	<connectionString value="Data Source=DESKTOP-T2D6ILD;Initial Catalog=LogManager;Persist Security Info=True;User ID=sa;Password=sa123" />
	<commandText value="INSERT INTO Log4Net ([Date],[Thread],[Level],[Logger],[Message],[Exception]) VALUES (@log_date, @thread, @log_level, @logger, @message, @exception)" />
	<parameter>
		<parameterName value="@log_date" />
		<dbType value="DateTime" />
		<layout type="log4net.Layout.RawTimeStampLayout" />
	</parameter>
	<parameter>
		<parameterName value="@thread" />
		<dbType value="String" />
		<size value="255" />
		<layout type="log4net.Layout.PatternLayout">
			<conversionPattern value="%thread" />
		</layout>
	</parameter>
	<parameter>
		<parameterName value="@log_level" />
		<dbType value="String" />
		<size value="50" />
		<layout type="log4net.Layout.PatternLayout">
			<conversionPattern value="%level" />
		</layout>
	</parameter>
	<parameter>
		<parameterName value="@logger" />
		<dbType value="String" />
		<size value="255" />
		<layout type="log4net.Layout.PatternLayout">
			<conversionPattern value="%logger" />
		</layout>
	</parameter>
	<parameter>
		<parameterName value="@message" />
		<dbType value="String" />
		<size value="4000" />
		<layout type="log4net.Layout.PatternLayout">
			<conversionPattern value="%message" />
		</layout>
	</parameter>
	<parameter>
		<parameterName value="@exception" />
		<dbType value="String" />
		<size value="2000" />
		<layout type="log4net.Layout.ExceptionLayout" />
	</parameter>
</appender>
<root>

	<!--控制级别,由低到高: ALL|DEBUG|INFO|WARN|ERROR|FATAL|OFF-->
	<!--OFF:0-->
	<!--FATAL:FATAL-->
	<!--ERROR: ERROR,FATAL-->
	<!--WARN: WARN,ERROR,FATAL-->
	<!--INFO: INFO,WARN,ERROR,FATAL-->
	<!--DEBUG: INFO,WARN,ERROR,FATAL-->
	<!--ALL: DEBUG,INFO,WARN,ERROR,FATAL-->
	<priority value="ALL"/>

	<level value="INFO"/>
	<appender-ref ref="rollingAppender" />
	<appender-ref ref="AdoNetAppender_SqlServer" />
</root>
完整文件(既输出本地文件日志,又输出数据库日志)
<?xml version="1.0" encoding="utf-8"?>
<log4net>
	<!-- Define some output appenders -->
	<appender name="rollingAppender" type="log4net.Appender.RollingFileAppender">
		<file value="log4\log.txt" />
		<!--追加日志内容-->
		<appendToFile value="true" />

		<!--防止多线程时不能写Log,官方说线程非安全-->
		<lockingModel type="log4net.Appender.FileAppender+MinimalLock" />

		<!--可以为:Once|Size|Date|Composite-->
		<!--Composite为Size和Date的组合-->
		<rollingStyle value="Composite" />

		<!--当备份文件时,为文件名加的后缀-->
		<datePattern value="yyyyMMdd.TXT" />

		<!--日志最大个数,都是最新的-->
		<!--rollingStyle节点为Size时,只能有value个日志-->
		<!--rollingStyle节点为Composite时,每天有value个日志-->
		<maxSizeRollBackups value="20" />

		<!--可用的单位:KB|MB|GB-->
		<maximumFileSize value="3MB" />

		<!--置为true,当前最新日志文件名永远为file节中的名字-->
		<staticLogFileName value="true" />

		<!--输出级别在INFO和ERROR之间的日志-->
		<filter type="log4net.Filter.LevelRangeFilter">
			<param name="LevelMin" value="ALL" />
			<param name="LevelMax" value="FATAL" />
		</filter>
		<layout type="log4net.Layout.PatternLayout">
			<conversionPattern value="%date [%thread] %-5level %logger - %message%newline"/>
		</layout>
	</appender>

	<!--SqlServer形式-->
	<!--log4net日志配置:http://logging.apache.org/log4net/release/config-examples.html -->
	<appender name="AdoNetAppender_SqlServer" type="log4net.Appender.AdoNetAppender">
		<!--日志缓存写入条数 设置为0时只要有一条就立刻写到数据库-->
		<bufferSize value="0" />
		<connectionType value="System.Data.SqlClient.SqlConnection,System.Data.SqlClient, Version=4.6.1.3, Culture=neutral, PublicKeyToken=b03f5f7f11d50a3a" />
		<connectionString value="Data Source=DESKTOP-T2D6ILD;Initial Catalog=LogManager;Persist Security Info=True;User ID=sa;Password=sa123" />
		<commandText value="INSERT INTO Log4Net ([Date],[Thread],[Level],[Logger],[Message],[Exception]) VALUES (@log_date, @thread, @log_level, @logger, @message, @exception)" />
		<parameter>
			<parameterName value="@log_date" />
			<dbType value="DateTime" />
			<layout type="log4net.Layout.RawTimeStampLayout" />
		</parameter>
		<parameter>
			<parameterName value="@thread" />
			<dbType value="String" />
			<size value="255" />
			<layout type="log4net.Layout.PatternLayout">
				<conversionPattern value="%thread" />
			</layout>
		</parameter>
		<parameter>
			<parameterName value="@log_level" />
			<dbType value="String" />
			<size value="50" />
			<layout type="log4net.Layout.PatternLayout">
				<conversionPattern value="%level" />
			</layout>
		</parameter>
		<parameter>
			<parameterName value="@logger" />
			<dbType value="String" />
			<size value="255" />
			<layout type="log4net.Layout.PatternLayout">
				<conversionPattern value="%logger" />
			</layout>
		</parameter>
		<parameter>
			<parameterName value="@message" />
			<dbType value="String" />
			<size value="4000" />
			<layout type="log4net.Layout.PatternLayout">
				<conversionPattern value="%message" />
			</layout>
		</parameter>
		<parameter>
			<parameterName value="@exception" />
			<dbType value="String" />
			<size value="2000" />
			<layout type="log4net.Layout.ExceptionLayout" />
		</parameter>
	</appender>

	<root>

		<!--控制级别,由低到高: ALL|DEBUG|INFO|WARN|ERROR|FATAL|OFF-->
		<!--OFF:0-->
		<!--FATAL:FATAL-->
		<!--ERROR: ERROR,FATAL-->
		<!--WARN: WARN,ERROR,FATAL-->
		<!--INFO: INFO,WARN,ERROR,FATAL-->
		<!--DEBUG: INFO,WARN,ERROR,FATAL-->
		<!--ALL: DEBUG,INFO,WARN,ERROR,FATAL-->
		<priority value="ALL"/>

		<level value="INFO"/>
		<appender-ref ref="rollingAppender" />
		<appender-ref ref="AdoNetAppender_SqlServer" />
	</root>
</log4net>
Step3:初始化数据库日志表
建表SQL如下
USE [master]
GO

/*
  创建数据库LogManager
*/
CREATE DATABASE [LogManager];


GO
ALTER DATABASE [LogManager] SET COMPATIBILITY_LEVEL = 150
GO
IF (1 = FULLTEXTSERVICEPROPERTY('IsFullTextInstalled'))
begin
EXEC [LogManager].[dbo].[sp_fulltext_database] @action = 'enable'
end
GO
ALTER DATABASE [LogManager] SET ANSI_NULL_DEFAULT OFF
GO
ALTER DATABASE [LogManager] SET ANSI_NULLS OFF
GO
ALTER DATABASE [LogManager] SET ANSI_PADDING OFF
GO
ALTER DATABASE [LogManager] SET ANSI_WARNINGS OFF
GO
ALTER DATABASE [LogManager] SET ARITHABORT OFF
GO
ALTER DATABASE [LogManager] SET AUTO_CLOSE OFF
GO
ALTER DATABASE [LogManager] SET AUTO_SHRINK OFF
GO
ALTER DATABASE [LogManager] SET AUTO_UPDATE_STATISTICS ON
GO
ALTER DATABASE [LogManager] SET CURSOR_CLOSE_ON_COMMIT OFF
GO
ALTER DATABASE [LogManager] SET CURSOR_DEFAULT  GLOBAL
GO
ALTER DATABASE [LogManager] SET CONCAT_NULL_YIELDS_NULL OFF
GO
ALTER DATABASE [LogManager] SET NUMERIC_ROUNDABORT OFF
GO
ALTER DATABASE [LogManager] SET QUOTED_IDENTIFIER OFF
GO
ALTER DATABASE [LogManager] SET RECURSIVE_TRIGGERS OFF
GO
ALTER DATABASE [LogManager] SET  DISABLE_BROKER
GO
ALTER DATABASE [LogManager] SET AUTO_UPDATE_STATISTICS_ASYNC OFF
GO
ALTER DATABASE [LogManager] SET DATE_CORRELATION_OPTIMIZATION OFF
GO
ALTER DATABASE [LogManager] SET TRUSTWORTHY OFF
GO
ALTER DATABASE [LogManager] SET ALLOW_SNAPSHOT_ISOLATION OFF
GO
ALTER DATABASE [LogManager] SET PARAMETERIZATION SIMPLE
GO
ALTER DATABASE [LogManager] SET READ_COMMITTED_SNAPSHOT OFF
GO
ALTER DATABASE [LogManager] SET HONOR_BROKER_PRIORITY OFF
GO
ALTER DATABASE [LogManager] SET RECOVERY FULL
GO
ALTER DATABASE [LogManager] SET  MULTI_USER
GO
ALTER DATABASE [LogManager] SET PAGE_VERIFY CHECKSUM
GO
ALTER DATABASE [LogManager] SET DB_CHAINING OFF
GO
ALTER DATABASE [LogManager] SET FILESTREAM( NON_TRANSACTED_ACCESS = OFF )
GO
ALTER DATABASE [LogManager] SET TARGET_RECOVERY_TIME = 60 SECONDS
GO
ALTER DATABASE [LogManager] SET DELAYED_DURABILITY = DISABLED
GO
ALTER DATABASE [LogManager] SET ACCELERATED_DATABASE_RECOVERY = OFF
GO
EXEC sys.sp_db_vardecimal_storage_format N'LogManager', N'ON'
GO
ALTER DATABASE [LogManager] SET QUERY_STORE = OFF
GO
USE [LogManager]
GO
/****** Object:  Table [dbo].[Log4Net]    Script Date: 2021/11/26 10:56:35 ******/
SET ANSI_NULLS ON
GO
SET QUOTED_IDENTIFIER ON
GO

/*
  创建Log4net的表
*/

CREATE TABLE [dbo].[Log4Net](
	[Id] [int] IDENTITY(1,1) NOT NULL,
	[Date] [datetime] NOT NULL,
	[Thread] [varchar](255) NOT NULL,
	[Level] [varchar](50) NOT NULL,
	[Logger] [varchar](255) NOT NULL,
	[Message] [varchar](4000) NOT NULL,
	[Exception] [varchar](2000) NULL
) ON [PRIMARY]
GO
/****** Object:  Table [dbo].[NLog]    Script Date: 2021/11/26 10:56:35 ******/
SET ANSI_NULLS ON
GO
SET QUOTED_IDENTIFIER ON
GO
Step4:注入写日志测试
测试成功
ISS
安装配置
1、IIS安装
2、ASPNETCore 部署IIS 程序包安装
https://dotnet.microsoft.com/download/dotnet/6.0
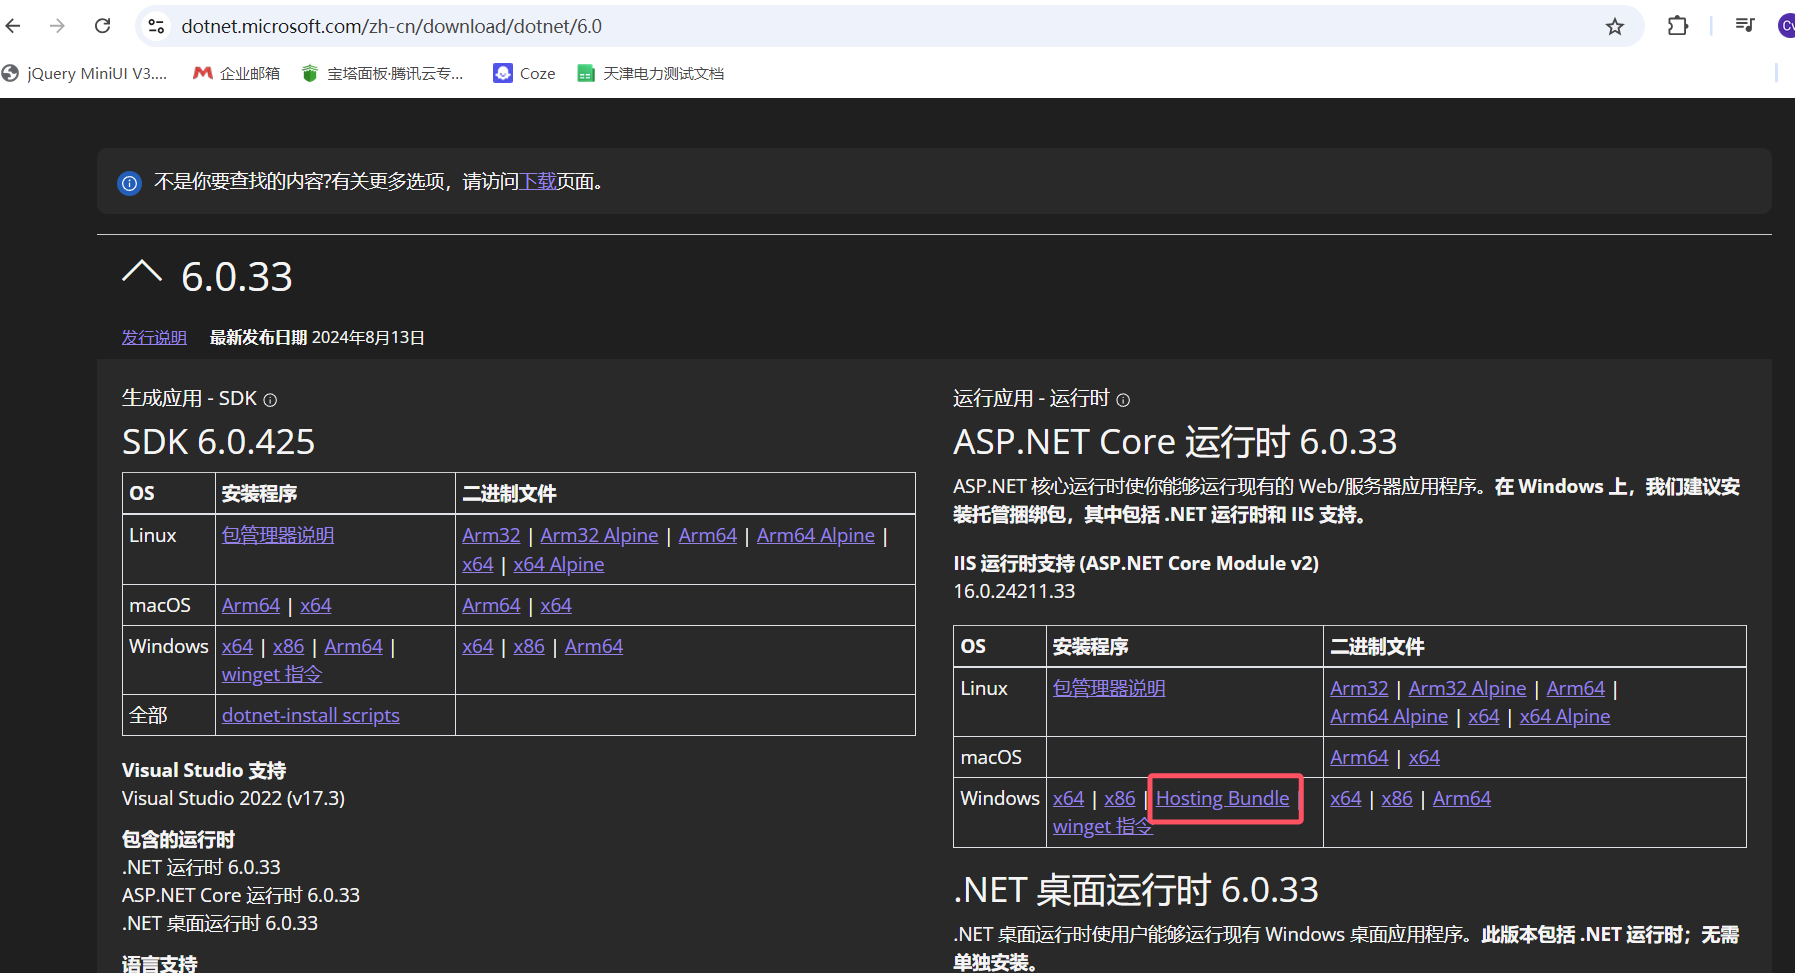
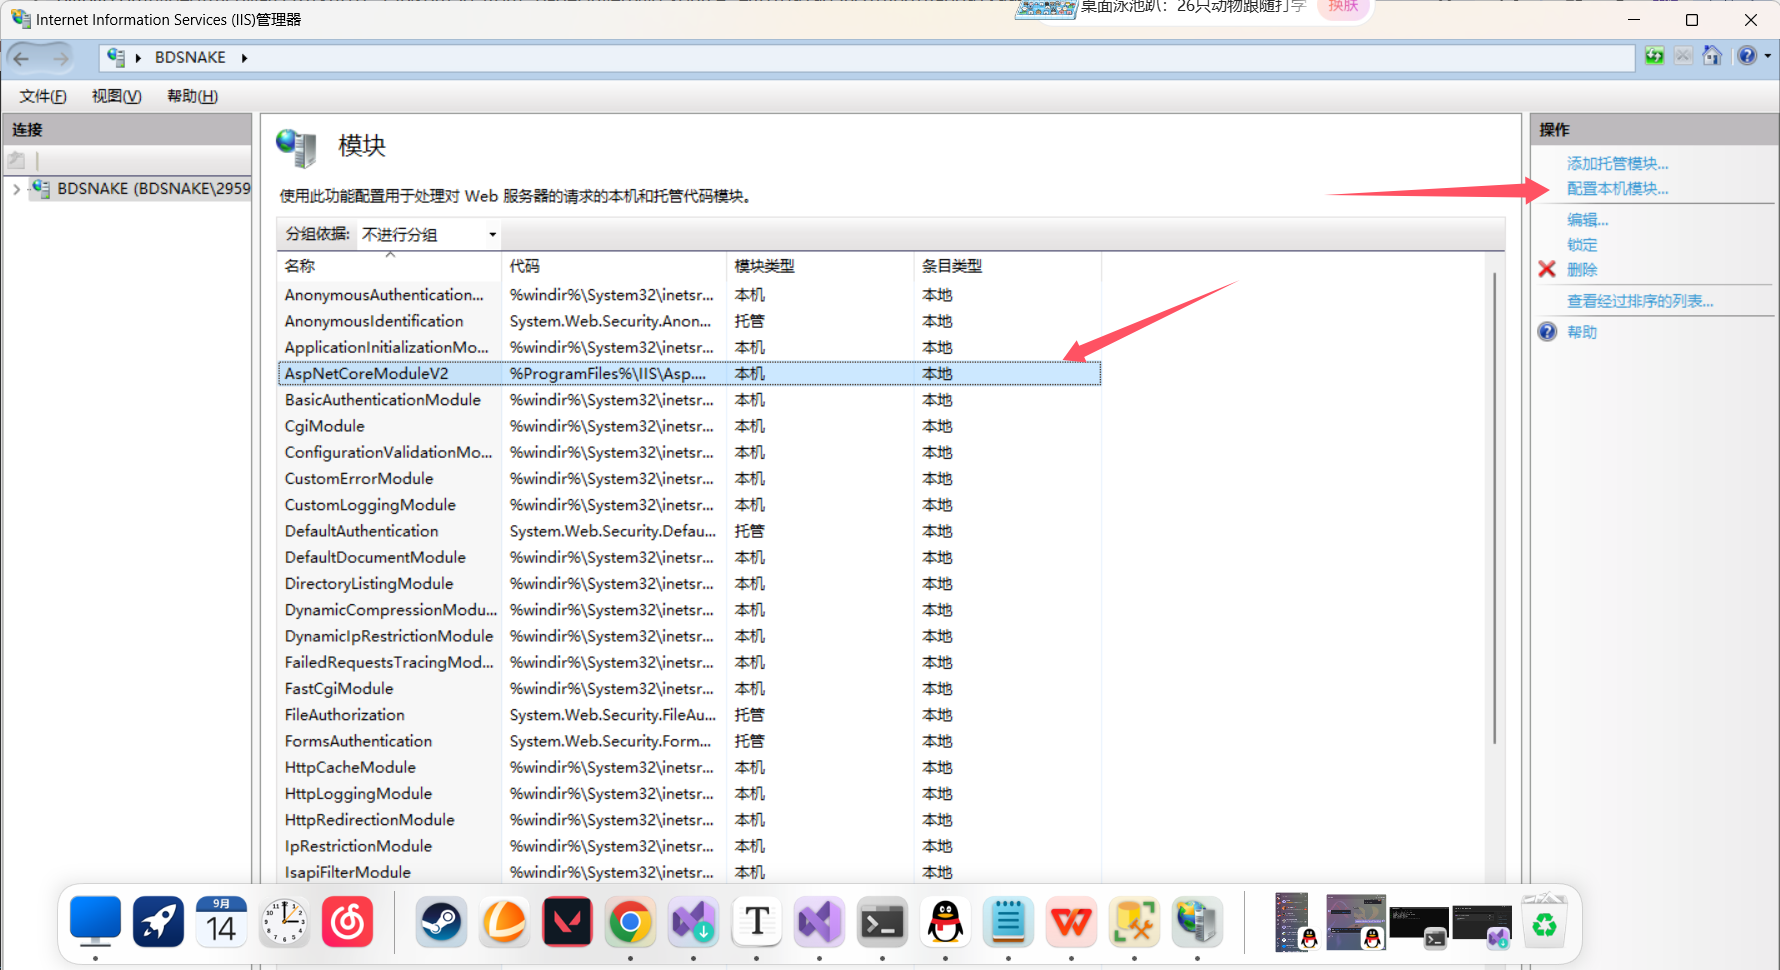
3、配置IIS
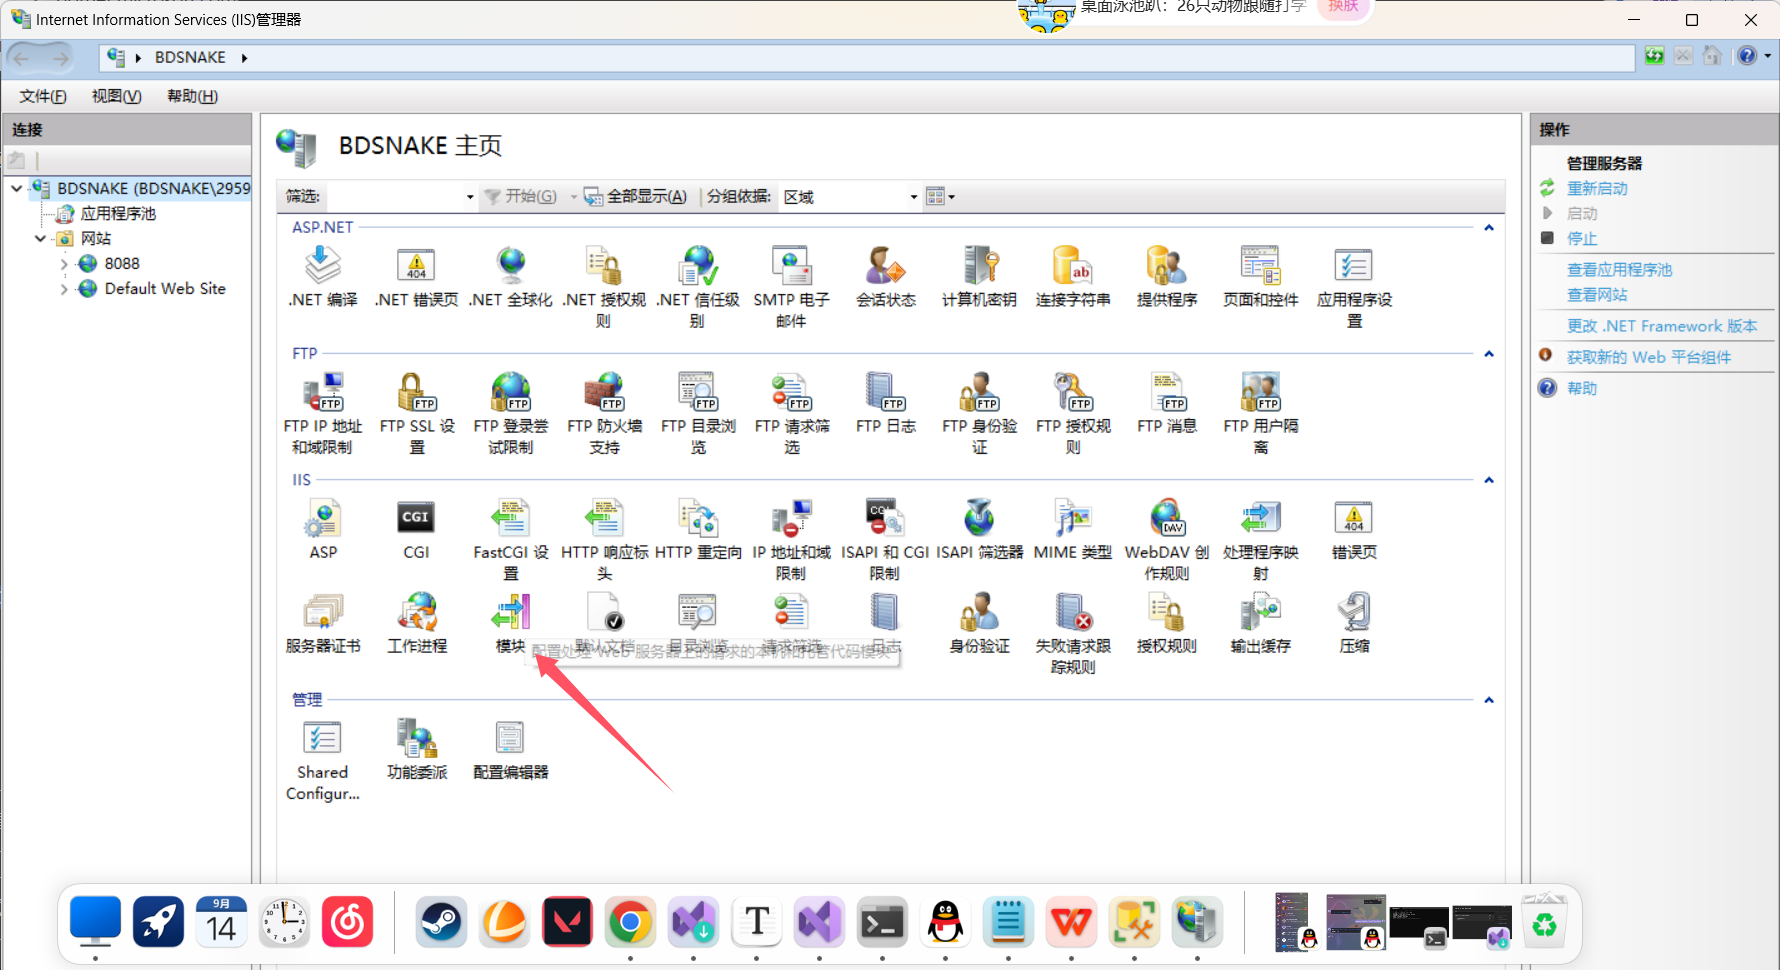
确保添加这个模块
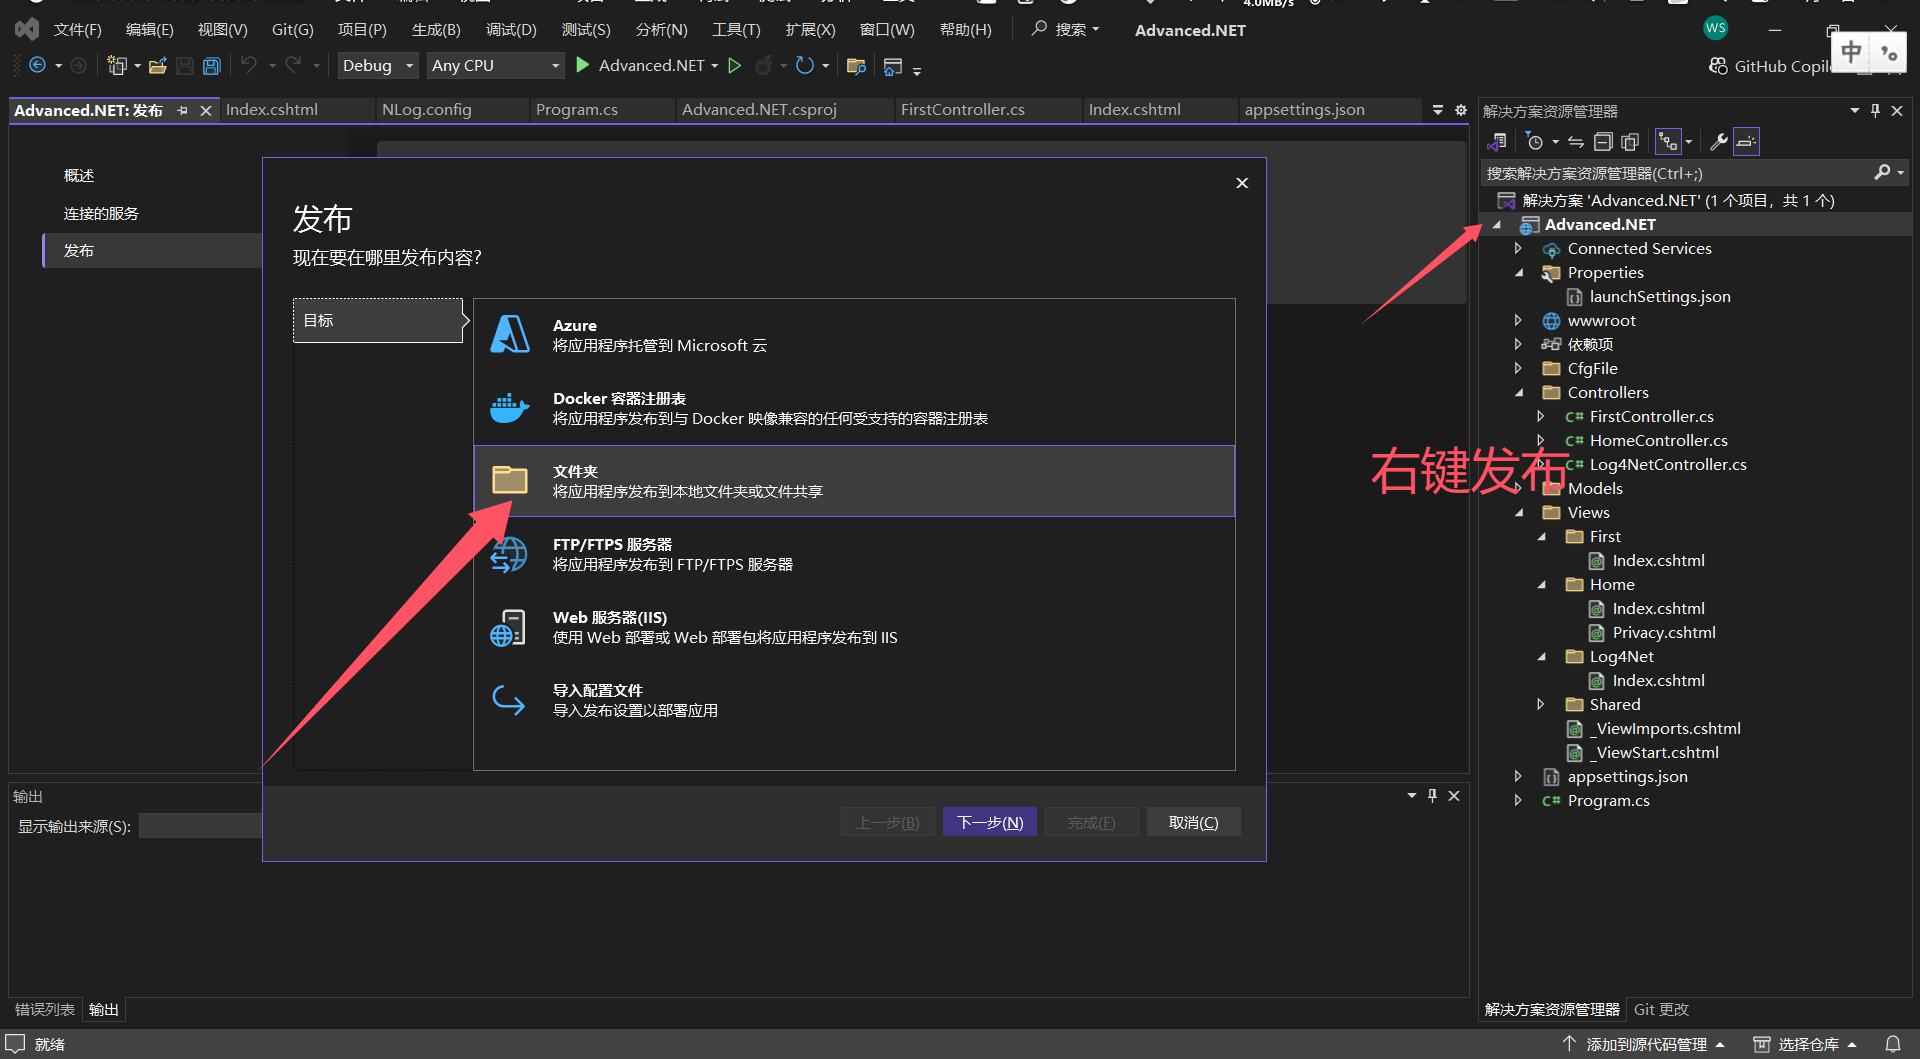
发布网站
Step1:发布项目
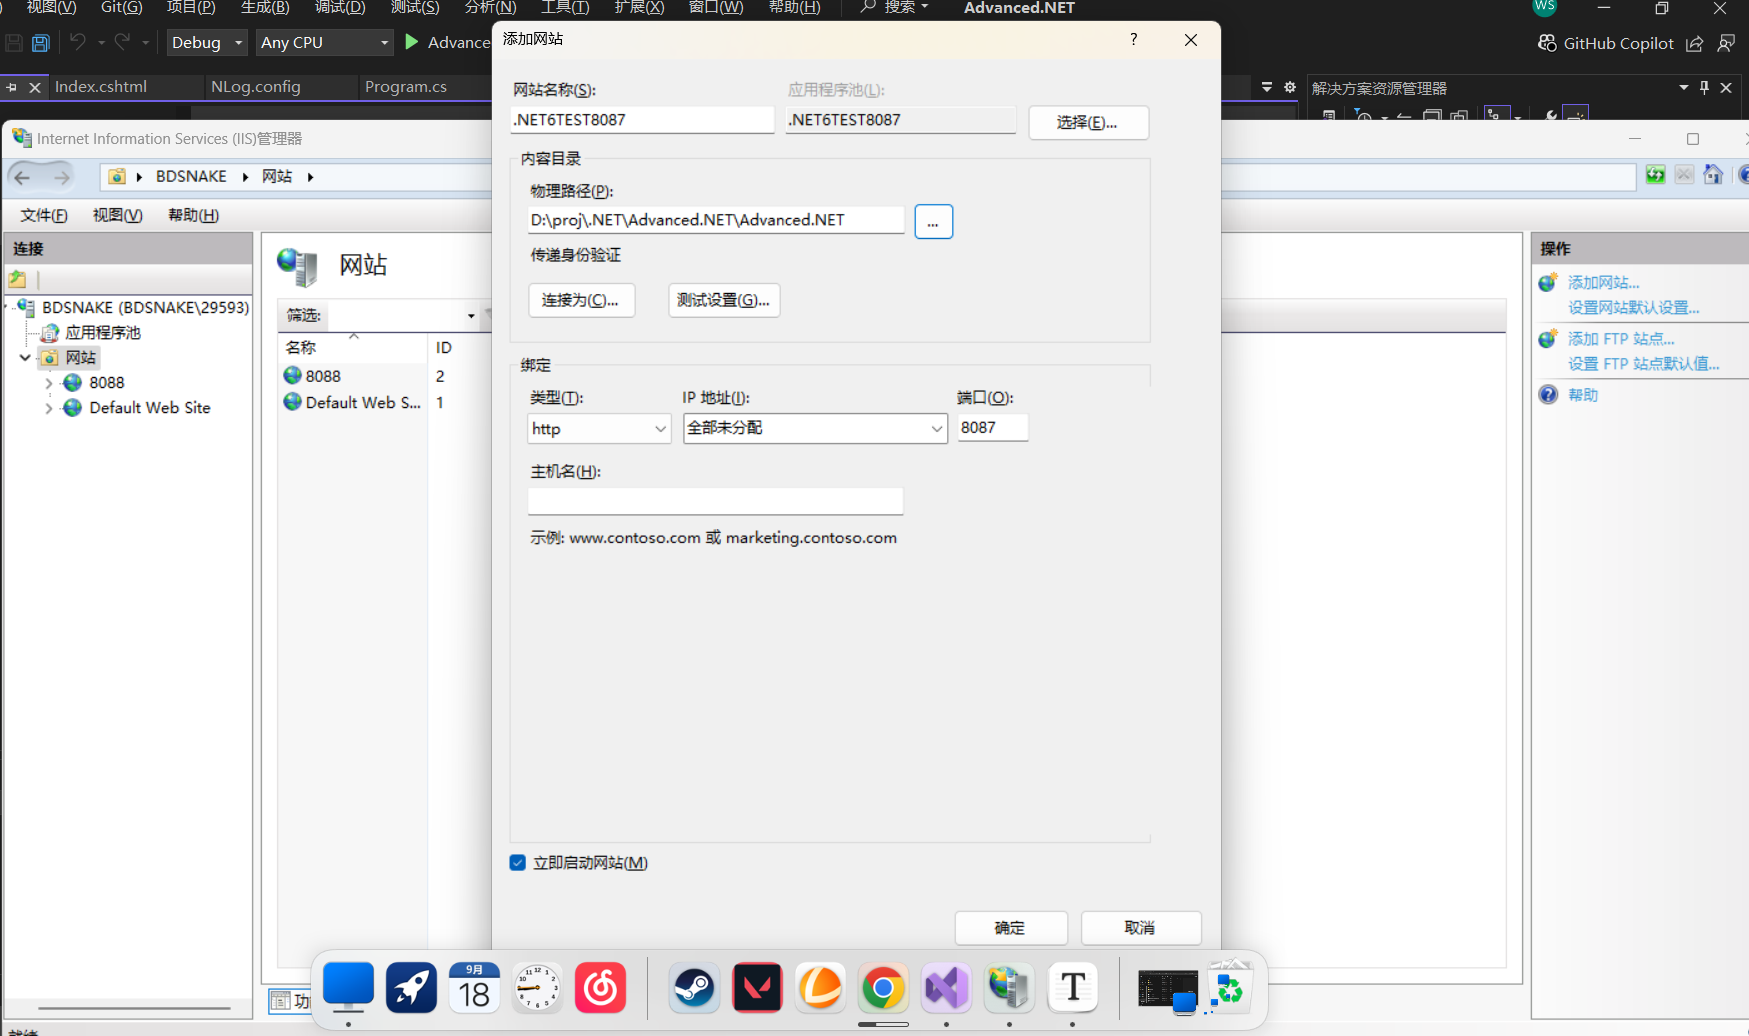
添加网站
图里路径不对,应该填发布的目录。填错了可点开在高级设置里改
AOP应用
参考博客:https://www.cnblogs.com/JohnTang
前言:带async的是异步版本,也是微软推荐使用的。
缓存、日志、返回结果封装只是这几个接口或类的常用功能,并不代表只能做这样的功能
- 授权过滤器(Authorization filters)
- 资源过滤器(Resource filters) 多用于缓存
- 操作过滤器(Action filters) 多用于日志
- 异常过滤器(Exception filters)
- 结果过滤器(Result filters) 多用于包装返回Json
IResourceFilter
接口介绍
IResourceFilter(资源缓存同步)
IResourceFilter扩展
ASP.NET Core6提供的是接口IResourceFilter
必须是自定义扩展 通过一个特性的支持
作用是做同步缓存
执行顺序
A 先执行OnResourceExecuting(在xx资源之前)
B 再执行构造函数
C 执行Action
D 最后执行OnResourceExecuted(在xx资源之后)
实现
缓存构造步骤
1定义一个缓存区域
2请求过来后进行判断,如果有缓存返回缓存里的值,如果没有缓存则进行处理
3把处理的结果加入缓存中
1定义特性类
名称以Attribute结尾(标记特性时可以省略),继承Attribute、IResourceFilter(并实现该接口)
public class CustomCacheResourceFilterAttribute : Attribute, IResourceFilter
2定义静态字典做缓存
private static Dictionary<string, object> _dictionary = new Dictionary<string, object>();
3 OnResourceExecuting(在xx资源之前)
如果缓存中有值,证明不是第一次,读取缓存中的值
简单实现:标记为Attribute 并实现IResourceFIlter接口
创建工具类设置缓存规则,这里以时间为例
using Microsoft.AspNetCore.Mvc.Filters;

namespace Advanced.NET.Utils
{
    public class CustomCacheResourceFilterAttribute : Attribute, IResourceFilter
    {
        //创建缓存字典
        private static Dictionary<string, object> CacheDictionary = new Dictionary<string, object>();
        //执行前
        public void OnResourceExecuting(ResourceExecutingContext context)
        {
            string cacheKey = context.HttpContext.Request.Path;
            if (CacheDictionary.ContainsKey(cacheKey))
            {
                context.Result = (Microsoft.AspNetCore.Mvc.IActionResult?)CacheDictionary[cacheKey];
            }
            //throw new NotImplementedException();
        }
        //执行后

        public void OnResourceExecuted(ResourceExecutedContext context)
        {
            string key = context.HttpContext.Request.Path;
            if (context.Result != null)
                CacheDictionary[key] = context.Result;
            //throw new NotImplementedException();
        }
    }
}
创建Controller与视图测试
using Advanced.NET.Utils;
using Microsoft.AspNetCore.Mvc;

namespace Advanced.NET.Controllers
{
    public class CacheResourceController : Controller
    {
        [CustomCacheResourceFilter]
        public IActionResult Index()
        {
            ViewBag.Date = DateTime.Now.ToString("yyyy-MM-dd HH:mm:ss");
            return View();
        }
    }
}
@*
    For more information on enabling MVC for empty projects, visit https://go.microsoft.com/fwlink/?LinkID=397860
*@
@{
}

<h1>后端返回:@ViewBag.Date</h1>
<h2>实时获取:@DateTime.Now.ToString("yyyy-MM-dd HH:mm:ss")</h2>
IAsyncResourceFilter
简介
IAsyncResourceFilter(资源缓存异步)
IAsyncResourceFilter扩展
ASP.NET Core6提供的是接口IAsyncResourceFilter
必须是自定义扩展 通过一个特性的支持
作用是做异步缓存
执行顺序
实现的接口里有个委托参数,执行这个委托(就是执行构造方法和Action方法),所以需要以这个委托执行为界限,可在之前或者之后添加
需要执行的。
实现
缓存构造步骤
1定义一个缓存区域
2请求过来后进行判断,如果有缓存返回缓存里的值,如果没有缓存则进行处理
3把处理的结果加入缓存中
实现IAsyncResourceFilter
1定义特性类
名称以Attribute结尾(标记特性时可以省略),继承Attribute、IAsyncResourceFilter(并实现该接口)
public class CustomCacheAsyncResourceFilterAttribute : Attribute, IAsyncResourceFilter
2定义静态字典做缓存
3 判断缓存
判断缓存中是否有key,如果有将值取出值
如果没有值,则将值加入到缓存中去
//异步的时候,建设使用 async +await,
ResourceExecutedContext resource = await next.Invoke();//这句话的执行就是去执行控制器的构造函数+Action方法
代码示例
工具类
using Microsoft.AspNetCore.Mvc;
using Microsoft.AspNetCore.Mvc.Filters;

namespace Advanced.NET.Utils
{
    public class CustomCacheAsyncResourceFilterAttribute : Attribute, IAsyncResourceFilter
    {
        //1定义一个缓存区域
        //2请求过来后进行判断,如果有缓存返回缓存里的值,如果没有缓存则进行处理
        //3把处理的结果加入缓存中

        private static Dictionary<string, object> _dictionary = new Dictionary<string, object>();

        public async Task OnResourceExecutionAsync(ResourceExecutingContext context, ResourceExecutionDelegate next)
        {
            Console.WriteLine("CustomCacheAsyncResourceFilterAttribute.OnResourceExecutionAsync Before");

            string key = context.HttpContext.Request.Path;
            //在xx资源之前
            if (_dictionary.ContainsKey(key))
            {
                context.Result = (IActionResult)_dictionary[key];
            }
            else
            {
                //next是一个委托,执行委托Invoke();
                //查看委托的返回类型为Task<ResourceExecutedContext>
                // Task<ResourceExecutedContext> resource = next.Invoke();

                //异步的时候,建设使用 async +await,
                ResourceExecutedContext resource = await next.Invoke();//这句话的执行就是去执行控制器的构造函数+Action方法
                //在xx资源之后
                if (resource.Result != null)
                {
                    _dictionary[key] = resource.Result;
                }

            }
        }
    }
}
控制器
[CustomCacheAsyncResourceFilter]
public IActionResult Index1()
{
    {
        //此处是处理的业务逻辑,或返回的处理结果 省略..........
    }
    ViewBag.Date = DateTime.Now.ToString("yyyy-MM-dd HH:mm:ss");
    return View();
}
前端
@*
    For more information on enabling MVC for empty projects, visit https://go.microsoft.com/fwlink/?LinkID=397860
*@
@{
    ViewData["Title"] = "Index2";
}

<h1>Index2</h1>
<h3>来自于控制器的计算结果:@ViewBag.Date</h3>
<h3>视图中实际计算的结果:@DateTime.Now.ToString("yyyy-MM-dd HH:mm:ss")</h3>
IActionFilter
简介
IAcIActionFilter(日志同步实现)
IActionFilter概念
ASP.NET Core6提供的是接口IActionFilter/ActionFilterAttribute
系统框架提供的抽象(接口(同步实现和异步实现)/抽象类),可以是自定义扩展,也可以直接使用
通过一个特性的支持
作用是做日志,更加贴合Action,缓存也能做,但是专人做专事,用它来做日志会更好
执行顺序
A 先执行构造函数
B 再执行OnActionExecuting(在xxAction之前)
C 执行Action
D 最后执行OnActionExecuted(在xxAction之后)
实现
定义特性类
名称以Attribute结尾(标记特性时可以省略),继承Attribute、IActionFilter(并实现该接口)
public class CustomIActionFilecuting(ActionExecutingContext context)
这里的执行顺序会是在构造函数执行以后,Action执行之前执行
3 OnActionExecuted(在xxAcion之后)
public void OnActionExecuted(ActionExecutedContext context)
这里的执行顺序会是在Action执行完毕以后执行
5 加入特性标记
在需要做日志的方法上标记特性
代码
/// <summary>

    /// ActionFilter写入Log4net

    /// </summary>

    public class CustomIActionFilterAttribute : Attribute, IActionFilter

    {


        //构造函数注入1:创建只读私有私有属性

        private readonly ILogger<CustomIActionFilterAttribute> _logger;


        /// <summary>

        /// 构造函数赋值

        /// </summary>

        /// <param name="logger"></param>

        public CustomIActionFilterAttribute(ILogger<CustomIActionFilterAttribute> logger)

        {


            this._logger = logger;

        }


        /// <summary>

        /// 在xxAction 之后

        /// </summary>

        /// <param name="context"></param>

        /// <exception cref="NotImplementedException"></exception>

        public void OnActionExecuted(ActionExecutedContext context)

        {

            Console.WriteLine("之后");

            var controllerName = context.HttpContext.GetRouteValue("controller");

            var actionName = context.HttpContext.GetRouteValue("action");

            var result = Newtonsoft.Json.JsonConvert.SerializeObject(context.Result);

            _logger.LogInformation($"执行{controllerName}控制器的{actionName}方法,结果是:{result}");

        }


        /// <summary>

        /// 在xxAction之前

        /// </summary>

        /// <param name="context"></param>

        /// <exception cref="NotImplementedException"></exception>

        public void OnActionExecuting(ActionExecutingContext context)

        {

            var para = context.HttpContext.Request.QueryString.Value;

            var controllerName = context.HttpContext.GetRouteValue("controller");

            var actionName = context.HttpContext.GetRouteValue("action");

            _logger.LogInformation($"执行{controllerName}控制器的{actionName}方法,参数是:{para}");

            Console.WriteLine("之前");

        }

    }
控制器
[TypeFilter(typeof(CustomIActionFilterAttribute))]
        public IActionResult index3(int id )
        {

            ViewBag.user = Newtonsoft.Json.JsonConvert.SerializeObject(new
            {
                Id = id,
                Name = "John--ViewBag",
                Age = 18
            });

            ViewData["UserInfo"] = Newtonsoft.Json.JsonConvert.SerializeObject(new
            {
                Id = id,
                Name = "John --ViewData",
                Age = 18
            });

            return View();
        }
IActionFilter更适合做日志的原因
更加贴合Action
这一点我们可以从执行的顺序可以看到,IAction的执行顺序是先执行构造函数,再执行OnActionExecuting(在xxAction之前),然后执行
Action,执行完毕后再执行最后执行OnActionExecuted(在xxAction之后)。IAction将Action包裹且最贴近,比如前台传递过来的值,或许经过一系列处理后,值发生了变化,而IActionFilter无疑是可以记录最真实的
IAsyncActionFilter
简介
ASP.NET Core6提供的是接口IAsyncActionFilter/ActionFilterAttribute
系统框架提供的抽象(接口(异步实现)/抽象类),可以是自定义扩展,也可以直接使用
通过一个特性的支持
作用是做日志,更加贴合Action,缓存也能做,但是专人做专事,用它来做日志会更好
执行顺序
实现的接口里有个委托参数,执行这个委托(就是执行Action方法),所以需要以这个委托执行为界限,可在之前或者之后添加
需要执行的。
实现
实现接口
public async Task OnActionExecutionAsync(ActionExecutingContext context, ActionExecutionDelegate next)
执行next委托就会执行Action,以这个委托执行为界限,可在之前或者之后添加
需要执行的。
加入特性标记
在需要做日志的方法上标记特性
    [TypeFilter(typeof(CustomIAsyncActionFilterAttribute))]

    public IActionResult index3(int id ){

      return View();

    }
异步Filter
using Microsoft.AspNetCore.Mvc.Filters;

namespace WebApplication1.Untity.Filters
{

    /// <summary>
    /// 异步ActionFilter
    /// </summary>
    public class CustomIAsyncActionFilterAttribute : Attribute, IAsyncActionFilter
    {


        //构造函数注入
        private readonly ILogger<CustomIAsyncActionFilterAttribute> _logger;
        public CustomIAsyncActionFilterAttribute(ILogger<CustomIAsyncActionFilterAttribute> logger)
        {
            this._logger = logger;
        }

        /// <summary>
        /// 实现接口方法
        /// </summary>
        /// <param name="context"></param>
        /// <param name="next">执行委托就会执行Action</param>
        /// <returns></returns>
        public async Task OnActionExecutionAsync(ActionExecutingContext context, ActionExecutionDelegate next)
        {
            var para = context.HttpContext.Request.QueryString.Value;
            var controllerName = context.HttpContext.GetRouteValue("controller");
            var actionName = context.HttpContext.GetRouteValue("action");


            _logger.LogInformation($"执行{controllerName}控制器的{actionName}方法,参数是:{para}");
            Console.WriteLine("之前");

            ActionExecutedContext executedContext = await next.Invoke();//这里就是执行Action
            Console.WriteLine("之后");
            var result = Newtonsoft.Json.JsonConvert.SerializeObject(executedContext.Result);
            _logger.LogInformation($"执行{controllerName}控制器的{actionName}方法,结果是:{result}");

        }
    }
}
测试
//[TypeFilter(typeof(CustomIActionFilterAttribute))]
        [TypeFilter(typeof(CustomIAsyncActionFilterAttribute))]
        public IActionResult index3(int id )
        {

            ViewBag.user = Newtonsoft.Json.JsonConvert.SerializeObject(new
            {
                Id = id,
                Name = "John--ViewBag",
                Age = 18
            });

            ViewData["UserInfo"] = Newtonsoft.Json.JsonConvert.SerializeObject(new
            {
                Id = id,
                Name = "John --ViewData",
                Age = 18
            });

            object description = "参数测试啊啊啊啊";

            return View(description);
        }
IResultFIlter
简介
IResultFilter同步过滤器与IAsyncResultFilter异步过滤器常常被用作于渲染视图或处理结果。
IResultFilter同步过滤器执行顺序:
1:执行控制器中的构造函数,实例化控制器
2:执行具体的Action方法
3:执行ResultFilter.OnResultExecuting方法
4:渲染视图或处理结果
5:执行ResultFilter.OnResultExecuted方法
IActionFilter同步过滤器与IAsyncActionFilter异步过滤器处理Json数据或Ajax数据。
实现
控制器代码
        /// <summary>
        /// Get请求
        /// 应用ResultFilter扩展
        /// Home控制器的Index
        /// </summary>
        /// <returns>Index视图</returns>
        [HttpGet]
        [ResultFilter]
public IActionResult TestResult()
{
    return Json(new
    {
        Name = "BDsnake",
        Id = 123,
        Age = 18
    });
}
ResultFilter
using Advanced.NET.Models;
using Microsoft.AspNetCore.Mvc;
using Microsoft.AspNetCore.Mvc.Filters;

namespace Advanced.NET.Utils
{
    public class CustomResultFilterAttribute : Attribute, IResultFilter
    {
        /// <summary>
        /// 在XXX执行之前
        /// </summary>
        /// <param name="context"></param>
        /// <exception cref="NotImplementedException"></exception>
        public void OnResultExecuting(ResultExecutingContext context)
        {
            if (context.Result is JsonResult)
            {
                JsonResult result = (JsonResult)context.Result;
                context.Result = new JsonResult(new AjaxResult()
                {
                    Success = true,
                    Message = "Ok",
                    Data = result.Value
                });
            }
        }
        /// <summary>
        /// 在XXX执行之后
        /// </summary>
        /// <param name="context"></param>
        /// <exception cref="NotImplementedException"></exception>
        public void OnResultExecuted(ResultExecutedContext context)
        {
            Console.WriteLine("在XXX执行之后ResultFilter.OnResultExecuted方法");
        }
    }


}
}
AjaxResult
namespace Study_ASP.NET_Core_MVC.Models
{
    public class AjaxResult
    {
        /// <summary>
        /// 初始化结果
        /// </summary>
        public bool Success { get; set; }
        /// <summary>
        /// 初始化结果信息
        /// </summary>
        public string? Message { get; set; }
        /// <summary>
        /// 初始化结果数据
        /// </summary>
        public object? Data { get; set; }
    }
}
得到输出
{
  "success": true,
  "message": "Ok",
  "data": {
    "name": "BDsnake",
    "id": 123,
    "age": 18
  }
}
IAsyncResultFIlter
简介
略
实现
控制器
        /// <summary>
        /// Get请求
        /// 应用ResultAsyncFilter扩展
        /// Home控制器的Index
        /// </summary>
        /// <returns>Index视图</returns>
        [HttpGet]
        [ResultAsyncFilter]
        public IActionResult Index()
        {
            return Json(new
            {
                Id = 123456,
                Name = "Vin Cente",
                Age = 28
            });
        }
FIlter
using Microsoft.AspNetCore.Mvc;
using Microsoft.AspNetCore.Mvc.Filters;
using Study_ASP.NET_Core_MVC.Models;

namespace Study_ASP.NET_Core_MVC.Utility.Filters
{
    public class ResultAsyncFilter : Attribute, IAsyncResultFilter
    {
        /// <summary>
        /// 在XXX执行时
        /// </summary>
        /// <param name="context"></param>
        /// <param name="next"></param>
        /// <returns></returns>
        /// <exception cref="NotImplementedException"></exception>
        public async Task OnResultExecutionAsync(ResultExecutingContext context, ResultExecutionDelegate next)
        {
            if (context.Result is JsonResult)
            {
                JsonResult result = (JsonResult)context.Result;
                context.Result = new JsonResult(new AjaxResult()
                {
                    Success = true,
                    Message = "Ok",
                    Data = result.Value
                });
            }
            await next.Invoke();
        }
    }
}
AjaxResult
namespace Study_ASP.NET_Core_MVC.Models
{
    public class AjaxResult
    {
        /// <summary>
        /// 初始化结果
        /// </summary>
        public bool Success { get; set; }
        /// <summary>
        /// 初始化结果信息
        /// </summary>
        public string? Message { get; set; }
        /// <summary>
        /// 初始化结果数据
        /// </summary>
        public object? Data { get; set; }
    }
}
Action/Result FIlterAttribute
简介
官方预制
包含ActionFIlter和ResultFilter的多种实现
重写ActionFilterAttribute即可实现上文Action与Result切面。
注意如果同时重写异步和同步方法,则只执行异步
包含方法:
OnActionExecuting OnActionExecuted OnActionExecutionAsync
OnResultExecuting OnResultExecuted OnResultExecutionAsync
恰好与上文对应
源码
// Licensed to the .NET Foundation under one or more agreements.
// The .NET Foundation licenses this file to you under the MIT license.

using System;
using System.Threading.Tasks;

namespace Microsoft.AspNetCore.Mvc.Filters
{
    /// <summary>
    /// An abstract filter that asynchronously surrounds execution of the action and the action result. Subclasses
    /// should override <see cref="OnActionExecuting"/>, <see cref="OnActionExecuted"/> or
    /// <see cref="OnActionExecutionAsync"/> but not <see cref="OnActionExecutionAsync"/> and either of the other two.
    /// Similarly subclasses should override <see cref="OnResultExecuting"/>, <see cref="OnResultExecuted"/> or
    /// <see cref="OnResultExecutionAsync"/> but not <see cref="OnResultExecutionAsync"/> and either of the other two.
    /// </summary>
    [AttributeUsage(AttributeTargets.Class | AttributeTargets.Method, AllowMultiple = true, Inherited = true)]
    public abstract class ActionFilterAttribute :
        Attribute, IActionFilter, IAsyncActionFilter, IResultFilter, IAsyncResultFilter, IOrderedFilter
    {
        /// <inheritdoc />
        public int Order { get; set; }

        /// <inheritdoc />
        public virtual void OnActionExecuting(ActionExecutingContext context)
        {
        }

        /// <inheritdoc />
        public virtual void OnActionExecuted(ActionExecutedContext context)
        {
        }

        /// <inheritdoc />
        public virtual async Task OnActionExecutionAsync(
            ActionExecutingContext context,
            ActionExecutionDelegate next)
        {
            if (context == null)
            {
                throw new ArgumentNullException(nameof(context));
            }

            if (next == null)
            {
                throw new ArgumentNullException(nameof(next));
            }

            OnActionExecuting(context);
            if (context.Result == null)
            {
                OnActionExecuted(await next());
            }
        }

        /// <inheritdoc />
        public virtual void OnResultExecuting(ResultExecutingContext context)
        {
        }

        /// <inheritdoc />
        public virtual void OnResultExecuted(ResultExecutedContext context)
        {
        }

        /// <inheritdoc />
        public virtual async Task OnResultExecutionAsync(
            ResultExecutingContext context,
            ResultExecutionDelegate next)
        {
            if (context == null)
            {
                throw new ArgumentNullException(nameof(context));
            }

            if (next == null)
            {
                throw new ArgumentNullException(nameof(next));
            }

            OnResultExecuting(context);
            if (!context.Cancel)
            {
                OnResultExecuted(await next());
            }
        }
    }
}
IAlwaysRunResultFilterAttribute/Action同
简介
上文Resource相关Filter中,获取到缓存后就不在调用Controller构造函数和方法。但如果我们还想获取到一些非缓存数据?
此接口是在获取到结果前后一定会调用的,不管是否获取到了缓存
当我们需要获取缓存外的数据时可用此方法
using Microsoft.AspNetCore.Mvc.Filters;

namespace Advanced.NET.Utils
{
    public class CustomAlwaysRunResultFilterAttribute : Attribute, IAlwaysRunResultFilter
    {
        public void OnResultExecuted(ResultExecutedContext context)
        {
            //throw new NotImplementedException();
        }

        public void OnResultExecuting(ResultExecutingContext context)
        {
            //throw new NotImplementedException();
        }
    }
}
ExceptionFIlter
参考文档:https://blog.youkuaiyun.com/nmmking/article/details/139025585
ExceptionFilter 扩展
同步异常的执行特点:
如果实现ActionFilterAttribute抽象父类,在执行的时候,只会执行异步版本的方法(在源码中他是直接判断了,如果有异步版本,同步版本就不执行了)。
CustomExceptionFilterAttribute 同时实现 IExceptionFilter 和 IAsyncExceptionFilter,会使用 OnExceptionAsync 异步方法。
    public class CustomExceptionFilterAttribute : Attribute, IExceptionFilter,IAsyncExceptionFilter
    {
        /// <summary>
        /// 当有异常发生的时候,就会触发到这里
        /// </summary>
        /// <param name="context"></param>
        /// <exception cref="NotImplementedException"></exception>
        public void OnException(ExceptionContext context)
        {
            throw new NotImplementedException();
        }

        /// <summary>
        /// 当有异常发生的时候,就会触发到这里
        /// </summary>
        /// <param name="context"></param>
        /// <returns></returns>
        /// <exception cref="NotImplementedException"></exception>
        public Task OnExceptionAsync(ExceptionContext context)
        {
            throw new NotImplementedException();
        }
    }
ExceptionFilter封装扩展
异常的标准处理方式
    public class CustomExceptionFilterAttribute : Attribute, IExceptionFilter,IAsyncExceptionFilter
    {
        private readonly IModelMetadataProvider _IModelMetadataProvider;
        public CustomExceptionFilterAttribute(IModelMetadataProvider modelMetadataProvider)
        {
            this._IModelMetadataProvider = modelMetadataProvider;
        }

        /// <summary>
        /// 当有异常发生的时候,就会触发到这里
        /// </summary>
        /// <param name="context"></param>
        /// <exception cref="NotImplementedException"></exception>
        public void OnException(ExceptionContext context)
        {
            if (context.ExceptionHandled == false)
            {
                //在这里就开始处理异常--还是要响应结果给客户端
                //1.页面展示
                //2.包装成一个JSON格式
                if (IsAjaxRequest(context.HttpContext.Request)) //判断是否是Ajax请求--JSON
                {
                    //JSON返回
                    context.Result = new JsonResult(new
                    {
                        Succeess = false,
                        Message = context.Exception.Message
                    });
                }
                else
                {
                    //返回页面
                    ViewResult result = new ViewResult { ViewName = "~/Views/Shared/Error.cshtml" };
                    result.ViewData = new ViewDataDictionary(_IModelMetadataProvider, context.ModelState);
                    result.ViewData.Add("Exception", context.Exception);
                    context.Result = result; //断路器---只要对Result赋值--就不继续往后了;
                }
                context.ExceptionHandled = true;//表示当前异常被处理过
            }
        }

        /// <summary>
/// 当有异常发生的时候,就会触发到这里
/// </summary>
/// <param name="context"></param>
/// <returns></returns>
/// <exception cref="NotImplementedException"></exception>
public async Task OnExceptionAsync(ExceptionContext context)
{
    if (context.ExceptionHandled == false)
    {
        //在这里就开始处理异常--还是要响应结果给客户端
        //1.页面展示
        //2.包装成一个JSON格式
        if (IsAjaxRequest(context.HttpContext.Request)) //判断是否是Ajax请求--JSON
        {
            //JSON返回
            context.Result = new JsonResult(new
            {
                Succeess = false,
                Message = context.Exception.Message
            });
        }
        else
        {
            //返回页面
            ViewResult result = new ViewResult { ViewName = "~/Views/Shared/Error.cshtml" };
            result.ViewData = new ViewDataDictionary(_IModelMetadataProvider, context.ModelState);
            result.ViewData.Add("Exception", context.Exception);
            context.Result = result; //断路器---只要对Result赋值--就不继续往后了;
        }
        context.ExceptionHandled = true;//表示当前异常被处理过
    }
    await Task.CompletedTask;
}

        private bool IsAjaxRequest(HttpRequest request)
        {
            //HttpWebRequest httpWebRequest = null;
            //httpWebRequest.Headers.Add("X-Requested-With", "XMLHttpRequest");
            string header = request.Headers["X-Requested-With"];
            return "XMLHttpRequest".Equals(header);
        }

    }
测试
        #region ExceptionFilter
        [TypeFilter(typeof(CustomExceptionFilterAttribute))]
        public IActionResult Index7()
        {
            throw new Exception("测试,抛出一个异常");
        }
        #endregion
异常页面
@model ErrorViewModel
@{
    Exception exception = ViewData["Exception"] as Exception;
}

<h1>Error.</h1>
@if (exception != null)
{
    <h3>@exception.Message</h3>
}
ExceptionFilter覆盖范围
Action出现没有处理的异常
        /// <summary>
        /// Action出现没有处理的异常
        /// </summary>
        /// <returns></returns>
        /// <exception cref="Exception"></exception>
        [TypeFilter(typeof(CustomExceptionFilterAttribute))]
        public IActionResult Index8()
        {
            throw new Exception(" Action出现没有处理的异常");
        }
Action出现已经处理的异常
这里不会跳转到异常页
        /// <summary>
        /// Action出现已经处理的异常
        /// </summary>
        /// <returns></returns>
        [TypeFilter(typeof(CustomExceptionFilterAttribute))]
        public IActionResult Index9()
        {
            try
            {
                throw new Exception(" Action出现已经处理的异常");
            }
            catch (Exception)
            {
                return View();
            }
        }
Service层的异常
可以捕获异常
        /// <summary>
        /// Service层的异常
        /// </summary>
        /// <returns></returns>
        [TypeFilter(typeof(CustomExceptionFilterAttribute))]
        public IActionResult Index10()
        {
            new ExceptionInFoService().Show();
            return View();
        }
    public class ExceptionInFoService
    {
        public void Show()
        {
            throw new Exception("Service层的异常     ");
        }
    }
View绑定时出现了异常
        /// <summary>
        /// View绑定时出现了异常
        /// </summary>
        /// <returns></returns>
        /// <exception cref="Exception"></exception>
        [TypeFilter(typeof(CustomExceptionFilterAttribute))]
        public IActionResult Index11()
        {
            return View();
        }
这里出现的异常是捕捉不到的
不存在的Url地址
捕捉不到异常
其他Filter中发生的异常
如果在 Action过滤器发生异常,CustomExceptionFilterAttribute可以捕获,Resource过滤器 和Result过滤器发生异常时, CustomExceptionFilterAttribute可以捕获不到。
        /// <summary>
        ///其他Filter中发生的异常
        /// </summary>
        /// <returns></returns>
        /// <exception cref="Exception"></exception>

        [TypeFilter(typeof(CustomExceptionFilterAttribute))]
     /*  [TypeFilter(typeof(CustomLogActionFilterAttribute))] */  //Action中发生异常---可以捕捉到
       // [TypeFilter(typeof(CustomCacheResourceFilterAttribute))]   //Resource中发生异常--捕捉不到
        [TypeFilter(typeof(CustomResultFilterAttribute))]   //Result中发生异常 ---捕捉不到的
        public IActionResult Index12()
        {
            return View();
        }
ExceptionFilter未捕捉到的异常处理
中间件支持 放到Program.cs里
综合支持可以捕捉到所有的异常
ExceptionFilter+中间件==处理所有的异常
#region 中间件处理异常
{
    ///如果Http请求中的Response中的状态不是200,就会进入Home/Error中;
    app.UseStatusCodePagesWithReExecute("/Home/Error/{0}");//只要不是200 都能进来

    //下面这个是自己拼装一个Reponse 输出
    app.UseExceptionHandler(errorApp =>
    {
        errorApp.Run(async context =>
        {
            context.Response.StatusCode = 200;
            context.Response.ContentType = "text/html";
            await context.Response.WriteAsync("<html lang=\"en\"><body>\r\n");
            await context.Response.WriteAsync("ERROR!<br><br>\r\n");
            var exceptionHandlerPathFeature =
                context.Features.Get<IExceptionHandlerPathFeature>();

            Console.WriteLine("&&&&&&&&&&&&&&&&&&&&&&&&&&&&&&&&&&&&&&&&&");
            Console.WriteLine($"{exceptionHandlerPathFeature?.Error.Message}");
            Console.WriteLine("&&&&&&&&&&&&&&&&&&&&&&&&&&&&&&&&&&&&&&&&&");

            if (exceptionHandlerPathFeature?.Error is FileNotFoundException)
            {
                await context.Response.WriteAsync("File error thrown!<br><br>\r\n");
            }
            await context.Response.WriteAsync("<a href=\"/\">Home</a><br>\r\n");
            await context.Response.WriteAsync("</body></html>\r\n");
            await context.Response.WriteAsync(new string(' ', 512)); // IE padding
        });
    });
}
#endregion
FIlter注册的几种方式
按照作用范围可分为 全局注册 控制器注册 方法注册
在 ASP.NET Core 中,过滤器(Filters)是一种在 MVC 应用程序中运行代码的方法,可以在操作(Actions)执行之前或之后运行。过滤器可以应用于控制器(Controllers)或特定的操作方法。过滤器可以用来实现跨切面的逻辑,比如异常处理、授权、缓存、日志等。
有几种类型的过滤器:
授权过滤器(Authorization filters)
资源过滤器(Resource filters)
操作过滤器(Action filters)
异常过滤器(Exception filters)
结果过滤器(Result filters)
自定义过滤器通常通过实现特定的过滤器接口来创建,如 IAuthorizationFilter, IResourceFilter, IActionFilter, IExceptionFilter, IResultFilter,或者通过继承 Filter 的抽象类,如 ActionFilterAttribute。
过滤器的注入方式:
构造函数注入:在 ASP.NET Core 中,过滤器是通过依赖注入(DI)容器中注册的服务来解析的。这意味着可以在自定义过滤器的构造函数中注入所需的依赖。
示例:
public class MyCustomFilter : IActionFilter
{
    private readonly IMyDependency _myDependency;
public MyCustomFilter(IMyDependency myDependency)
{
    _myDependency = myDependency;
}

public void OnActionExecuting(ActionExecutingContext context)
{
    // 使用 _myDependency
}

public void OnActionExecuted(ActionExecutedContext context)
{
    // 其他逻辑
}
}
注: 这种方式要求过滤器本身也需要通过服务注册添加到 DI 容器:
services.AddScoped<IMyDependency, MyDependency>();
services.AddScoped<MyCustomFilter>();
服务查找:在过滤器内部通过服务定位器模式来解析服务。这通常在无法直接使用构造函数注入的情况下使用,例如使用属性注入或基于属性的过滤器。
示例:
public class MyCustomFilter : IActionFilter
{
    private IMyDependency _myDependency;
public void OnActionExecuting(ActionExecutingContext context)
{
    _myDependency = context.HttpContext.RequestServices.GetService<IMyDependency>();
    // 使用 _myDependency
}

public void OnActionExecuted(ActionExecutedContext context)
{
    // 其他逻辑
}
}
这种方法虽然方便,但有时会被认为是一个反模式,因为它违反了依赖注入的原则,并且使得依赖关系隐蔽而不是显式的。
通过 TypeFilter 或 ServiceFilter 属性注入:当你希望在过滤器属性中指定组件类型,并通过依赖注入容器来解析依赖时,可以使用 TypeFilter 或 ServiceFilter 属性。这两个属性允许您将服务添加到过滤器,并通过属性的方式应用到控制器或动作方法。
示例 (TypeFilter):
[TypeFilter(typeof(MyCustomFilter))]
public class MyController : Controller
{
    // 控制器动作
}

// 或者在 Action 上:

[TypeFilter(typeof(MyCustomFilter))]
public IActionResult MyAction()
{
    // 动作逻辑
}
示例 (ServiceFilter):
[ServiceFilter(typeof(MyCustomFilter))]
public class MyController : Controller
{
    // 控制器动作
}

// 或者在 Action 上:

[ServiceFilter(typeof(MyCustomFilter))]
public IActionResult MyAction()
{
    // 动作逻辑
}
注意 ServiceFilter 需要过滤器类型已经被注册到依赖注入容器。
使用 AddMvcOptions 或 AddControllers 添加全局过滤器:全局过滤器适用于所有控制器和操作方法。
services.AddControllers(options =>
{
    options.Filters.Add<MyCustomFilter>(); // 添加自定义全局过滤器
});
这些都是 ASP.NET Core 中注入自定义过滤器的常用方法。选择最佳方法主要取决于场景和需求,例如是否需要全局应用过滤器,或者是否希望通过依赖注入来解耦过滤器和它的依赖。
————————————————
原文链接:https://blog.youkuaiyun.com/qq_41942413/article/details/138143340
传统鉴权授权
背景
为了保护我们的服务器资源,给被访问的资源或接口添加限制,让每一个请求不能随意访问 服务或 API 或 Action 方法。一般的过程是用户在客户端登录确认身份,向服务器发送登录信息从而验证这个人是否有登录权限。
在ASP.NET中,授权(Authorization)是确定当前用户是否被允许访问特定资源的过程。授权通常在身份验证之后发生,确保用户具有执行某些操作的权限。
Http协议无状态
HTTP请求被设计为无状态协议,意味着每个请求都是独立的,服务器不会在两个请求之间保留任何上下文信息。这是为了简化服务器的设计和提高可伸缩性。然而,有几种方法可以在不同的HTTP请求之间共享信息:
- 使用Cookies:服务器可以在HTTP响应中设置Cookies,浏览器会存储这些Cookies并在后续的HTTP请求中将它们发送到服务器。
- 使用Session:在服务器端,可以为每个用户创建一个会话(session)对象来存储在不同请求之间需要共享的信息。
- 使用URL参数:在URL中传递信息,通常用于GET请求。
- 使用POST数据:POST请求可以在请求体中发送数据。
- 使用HTTP头部:可以自定义头部来传递额外的信息,如认证令牌等。
- 使用Web存储API:例如localStorage或sessionStorage,在客户端存储数据。
- 使用WebSockets:这是一个全双工通信协议,可以在客户端和服务器之间建立一个持续的连接,从而可以在多个请求之间共享状态。
基本配置
在
使用中间件:Program.cs中配置
app.UseAuthentication();
app.UseAuthorization();
配置
#region 配置鉴权
{
    builder.Services.AddAuthentication(option => {
        option.DefaultAuthenticateScheme = CookieAuthenticationDefaults.AuthenticationScheme;
        option.DefaultChallengeScheme = CookieAuthenticationDefaults.AuthenticationScheme;
        option.DefaultSignInScheme = CookieAuthenticationDefaults.AuthenticationScheme;
        option.DefaultForbidScheme = CookieAuthenticationDefaults.AuthenticationScheme;
        option.DefaultSignOutScheme = CookieAuthenticationDefaults.AuthenticationScheme;

    }).AddCookie(CookieAuthenticationDefaults.AuthenticationScheme,option
     =>
    {
        //如果没有找到用户信息,鉴权和授权都失败,就跳转到指定的Action
        option.LoginPath = "/TestAuth/Login";
    });
}
#endregion
控制器
using Microsoft.AspNetCore.Authentication.Cookies;
using Microsoft.AspNetCore.Authentication;
using Microsoft.AspNetCore.Authorization;
using Microsoft.AspNetCore.Mvc;
using System.Security.Claims;

namespace Advanced.NET.Controllers
{
    public class TestAuthController : Controller
    {
        /// <summary>
        /// 正常访问的页面
        /// </summary>
        /// <returns></returns>
        [Authorize]
        public IActionResult Index()
        {
            return View();
        }

        /// <summary>
        /// 登录页
        /// </summary>
        /// <returns></returns>
        [HttpGet]
        public IActionResult Login()
        {
            return View();
        }

        /// <summary>
        /// 提交
        /// </summary>
        /// <param name="name"></param>
        /// <param name="password"></param>
        /// <returns></returns>
        [HttpPost]
        public async Task<IActionResult> Login(string name, string password)
        {
            if ("yika".Equals(name) && "1".Equals(password))
            {
                var claims = new List<Claim>()//鉴别你是谁,相关信息
                    {
                        new Claim("Userid","1"),
                        new Claim(ClaimTypes.Role,"Admin"),
                        new Claim(ClaimTypes.Role,"User"),
                        new Claim(ClaimTypes.Name,$"{name}--来自于Cookies"),
                        new Claim(ClaimTypes.Email,$"19998888698@163.com"),
                        new Claim("password",password),//可以写入任意数据
                        new Claim("Account","Administrator"),
                        new Claim("role","admin"),
                         new Claim("QQ","1025025050")
                    };
                ClaimsPrincipal userPrincipal = new ClaimsPrincipal(new ClaimsIdentity(claims, "Customer"));
                HttpContext.SignInAsync(CookieAuthenticationDefaults.AuthenticationScheme, userPrincipal, new AuthenticationProperties
                {
                    ExpiresUtc = DateTime.UtcNow.AddMinutes(30),//过期时间:30分钟

                }).Wait();
                var user = HttpContext.User;
                return base.Redirect("/TestAuth/Index");
            }
            else
            {
                base.ViewBag.Msg = "用户或密码错误";
            }
            return await Task.FromResult<IActionResult>(View());
        }
    }
}
HttpContext.SignInAsync方法用于在 ASP.NET Core 中通过指定的身份验证方案(在这个例子中是CookieAuthenticationDefaults.AuthenticationScheme)对用户进行登录,并设置用户的身份信息(userPrincipal)和一些额外的认证属性(AuthenticationProperties)。代码解释:
CookieAuthenticationDefaults.AuthenticationScheme:使用 Cookie 身份验证方案,这是一种常见的基于 Cookie 的身份验证方式。userPrincipal:表示用户的身份信息,通常是ClaimsPrincipal对象,它包含用户的身份(例如用户名、角色等)。AuthenticationProperties:提供了一些认证相关的额外属性。在这个例子中,ExpiresUtc属性设置了 Cookie 的过期时间为当前时间加 30 分钟(即用户登录状态将持续 30 分钟)。.Wait():因为SignInAsync是一个异步方法,.Wait()用来强制同步等待该异步操作完成。总结
这段代码实现了使用 Cookie 对用户进行身份验证,并设置了该用户的登录状态将在 30 分钟后过期。
登录页
@using Advanced.NET.Models

@model CurrentUser
@{
    ViewBag.Title = "登录";
}

<h2>登录</h2>
<div class="row">
    <div class="col-md-8">
        <section id="loginForm">
            @using (Html.BeginForm("Login", "TestAuth", new { sid = "123", Account = "yika" },
            FormMethod.Post, true, new { @class = "form-horizontal", role = "form" }))
            {
                @Html.AntiForgeryToken()
                <hr />
                @Html.ValidationSummary(true)
                <div class="mb-3 row">
                    @Html.LabelFor(m => m.Name, new { @class = "col-sm-1 col-form-label" })
                    <div class="col-md-6">
                        @Html.TextBoxFor(m => m.Name, new { @class = "form-control", @placeholder = "请输入您的用户名" })
                    </div>
                </div>
                <div class="mb-3 row">
                    @Html.LabelFor(m => m.Password, new { @class = "col-md-1 control-label" })
                    <div class="col-md-6">
                        @Html.PasswordFor(m => m.Password, new { @class = "form-control", @placeholder = "请输入密码" })
                    </div>
                </div>
                <div class="mb-3 row">
                    <div class="col-md-offset-2 col-md-6">
                        <button type="submit" class="btn btn-primary mb-3">登录</button>
                        @base.ViewBag.Msg
                    </div>
                </div>
            }
        </section>
    </div>
</div>
角色授权
角色授权
Authorize配置
AuthenticationSchemes配置
- 在授权时,先要鉴权:找出用户信息,如果能找到用户信息,那就证明用户一定登录过。
- 这里要求不仅需要用户信息,而且还要有符合某些条件的用户信息,这样才能让请求访问资源。
- 可以在某个方法/控制器,标记角色,如果要访问这个方法,就必须登录。还要要求用户信息必须包含某个角色。
 [Authorize(AuthenticationSchemes = CookieAuthenticationDefaults.AuthenticationScheme, Roles = "Admin")]
 public IActionResult AdminIndex()
 {
     return View();
 }
 [Authorize(AuthenticationSchemes = CookieAuthenticationDefaults.AuthenticationScheme, Roles = "User")]
 public IActionResult UserIndex()
 {
     return View();
 }
没有权限时,指定跳转的页面
#region 配置鉴权
{
    builder.Services.AddAuthentication(option => {
        option.DefaultAuthenticateScheme = CookieAuthenticationDefaults.AuthenticationScheme;
        option.DefaultChallengeScheme = CookieAuthenticationDefaults.AuthenticationScheme;
        option.DefaultSignInScheme = CookieAuthenticationDefaults.AuthenticationScheme;
        option.DefaultForbidScheme = CookieAuthenticationDefaults.AuthenticationScheme;
        option.DefaultSignOutScheme = CookieAuthenticationDefaults.AuthenticationScheme;

    }).AddCookie(CookieAuthenticationDefaults.AuthenticationScheme, option
     =>
    {
        //如果没有找到用户信息,鉴权和授权都失败,就跳转到指定的Action
        option.LoginPath = "/TestAuth/Login";
        //没有权限,跳转到指定页面
        option.AccessDeniedPath = "/TestAuth/NoAuthority";
    });
}
#endregion
控制器添加 NoAuthority。
/// <summary>
/// 无权限页面
/// </summary>
/// <returns></returns>
public IActionResult NoAuthority()
{
    return View();
}
@model ErrorViewModel


@{
    var user = Context.User;
}

<h1 class="text-danger">Error.</h1>

<h3>对不起,没有权限</h3>
访问测试 略
角色授权多组合
标记多个Authorize
Login 方法中 claims 声明中包含了 Admin 和 User 角色。详细请见
给定不同的 Role,当前用户必须是同时包含 Admin、User 角色(并且关系),同时满足才能授权访问。
        [Authorize(AuthenticationSchemes = CookieAuthenticationDefaults.AuthenticationScheme, Roles = "Admin")]
        [Authorize(AuthenticationSchemes = CookieAuthenticationDefaults.AuthenticationScheme, Roles = "User")]
        public IActionResult Index1()
        {
            return View();
        }
标记一个Authorize
逗号分割多个 Role的信息,多个角色只要有一个角色是满足的就可以访问当前的方法,当前 Roles 用户信息包含 Admin 和 User两个角色(或则关系) 。
        [Authorize(AuthenticationSchemes = CookieAuthenticationDefaults.AuthenticationScheme, Roles = "Admin,User")]
        public IActionResult Index2()
        {
            return View();
        }
策略授权
角色授权是根据用户信息中的角色来判断,角色授权其实就是一种特殊的策略授权。
定义策略
在 Program 类中添加策略授权,包含Admin 角色。
#region 策略授权
{
    builder.Services.AddAuthorization(options =>
    {
        options.AddPolicy("rolePolicy",policyBuilder =>
        {
            policyBuilder.RequireRole("Admin");
        });
    });
}
#endregion
在控制器中配置
[Authorize(AuthenticationSchemes = CookieAuthenticationDefaults.AuthenticationScheme, Policy = "rolePolicy")]
public IActionResult Index3()
{
return View();
}
@{
}
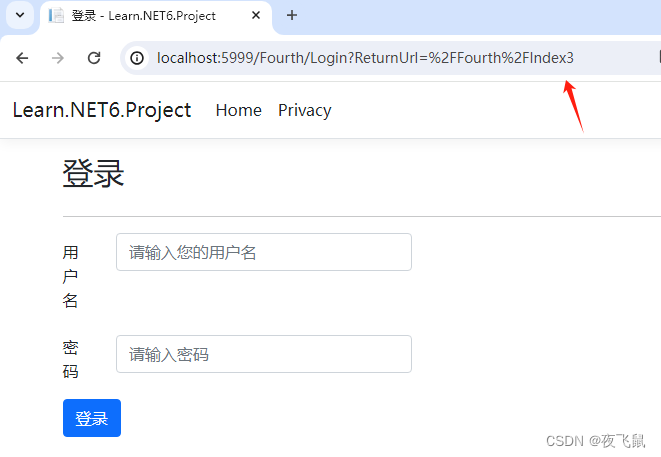
<h2>策略授权</h2>
在浏览器输入 http://localhost:5999/Fourth/Index3,没有登录回跳转到登录的页面;
在 Program 类中我们可以添加更为复杂的策略授权
#region 策略授权
{
    builder.Services.AddAuthorization(options =>
    {
        options.AddPolicy("rolePolicy",policyBuilder =>
        {
            //policyBuilder.RequireRole("Admin");
            policyBuilder.RequireClaim("Account"); // 必须包含某一个Claim
            policyBuilder.RequireAssertion(context =>
            {
                // 必须包含一个Role类型,第一个Claim角色类型为Admin,包括Name 类型的Claim
                bool bResult = context.User.HasClaim(c => c.Type == ClaimTypes.Role)
                    && context.User.Claims.First(c => c.Type.Equals(ClaimTypes.Role)).Value == "Admin"
                   && context.User.Claims.Any(c => c.Type == ClaimTypes.Name);

                return bResult;
            });
        });
    });
}
#endregion
代码解释:
1.
builder.Services.AddAuthorization:这行代码注册了授权服务,并允许你定义自定义的授权策略。
2.
options.AddPolicy("rolePolicy", policyBuilder => {...}):这部分代码定义了一个名为
"rolePolicy"的自定义授权策略。在这段代码中,策略的定义包含了两部分:RequireClaim和RequireAssertion。3.
policyBuilder.RequireClaim("Account"):这个方法要求用户必须包含一个类型为
"Account"的 Claim 才能满足授权条件。Claim 是一个键值对,用于存储关于用户的信息。4.
policyBuilder.RequireAssertion(context => {...}):这个方法允许你定义更加复杂的自定义授权逻辑。具体的逻辑是通过传入的
context参数中的User对象来实现的。
context.User.HasClaim(c => c.Type == ClaimTypes.Role): 检查用户是否拥有一个类型为ClaimTypes.Role(角色)的 Claim。context.User.Claims.First(c => c.Type.Equals(ClaimTypes.Role)).Value == "Admin": 获取用户第一个角色类型的 Claim,并检查它的值是否为"Admin"。context.User.Claims.Any(c => c.Type == ClaimTypes.Name): 检查用户是否拥有一个类型为ClaimTypes.Name的 Claim。bool bResult = ...: 结合以上三个条件,bResult的值为true表示用户通过了授权策略,false表示未通过。return bResult;: 返回bResult以决定用户是否满足该策略的授权要求。总结
这段代码定义了一个自定义授权策略
"rolePolicy",要求用户必须:
- 拥有一个类型为
"Account"的 Claim。- 拥有一个类型为
Role且值为"Admin"的 Claim。- 拥有一个类型为
Name的 Claim。只有当这三个条件都满足时,用户才能通过这个授权策略。
策略授权Requirement扩展
上述的授权全部都在固定的代码中,如果想要请求来了以后,通过用户信息,连接数据验证呢?
在 Learn.NET6.ExceptionService 层添加 IUserService 和 UserService:
    public class UserService : IUserService
    {

        public bool Validata(string userId, string qq)
        {
            //在这里去链接数据库去校验这个QQ是否正确

            return true;
        }
    }
    public interface IUserService
    {
        public bool Validata(string userId, string qq);
    }
添加Requirement扩展 验证
    public class QQEmailRequirement : IAuthorizationRequirement
    {
    }
    public class QQHandler : AuthorizationHandler<QQEmailRequirement>
    {

        private IUserService _UserService;

        public QQHandler(IUserService userService)
        {
            this._UserService = userService;
        }


        protected override Task HandleRequirementAsync(AuthorizationHandlerContext context, QQEmailRequirement requirement)
        {

            if (context.User.Claims.Count() == 0)
            {
                return Task.CompletedTask;
            }

            string userId = context.User.Claims.First(c => c.Type == "Userid").Value;
            string qq = context.User.Claims.First(c => c.Type == "QQ").Value;

            // 当做调用第三方服务

            if (_UserService.Validata(userId, qq))
            {
                context.Succeed(requirement); //验证通过了
            }
            //在这里就可以做验证

            return Task.CompletedTask;
        }
    }
在 Program 文件中添加策略授权:
#region 策略授权
{
    builder.Services.AddAuthorization(options =>
    {
        options.AddPolicy("rolePolicy",policyBuilder =>
        {
            //policyBuilder.RequireRole("Admin");
            //policyBuilder.RequireClaim("Account"); // 必须包含某一个Claim
            policyBuilder.RequireAssertion(context =>
            {
                // 必须包含一个Role类型,第一个Claim角色类型为Admin,包括Name 类型的Claim
                bool bResult = context.User.HasClaim(c => c.Type == ClaimTypes.Role)
                    && context.User.Claims.First(c => c.Type.Equals(ClaimTypes.Role)).Value == "Admin"
                   && context.User.Claims.Any(c => c.Type == ClaimTypes.Name);

                //UserService userService = new UserService();
                //userService.Validata();

                return bResult;
            });

            policyBuilder.AddRequirements(new QQEmailRequirement());
        });
    });

    // 注入
    builder.Services.AddTransient<IUserService, UserService>();
    builder.Services.AddTransient<IAuthorizationHandler, QQHandler>();
}
#endregion
注入
    builder.Services.AddTransient<IUserService, UserService>();
    builder.Services.AddTransient<IAuthorizationHandler, QQHandler>();
测试略
IOC与DI
IOC控制反转 DI依赖注入 讲到这两者就是分不开的
IOC简介
ASP.NET Core6 lOC容器
控制反转(Inversion of Control, IoC)是一种软件设计模式,其目的是降低代码之间的耦合度。在C#中,可以使用依赖注入(Dependency Injection, DI)来实现控制反转。
一般系统分为 UI 层、BLL 层、DAL 层、IBLL 层 和 IDAL 层,IOC 实质是通过抽象 IBLL(接口、抽象类、普通父类)获取BLL层的实例,如果使用依赖注入,那么各层的关系如下:
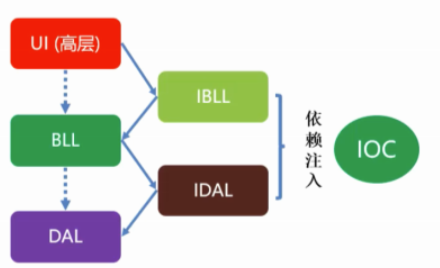
DI简介
在创建对象的实例时,如果对象A,依赖于对象B,对象B依赖于对象C,那么在创建对象A的时候,
自动的把对象C创建出来交给对象B,再把对象B创建出来交给对象A,从而创建出对象A。
可以在全局跟一个ioc容器,配置抽象和具体普通之间的关系的时候,可以修改,这里修改了,获取实例就获取新的实例。
依赖注入的过程解释
- IoC 容器的作用
IoC 容器的核心职责是管理对象的创建、配置及它们的依赖关系。在传统的编程模式下,类需要手动创建它所依赖的对象,而在使用 IoC 容器时,容器会根据配置自动创建并注入这些依赖对象。这一过程称为“依赖注入”。
- 服务注册
在 Program.cs 中,我们通过以下代码将 IMyService 和它的实现 MyService 注册到 IoC 容器中:
builder.Services.AddSingleton<IMyService, MyService>();
这句话做了两件事:
- 注册服务接口
IMyService:告诉容器,当需要IMyService的实例时,它应该提供什么。 - 指定服务的实现
MyService:告诉容器,当请求IMyService时,实际上应该返回MyService的实例。
- 构造函数注入的工作原理
当 HomeController 被创建时,.NET 的依赖注入框架会查看 HomeController 的构造函数,找到它的参数。它会看到 HomeController 的构造函数需要一个 IMyService 类型的参数:
public HomeController(IMyService myService)
{
    _myService = myService;
}
此时,框架会做以下几步:
-
查找服务注册:框架会查看 IoC 容器中的服务注册信息,找到
IMyService的实现类。在我们的注册中,IMyService对应的是MyService。 -
创建服务实例:框架会创建一个
MyService的实例,或者在AddSingleton的情况下,直接使用已经创建好的单例实例。 -
注入服务实例:框架将
MyService的实例作为参数传递给HomeController的构造函数。 -
为什么框架会自动注入?
框架自动注入的原因是依赖注入容器(IoC 容器)自动处理对象的生命周期和依赖关系。具体来说:
- 依赖关系的注册:通过
AddSingleton<IMyService, MyService>(),你明确告诉 IoC 容器,“每当你需要IMyService时,使用MyService来满足这个需求”。 - 对象的解析:当框架需要实例化
HomeController时,它会自动解析HomeController所依赖的对象(即IMyService),并从 IoC 容器中获取对应的实现(即MyService)。 - 对象的创建与注入:IoC 容器根据依赖关系的注册情况自动创建
MyService的实例,并将它注入到HomeController的构造函数中。
- 总结
当 HomeController 被请求时,框架会根据控制器的构造函数签名查找所需的依赖,并从 IoC 容器中获取这些依赖的实例(如 MyService)。由于 IMyService 已经在容器中注册为 MyService 的实现,框架会自动生成 MyService 的实例并注入到 HomeController 中。这一切的关键在于依赖关系的注册和 IoC 容器的解析能力。
WebAPI
创建
创建一个ASP.NET Core WebAPI 项目 直接运行
即可跳转到Swagger界面(已内置)
已存在示例控制器 Weatherforcast
swaggerui
封装注册代码
如果想自定义swagger可以做一个封装再放到配置里
/// <summary>
    /// swagger启动服务
    /// </summary>
    public static class SwaggerSetUp
    {
        public static void AddSwaggerSetup(this IServiceCollection services)
        {
            if (services == null)
                throw new ArgumentNullException(nameof(services));

            var ApiName = "Web.Core";

            services.AddSwaggerGen(c =>
            {
                c.SwaggerDoc("V1", new OpenApiInfo
                {
                    // {ApiName} 定义成全局变量,方便修改
                    Version = "V1",
                    Title = $"{ApiName} 接口文档——.NetCore 6.0",
                    Description = $"{ApiName} HTTP API V1",
                });
                c.OrderActionsBy(o => o.RelativePath);

            });

        }
    }
//注册swagger
builder.Services.AddSwaggerSetup();
if (app.Environment.IsDevelopment())
{
    app.UseDeveloperExceptionPage();
}

app.UseSwagger();
app.UseSwaggerUI(c =>
{
    c.SwaggerEndpoint($"/swagger/V1/swagger.json", $"Web.Core.API V1");

    //路径配置,设置为空,表示直接在根域名(localhost:8001)访问该文件,注意localhost:8001/swagger是访问不到的,去launchSettings.json把launchUrl去掉,如果你想换一个路径,直接写名字即可,比如直接写c.RoutePrefix = "doc";
    c.RoutePrefix = "ocs";
});
显示接口注释
属性-勾选此项
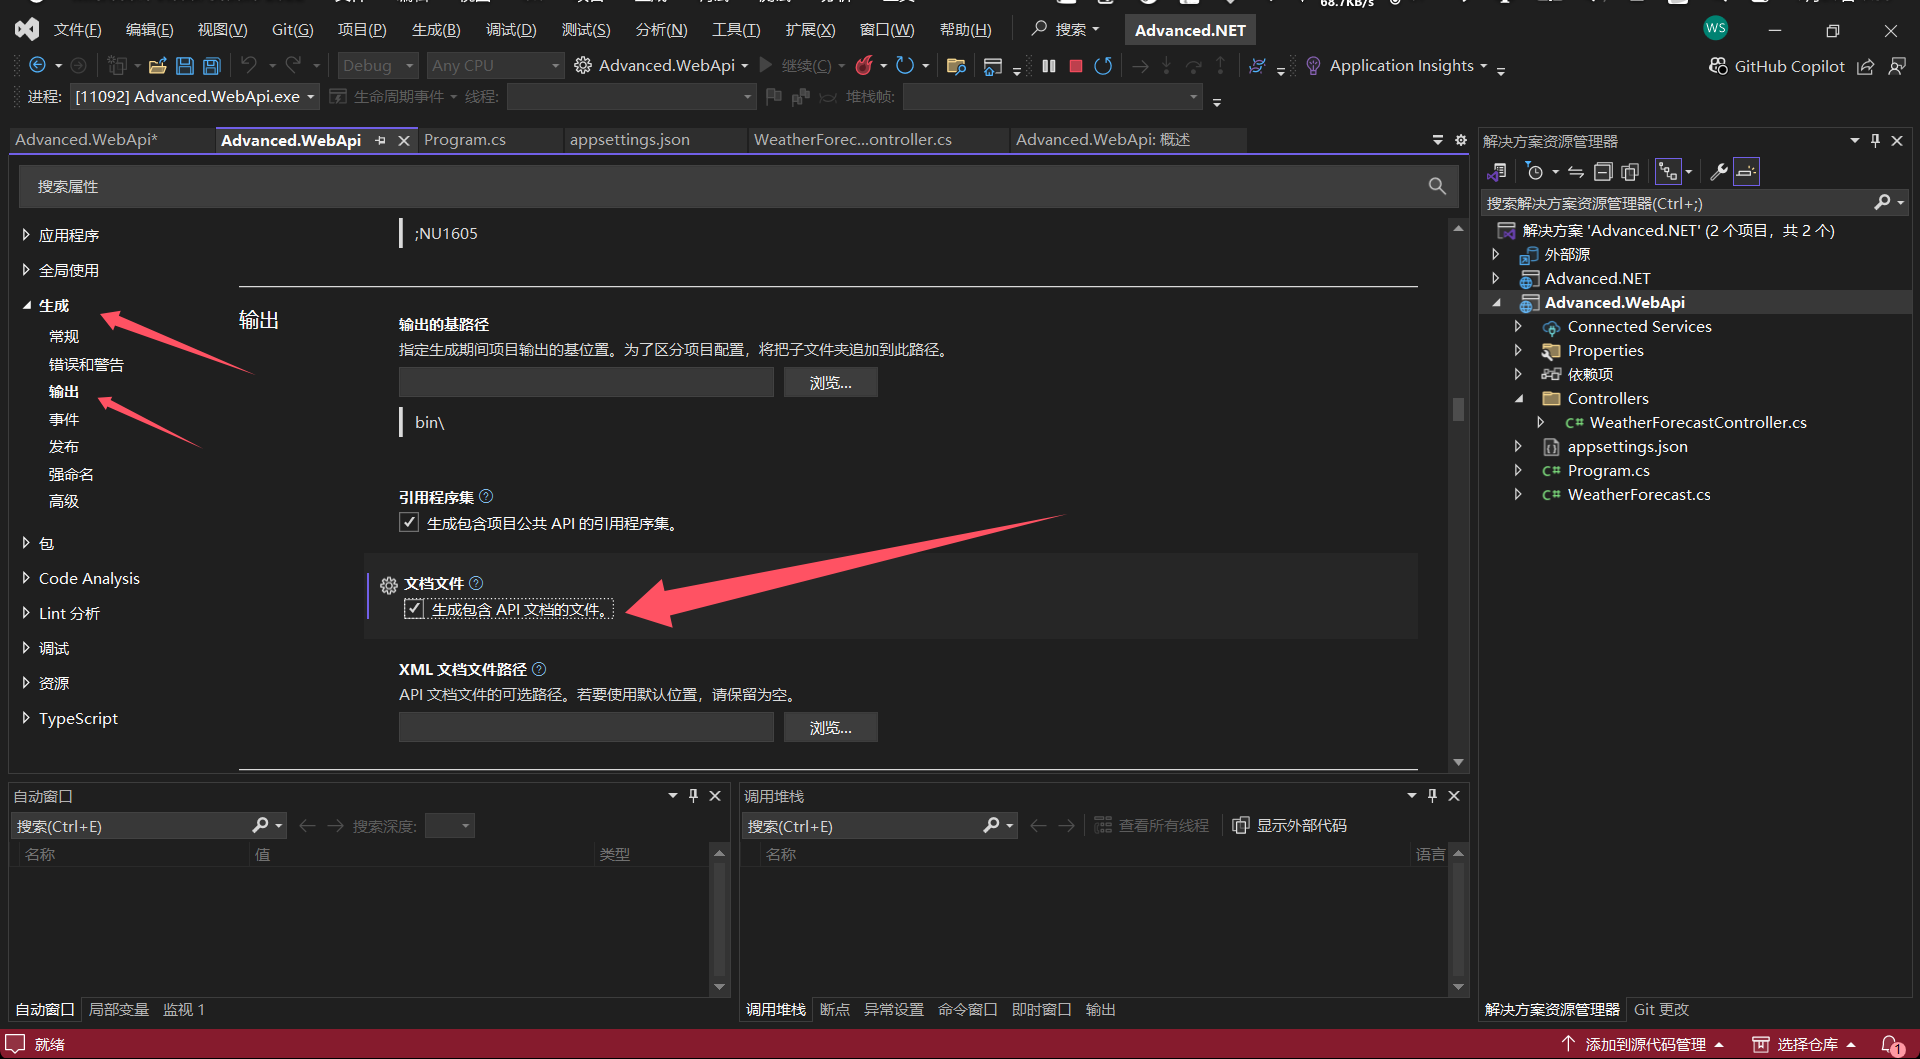
然后重新运行,会生成
在SwaggerSetup添加代码
services.AddSwaggerGen(c =>
            {
                c.SwaggerDoc("V1", new OpenApiInfo
                {
                    // {ApiName} 定义成全局变量,方便修改
                    Version = "V1",
                    Title = $"{ApiName} 接口文档——.NetCore 6.0",
                    Description = $"{ApiName} HTTP API V1",
                });
                c.OrderActionsBy(o => o.RelativePath);

                var xmlPath = Path.Combine(AppContext.BaseDirectory, "Web.Core.API.xml");//这个就是刚刚配置的xml文件名
                c.IncludeXmlComments(xmlPath, true);//默认的第二个参数是false,这个是controller的注释,记得修改
            });
这时添加的注释就可以显示了,设置完swagger页面路径(这里是docs) 可以再去lauchSettings.json里把运行后默认跳转页面改一下
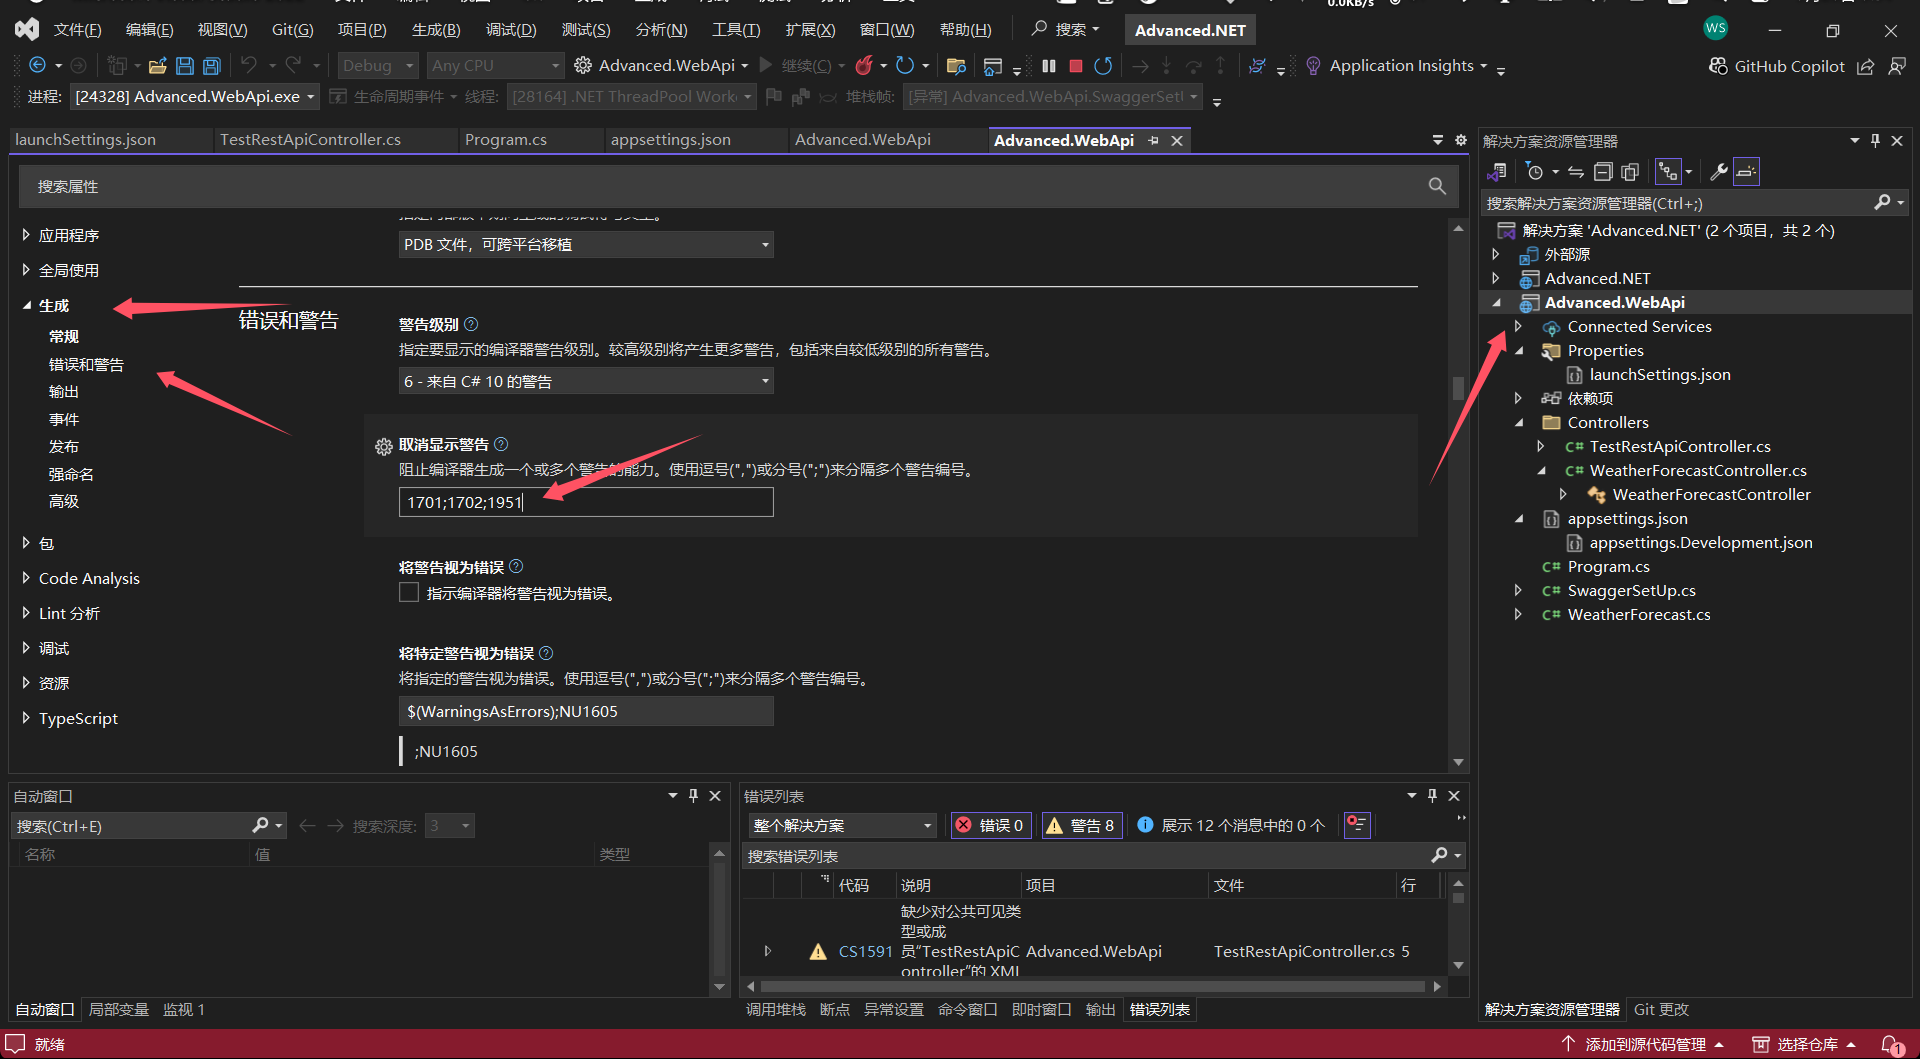
额外:没写注释的全都有warning
解决:在属性的错误和警告中取消1951(需要重启vs生效)
JWT
原理:
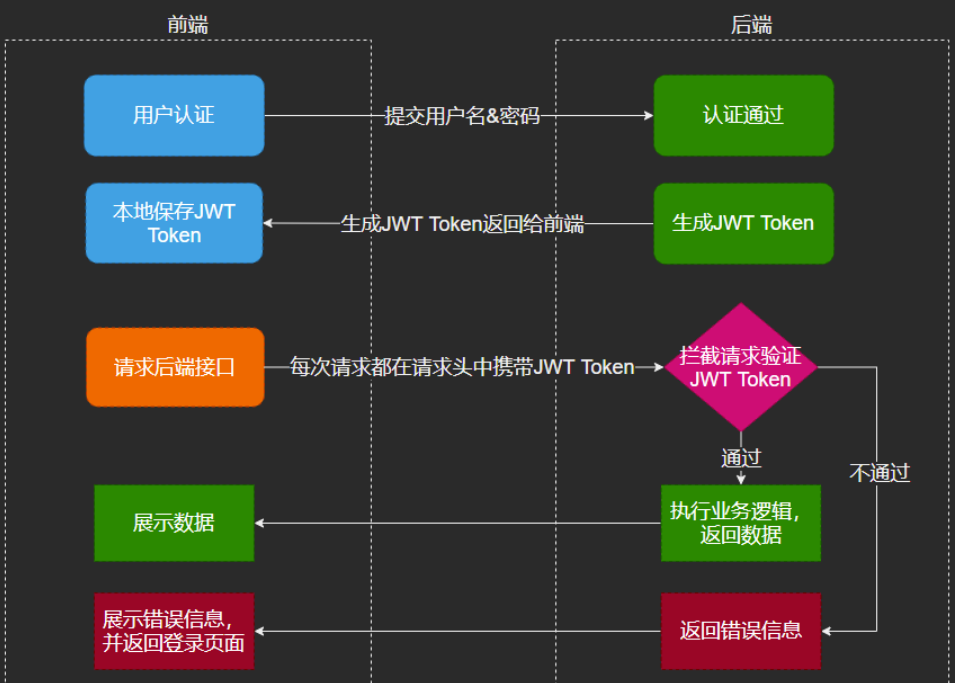
构建步骤
搭建jwt认证服务器
AppSettings中药添加秘钥与其他信息
{
  "Logging": {
    "LogLevel": {
      "Default": "Information",
      "Microsoft.AspNetCore": "Warning"
    }
  },
  "AllowedHosts": "*",
  "JWTTokenOptions": {
    "Audience": "http://localhost:5200",//接受者
    "Issuer": "http://localhost:5200",//发行者
    "SecurityKey": "MIGfMA0GCSqGSIb3DQEBAQUAA4GNADCBiQKBgQDI2a2EJ7m872v0afyoSDJT2o1+SitIeJSWtLJU8/Wz2m7gStexajkeD+Lka6DSTy8gt9UwfgVQo6uKjVLG5Ex7PiGOODVqAEghBuS7JzIYU5RvI543nNDAPfnJsas96mSA7L/mD7RTE2drj6hf3oZjJpMPZUQI/B1Qjb5H3K3PNwIDAQAB"
  }
}
JWT认证类
using System;
using System.Collections.Generic;
using System.Linq;
using System.Threading.Tasks;

namespace Advanced.NET6.Jwt.AuthenticationCenter.Utility
{
    public class JWTTokenOptions
    {
        public string Audience
        {
            get;
            set;
        }
        public string SecurityKey
        {
            get;
            set;
        }
        //public SigningCredentials Credentials
        //{
        //    get;
        //    set;
        //}
        public string Issuer
        {
            get;
            set;
        }
    }
}
服务接口
using System;
using System.Collections.Generic;
using System.Linq;
using System.Threading.Tasks;

namespace Advanced.NET6.Jwt.AuthenticationCenter.Utility
{
    public interface ICustomJWTService
    {
        string GetToken(string UserName, string password);
    }
}
JWT服务
using Microsoft.Extensions.Options;
using Microsoft.IdentityModel.Tokens;
using System;
using System.Collections.Generic;
using System.IdentityModel.Tokens.Jwt;
using System.Linq;
using System.Security.Claims;
using System.Text;
using System.Threading.Tasks;

namespace Advanced.NET6.Jwt.AuthenticationCenter.Utility
{
    public class CustomHSJWTService : ICustomJWTService
    {
        #region Option注入
        private readonly JWTTokenOptions _JWTTokenOptions;
        public CustomHSJWTService(IOptionsMonitor<JWTTokenOptions> jwtTokenOptions)
        {
            this._JWTTokenOptions = jwtTokenOptions.CurrentValue;
        }
        #endregion
        /// <summary>
        /// 用户登录成功以后,用来生成Token的方法
        /// </summary>
        /// <param name="UserName"></param>
        /// <returns></returns>
        public string GetToken(string UserName, string password)
        {
            #region 有效载荷,大家可以自己写,爱写多少写多少;尽量避免敏感信息
            var claims = new[]
            {
               new Claim(ClaimTypes.Name, UserName),
                new Claim(ClaimTypes.Role, "teache0"),
               new Claim("NickName",UserName),
               new Claim("Role","Administrator"),//传递其他信息
               new Claim("ABCC","ABCC"),
               new Claim("Student","甜酱油")
            };

            //需要加密:需要加密key:
            //Nuget引入:Microsoft.IdentityModel.Tokens
            SymmetricSecurityKey key = new SymmetricSecurityKey(Encoding.UTF8.GetBytes(_JWTTokenOptions.SecurityKey));

            SigningCredentials creds = new SigningCredentials(key, SecurityAlgorithms.HmacSha256);

            //Nuget引入:System.IdentityModel.Tokens.Jwt
            JwtSecurityToken token = new JwtSecurityToken(
             issuer: _JWTTokenOptions.Issuer,
             audience: _JWTTokenOptions.Audience,
             claims: claims,
             expires: DateTime.Now.AddMinutes(5),//5分钟有效期
             signingCredentials: creds);

            string returnToken = new JwtSecurityTokenHandler().WriteToken(token);
            return returnToken;
            #endregion

        }
    }
}
控制器
    [Route("api/[controller]")]
    [ApiController]
    public class AuthenticationController : ControllerBase
    {
        private ICustomJWTService _iJWTService = null;
        public AuthenticationController(ICustomJWTService customJWTService)
        {
            _iJWTService = customJWTService;
        }

        [Route("Get")]
        [HttpGet]
        public IEnumerable<int> Get()
        {
            return new List<int>() { 1, 2, 3, 4, 6, 7 };
        }

        [Route("Login")]
        [HttpPost]
        public string Login(string name, string password)
        {
            //在这里需要去数据库中做数据验证
            if ("Richard".Equals(name) && "123456".Equals(password))
            {
                //就应该生成Token
                string token = this._iJWTService.GetToken(name, password);
                return JsonConvert.SerializeObject(new
                {
                    result = true,
                    token
                });

            }
            else
            {
                return JsonConvert.SerializeObject(new
                {
                    result = false,
                    token = ""
                });
            }
        }
    }
注册
var builder = WebApplication.CreateBuilder(args);

// Add services to the container.

builder.Services.AddControllers();
// Learn more about configuring Swagger/OpenAPI at https://aka.ms/aspnetcore/swashbuckle

builder.Services.Configure<JWTTokenOptions>(builder.Configuration.GetSection("JWTTokenOptions"));
builder.Services.AddTransient<ICustomJWTService, CustomHSJWTService>();

builder.Services.AddEndpointsApiExplorer();
builder.Services.AddSwaggerGen();

var app = builder.Build();

// Configure the HTTP request pipeline.
if (app.Environment.IsDevelopment())
{
    app.UseSwagger();
    app.UseSwaggerUI();
}

app.UseHttpsRedirection();

app.UseAuthorization();

app.MapControllers();

app.Run();
鉴权授权拦截
Appsettings添加信息
{
  "Logging": {
    "LogLevel": {
      "Default": "Information",
      "Microsoft.AspNetCore": "Warning"
    }
  },
  "AllowedHosts": "*",
  "JWTTokenOptions": {
    "Audience": "http://localhost:5200",
    "Issuer": "http://localhost:5200",
    "SecurityKey": "MIGfMA0GCSqGSIb3DQEBAQUAA4GNADCBiQKBgQDI2a2EJ7m872v0afyoSDJT2o1+SitIeJSWtLJU8/Wz2m7gStexajkeD+Lka6DSTy8gt9UwfgVQo6uKjVLG5Ex7PiGOODVqAEghBuS7JzIYU5RvI543nNDAPfnJsas96mSA7L/mD7RTE2drj6hf3oZjJpMPZUQI/B1Qjb5H3K3PNwIDAQAB"
  }
}
JWT认证类
    public class JWTTokenOptions
    {
        public string Audience
        {
            get;
            set;
        }
        public string SecurityKey
        {
            get;
            set;
        }
        //public SigningCredentials Credentials
        //{
        //    get;
        //    set;
        //}
        public string Issuer
        {
            get;
            set;
        }
    }
注册
    #region jwt校验  HS
    {
        //第二步,增加鉴权逻辑
        JWTTokenOptions tokenOptions = new JWTTokenOptions();
        builder.Configuration.Bind("JWTTokenOptions", tokenOptions);
        builder.Services.AddAuthentication(JwtBearerDefaults.AuthenticationScheme)//Scheme
         .AddJwtBearer(options =>  //这里是配置的鉴权的逻辑
         {
             options.TokenValidationParameters = new TokenValidationParameters
             {
                 //JWT有一些默认的属性,就是给鉴权时就可以筛选了
                 ValidateIssuer = true,//是否验证Issuer
                 ValidateAudience = true,//是否验证Audience
                 ValidateLifetime = true,//是否验证失效时间
                 ValidateIssuerSigningKey = true,//是否验证SecurityKey
                 ValidAudience = tokenOptions.Audience,//
                 ValidIssuer = tokenOptions.Issuer,//Issuer,这两项和前面签发jwt的设置一致
                 IssuerSigningKey = new SymmetricSecurityKey(Encoding.UTF8.GetBytes(tokenOptions.SecurityKey))//拿到SecurityKey
             };
         });
    }
    #endregion
#region 鉴权授权
app.UseAuthentication();
app.UseAuthorization();
#endregion
测试
/// <summary>
/// 获取数据
/// </summary>
/// <returns></returns>
[HttpGet]
//[Route("GetData")]
[Authorize(AuthenticationSchemes= JwtBearerDefaults.AuthenticationScheme)]
public object GetData()
{
    Console.WriteLine("请求到了~~");
    return new
    {
        Id = 123,
        Name = "Richard"
    };
}
跨域
https://blog.youkuaiyun.com/yangshuquan/article/details/135295093
EF Core
EFCore版本与.NET版本相对应
DBFirst与CodeFirst
顾名思义,就是在构建orm层时,先构建数据表再生成实体类,还是先构建实体类再生成数据表。
DBFirst
1.Nuget包
Microsoft.EntityFrameworkCore
Microsoft.EntityFrameworkCore.SqlServer
Microsoft.EntityFrameworkCore.SqlServer.Design
Microsoft.EntityFrameworkCore.Tools
2.打开程序管理器控制台->默认项目(选择解决方案)
记得把中括号去了
Scaffold-DbContext "Data Source =[数据库地址,本机用.];Initial Catalog =[数据库名称];Persist Security Info=True;User ID=[数据库用户名];Password=[数据库密码];Encrypt=False;" Microsoft.EntityFrameworkCore.SqlServer -OutputDir Models -ContextDir Models -Context CustomerDbContext -Force
Scaffold-DbContext "Data Source =BDsnake;Initial Catalog =AdvancedCustomerDB;Persist Security Info=True;User ID=sa;Password=qsj123;Encrypt=False;" Microsoft.EntityFrameworkCore.SqlServer -OutputDir Models -ContextDir Models -Context CustomerDbContext -Force
3.配置数据库链接字符串
自动生成的为硬编码连接信息,这一步是将其修改为配置文件注入型
生成CustomerDbContext.cs修改
    protected override void OnConfiguring(DbContextOptionsBuilder optionsBuilder)
    {
        base.OnConfiguring(optionsBuilder);
    }
配置文件appsettings.json
  "ConnectionStrings": {
    "DefaultConnection": "Data Source =[数据库地址,本机用.];Initial Catalog =[数据库名称];Persist Security Info=True;User ID=[数据库用户名];Password=[数据库密码];Encrypt=False;"
}
把CustomerDbContext对象注入IOC容器进行管理Program.cs
//dbcontext
builder.Services.AddDbContext<CustomerDbContext>(option =>
{
    option.UseSqlServer("name=ConnectionStrings:DefaultConnection");
});
CodeFirst
1.Nuget包
- Microsoft.EntityFrameworkCore.SqlServer
- Microsoft.EntityFrameworkCore.Tools
2.添加数据库表类文件和操作文件
    public class User
    {
        public int ID { get; set; }
        public string Account { get; set; }
        public string Password { get; set; }

    }
    public class CustomerDbContext:DbContext
    {
        public virtual DbSet<User> Users { get; set; }
        public virtual DbSet<Production> Productions { get; set; }
        public CustomerDbContext(DbContextOptions options):base(options)
        {
        }
    }
3.配置数据库连连接字符串
配置文件appsettings.json
  "ConnectionStrings": {
    "DefaultConnection": "Data Source =[数据库地址,本机用.];Initial Catalog =[数据库名称];Persist Security Info=True;User ID=[数据库用户名];Password=[数据库密码];Encrypt=False;"
把DbContext对象放到IOC容器进行管理Program.cs
builder.Services.AddDbContext<CustomerDbContext>(option =>
{
    option.UseSqlServer("name=ConnectionStrings:DefaultConnection");
});
4.打开程序管理器控制台->默认项目(选择解决方案)
初始化:add-migration init
更新:update-database
注:修改表也是当前命令
EF迁移
“迁移”(Migration)可以理解为将实体类的变化转换为对数据库修改的方案,应用迁移就是将这个修改方案应用到数据库。其次,迁移也记录了数据库的版本历史等信息。
这里直接举例讲解EF迁移
初始化
1. 创建项目
略
2. nuget导包
dotnet add package Microsoft.EntityFrameworkCore
dotnet add package Microsoft.EntityFrameworkCore.Sqlite
dotnet add package Microsoft.EntityFrameworkCore.Tools
3. 创建实体类
在 Models 文件夹中创建一个新的类,例如 Product.cs:
using System;

namespace MyProductApi.Models
{
    public class Product
    {
        public Guid ID { get; set; }
        public string Name { get; set; }
        public DateTime ReleaseDate { get; set; }
        public decimal Price { get; set; }
    }
}
4. 创建DbContext
在 Data 文件夹中创建一个名为 AppDbContext.cs 的文件:
using Microsoft.EntityFrameworkCore;
using MyProductApi.Models;

namespace MyProductApi.Data
{
    public class AppDbContext : DbContext
    {
        public AppDbContext(DbContextOptions<AppDbContext> options) : base(options) { }

        public DbSet<Product> Products { get; set; }
    }
}
5.配置服务
在 Program.cs 中配置 EF Core 和 SQLite:
using Microsoft.EntityFrameworkCore;
using MyProductApi.Data;

var builder = WebApplication.CreateBuilder(args);

// Add services to the container.
builder.Services.AddDbContext<AppDbContext>(options =>
    options.UseSqlite("Data Source=products.db"));

builder.Services.AddControllers();

var app = builder.Build();

// Configure the HTTP request pipeline.
app.UseAuthorization();
app.MapControllers();

app.Run();
6.创建迁移
运行以下命令创建初始迁移:
dotnet ef migrations add InitialCreate
7.更新数据库
运行以下命令应用迁移到 SQLite 数据库:
dotnet ef database update
8.控制器
这时可测试基本新增与查询功能是否正常
using Microsoft.AspNetCore.Mvc;
using Microsoft.EntityFrameworkCore;
using MyProductApi.Data;
using MyProductApi.Models;

namespace MyProductApi.Controllers
{
    [Route("api/[controller]")]
    [ApiController]
    public class ProductsController : ControllerBase
    {
        private readonly AppDbContext _context;

        public ProductsController(AppDbContext context)
        {
            _context = context;
        }

        [HttpGet]
        public async Task<ActionResult<IEnumerable<Product>>> GetProducts()
        {
            return await _context.Products.ToListAsync();
        }

        [HttpPost]
        public async Task<ActionResult<Product>> PostProduct(Product product)
        {
            product.ID = Guid.NewGuid(); // 自动生成 ID
            _context.Products.Add(product);
            await _context.SaveChangesAsync();
            return CreatedAtAction(nameof(GetProducts), new { id = product.ID }, product);
        }
    }
}
9.创建新迁移
如果后续需要添加新字段或修改模型,可以按以下步骤操作:
- 修改模型:在
Product.cs中添加新的属性。
这里改了一个字段
namespace EF迁移测试.Models
{
    public class Product
    {
        public Guid ID { get; set; }
        public string Name { get; set; }
        public DateTime ReleaseDate { get; set; }
        public int Number { get; set; }
    }
}
2.创建新的迁移:
dotnet ef migrations add AddNewField
3.更新数据库
dotnet ef database update
10.迁移回滚
首先,你可以查看当前的迁移历史,以确定你想回滚到哪个迁移。运行以下命令:
dotnet ef migrations list
回滚到指定迁移
dotnet ef database update InitialCreate
回滚到最初状态
dotnet ef database update 0
11.删除迁移
删除最后一个迁移
dotnet ef migrations remove
常用方法
判断是否Ajax请求
private bool IsAjaxRequest(HttpRequest request)
{
    //HttpWebRequest httpWebRequest = null;
    //httpWebRequest.Headers.Add("X-Requested-With", "XMLHttpRequest");
    string header = request.Headers["X-Requested-With"];
    return "XMLHttpRequest".Equals(header);
}
crud方法包装
公共业务逻辑
using Microsoft.Data.SqlClient;
using System;
using System.Collections.Generic;
using System.Linq;
using System.Linq.Expressions;
using System.Text;
using System.Threading.Tasks;

namespace Advanced.NET6.Business.Interfaces
{
    public interface IBaseService
    {
        #region Query
        /// <summary>
        /// 根据id查询实体
        /// </summary>
        /// <param name="id"></param>
        /// <returns></returns>
        T Find<T>(int id) where T : class;

        /// <summary>
        /// 提供对单表的查询
        /// </summary>
        /// <returns>IQueryable类型集合</returns>
        [Obsolete("尽量避免使用,using 带表达式目录树的 代替")]
        IQueryable<T> Set<T>() where T : class;

        /// <summary>
        /// 查询
        /// </summary>
        /// <typeparam name="T"></typeparam>
        /// <param name="funcWhere"></param>
        /// <returns></returns>
        IQueryable<T> Query<T>(Expression<Func<T, bool>> funcWhere) where T : class;

        /// <summary>
        /// 分页查询
        /// </summary>
        /// <typeparam name="T"></typeparam>
        /// <typeparam name="S"></typeparam>
        /// <param name="funcWhere"></param>
        /// <param name="pageSize"></param>
        /// <param name="pageIndex"></param>
        /// <param name="funcOrderby"></param>
        /// <param name="isAsc"></param>
        /// <returns></returns>
        PageResult<T> QueryPage<T, S>(Expression<Func<T, bool>> funcWhere, int pageSize, int pageIndex, Expression<Func<T, S>> funcOrderby, bool isAsc = true) where T : class;
        #endregion

        #region Add
        /// <summary>
        /// 新增数据,即时Commit
        /// </summary>
        /// <param name="t"></param>
        /// <returns>返回带主键的实体</returns>
        T Insert<T>(T t) where T : class;

        /// <summary>
        /// 新增数据,即时Commit
        /// 多条sql 一个连接,事务插入
        /// </summary>
        /// <param name="tList"></param>
        IEnumerable<T> Insert<T>(IEnumerable<T> tList) where T : class;
        #endregion

        #region Update
        /// <summary>
        /// 更新数据,即时Commit
        /// </summary>
        /// <param name="t"></param>
        void Update<T>(T t) where T : class;

        /// <summary>
        /// 更新数据,即时Commit
        /// </summary>
        /// <param name="tList"></param>
        void Update<T>(IEnumerable<T> tList) where T : class;
        #endregion

        #region Delete
        /// <summary>
        /// 根据主键删除数据,即时Commit
        /// </summary>
        /// <param name="t"></param>
        void Delete<T>(int Id) where T : class;

        /// <su+mary>
        /// 删除数据,即时Commit
        /// </summary>
        /// <param name="t"></param>
        void Delete<T>(T t) where T : class;

        /// <summary>
        /// 删除数据,即时Commit
        /// </summary>
        /// <param name="tList"></param>
        void Delete<T>(IEnumerable<T> tList) where T : class;
        #endregion

        #region Other
        /// <summary>
        /// 立即保存全部修改
        /// 把增/删的savechange给放到这里,是为了保证事务的
        /// </summary>
        void Commit();

        /// <summary>
        /// 执行sql 返回集合
        /// </summary>
        /// <param name="sql"></param>
        /// <param name="parameters"></param>
        /// <returns></returns>
        IQueryable<T> ExcuteQuery<T>(string sql, SqlParameter[] parameters) where T : class;

        /// <summary>
        /// 执行sql,无返回
        /// </summary>
        /// <param name="sql"></param>
        /// <param name="parameters"></param>
        void Excute<T>(string sql, SqlParameter[] parameters) where T : class;

        #endregion


        #region 伪代码
        //public void Add();

        //public void Update();

        //public void Delete();

        //public void Query();
        #endregion
    }
}
using Advanced.NET6.Business.Interfaces;
using Advanced.NET6.Framework;
using Microsoft.Data.SqlClient;
using Microsoft.EntityFrameworkCore;
using Microsoft.EntityFrameworkCore.Storage;
using System;
using System.Collections.Generic;
using System.Linq;
using System.Linq.Expressions;
using System.Text;
using System.Threading.Tasks;

namespace Advanced.NET6.Business.Services
{
    public abstract class BaseService : IBaseService
    {
        protected DbContext Context { get; set; }

        /// <summary>
        ///
        /// </summary>
        /// <param name="context"></param>
        public BaseService(DbContext context)
        {
            Console.WriteLine($"{this.GetType().FullName}被构造....");
            Context = context;
        }

        #region Query
        public T Find<T>(int id) where T : class
        {
            return this.Context.Set<T>().Find(id);
        }

        /// <summary>
        /// 不应该暴露给上端使用者,尽量少用
        /// </summary>
        /// <typeparam name="T"></typeparam>
        /// <returns></returns>
        //[Obsolete("尽量避免使用,using 带表达式目录树的代替")]
        public IQueryable<T> Set<T>() where T : class
        {
            return this.Context.Set<T>();
        }

        /// <summary>
        /// 这才是合理的做法,上端给条件,这里查询
        /// </summary>
        /// <typeparam name="T"></typeparam>
        /// <param name="funcWhere"></param>
        /// <returns></returns>
        public IQueryable<T> Query<T>(Expression<Func<T, bool>> funcWhere) where T : class
        {
            return this.Context.Set<T>().Where<T>(funcWhere);
        }

        public PageResult<T> QueryPage<T, S>(Expression<Func<T, bool>> funcWhere, int pageSize, int pageIndex, Expression<Func<T, S>> funcOrderby, bool isAsc = true) where T : class
        {
            var list = Set<T>();
            if (funcWhere != null)
            {
                list = list.Where<T>(funcWhere);
            }
            if (isAsc)
            {
                list = list.OrderBy(funcOrderby);
            }
            else
            {
                list = list.OrderByDescending(funcOrderby);
            }
            PageResult<T> result = new PageResult<T>()
            {
                DataList = list.Skip((pageIndex - 1) * pageSize).Take(pageSize).ToList(),
                PageIndex = pageIndex,
                PageSize = pageSize,
                TotalCount = list.Count()
            };
            return result;
        }
        #endregion

        #region Insert
        /// <summary>
        /// 即使保存  不需要再Commit
        /// </summary>
        /// <typeparam name="T"></typeparam>
        /// <param name="t"></param>
        /// <returns></returns>
        public T Insert<T>(T t) where T : class
        {
            this.Context.Set<T>().Add(t);
            this.Commit();//写在这里  就不需要单独commit  不写就需要
            return t;
        }

        public IEnumerable<T> Insert<T>(IEnumerable<T> tList) where T : class
        {
            this.Context.Set<T>().AddRange(tList);
            this.Commit();//一个链接  多个sql
            return tList;
        }
        #endregion

        #region Update
        /// <summary>
        /// 是没有实现查询,直接更新的,需要Attach和State
        ///
        /// 如果是已经在context,只能再封装一个(在具体的service)
        /// </summary>
        /// <typeparam name="T"></typeparam>
        /// <param name="t"></param>
        public void Update<T>(T t) where T : class
        {
            if (t == null) throw new Exception("t is null");

            this.Context.Set<T>().Attach(t);//将数据附加到上下文,支持实体修改和新实体,重置为UnChanged
            this.Context.Entry<T>(t).State = EntityState.Modified;
            this.Commit();//保存 然后重置为UnChanged
        }

        public void Update<T>(IEnumerable<T> tList) where T : class
        {
            foreach (var t in tList)
            {
                this.Context.Set<T>().Attach(t);
                this.Context.Entry<T>(t).State = EntityState.Modified;
            }
            this.Commit();
        }

        #endregion

        #region Delete
        /// <summary>
        /// 先附加 再删除
        /// </summary>
        /// <typeparam name="T"></typeparam>
        /// <param name="t"></param>
        public void Delete<T>(T t) where T : class
        {
            if (t == null) throw new Exception("t is null");
            this.Context.Set<T>().Attach(t);
            this.Context.Set<T>().Remove(t);
            this.Commit();
        }

        /// <summary>
        /// 还可以增加非即时commit版本的,
        /// 做成protected
        /// </summary>
        /// <typeparam name="T"></typeparam>
        /// <param name="Id"></param>
        public void Delete<T>(int Id) where T : class
        {
            T t = this.Find<T>(Id);//也可以附加
            if (t == null) throw new Exception("t is null");
            this.Context.Set<T>().Remove(t);
            this.Commit();
        }

        public void Delete<T>(IEnumerable<T> tList) where T : class
        {
            foreach (var t in tList)
            {
                this.Context.Set<T>().Attach(t);
            }
            this.Context.Set<T>().RemoveRange(tList);
            this.Commit();
        }
        #endregion

        #region Other
        public void Commit()
        {
            this.Context.SaveChanges();
        }

        public IQueryable<T> ExcuteQuery<T>(string sql, SqlParameter[] parameters) where T : class
        {
            return null;
        }

        public void Excute<T>(string sql, SqlParameter[] parameters) where T : class
        {
            IDbContextTransaction trans = null;
            //DbContextTransaction trans = null;
            try
            {
                trans = this.Context.Database.BeginTransaction();
                //this.Context.Database.ExecuteSqlRaw(sql, parameters);
                trans.Commit();
            }
            catch (Exception)
            {
                if (trans != null)
                    trans.Rollback();
                throw;
            }
        }

        public virtual void Dispose()
        {
            if (this.Context != null)
            {
                this.Context.Dispose();
            }
        }
        #endregion


        #region 伪代码

        //private CustomerDbContext Context = new CustomerDbContext();

        //public void Add()
        //{
        //    //Context.Companies.Add;
        //    //Context.SaveChanges();
        //}

        //public void Delete()
        //{
        //    throw new NotImplementedException();
        //}

        //public void Qeury()
        //{
        //    throw new NotImplementedException();
        //}

        //public void Update()
        //{
        //    throw new NotImplementedException();
        //}
        #endregion
    }
}


 被折叠的 条评论
为什么被折叠?
被折叠的 条评论
为什么被折叠?
 到【灌水乐园】发言


