


目录
1. 自动化运维的含义
1.1 手动运维时代
假设我们要在10台服务器上安装一个nginx服务,手动是怎么做的?

1.2 自动化运维时代

1.3 自动化运维的优点

2. 什么是ansible?
Ansible是python中的一套模块,系统中的一套自动化工具,只需要使用ssh协议连接即可用于系统管理、自动化执行命令等任务。
2.1 有哪些要求
1)控制节点上需要安装Python3(版本3.5或以上)或Python2(版本2.7或以上)
2)linux或unix受管主机需要安装Python2(版本2.6或以上)或Python3(版本3.5或以上)
网络自动化 Ansible for Network Automation — Ansible Documentation
2.2 Ansible有哪些优势
1)ansible不需要单独安装客户端,也不需要启动任何服务
2)ansible是python中的一套完整的自动化执行模块
3)ansible playbook 采用yaml配置,对于自动化任务执行一目了然
4)ansible模块较多,对于自动化的场景支持较丰富
3. Ansible基础
https://docs.ansible.com/ansible/latest/getting_started/index.html
3.1 主要组件
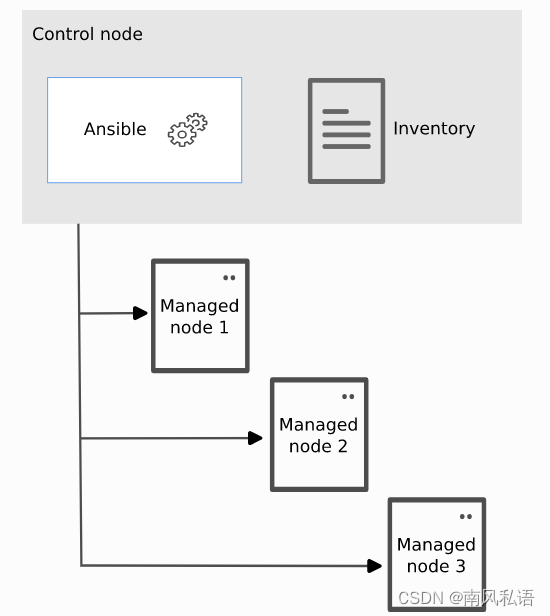
一个基本的Ansible环境包括三个主要组件:
控制节点:安装了 Ansible 的系统。可以在控制节点上运行 Ansible 命令,例如ansible或ansible-inventory
被管节点:Ansible 控制的远程系统或主机。
清单(Inventory):逻辑组织的受管节点列表。在控制节点上创建一个清单以向 Ansible 描述主机部署。
3.2 安装ansible
yum install ansible -y[student@workstation ~]$ ansible --version
ansible 2.8.0
config file = /etc/ansible/ansible.cfg
configured module search path = ['/home/student/.ansible/plugins/modules', '/usr/share/ansible/plugins/modules']
ansible python module location = /usr/lib/python3.6/site-packages/ansible
executable location = /usr/bin/ansible
python version = 3.6.8 (default, Apr 3 2019, 17:26:03) [GCC 8.2.1 20180905 (Red Hat 8.2.1-3)]
[student@workstation ~]$
3.3 配置列表清单Inventory
[student@workstation ~]$ cat /etc/ansible/ansible.cfg | grep -i inven
#inventory      = /etc/ansible/hosts
默认的inventory是/etc/ansible/hosts
写入清单列表
[student@workstation ~]$ cat /etc/ansible/hosts | grep -v ^# | grep -v ^$
[test_hosts]
servera
serverb
serverc
[student@workstation ~]$
验证清单中的内容
方法1:
[student@workstation ~]$ ansible all --list-hosts
  hosts (3):
    servera
    serverb
    serverc
[student@workstation ~]$
方法2:
[student@workstation ~]$ ansible-inventory --graph
@all:
  |--@test_hosts:
  |  |--servera
  |  |--serverb
  |  |--serverc
  |--@ungrouped:
[student@workstation ~]$
4. Ansible配置文件说明
4.1 ansible配置文件优先级
./ansible.cfg > ~/ansible.cfg > /etc/ansible/ansible.cfg
当前目录优先于家目录优先于系统基础配置
[student@workstation ~]$ ll /etc/ansible/ansible.cfg ~ ./ansible/
-rw-r--r--. 1 root    root    19980 May 17  2019 /etc/ansible/ansible.cfg

./ansible/:
total 20
-rw-r--r--. 1 student student 19980 Sep 26 18:37 ansible.cfg

/home/student:
total 20
drwxrwxr-x. 2 student student    25 Sep 26 18:37 ansible
-rw-r--r--. 1 student student 19980 Sep 26 18:34 ansible.cfg
[student@workstation ~]$
[student@workstation ansible]$ pwd
/home/student/ansible
[student@workstation ansible]$ ansible --version
ansible 2.8.0
  config file = /home/student/ansible/ansible.cfg
…………
[student@workstation ansible]$ cd ~
[student@workstation ~]$ ansible --version
ansible 2.8.0
  config file = /home/student/ansible.cfg
…………
[student@workstation ~]$
4.2 配置文件中的参数设置
[student@workstation ansible]$ cat ansible.cfg
[defaults]
inventory      = ./inventory         #表示资源清单的位置
#forks          = 5                   #默认并发数5
#roles_path    = /etc/ansible/roles    #引用角色的路径,可多路径,用分号隔开
#host_key_checking = False               #是否检查主机秘钥
remote_user = root                       #登录被控节点的账号
#remote_password =                        #登录被控节点的账号密码
[privilege_escalation]        #若登录账号为非root账号,提权使用
#become=True
#become_method=sudo
#become_user=root
#become_ask_pass=False        #若sudo免密,这个即可设置为False
5. ansible命令集
ansible  #Ansibe AD-Hoc 临时命令执行工具,常用于临时命令的执行
ansible-doc   #Ansible 模块功能查看工具
ansible-galaxy  #下载/上传优秀代码或Roles模块 的官网平台,基于网络的
ansible-playbook  #Ansible 定制自动化的任务集编排工具
ansible-vault  #Ansible 文件加密工具
ansible-doc 常用用法
ansible-doc -l        #查看所有模块信息
ansible-doc  copy        #查看copy模块具体使用方式
6. Ansible Ad-Hoc
ad-hoc简而言之,就是“临时命令”,不会保存。多用于测试以及验证操作结果。

6.1 ping模块使用
一种最简单的临时命令就是使用ping模块。此模块执行的不是ICMP ping,而是检查能否在受管主机上运行基于Python的模块。
[student@workstation ansible]$ ansible servera -m ping
servera | SUCCESS => {
    "ansible_facts": {
        "discovered_interpreter_python": "/usr/libexec/platform-python"
    },
    "changed": false,
    "ping": "pong"
}
[student@workstation ansible]$
6.2 command模块使用
command模块允许管理员在受管主机上运行任何命令。通过-a可以指定该模块的参数。以下是在受管主机servera上运行hostname命令。
[student@workstation ansible]$ ansible servera -m command -a hostname
servera | CHANGED | rc=0 >>
servera.lab.example.com

[student@workstation ansible]$
6.3 copy模块使用
copy模块主要用于文件或者目录复制,支持文件、目录、权限、用户组功能。
[student@workstation ansible]$ ansible servera -m copy -a "src=/home/student/ansible/test.txt dest=/root/ owner=student group=student mode=664"
servera | CHANGED => {
    "ansible_facts": {
        "discovered_interpreter_python": "/usr/libexec/platform-python"
    },
    "changed": true,
    "checksum": "4e1243bd22c66e76c2ba9eddc1f91394e57f9f83",
    "dest": "/root/test.txt",
    "gid": 1000,
    "group": "student",
    "md5sum": "d8e8fca2dc0f896fd7cb4cb0031ba249",
    "mode": "0664",
    "owner": "student",
    "size": 5,
    "src": "/root/.ansible/tmp/ansible-tmp-1664205767.2125797-279632872659455/source",
    "state": "file",
    "uid": 1000
}

[student@workstation ansible]$ ansible servera -m command -a "ls -l /root/test.txt"
servera | CHANGED | rc=0 >>
-rw-rw-r-- 1 student student 5 Sep 26 23:22 /root/test.txt

[student@workstation ansible]$
[student@workstation ansible]$ ansible servera -m command -a "cat /root/test.txt"
servera | CHANGED | rc=0 >>
test

[student@workstation ansible]$
也可以直接写入指定的内容。 注:相当于“>”
[student@workstation ansible]$ ansible servera -m copy -a "content='This is a test\n hahaha\n' dest=/root/test.txt"
servera | CHANGED => {
    "ansible_facts": {
        "discovered_interpreter_python": "/usr/libexec/platform-python"
    },
    "changed": true,
    "checksum": "397ee3703d1de3c73d73b43924e8db775657f3d4",
    "dest": "/root/test.txt",
    "gid": 1000,
    "group": "student",
    "md5sum": "6b026d0e61379da0235f59bb3a60d1d7",
    "mode": "0664",
    "owner": "student",
    "size": 23,
    "src": "/root/.ansible/tmp/ansible-tmp-1664206376.128315-79572276496311/source",
    "state": "file",
    "uid": 1000
}
[student@workstation ansible]$ ansible servera -m command -a "cat /root/test.txt"
servera | CHANGED | rc=0 >>
This is a test
 hahaha

[student@workstation ansible]$
6.4 lininfile模块使用
lineinfile模块功能有些类似于sed,可以对文件内容进行修改、增加、删除。
1)修改文件内容
[student@workstation ansible]$ ansible servera -m command -a "cat /root/test.txt"
servera | CHANGED | rc=0 >>
test
Dapan is good
Dapan=versatile

[student@workstation ansible]$
[student@workstation ansible]$ ansible servera -m lineinfile -a 'path=/root/test.txt regexp: '^Dapan='line="Dapan=God"'
ERROR! this task 'lineinfile' has extra params, which is only allowed in the following modules: shell, set_fact, raw, include_tasks, include, add_host, meta, import_role, include_role, import_tasks, include_vars, win_shell, command, group_by, script, win_command
[student@workstation ansible]$
[student@workstation ansible]$
[student@workstation ansible]$ ansible servera -m lineinfile -a 'path=/root/test.txt regexp='^Dapan=' line="Dapan=God"'
servera | CHANGED => {
    "ansible_facts": {
        "discovered_interpreter_python": "/usr/libexec/platform-python"
    },
    "backup": "",
    "changed": true,
    "msg": "line replaced"
}
[student@workstation ansible]$ ansible servera -m command -a "cat /root/test.txt"
servera | CHANGED | rc=0 >>
test
Dapan is good
Dapan=God

[student@workstation ansible]$
2)增加文件内容
在某行前加入:insertbefore
在某行后加入:insertafter
[student@workstation ansible]$ ansible servera -m command -a "cat /root/test.txt"
servera | CHANGED | rc=0 >>
test

[student@workstation ansible]$ ansible servera -m lineinfile -a 'path=/root/test.txt line="Dapan is good"'
servera | CHANGED => {
    "ansible_facts": {
        "discovered_interpreter_python": "/usr/libexec/platform-python"
    },
    "backup": "",
    "changed": true,
    "msg": "line added"
}
[student@workstation ansible]$ ansible servera -m command -a "cat /root/test.txt"
servera | CHANGED | rc=0 >>
test
Dapan is good

[student@workstation ansible]$
3)删除某行内容
[student@workstation ansible]$ ansible servera -m command -a "cat /root/test.txt"
servera | CHANGED | rc=0 >>
test
Dapan is good
Dapan=God

[student@workstation ansible]$
[student@workstation ansible]$
[student@workstation ansible]$ ansible servera -m lineinfile -a 'path=/root/test.txt regexp='^Dapan=' state=absent'
servera | CHANGED => {
    "ansible_facts": {
        "discovered_interpreter_python": "/usr/libexec/platform-python"
    },
    "backup": "",
    "changed": true,
    "found": 1,
    "msg": "1 line(s) removed"
}
[student@workstation ansible]$ ansible servera -m command -a "cat /root/test.txt"
servera | CHANGED | rc=0 >>
test
Dapan is good

[student@workstation ansible]$
更多临时命令,请参考:Introduction to ad hoc commands — Ansible Documentation
7. 初识playbook
Ansible Playbooks 提供了一个可重复、可重用、简单的配置管理和多机部署系统,非常适合部署复杂的应用程序。
7.1 playbook的格式
为了大家更好的理解playbook,我们将前面的临时命令进行修改成playbook的形式。
临时命令:
ansible servera -m copy -a "src=/home/student/ansible/test.txt dest=/root/ owner=student group=student mode=664"playbook形式:
---
- name: copy a file
  hosts: servera
  tasks:
  - name: Copy file with owner and permissions
    copy:
      src: /home/student/ansible/test.txt
      dest: /root/
      owner: student
      group: student
      mode: 664
playbook是以yaml格式编辑的文本文件,通常用yml保存。playbook使用空格字符缩进来表示其数据结构。yaml缩进的空格有两个基本原则:
- 处于层次结构同一级别的数据元素必须具有相同的缩进量。
- 如果项目属于其他项目的子项,其缩进量必须大于父项。
注意:只有空格可用于缩进;不允许使用制表符!!!
为了更高效的编辑yaml文件,建议配置一下参数
[student@workstation ansible]$ cat ~/.vimrc
set number  ts=2    #显示行号,并且将TAB键转换成两个空格

#vi 检测到正在编辑yaml文件,会将TAB键自动转换为两个空格
#autocmd Filetype yaml setlocal ai ts=2 sw=2 et
7.2 语法验证功能
在执行playbook之前,可以进行下格式验证,确保其内容的语法正确,ansible-playbook提供了一个--syntax-check选项,可用于验证playbook的语法。
[student@workstation ansible]$ ansible-playbook --syntax-check copy.yaml
ERROR! Syntax Error while loading YAML.
  did not find expected key

The error appears to be in '/home/student/ansible/copy.yaml': line 15, column 7, but may
be elsewhere in the file depending on the exact syntax problem.

The offending line appears to be:

        src: /home/student/ansible/test.txt
      dest: /root/test4.txt
      ^ here

[student@workstation ansible]$
7.3 空执行
可以使用-C选项对playbook执行空运行。这会出现playbook正常运行会出现的回显,但是不会对受管主机做出修改。
下面演示了一个playbook的空运行,它包含单项任务,可将主控节点的文件复制到受管主机。可以发现,playbook空运行后,并未在受管主机生成新的文件。
[student@workstation ansible]$ ansible servera -m command -a "ls -l "
servera | CHANGED | rc=0 >>
total 16
-rw-------. 1 root root 6947 Apr  4  2019 anaconda-ks.cfg
-rw-------. 1 root root 6750 Apr  4  2019 original-ks.cfg

[student@workstation ansible]$ ansible-playbook -C copy.yaml

PLAY [copy a file] ******************************************************************************************

TASK [Gathering Facts] **************************************************************************************
ok: [servera]

TASK [Copy file with owner and permissions] *****************************************************************
changed: [servera]

PLAY RECAP **************************************************************************************************
servera                    : ok=2    changed=1    unreachable=0    failed=0    skipped=0    rescued=0    ignored=0

[student@workstation ansible]$ ansible servera -m command -a "ls -l "
servera | CHANGED | rc=0 >>
total 16
-rw-------. 1 root root 6947 Apr  4  2019 anaconda-ks.cfg
-rw-------. 1 root root 6750 Apr  4  2019 original-ks.cfg
7.4 正常运行结果
正常运行后,通过临时命令验证在受管主机上可以看到copy的新文件。
[student@workstation ansible]$ ansible-playbook  copy.yaml

PLAY [copy a file] ******************************************************************************************

TASK [Gathering Facts] **************************************************************************************
ok: [servera]

TASK [Copy file with owner and permissions] *****************************************************************
changed: [servera]

PLAY RECAP **************************************************************************************************
servera                    : ok=2    changed=1    unreachable=0    failed=0    skipped=0    rescued=0    ignored=0

[student@workstation ansible]$ ansible servera -m command -a "ls -l "
servera | CHANGED | rc=0 >>
total 20
-rw-------. 1 root    root    6947 Apr  4  2019 anaconda-ks.cfg
-rw-------. 1 root    root    6750 Apr  4  2019 original-ks.cfg
--w--wx--T  1 student student    5 Sep 27 21:42 test.txt

[student@workstation ansible]$
8. Playbook实战
[student@workstation ansible]$ ansible-inventory --graph
@all:
  |--@dev:
  |  |--servera
  |  |--serverc
  |--@pro:
  |  |--serverb
  |--@ungrouped:
8.1 yum模块与service模块
要求:
- 在dev组主机安装http服务并设置开机自启动
- 更新所有受管主机的软件包
###两个playbook的形式
[student@workstation ansible]$ cat packages.yml
---
- name: install package
  hosts: servera,serverc
  tasks:
  - name: install the latest version of Apache
    yum:
      name: httpd
      state: latest
  - name: Start service httpd, if not started
    service:
      name: httpd
      state: started
      enabled: yes

- name: update all package
  hosts: all
  tasks:
  - name: upgrade all packages
    yum:
      name: '*'
      state: latest
[student@workstation ansible]$


###一个playbook的形式
- name: install and update package
  hosts: all
  tasks:
  - name: install the latest version of Apache
    yum:
      name: httpd
      state: latest
    when: inventory_hostname in groups.dev
  - name: Start service httpd, if not started
    service:
      name: httpd
      state: started
      enabled: yes
    when: "'dev' in group_names"
  - name: upgrade all packages
    yum:
      name: '*'
      state: latest
8.2 获取ansible事实
ansible事实是ansible在受管主机上自动检测到的变量。
可收集的事实包括但不限于以下信息:
主机名称、内核版本、IP地址、可用磁盘空间等
[student@workstation ansible]$ ansible servera -m setup -a 'filter=*mem*'
servera | SUCCESS => {
    "ansible_facts": {
        "ansible_memfree_mb": 247,
        "ansible_memory_mb": {
            "nocache": {
                "free": 585,
                "used": 236
            },
            "real": {
                "free": 247,
                "total": 821,
                "used": 574
            },
            "swap": {
                "cached": 0,
                "free": 0,
                "total": 0,
                "used": 0
            }
        },
        "ansible_memtotal_mb": 821,
        "discovered_interpreter_python": "/usr/libexec/platform-python"
    },
    "changed": false
}
[student@workstation ansible]$ ansible servera -m setup -a 'filter=*hostname*'
servera | SUCCESS => {
    "ansible_facts": {
        "ansible_hostname": "servera",
        "discovered_interpreter_python": "/usr/libexec/platform-python"
    },
    "changed": false
}
[student@workstation ansible]$ ansible servera -m setup -a 'filter=*bios*'
servera | SUCCESS => {
    "ansible_facts": {
        "ansible_bios_date": "04/01/2014",
        "ansible_bios_version": "1.11.1-3.module+el8+2529+a9686a4d",
        "discovered_interpreter_python": "/usr/libexec/platform-python"
    },
    "changed": false
}
[student@workstation ansible]$ ansible servera -m setup -a 'filter=*ipv4*'
servera | SUCCESS => {
    "ansible_facts": {
        "ansible_all_ipv4_addresses": [
            "172.25.250.10"
        ],
        "ansible_default_ipv4": {
            "address": "172.25.250.10",
            "alias": "enp1s0",
            "broadcast": "172.25.250.255",
            "gateway": "172.25.250.254",
            "interface": "enp1s0",
            "macaddress": "52:54:00:00:fa:0a",
            "mtu": 1500,
            "netmask": "255.255.255.0",
            "network": "172.25.250.0",
            "type": "ether"
        },
        "discovered_interpreter_python": "/usr/libexec/platform-python"
    },
    "changed": false
}
[student@workstation ansible]$
8.3 生成硬件报告
要求:
- 从主控节点拷贝文件,保存为/root/hwreport.txt
- 将正确的值填进/root/hwreport.txt
- 如果硬件项不存在,相关的值设为NONE
[student@workstation ansible]$ cat hwreport.yml
---
- name: 生成硬件报告
  hosts: all
  tasks:
  - name: copy hwreport.txt
    copy:
      src: ./hwreport.txt
      dest: /root/hwreport.txt
  - name: Ensure 1
    lineinfile:
      path: /root/hwreport.txt
      regexp: '^HOST='
      line: HOST={{ inventory_hostname }}
  - name: Ensure 2
    lineinfile:
      path: /root/hwreport.txt
      regexp: '^MEMORY='
      line: MEMORY={{ ansible_memtotal_mb }}
  - name: Ensure 3
    lineinfile:
      path: /root/hwreport.txt
      regexp: '^BIOS='
      line: BIOS={{ ansible_bios_version }}
  - name: Ensure 4
    lineinfile:
      path: /root/hwreport.txt
      regexp: '^DISK_SIZE_VDA='
      line: DISK_SIZE_VDA={{ ansible_devices.vda.size | default('NONE', true)}}
  - name: Ensure 5
    lineinfile:
      path: /root/hwreport.txt
      regexp: '^DISK_SIZE_VDB='
      line: DISK_SIZE_VDB={{ ansible_devices.vdb.size | default('NONE', true)}}
  - name: Ensure 6
    lineinfile:
      path: /root/hwreport.txt
      regexp: '^DISK_SIZE_VDD='
      line: DISK_SIZE_VDD={{ ansible_devices.vdd.size | default('NONE', true)}}

[student@workstation ansible]$
验证结果:
(我这里三台虚机的规格是一样的,所以返回的结果一样)
[student@workstation ansible]$ ansible all -m command -a 'cat /root/hwreport.txt'
serverc | CHANGED | rc=0 >>
HOST=serverc
MEMORY=821
BIOS=1.11.1-3.module+el8+2529+a9686a4d
DISK_SIZE_VDA=10.00 GB
DISK_SIZE_VDB=5.00 GB
DISK_SIZE_VDD=NONE

servera | CHANGED | rc=0 >>
HOST=servera
MEMORY=821
BIOS=1.11.1-3.module+el8+2529+a9686a4d
DISK_SIZE_VDA=10.00 GB
DISK_SIZE_VDB=5.00 GB
DISK_SIZE_VDD=NONE

serverb | CHANGED | rc=0 >>
HOST=serverb
MEMORY=821
BIOS=1.11.1-3.module+el8+2529+a9686a4d
DISK_SIZE_VDA=10.00 GB
DISK_SIZE_VDB=5.00 GB
DISK_SIZE_VDD=NONE

[student@workstation ansible]$
8.4 利用jinja2模板生成主机文件
要求:
以hosts.j2为模板,在dev主机组中生成/root/myhosts文件,文件针对每个受管主机包含一行内容:
127.0.0.1   localhost localhost.localdomain localhost4 localhost4.localdomain4
::1         localhost localhost.localdomain localhost6 localhost6.localdomain6

172.25.250.10   servera.lab.example.com servera
172.25.250.11   serverb.lab.example.com serverb
172.25.250.12   serverc.lab.example.com serverc
注:主机顺序不重要。
[student@workstation ansible]$ cat hosts.j2
127.0.0.1   localhost localhost.localdomain localhost4 localhost4.localdomain4
::1         localhost localhost.localdomain localhost6 localhost6.localdomain6

{% for host in groups['all'] %}
{{ hostvars[host]['ansible_facts']['default_ipv4']['address'] }} {{ hostvars[host]['ansible_facts']['fqdn']}} {{ hostvars[host]['ansible_facts']['hostname'] }}
{% endfor %}

[student@workstation ansible]$
student@workstation ansible]$ cat hosts.yml
---
- name: 生成主机文件
hosts: all
tasks:
- name: Template a file to /root/myhosts.txt
template:
src: ./hosts.j2
dest: /root/myhosts.txt
when: inventory_hostname in groups.dev
# when: '"dev" in group_names'
[student@workstation ansible]$
[student@workstation ansible]$ ansible all -m command -a 'cat myhosts.txt'
serverb | FAILED | rc=1 >>
cat: myhosts.txt: No such file or directorynon-zero return code

servera | CHANGED | rc=0 >>
127.0.0.1   localhost localhost.localdomain localhost4 localhost4.localdomain4
::1         localhost localhost.localdomain localhost6 localhost6.localdomain6

172.25.250.10 servera.lab.example.com servera
172.25.250.12 serverc.lab.example.com serverc
172.25.250.11 serverb.lab.example.com serverb


serverc | CHANGED | rc=0 >>
127.0.0.1   localhost localhost.localdomain localhost4 localhost4.localdomain4
::1         localhost localhost.localdomain localhost6 localhost6.localdomain6

172.25.250.10 servera.lab.example.com servera
172.25.250.12 serverc.lab.example.com serverc
172.25.250.11 serverb.lab.example.com serverb


[student@workstation ansible]$


 1095
1095

 被折叠的 条评论
为什么被折叠?
被折叠的 条评论
为什么被折叠?
 到【灌水乐园】发言


