


项目创建及代码规范化开发
vue脚手架创建项目
安装vue脚手架
npm install-g @vue/cli
npm update -g @vue/cli
终端输入vue create 项目名称 即可进入模板选择
//利用vue-cli创建项目
进入模板选择
Vue CLI v5.0.8
? Please pick a preset:
  Default ([Vue 3] babel, eslint)
  Default ([Vue 2] babel, eslint)

> Manually select features //选择手动配置
这里是引用
Vue CLI v5.0.8
? Please pick a preset: Manually select features
? Check the features needed for your project: (Press <space> to select, <a> to toggle all, <i> to invert selection, and
<enter> to proceed)
>(*) Babel //使用babel
 ( ) TypeScript //不使用ts
 ( ) Progressive Web App (PWA) Support //不适用PWA
 (*) Router //添加vue-router
 (*) Vuex //添加vuex
 (*) CSS Pre-processors //使用css预处理器
 (*) Linter / Formatter //使用代码格式化
 ( ) Unit Testing //不配置测试
 ( ) E2E Testing //不配置测试
这里是引用
Vue CLI v5.0.8
? Please pick a preset: Manually select features
? Check the features needed for your project: Babel, Router, Vuex, CSS Pre-processors, Linter
? Choose a version of Vue.js that you want to start the project with (Use arrow keys)
> 3.x //选择vue3版本
  2.x
这里是引用
> 这里是引用

Vue CLI v5.0.8
? Please pick a preset: Manually select features
? Check the features needed for your project: Babel, Router, Vuex, CSS Pre-processors, Linter
? Choose a version of Vue.js that you want to start the project with 3.x
? Use history mode for router? (Requires proper server setup for index fallback in production) (Y/n) n //不使用history模式的路由
这里是引用
Vue CLI v5.0.8
? Please pick a preset: Manually select features
? Check the features needed for your project: Babel, Router, Vuex, CSS Pre-processors, Linter
? Choose a version of Vue.js that you want to start the project with 3.x
? Use history mode for router? (Requires proper server setup for index fallback in production) No
? Pick a CSS pre-processor (PostCSS, Autoprefixer and CSS Modules are supported by default): (Use arrow keys)
> Sass/SCSS (with dart-sass) //使用基于dart-sass的scss预处理器
  Less
  Stylus
这里是引用
Vue CLI v5.0.8
? Please pick a preset: Manually select features
? Check the features needed for your project: Babel, Router, Vuex, CSS Pre-processors, Linter
? Choose a version of Vue.js that you want to start the project with 3.x
? Use history mode for router? (Requires proper server setup for index fallback in production) No
? Pick a CSS pre-processor (PostCSS, Autoprefixer and CSS Modules are supported by default): Sass/SCSS (with dart-sass)
? Pick a linter / formatter config:
  ESLint with error prevention only
  ESLint + Airbnb config
> ESLint + Standard config //使用ESLint标准化代码方案
  ESLint + Prettier
这里是引用
Vue CLI v5.0.8
? Please pick a preset: Manually select features
? Check the features needed for your project: Babel, Router, Vuex, CSS Pre-processors, Linter
? Choose a version of Vue.js that you want to start the project with 3.x
? Use history mode for router? (Requires proper server setup for index fallback in production) No
? Pick a CSS pre-processor (PostCSS, Autoprefixer and CSS Modules are supported by default): Sass/SCSS (with dart-sass)
? Pick a linter / formatter config: Standard
? Pick additional lint features: (Press <space> to select, <a> to toggle all, <i> to invert selection, and <enter> to
proceed)
 (*) Lint on save
>(*) Lint and fix on commit //保存时和提交时都进行lint
这里是引用
Vue CLI v5.0.8
? Please pick a preset: Manually select features
? Check the features needed for your project: Babel, Router, Vuex, CSS Pre-processors, Linter
? Choose a version of Vue.js that you want to start the project with 3.x
? Use history mode for router? (Requires proper server setup for index fallback in production) No
? Pick a CSS pre-processor (PostCSS, Autoprefixer and CSS Modules are supported by default): Sass/SCSS (with dart-sass)
? Pick a linter / formatter config: Standard
? Pick additional lint features: Lint on save, Lint and fix on commit
? Where do you prefer placing config for Babel, ESLint, etc.? (Use arrow keys)
> In dedicated config files //单独的配置文件
  In package.json
这里是引用
Vue CLI v5.0.8
? Please pick a preset: Manually select features
? Check the features needed for your project: Babel, Router, Vuex, CSS Pre-processors, Linter
? Choose a version of Vue.js that you want to start the project with 3.x
? Use history mode for router? (Requires proper server setup for index fallback in production) No
? Pick a CSS pre-processor (PostCSS, Autoprefixer and CSS Modules are supported by default): Sass/SCSS (with dart-sass)
? Pick a linter / formatter config: Standard
? Pick additional lint features: Lint on save, Lint and fix on commit
? Where do you prefer placing config for Babel, ESLint, etc.? In dedicated config files
? Save this as a preset for future projects? (y/N) n //不储存预设
等待片刻之后,项目创建成功
 $ cd my-vue3-admin
 $ npm run serve
执行成功后,即可运行项目。
更新vue相关版本
vuex
npm install vuex@next --save
vue-router
npm install vue-router@4
执行
如果页面报错就根据需要更新对应eslint插件版本后再更新vue版本
npm i eslint-plugin-vue@8.7.1 eslint-plugin-vue@7.20.0

在更新对应vue版本
npm i vue@3.2.8 vue-router@4 vuex@next
升级后,查看packge.json得到的版本应为:
 "vue": "^3.2.8",
 "vue-router": "^4.2.5",
 "vuex": "^4.0.2"
标准化开发规范
为什么需要标准化变成规范
有的地方有空格进行分割,有的地方却没有
有的地方是单引号,有的地方却是双引号
有的地方有分号,有的地方没有分号
规范分类:
- 编码规范
- git规范
ESlint
ESLint 是 2013年6月 创建的一个开源项目,它的目标非常简单,只有一个,那就是 提供一个插件化的 javascript 代码检测工具 ,说白了就是做 代码格式检测使用的
.eslintrc.js文件,这个文件就是eslint的配置文件。
我们在创建项目时,就进行过这样的选择:
? Pick a linter / formatter config:
  ESLint with error prevention only // 仅包含错误的 ESLint
  ESLint + Airbnb config // Airbnb 的 ESLint 延伸规则
  ESLint + Standard config // 标准的 ESLint 规则
我们当前选择了 标准的 ESLint 规则 ,那么接下来我们就在该规则之下,看一看 ESLint 它的一些配置都有什么?
打开项目中的 .eslintrc.js 文件
// ESLint 配置文件遵循 commonJS 的导出规则,所导出的对象就是 ESLint 的配置对象
// 文档:https://eslint.bootcss.com/docs/user-guide/configuring
module.exports = {
  // 表示当前目录即为根目录,ESLint 规则将被限制到该目录下
  root: true,
  // env 表示启用 ESLint 检测的环境
  env: {
    // 在 node 环境下启动 ESLint 检测
    node: true
  },
  // ESLint 中基础配置需要继承的配置
  extends: ["plugin:vue/vue3-essential", "@vue/standard"],
  // 解析器
  parserOptions: {
    parser: "babel-eslint"
  },
  // 需要修改的启用规则及其各自的错误级别
  /**
   * 错误级别分为三种:
   * "off" 或 0 - 关闭规则
   * "warn" 或 1 - 开启规则,使用警告级别的错误:warn (不会导致程序退出)
   * "error" 或 2 - 开启规则,使用错误级别的错误:error (当被触发的时候,程序会退出)
   */
  rules: {
    "no-console": process.env.NODE_ENV === "production" ? "warn" : "off",
    "no-debugger": process.env.NODE_ENV === "production" ? "warn" : "off"
  }
};
那么到这里咱们已经大致的了解了.eslintrc.js 文件,基于 ESLint 如果我们出现不符合规范的代码格式时,那么就会得到一个对应的错误。
比如:
我们可以把
Home.vue中的name属性值,由单引号改为双引号
此时,只要我们一保存代码,那么就会得到一个对应的错误
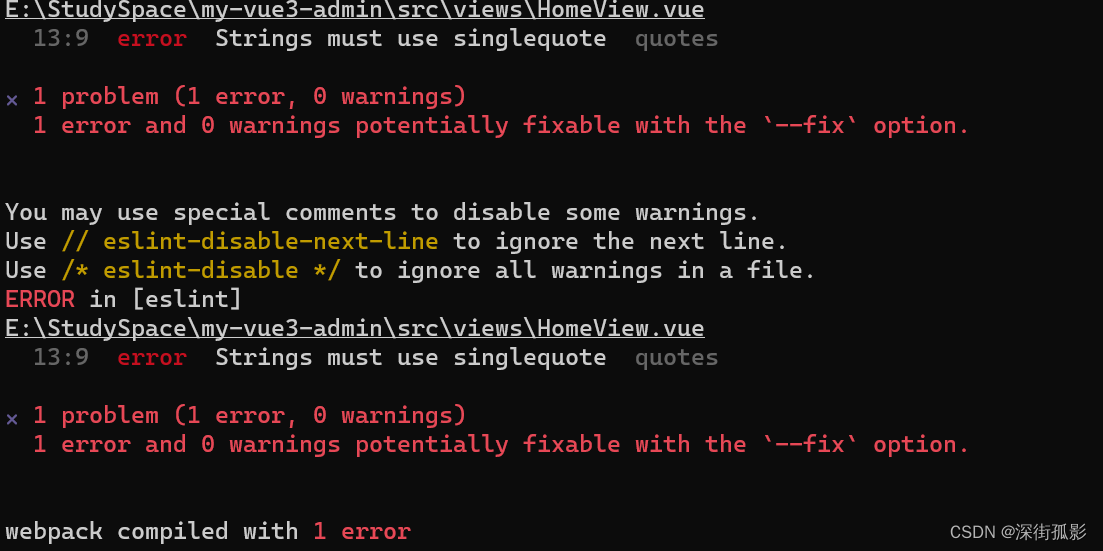
这个错误表示:
- 此时我们触发了一个 《错误级别的错误》
- 触发该错误的位置是 在
Home.vue的第 13 行 第九列 中 - 错误描述为:字符串必须使用单引号
- 错误规则为:
quotes
那么想要解决这个错误,通常情况下我们有两种方式:
- 按照
ESLint的要求修改代码 - 修改
ESLint的验证规则
按照 ESLint 的要求修改代码:
在
Home.vue的第 13 行中把双引号改为单引号
修改 ESLint 的验证规则:
-
在
.eslintrc.js文件中,新增一条验证规则"quotes": "error" // 默认 "quotes": "warn" // 修改为警告 "quotes": "off" // 修改不校验
为了避免开发人员水平不齐以及时时刻刻 需要注意代码格式问题就需要搭配Prettier
遇到:类似错误可以重新安装后再重新运行试试
  0:0  error  Parsing error: Cannot find module 'babel-eslint'

  npm i babel-eslint
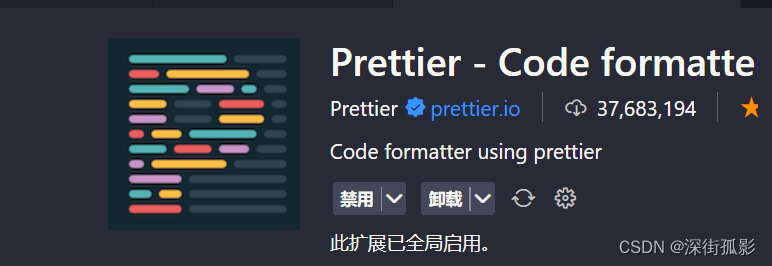
Prettier
prettier!(点击 这里 进入 prettier 中文官网!)
- 一个代码格式化工具
- 开箱即用
- 可以直接集成到
VSCode之中- 在保存时,让代码直接符合
ESLint标准(需要通过一些简单配置)
ESLint与Prettier配合解决格式问题
- vscode安装prettier插件
-
在项目中新建
.prettierrc文件,该文件为perttier默认配置文件 -
在该文件中写入如下配置:
{
  // 不尾随分号
  "semi": false,
  // 使用单引号
  "singleQuote": true,
  // 多行逗号分割的语法中,最后一行不加逗号
  "trailingComma": "none"
}
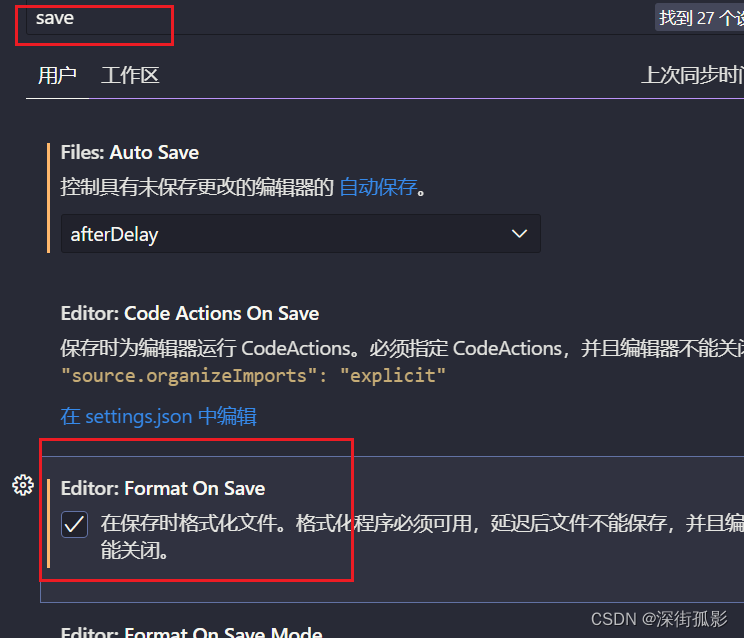
- 打开
VSCode《设置面板》
- 在设置中,搜索
save,勾选Format On Save
但是! 只做到这样还不够!
VSCode 而言,默认一个 tab 等于 4 个空格,而 ESLint 希望一个 tab 为两个空格
如果大家的 VSCode 安装了多个代码格式化工具的化
ESLint 和 prettier 之间的冲突问题
我们尝试在 Home.vue 中写入一个 created 方法,写入完成之后,打开我们的控制台我们会发现,此时代码抛出了一个 ESLint 的错误

这个错误的意思是说:created 这个方法名和后面的小括号之间,应该有一个空格!
但是当加入了这个空格之后,只要一保存代码,就会发现 prettier 会自动去除掉这个空格。
那么此时的这个问题就是 prettier 和 ESLint 的冲突问题。
针对于这个问题想要解决也非常简单:
-
打开
.eslintrc.js配置文件 -
在
rules规则下,新增一条规则'space-before-function-paren': 'off' -
该规则表示关闭《方法名后增加空格》的规则
-
重启项目
约定式提交规范(git提交规范)
在现在的项目开发中,通常情况下,都会通过 git 来管理项目。只要通过 git 来管理项目,那么就必然会遇到使用 git 提交代码的场景
当执行 git commit -m "描述信息" 的时候,知道此时必须添加一个描述信息。但是不同的人去填写描述信息的时候,都会根据自己的理解来进行描述造成混乱。
git提交规范
约定式提交规范要求如下:
<type>[optional scope]: <description>

[optional body]

[optional footer(s)]

--------  翻译 -------------

<类型>[可选 范围]: <描述>

[可选 正文]

[可选 脚注]
其中 <type> 类型,必须是一个可选的值,比如:
- 新功能:
feat - 修复:
fix - 文档变更:
docs - …
Commitizen规范化提交代码
Commitizen:是一个命令行提示工具,它主要用于帮助我们更快地写出规范的commit message
Commitlint:用于校验填写的commit message是否符合设定的规范
Husky:是一个git hook工具,用于在提交过程中的某个特定时刻触发commitlint
————————————————
commitizen 仓库名为 cz-cli ,它提供了一个 git cz 的指令用于代替 git commit,简单一句话介绍它:
当你使用
commitizen进行代码提交(git commit)时,commitizen会提交你在提交时填写所有必需的提交字段!
安装流程
-
全局安装
Commitizennpm install -g commitizen -
全局安装Commitizen的适配器,一般是
cz-conventional-changelog。npm install -g cz-conventional-changelog适配器的作用是按照某个指定的规范帮助我们生成commit message。cz-conventional-changelog 预设的是Angular团队规范。你也可以选择其他的适配器来切换不同的规范,甚至自定义一个适配器。
如果你是mac用户,请运行下面这条命令,它会在你的home目录下,创建一个.czrc文件。路径指向刚才全局安装的适配器。
echo '{ "path": "cz-conventional-changelog" }' > ~/.czrc如果你是windows用户,请把下面这条命令中的C:\Users\12105更换成你自己电脑上的\Users\username目录再运行。这条命令的本质其实就是在Users\username目录下创建一个内容为{ “path”: “cz-conventional-changelog” }的.czrc文件。
echo { "path": "cz-conventional-changelog" } > C:\Users\username\.czrc至此,全局安装Commitizen完成。在任何一个git仓库中运行git cz,就可以通过Commitizen来填写commit message完成提交。
-
安装并配置
cz-customizable插件-
使用
npm下载cz-customizablenpm i cz-customizable --save-dev -
添加以下配置到
package.json中... "config": { "commitizen": { "path": "node_modules/cz-customizable" } }
-
-
项目根目录下创建
.cz-config.js自定义提示文件module.exports = { // 可选类型 types: [ { value: 'feat', name: 'feat: 新功能' }, { value: 'fix', name: 'fix: 修复' }, { value: 'docs', name: 'docs: 文档变更' }, { value: 'style', name: 'style: 代码格式(不影响代码运行的变动)' }, { value: 'refactor', name: 'refactor: 重构(既不是增加feature,也不是修复bug)' }, { value: 'perf', name: 'perf: 性能优化' }, { value: 'test', name: 'test: 增加测试' }, { value: 'chore', name: 'chore: 构建过程或辅助工具的变动' }, { value: 'revert', name: 'revert: 回退' }, { value: 'build', name: 'build: 打包' } ], // 消息步骤 messages: { type: '请选择提交类型:', customScope: '请输入修改范围(可选):', subject: '请简要描述提交(必填):', body: '请输入详细描述(可选):', footer: '请输入要关闭的issue(可选):', confirmCommit: '确认使用以上信息提交?(y/n/e/h)' }, // 跳过问题 skipQuestions: ['body', 'footer'], // subject文字长度默认是72 subjectLimit: 72 } -
使用
git cz代替git commit
使用git cz代替git commit,即可看到提示内容
Git Hooks
为了避免开发人员忘记使用git cz提交
我们希望:
当《提交描述信息》不符合 约定式提交规范 的时候,阻止当前的提交,并抛出对应的错误提示
了解一个概念,叫做 Git hooks(git 钩子 || git 回调方法)
也就是:git 在执行某个事件之前或之后进行一些其他额外的操作
而我们所期望的 阻止不合规的提交消息,那么就需要使用到 hooks 的钩子函数。
整理出来的所有的 hooks ,其中加粗的是常用到的 hooks:
| Git Hook | 调用时机 | 说明 |
|---|---|---|
| pre-applypatch | git am执行前 | |
| applypatch-msg | git am执行前 | |
| post-applypatch | git am执行后 | 不影响git am的结果 |
| pre-commit | git commit执行前 | 可以用git commit --no-verify绕过 |
| commit-msg | git commit执行前 | 可以用git commit --no-verify绕过 |
| post-commit | git commit执行后 | 不影响git commit的结果 |
| pre-merge-commit | git merge执行前 | 可以用git merge --no-verify绕过。 |
| prepare-commit-msg | git commit执行后,编辑器打开之前 | |
| pre-rebase | git rebase执行前 | |
| post-checkout | git checkout或git switch执行后 | 如果不使用--no-checkout参数,则在git clone之后也会执行。 |
| post-merge | git commit执行后 | 在执行git pull时也会被调用 |
| pre-push | git push执行前 | |
| pre-receive | git-receive-pack执行前 | |
| update | ||
| post-receive | git-receive-pack执行后 | 不影响git-receive-pack的结果 |
| post-update | 当 git-receive-pack对 git push 作出反应并更新仓库中的引用时 | |
| push-to-checkout | 当``git-receive-pack对git push做出反应并更新仓库中的引用时,以及当推送试图更新当前被签出的分支且receive.denyCurrentBranch配置被设置为updateInstead`时 | |
| pre-auto-gc | git gc --auto执行前 | |
| post-rewrite | 执行git commit --amend或git rebase时 | |
| sendemail-validate | git send-email执行前 | |
| fsmonitor-watchman | 配置core.fsmonitor被设置为.git/hooks/fsmonitor-watchman或.git/hooks/fsmonitor-watchmanv2时 | |
| p4-pre-submit | git-p4 submit执行前 | 可以用git-p4 submit --no-verify绕过 |
| p4-prepare-changelist | git-p4 submit执行后,编辑器启动前 | 可以用git-p4 submit --no-verify绕过 |
| p4-changelist | git-p4 submit执行并编辑完changelist message后 | 可以用git-p4 submit --no-verify绕过 |
| p4-post-changelist | git-p4 submit执行后 | |
| post-index-change | 索引被写入到read-cache.c do_write_locked_index后 |
PS:详细的 HOOKS介绍 可点击这里查看
整体的 hooks 非常多,当时我们其中用的比较多的其实只有两个:
| Git Hook | 调用时机 | 说明 |
|---|---|---|
| pre-commit | git commit执行前它不接受任何参数,并且在获取提交日志消息并进行提交之前被调用。脚本 git commit以非零状态退出会导致命令在创建提交之前中止。 | 可以用git commit --no-verify绕过 |
| commit-msg | git commit执行前可用于将消息规范化为某种项目标准格式。 还可用于在检查消息文件后拒绝提交。 | 可以用git commit --no-verify绕过 |
简单来说这两个钩子:
commit-msg:可以用来规范化标准格式,并且可以按需指定是否要拒绝本次提交pre-commit:会在提交前被调用,并且可以按需指定是否要拒绝本次提交
接下来要做的关键,就在这两个钩子上面。
使用 husky + commitlint 检查提交描述是否符合规范要求
husky
首先,在项目中安装husky:
npm install husky --save-dev
然后,启用git hooks:, 生成 .husky 文件夹 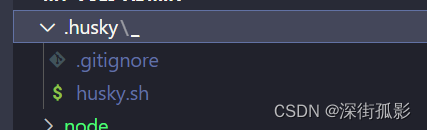
npx husky install
为了以后能在npm install之后自动地启用git hooks,我们可以在package.json中添加以下配置:(prepare脚本会在npm install之后自动执行,它是npm的一个生命周期脚本)
{
  ...
  "scripts": {
    "prepare": "husky install"
  }
}
或者,运行下面这条命令。注意:该命令要求npm版本在7及以上。
npm set-script prepare "husky install"
commitlint
首先,在项目中安装==@commitlint/cli和@commitlint/config-conventional==。
npm install --save-dev @commitlint/config-conventional @commitlint/cli
@commitlint/config-conventional,它配置了Commitlint使用的校验规则,要求commit message符合Angular团队规范。当然,也可以通过安装其他的配置包来切换不同的规范。
然后,在项目目录下添加commitlint.config.js配置文件。
echo module.exports = {extends: ['@commitlint/config-conventional']} > commitlint.config.js
最后,添加commit-msg hook配置,用于在commit-msg中校验commit message。commit-msg是一个git hook,它会在提交时被触发。
.\node_modules\.bin\husky add .husky/commit-msg "npx --no -- commitlint --edit $1"
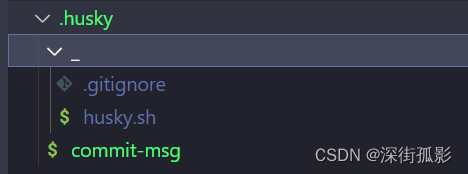
或:
npx husky add .husky/commit-msg 'npx --no commitlint --edit "$1"'
现在,你就可以通过git cz来代替git commit,借助Commitizen的提交完成提交。比如像这样:
-
打开
commitlint.config.js, 增加配置项( config-conventional 默认配置点击可查看 ):module.exports = { // 继承的规则 extends: ['@commitlint/config-conventional'], // 定义规则类型 rules: { // type 类型定义,表示 git 提交的 type 必须在以下类型范围内 'type-enum': [ 2, 'always', [ 'feat', // 新功能 feature 'fix', // 修复 bug 'docs', // 文档注释 'style', // 代码格式(不影响代码运行的变动) 'refactor', // 重构(既不增加新功能,也不是修复bug) 'perf', // 性能优化 'test', // 增加测试 'chore', // 构建过程或辅助工具的变动 'revert', // 回退 'build' // 打包 ] ], // subject 大小写不做校验 'subject-case': [0] } }
注意:确保保存为 UTF-8 的编码格式,否则可能会出现错误
最后,添加commit-msg hook配置,用于在commit-msg中校验commit message。commit-msg是一个git hook,它会在提交时被触发。
.\node_modules\.bin\husky add .husky/commit-msg "npx --no -- commitlint --edit $1"
或:
npx husky add .husky/commit-msg 'npx --no commitlint --edit "$1"'
现在,就可以通过git cz来代替git commit,借助Commitizen的提交完成提交。已经可以处理好了 强制规范化的提交要求,到现在 不符合规范的提交信息,将不可在被提交!
pre-commit 检测提交时代码规范
在 ESLint 与 Prettier 配合解决代码格式问题 中了解了如何处理 本地!代码格式问题。
但是这样的一个格式处理问题,他只能够在本地进行处理,并且我们还需要 手动在 VSCode 中配置自动保存 才可以。那么这样就会存在一个问题,要是有人忘记配置这个东西了怎么办呢?他把代码写的乱七八糟的直接就提交了怎么办呢?
所以我们就需要有一种方式来规避这种风险。
那么想要完成这么一个操作就需要使用 husky 配合 eslint 才可以实现。
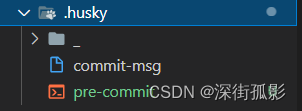
我们期望通过 husky 监测 pre-commit 钩子,在该钩子下执行 npx eslint --ext .js,.vue src 指令来去进行相关检测:
-
执行
npx husky add .husky/pre-commit "npx eslint --ext .js,.vue src"添加commit时的hook(npx eslint --ext .js,.vue src会在执行到该 hook 时运行) -
该操作会生成对应文件
pre-commit:
-
关闭
VSCode的自动保存操作 -
修改一处代码,使其不符合
ESLint校验规则 -
执行 提交操作 会发现,抛出一系列的错误,代码无法提交
PS E:\StudySpace\my-vue3-admin\src\views\HomeView.vue 18:24 error Extra semicolon semi 19:23 error Extra semicolon semi ✖ 2 problems (2 errors, 0 warnings) 2 errors and 0 warnings potentially fixable with the `--fix` option. husky - pre-commit hook exited with code 1 (error) -
想要提交代码,必须处理完成所有的错误信息
lint-staged 自动修复格式错误
通过 pre-commit 处理了 检测代码的提交规范问题,当我们进行代码提交时,会检测所有的代码格式规范 。
但是这样会存在两个问题:
- 我们只修改了个别的文件,没有必要检测所有的文件代码格式
- 它只能给我们提示出对应的错误,我们还需要手动的进行代码修改
我们就需要处理这两个问题
那么想要处理这两个问题,就需要使用另外一个插件 lint-staged !
lint-staged 可以让你当前的代码检查 只检查本次修改更新的代码,并在出现错误的时候,自动修复并且推送
lint-staged 无需单独安装,我们生成项目时,vue-cli 已经帮助我们安装过了,所以我们直接使用就可以了
-
修改
package.json配置"lint-staged": { "src/**/*.{js,vue}": [ "eslint --fix", "git add" ] } -
如上配置,每次它只会在你本地
commit之前,校验你提交的内容是否符合你本地配置的eslint规则(这个见文档 ESLint ),校验会出现两种结果:- 如果符合规则:则会提交成功。
- 如果不符合规则:它会自动执行
eslint --fix尝试帮你自动修复,如果修复成功则会帮你把修复好的代码提交,如果失败,则会提示你错误,让你修好这个错误之后才能允许你提交代码。
-
修改
.husky/pre-commit文件#!/bin/sh . "$(dirname "$0")/_/husky.sh" npx lint-staged -
再次执行提交代码
-
发现 暂存区中 不符合
ESlint的内容,被自动修复
总结
本章中处理了 编程格式规范的问题,整个规范大体可以分为两大类:
- 代码格式规范
git提交规范
代码格式规范:
对于 代码格式规范 而言,通过 ESLint + Prettier + VSCode 配置 配合进行了处理。
最终达到了在保存代码时,自动规范化代码格式的目的。
git 提交规范:
对于 git 提交规范 而言使用了 husky 来监测 Git hooks 钩子,并且通过以下插件完成了对应的配置:
- 约定式提交规范
- commitizen:git 提交规范化工具
- commitlint:用于检查提交信息
pre-commit:git hooks钩子- lint-staged:只检查本次修改更新的代码,并在出现错误的时候,自动修复并且推送
登录架构实现
在完成相关创建后以及设置规范开发后需要删除多余文件
和内容:
-
App.vue初始化代码如下:
<template> <router-view/> </template> <style lang="scss"> </style> -
删除views文件夹下所有.vue文件
-
删除components文件夹下的所有.vue文件
-
router/index.js中初始化代码如下:
import { createRouter, createWebHashHistory } from 'vue-router' const routes = [] const router = createRouter({ history: createWebHashHistory(), routes }) export default router -
修改package.json "script"字段
"scripts": { "dev": " "serve": "vue-cli-service serve", "dev":"npm run serve",vue-cli-service serve", "build": "vue-cli-service build", "lint": "vue-cli-service lint", "prepare": "husky install" }, -
运行项目
npm run dev -
浏览器打开后显示-
vue3项目初始结构解析
vue3初始项目和vue2的项目对比
main.js- 通过 按需导入的
createApp方法来来构建vue实例 - 通过
vue实例.use方法来挂载插件(router、vuex) - 没有了
Vue构造方法,无法再挂载原型
- 通过 按需导入的
App.vue- 组件内部结构无变化,依然是
tempaltescriptstyle
<template>标签中支持多个根标签
- 组件内部结构无变化,依然是
store/index.js- 通过 按需导入的
createStore方法来来构建store实例 - 无需再通过
Vue.use(Vuex)的形式进行挂载
- 通过 按需导入的
router/index.js- 通过 按需导入的
createRouter方法来构建router实例 - 通过 按需导入的
createWebHashHistory方法来创建hash模式对象,进行路由模式指定 - 无需再通过
Vue.use(VueRouter)的形式进行挂载 routes路由表的定义无差别
- 通过 按需导入的
综上所述,在 vue3 的初始化项目中,与 vue2 对比的最大差异其实就是两点:
vue3使用 按需导入的形式 进行初始化操作<template>标签中支持多个根标签
vue3新特性
vue3新增内容:
composition API- 使用了
Proxy代替Object.defineProperty()实现响应式 - 全新的全家桶
- 全新的
TS支持 vite
Composition API:组合式 API
想要了解 组合式 API,那么首先需要先了解 options API,也就是 vue2 中的开发形式。
vue2 中的开发形式被称为 options API,options API 存在
- 方便
- 易学
- 清晰
等一些特点,但是也存在着一些问题。
而其中最主要的一个问题就是:当你的组件变得越来越复杂时,组件的可读性会变得越来越差。
而 options API 所存在的问题:当你的组件变得越来越复杂时,组件的可读性会变得越来越差。
而 Composition API 所期望解决的就是这么一个问题
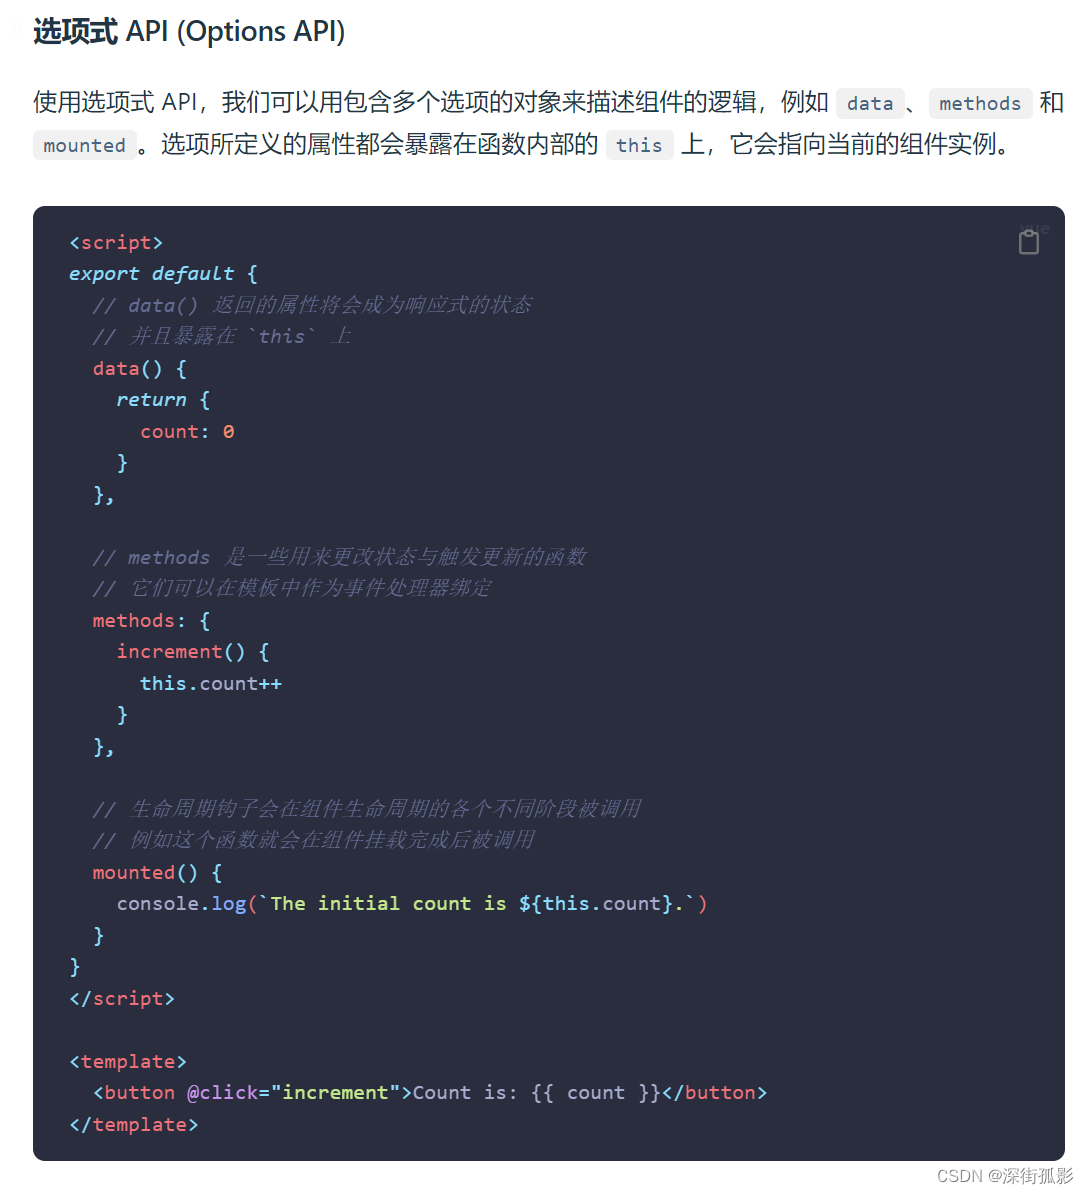
把定义数据与使用数据的逻辑放在一起进行处理,以达到更加易读,更加方便扩展的目的!
该选哪一个?
两种 API 风格都能够覆盖大部分的应用场景。它们只是同一个底层系统所提供的两套不同的接口。实际上,选项式 API 是在组合式 API 的基础上实现的!关于 Vue 的基础概念和知识在它们之间都是通用的。
选项式 API 以“组件实例”的概念为中心 (即上述例子中的 this),对于有面向对象语言背景的用户来说,这通常与基于类的心智模型更为一致。同时,它将响应性相关的细节抽象出来,并强制按照选项来组织代码,从而对初学者而言更为友好。
组合式 API 的核心思想是直接在函数作用域内定义响应式状态变量,并将从多个函数中得到的状态组合起来处理复杂问题。这种形式更加自由,也需要你对 Vue 的响应式系统有更深的理解才能高效使用。相应的,它的灵活性也使得组织和重用逻辑的模式变得更加强大。
在组合式 API FAQ 章节中,你可以了解更多关于这两种 API 风格的对比以及组合式 API 所带来的潜在收益。
如果你是使用 Vue 的新手,这里是我们的大致建议:
- 在学习的过程中,推荐采用更易于自己理解的风格。再强调一下,大部分的核心概念在这两种风格之间都是通用的。熟悉了一种风格以后,你也能够很快地理解另一种风格。
- 在生产项目中:
- 当你不需要使用构建工具,或者打算主要在低复杂度的场景中使用 Vue,例如渐进增强的应用场景,推荐采用选项式 API。
- 当你打算用 Vue 构建完整的单页应用,推荐采用组合式 API + 单文件组件。
在学习阶段,你不必只固守一种风格 。
使用了 Proxy 代替 Object.defineProperty() 实现响应式
在 vue 2 的文档中 有这么一段话:
由于 JavaScript 的限制,Vue 不能检测数组和对象的变化。
这里所谓的 JavaScript 的限制,所指的就是 Object.defineProperty() 的限制。
因为 Object.defineProperty() 是通过:为对象属性指定描述符 的方式来监听 对象中某个属性的 get 和 set。
所以在以下两种情况下,新的属性是 非响应式的:
-
对于对象:
var vm = new Vue({ data:{ a:1 } }) // `vm.a` 是响应式的 vm.b = 2 // `vm.b` 是非响应式的 -
对于数组:
var vm = new Vue({
  data: {
    items: ['a', 'b', 'c']
  }
})
vm.items[1] = 'x' // 不是响应性的
vm.items.length = 2 // 不是响应性的
这也是为什么会存在 Vue.set 这个 API 的原因。
但是,这样的一种情况其实一直都是不合理的,因为这只是无意义的增加了复杂度而已,但是一直以来因为 Object.defineProperty() 这个 API 本身的限制,所以一直无法处理。
直到 Proxy 被广泛支持,这种情况才发生了变化。
Proxy 用于:为对象创建一个代理,从而实现基本操作的拦截。 那么这样就从根本上解决了 Object.defineProperty() 所面临的那么两个问题。这也是为什么 vue3 中不再有 Vue.set 方法的原因。
关于 proxy 的详细介绍,大家可以查看这一篇博客 Vue 3 深入响应式原理 - 聊一聊响应式构建的那些经历,在视频中,就不过多赘述了
全新的全家桶
vue 被称为是 渐进式框架,就是因为,对于 vue 而言,它不仅仅只有 vue.js 这一个核心库,还有其他的比如 vue-router,vuex 等一些周边库。这些周边库和 vue.js 一起共同组成了 vue 。
所以说当 vue3 发布之后,vue-router、vuex 等全家桶也迎来了一波更新。在前面的 vue3 项目结构解析 这一小节,大家应该也能看到对应的代码变化。
全新的 TS 支持
vue 3 使用 TypeScript 进行了重构,其目的是 为了防止随着应用的增长,而产生的许多潜在的运行时静态类型的错误 。同时这也意味着以后在 vue 中使用 TypeScript 不再需要其他的任何工具。
但是有一点我需要提醒大家,虽然 vue 对 TypeScript 进行全面支持,这并不代表应该在任何情况下都无条件的使用 TypeScript(后面简称 TypeScript 为 TS)。
TS 的优势主要在于 静态类型检查和环境声明,但同时它也会为你的项目增加复杂度。如果你的项目需要使用到以上两点,那么我推荐你使用 TS 。否则只是增加了无谓的复杂度而已。
决定应该使用哪种技术的唯一条件,就是开发的目标。 需要做的是在可以 完成目标 的基础上,寻找最简单的实现方案。
所以,基于以上原因,项目中并没有使用 TS 进行项目的开发。如果在后续的过程中,发现大家有这方面的需要,那么我会考虑专门针对 TS 的特性来开发一个对应的项目。
vite
最后就是一个新的打包工具 vite,vite 严格来说不能算是 vue3 的内容,只不过它跟随 vue3 进行了发布所以这里就把它算到了新特性里面。
vite 的作用其实和 webpack 是一样的,都是一个 前端构建工具。它区别于 webpack 的地方在于它完全使用了 ES Module 的特性,可以无需预先打包,而是采用实时编译的方式。这样让它具备了远高于 webpack 的启动速度和热更新速度。
但是 成也萧何,败也萧何 因为 vite 完全依赖 ES Module 就导致了 它无法直接对 commonJS 的模块化方式进行支持,必须得采用 依赖预构建 的形式。
目前 vite 还不够稳定到足够支持商用,所以如果大家只是想要尝鲜,那么没有问题。如果大家希望创建一个商用的大型项目,那么个人还是推荐更加成熟的 webpack 方案。
而当前的项目旨在构建一个 后台前端解决方案系统,所以这里依然选择了 webpack ,而不是 vite。
全新的提案语法:script setup
下面两张截图为对比 原setup函数 与 script setup:
-
原 setup函数
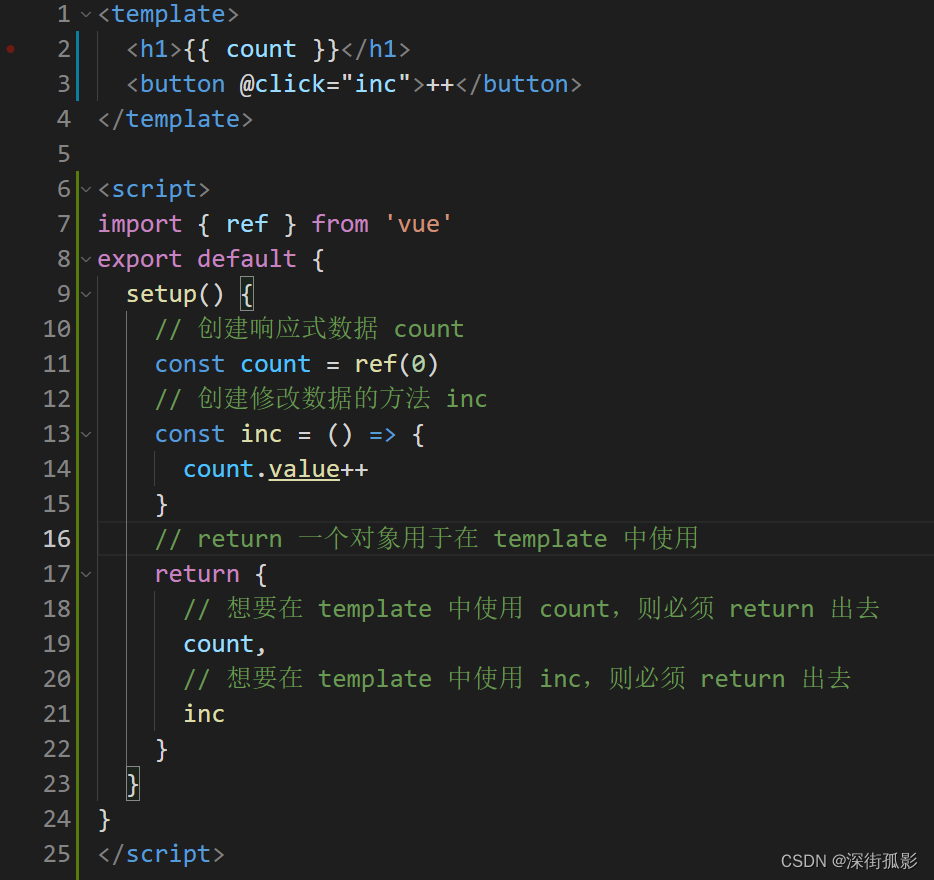
-
script setup
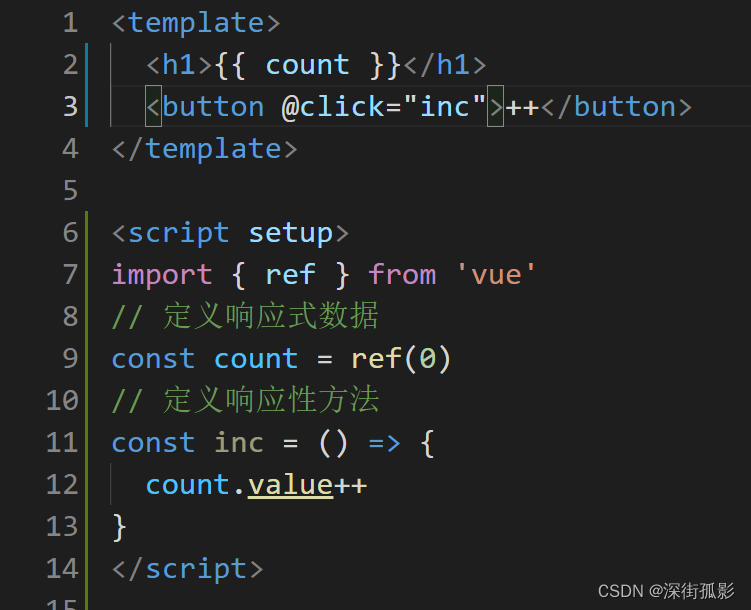
从截图中可以看出 script setup 语法更加符合开发者书写 JS 代码的习惯,它让书写 vue 就像再写普通的 js 一样。
所以以后的 composition API 将是 script setup 语法的时代,原setup函数 将会逐渐退出历史舞台。
导入 element-plus 和Icon图标
# element-plus选择一个你喜欢的包管理器

# NPM
$ npm install element-plus --save

# Yarn
$ yarn add element-plus

# pnpm
$ pnpm install element-plus
# Icon选择一个你喜欢的包管理器

# NPM
$ npm install @element-plus/icons-vue
# Yarn
$ yarn add @element-plus/icons-vue
# pnpm
$ pnpm install @element-plus/icons-vue
安装后修改main.js
// 引入ElementPlus
import ElementPlus from 'element-plus'
import 'element-plus/dist/index.css'
import zhCn from 'element-plus/dist/locale/zh-cn.mjs'
// 引入ElementPlusIcon
import * as ElementPlusIconsVue from '@element-plus/icons-vue'
const app = createApp(App)
for (const [key, component] of Object.entries(ElementPlusIconsVue)) {
  app.component(key, component)
}
按需导入#
您需要使用额外的插件来导入要使用的组件。
自动导入推荐#
首先你需要安装unplugin-vue-components 和 unplugin-auto-import这两款插件
npm install -D unplugin-vue-components unplugin-auto-import
然后把下列代码插入到你的 Vite 或 Webpack 的配置文件中
Vite#
// vite.config.ts
import { defineConfig } from 'vite'
import AutoImport from 'unplugin-auto-import/vite'
import Components from 'unplugin-vue-components/vite'
import { ElementPlusResolver } from 'unplugin-vue-components/resolvers'

export default defineConfig({
  // ...
  plugins: [
    // ...
    AutoImport({
      resolvers: [ElementPlusResolver()],
    }),
    Components({
      resolvers: [ElementPlusResolver()],
    }),
  ],
})
Webpack#
// webpack.config.js
const AutoImport = require('unplugin-auto-import/webpack')
const Components = require('unplugin-vue-components/webpack')
const { ElementPlusResolver } = require('unplugin-vue-components/resolvers')

module.exports = {
  // ...
  plugins: [
    AutoImport({
      resolvers: [ElementPlusResolver()],
    }),
    Components({
      resolvers: [ElementPlusResolver()],
    }),
  ],
}
想了解更多打包 (Rollup, Vue CLI) 和配置工具,请参考 unplugin-vue-components 和 unplugin-auto-import。
修改vue.config.js
const {
  defineConfig
} = require('@vue/cli-service')
const AutoImport = require('unplugin-auto-import/webpack')
const Components = require('unplugin-vue-components/webpack')
const {
  ElementPlusResolver
} = require('unplugin-vue-components/resolvers')
module.exports = defineConfig({
  transpileDependencies: true,
  configureWebpack: {
    plugins: [
      AutoImport({
        resolvers: [ElementPlusResolver()],
      }),
      Components({
        resolvers: [ElementPlusResolver()],
      }),
    ],
  },

})
创建登录页面
-
在
views中login文件夹,创建index.vue文件

-
在
router/index.js中增加以下路由配置/** * 公开路由表 */ const publicRoutes = [ { path: '/login', component: () => import('@/views/login/index') } ] const router = createRouter({ history: createWebHashHistory(), routes: publicRoutes }) -
在
login/index.vue中,生成基本页面结构<template> <div class=""></div> </template> <script setup> import {} from 'vue' </script> <style lang="scss" scoped></style> -
创建登录页面基本结构
<template>
  <div class="login-container">
    <el-form class="login-form">
      <div class="title-container">
        <h3 class="title">用户登录</h3>
      </div>
      <!-- username -->
      <el-form-item prop="username">
        <span class="svg-container">
          <el-icon>
            <avatar />
          </el-icon>
        </span>
        <el-input v-model="input" placeholder="username" name="username" type="text" />
      </el-form-item>
      <!-- passsword -->
      <el-form-item prop="password">
        <span class="svg-container">
          <el-icon>
            <avatar />
          </el-icon>
        </span>
        <el-input v-model="input" placeholder="password" name="password" type="password" />
        <span class="show-pwd">
          <el-icon>
            <avatar />
          </el-icon>
        </span>
      </el-form-item>

      <el-button type="primary" style="width: 100%; margin-bottom: 30px">登录</el-button>
    </el-form>
  </div>
</template>

<script setup>
import { ref } from 'vue'
const input = ref('')

</script>
美化登录页面样式
-
创建全局的
style-
在
src下创建styles/index.scss文件,并写入以下内容:html, body { height: 100%; margin: 0; padding: 0; -moz-osx-font-smoothing: grayscale; -webkit-font-smoothing: antialiased; text-rendering: optimizeLegibility; font-family: Helvetica Neue, Helvetica, PingFang SC, Hiragino Sans GB, Microsoft YaHei, Arial, sans-serif; } #app { height: 100%; } *, *:before, *:after { box-sizing: inherit; margin: 0; padding: 0; } a:focus, a:active { outline: none; } a, a:focus, a:hover { cursor: pointer; color: inherit; text-decoration: none; } div:focus { outline: none; } .clearfix { &:after { visibility: hidden; display: block; font-size: 0; content: ' '; clear: both; height: 0; } } -
在
main.js中导入全局样式... // 导入全局样式 import './styles/index.scss' ... -
在
views/login/index.vue中写入以下样式<style lang="scss" scoped> $bg: #2d3a4b; $dark_gray: #889aa4; $light_gray: #eee; $cursor: #fff; .login-container { min-height: 100%; width: 100%; background-color: $bg; overflow: hidden; .login-form { position: relative; width: 520px; max-width: 100%; padding: 160px 35px 0; margin: 0 auto; overflow: hidden; ::v-deep(.el-form-item) { border: 1px solid rgba(255, 255, 255, 0.1); background: rgba(0, 0, 0, 0.1); border-radius: 5px; color: #454545; } ::v-deep(.el-input) { // display: inline-block; height: 47px; width: 85%; .el-input__wrapper { background: transparent; box-shadow: none; } input { border: none; outline: none; outline: none; box-shadow: none; background: transparent; border: 0px; // -webkit-appearance: none; border-radius: 0px; padding: 12px 5px 12px 15px; color: $light_gray; height: 47px; caret-color: $cursor; } } } .svg-container { padding: 6px 5px 6px 15px; color: $dark_gray; vertical-align: middle; display: inline-block; } .title-container { position: relative; .title { font-size: 26px; color: $light_gray; margin: 0px auto 40px auto; text-align: center; font-weight: bold; } } .show-pwd { position: absolute; right: 10px; top: 7px; font-size: 16px; color: $dark_gray; cursor: pointer; user-select: none; } } </style>
-
Icon 图标处理方案:SvgIcon
在项目中所使用的 icon 图标,一共分为两类:
element-plus的图标- 自定义的
svg图标
这也是通常情况下企业级项目开发时,所遇到的一种常见情况。
对于 element-plus 的图标可以直接通过 el-icon 来进行显示,但是自定义图标的话,暂时还缺少显示的方式,所以说需要一个自定义的组件,来显示自定义的 svg 图标。
那么这种自定义组件处理 自定义 svg 图标的形式,就是在面临这种问题时的通用解决方案。
那么对于这个组件的话,它就需要拥有两种能力:
- 显示外部
svg图标 - 显示项目内的
svg图标
基于以上概念,可以创建出以下对应代码:
创建 components/SvgIcon/index.vue:
<template>
  <!-- 展示外部图标 -->
  <div v-if="isExternal" :style="styleExternalIcon" class="svg-external-icon svg-icon" :class="className"></div>
  <!-- 展示内部图标 -->
  <svg v-else class="svg-icon" :class="className" aria-hidden="true">
    <use :xlink:href="iconName" />
  </svg>
</template>

<script setup>
import { isExternal as external } from '@/utils/validate';
import { defineProps, computed } from 'vue';
const props = defineProps({
  // icon图标
  icon: {
    type: String,
    required: true
  },
  // 图标类名
  className: {
    type: String,
    default: ''
  }
})

/**
 * @description: 判断当前图标是否为外部图标
 * @param {*} computed
 * @return {*}
 */
const isExternal = computed(() => external(props.icon));
/**
 * @description:  外部图标样式
 * @param {*} computed
 * @return {*}
 */
const styleExternalIcon = computed(() => ({
  mask: `url(${props.icon}) no-repeat 50% 50%`,
  '-webkit-mask': `url(${props.icon}) no-repeat 50% 50%`
}));

/**
 * @description: 内部图标
 * @param {*} computed
 * @return {*}
 */
const iconName = computed(() => `#icon-${props.icon}`);
</script>

<style lang='scss' scoped>
.svg-icon {
  width: 1em;
  height: 1em;
  vertical-align: -0.15em;
  fill: currentColor;
  overflow: hidden;
}

.svg-external-icon {
  background-color: currentColor;
  mask-size: cover !important;
  display: inline-block;
}
</style>
创建 utils/validate.js:
/**
 * @description: 判断是否为外部资源
 * @param {*} path
 * @return {*}
 */
export function isExternal(path) {
  return /^(https?:|mailto:|tel:)/.test(path)
}
在 views/login/index.vue 中使用 外部 svg (https://res.lgdsunday.club/user.svg):
<span class="svg-container">
	<svg-icon icon="https://res.lgdsunday.club/user.svg"></svg-icon>
</span>
外部图标可正常展示。
处理内部 svg 图标显示
处理 内部的 svg 图标展示。
-
首先导入所有的
svg图标 ->src -> icons -> svg,导入到src -> icons -> svg处 -
在
icons下创建index.js文件,该文件中需要完成两件事情:- 导入所有的
svg图标 - 完成
SvgIcon的全局注册
- 导入所有的
-
得出以下代码:
/** * @description: 1、导入所有的svg图标 * @return {*} */ import SvgIcon from '@/components/SvgIcon'; // https://webpack.docschina.org/guides/dependency-management/#requirecontext // 通过 require.context() 函数来创建自己的 context const svgRequire = require.context('./svg', false, /\.svg$/) // 此时返回了一个Require函数,可以接收一个request的参数,用于require的导 // 该函数提供了三个属性,可以通过 svgRequire.keys() 获取所有的svg图标 // 遍历图标,把图标作为request 参数参入到 svgRequire 导入函数中,完成本地svg 图标的导入 // console.log(svgRequire.keys()); svgRequire.keys().forEach(svgIcon => svgRequire(svgIcon)) /** * @description: 2、完成SvgIcon的全局注册 * @return {*} */ export default app => { app.component('svg-icon', SvgIcon); } -
在
main.js中引入该文件... // 导入svgIcon import installIcons from '@/icons' ... installIcons(app) ... -
删除
views/login下 局部导入SvgIcon的代码 -
在
login/index.vue中使用SvgIcon引入本地svg// 用户名 <svg-icon icon="user" /> // 密码 <svg-icon icon="password" /> // 眼睛 <svg-icon icon="eye" /> -
此时 处理内容
svg图标的代码 已经完成
打开浏览器,发现 图标依然无法展示!
使用 svg-sprite-loader 处理 svg 图标
svg-sprite-loader 是 webpack 中专门用来处理 svg 图标的一个 loader ,图标之所有没有展示,就是因为缺少该 loader。
那么想要使用该 loader 需要做两件事情:
-
下载该
laoder,执行:npm i --save-dev svg-sprite-loader@6.0.9 -
创建
vue.config.js文件,新增如下配置:const path = require('path') function resolve(dir) { return path.join(__dirname, dir) } // https://cli.vuejs.org/zh/guide/webpack.html#%E7%AE%80%E5%8D%95%E7%9A%84%E9%85%8D%E7%BD%AE%E6%96%B9%E5%BC%8F module.exports = defineConfig({ ... chainWebpack(config) { // 设置 svg-sprite-loader // config 为 webpack 配置对象 // config.module 表示创建一个具名规则,以后用来修改规则 config.module // 规则 .rule('svg') // 忽略 .exclude.add(resolve('src/icons')) // 结束 .end() // config.module 表示创建一个具名规则,以后用来修改规则 config.module // 规则 .rule('icons') // 正则,解析 .svg 格式文件 .test(/\.svg$/) // 解析的文件 .include.add(resolve('src/icons')) // 结束 .end() // 新增了一个解析的loader .use('svg-sprite-loader') // 具体的loader .loader('svg-sprite-loader') // loader 的配置 .options({ symbolId: 'icon-[name]' }) // 结束 .end() } })
处理完以上配置之后,重新启动项目,图标即可显示!
Vue3.2 响应式优化对应用层的改变
在处理好了 SvgIcon 图标之后,接下来就需要处理登陆页面的逻辑问题了。不过在处理这个逻辑之前,需要先来明确一点 vue3 新的更新内容。
如果大家之前有过了解 Vue3 代码的话,那么会知道 Vue3 中声明响应式数据的方式有两种:
对于这两种使用方式而言,它们在应用层上并没有明确的界限,也就是说可能很难仅通过官网的介绍来判断我应该在什么情况下使用什么。
但是这种情况在现在已经不存在了。
2020年10月29日,社区大佬 basvanmeurs 提出了一个新的 PR,大概的意思是说:他重构了响应式的部分内容,大大增加了性能。
详细的介绍如下:
- Big runtime performance improvement for ref, computed, watch and watchEffect (30%-80% depending on the amount of dependencies)
- Memory usage decreased by about 30% when creating ref, computed, watch and watchEffect
- Creation time performance improvement, most notably for watchers and watchEffects
ref、calculated、watch 和 watchEffect 的运行时性能大幅提升(30%-80% 取决于依赖项的数量)
创建 ref、calculated、watch 和 watchEffect 时内存使用量减少了约 30%
创建时间性能改进,最显著的是 watchers 和 watchEffects
这是一个非常强大的变化,同时又因为这个变化过于庞大,所以一直等待到 2021年8月5日 伴随着 vue 3.2发布,尤大才合并对应的代码,并在这次变化中对该性能改进进行了如下的介绍:
- More efficient ref implementation (~260% faster read / ~50% faster write)
- ~40% faster dependency tracking
- ~17% less memory usage
更高效的 ref 实现(约 260% 的读取速度/约 50% 的写入速度)
依赖项跟踪速度提高约 40%
内存使用量减少约 17%
毫无疑问,这绝对是一个伟大的变化。
那么针对于这个变化,在应用层中最大的体现就是 ref 这个 API ,性能得到了大幅度的提升。
所以说,拥抱新的变化吧!
在之后能使用 ref 的地方就使用 ref 吧。毕竟现在它的性能得到了大幅的提升!
那么在咱们之后的代码中,同样也会全部使用 ref 来作为响应式数据构建的方式,无论是 基本数据类型 或者是 复杂数据类型, 毕竟这样做本身并没有什么问题,对不对?
完善登录表单校验
表单校验是表单使用的一个通用能力,在 element-plus 中想要为表单进行表单校验那么需要关注以下三点:
- 为
el-form绑定model属性 - 为
el-form绑定rules属性 - 为
el-form-item绑定prop属性
保证以上三点即可为 el-from 添加表单校验功能。
因为这一块是比较简单的功能,只要有过 element-ui 使用经验的同学,应该对这里都不陌生,所以这里就不对这块内容进行过多赘述了。对这里不是很了解的同学可以参考下 element-plus 中 from 表单部分
以下为对应的代码实现:
views/login
<template>
  <div class="login-container">
    <el-form class="login-form" :model="loginForm" :rules="loginRules">
      <div class="title-container">
        <h3 class="title">用户登录</h3>
      </div>
      <!-- username -->
      <el-form-item prop="username">
        <span class="svg-container">
          <svg-icon icon="user" />
        </span>
        <el-input v-model="loginForm.username" placeholder="username" name="username" type="text" />
      </el-form-item>
      <!-- passsword -->
      <el-form-item prop="password">
        <span class="svg-container">
          <svg-icon icon="password" />
        </span>
        <el-input v-model="loginForm.password" placeholder="password" name="password" type="password" />
        <span class="show-pwd">
          <svg-icon icon="eye" />
        </span>
      </el-form-item>

      <el-button type="primary" style="width: 100%; margin-bottom: 30px">登录</el-button>
    </el-form>
  </div>
</template>

<script setup>
import SvgIcon from '@/components/SvgIcon'
import { ref } from 'vue'
import { validatePassword } from './rules';
// 数据源
const loginForm = ref({
  username: 'super-admin',
  password: '123456'
});
// 验证规则
const loginRules = ref({
  username: [
    {
      required: true,
      trigger: 'blur',
      message: '用户名为必填项'
    }
  ],
  password: [
    {
      required: true,
      trigger: 'blur',
      validator: validatePassword()
    }
  ]
});
</script>
views/login/rules.js
/**
 * @description: 密码校验
 * @return {*}
 */
export const validatePassword = () => {
  return (rule, value, callback) => {
    if (value.length < 6) {
      return callback(new Error('Invalid password,密码不能少于6位'));
    } else {
      return callback();
    }
  }
}
密码框状态通用处理
对于密码框存在两种状态:
- 密文状态
- 明文状态
点击 眼睛 可以进行切换。
该功能实现为通用的处理方案,只需要动态修改 input 的 type 类型即可,其中:
password为密文显示text为明文显示
根据以上理论,即可得出以下代码:
<template>
  <div class="login-container">
    <el-form class="login-form" :model="loginForm" :rules="loginRules">
      ...
        <el-input
          ...
          :type="passwordType"
        />
        <span class="show-pwd">
          <svg-icon
            :icon="passwordType === 'password' ? 'eye' : 'eye-open'"
            @click="onChangePwdType"
          />
        </span>
      ...
    </el-form>
  </div>
</template>

<script setup>
import { ref } from 'vue'
...

// 处理密码框文本显示状态
const passwordType = ref('password')
const onChangePwdType = () => {
  if (passwordType.value === 'password') {
    passwordType.value = 'text'
  } else {
    passwordType.value = 'password'
  }
}
</script>
通用后台登录方案解析
处理完了表单的基本操作之后,接下来就是登录操作的实现了。
对于登录操作在后台项目中是一个通用的解决方案,具体可以分为以下几点:
- 封装
axios模块 - 封装 接口请求 模块
- 封装登录请求动作
- 保存服务端返回的
token - 登录鉴权
这些内容就共同的组成了一套 后台登录解决方案 。
配置环境变量封装 axios 模块
安装axios
npm i --save axios
首先先去完成第一步:封装 axios 模块。
在当前这个场景下,希望封装出来的 axios 模块,至少需要具备一种能力,那就是:根据当前模式的不同,设定不同的 BaseUrl ,因为通常情况下企业级项目在 开发状态 和 生产状态 下它的 baseUrl 是不同的。
对于 @vue/cli 来说,它具备三种不同的模式:
developmenttestproduction
具体可以点击 这里 进行参考。
根据前面所提到的 开发状态和生产状态 那么此时的 axios 必须要满足:在 开发 || 生产 状态下,可以设定不同 BaseUrl 的能力
那么想要解决这个问题,就必须要使用到 @vue/cli 所提供的 环境变量 来去进行实现。
可以在项目中创建两个文件:
.env.development.env.production
它们分别对应 开发状态 和 生产状态。
可以在上面两个文件中分别写入以下代码:
.env.development:
#标志
ENV = 'development'


#base api
VUE_APP_BASE_API = '/api'
.env.production:
#标志
ENV = 'production'


#base api
VUE_APP_BASE_API = '/prod-api'
有了这两个文件之后,就可以创建对应的 axios 模块
创建 utils/request.js ,写入如下代码:
import axios from 'axios';

const service = axios.create({
  baseURL: process.env.VUE_APP_BASE_API,
  timeout: 5000
})

export default service
封装请求动作
有了 axios 模块之后,接下来就可以
- 封装接口请求模块
- 封装登录请求动作
封装接口请求模块:
创建 api 文件夹,创建 sys.js:
import request from '@/utils/request'

/**
 * 登录
 */
export const login = data => {
  return request({
    url: '/sys/login',
    method: 'POST',
    data
  })
}
封装登录请求动作:
安装md5
npm i --save md5
该动作期望把它封装到 vuex 的 action 中
在 store 下创建 modules 文件夹,创建 user.js 模块,用于处理所有和 用户相关 的内容(此处需要使用第三方包 md5 ):
import {
  login
} from '@/api/sys'
import md5 from 'md5'

export default {

  namespaced: true, // 表示单独的模块不会合并到主模块中去
  state: () => ({}),
  mutations: {
  },
  actions: {
    login(context, userInfo) {
      const {
        username,
        password
      } = userInfo

      return new Promise((resolve, reject) => {
        login({
            username,
            password: md5(password)
          }).then(data => {
            // this.commit('user/setToken', data.token)
            console.log(data);
            // 保存登录时间
            resolve()
          })
          .catch(err => {
            reject(err)
          })
      })
    }
  },

}
在 store/index 中完成注册:
import {
  createStore
} from 'vuex'
import user from './modules/user.js'
export default createStore({
  state: {},
  getters: {},
  mutations: {},
  actions: {},
  modules: {
    user: user
  }
})
登录触发动作
在 login 中,触发定义的 action
<template>
  <div class="login-container">
    <el-form class="login-form" :model="loginForm" ref="loginFormRef" :rules="loginRules">
      <div class="title-container">
        <h3 class="title">用户登录</h3>
      </div>
      <!-- username -->
      <el-form-item prop="username">
        <span class="svg-container">
          <svg-icon icon="user" />
        </span>
        <el-input v-model="loginForm.username" placeholder="username" name="username" type="text" />
      </el-form-item>
      <!-- passsword -->
      <el-form-item prop="password">
        <span class="svg-container">
          <svg-icon icon="password" />
        </span>
        <el-input v-model="loginForm.password" placeholder="password" name="password" :type="passwordType" />
        <span class="show-pwd" @click="onChangePwdType">
          <svg-icon :icon="passwordType === 'password' ? 'eye' : 'eye-open'" />
        </span>
      </el-form-item>

      <el-button type="primary" style="width: 100%; margin-bottom: 30px" :loading="loading"
        @click="handleLogin">登录</el-button>
    </el-form>
  </div>
</template>

<script setup>
import { ref } from 'vue'
import { validatePassword } from './rules';
import { useStore } from 'vuex'

......

// 处理登录
const loading = ref(false);
const loginFormRef = ref(null);
const store = useStore()
const handleLogin = () => {
  // 1. 进行表单校验

  loginFormRef.value.validate(valid => {
    if (!valid) return
    loading.value = true
    // 2.触发登录动作
    store.dispatch('user/login', loginForm.value).then(() => {
     loading.value = false
 	 // 3.进行登录后处理
    }).catch(err => {
      console.log(err);
      loading.value = false
    })
  });
}
</script>
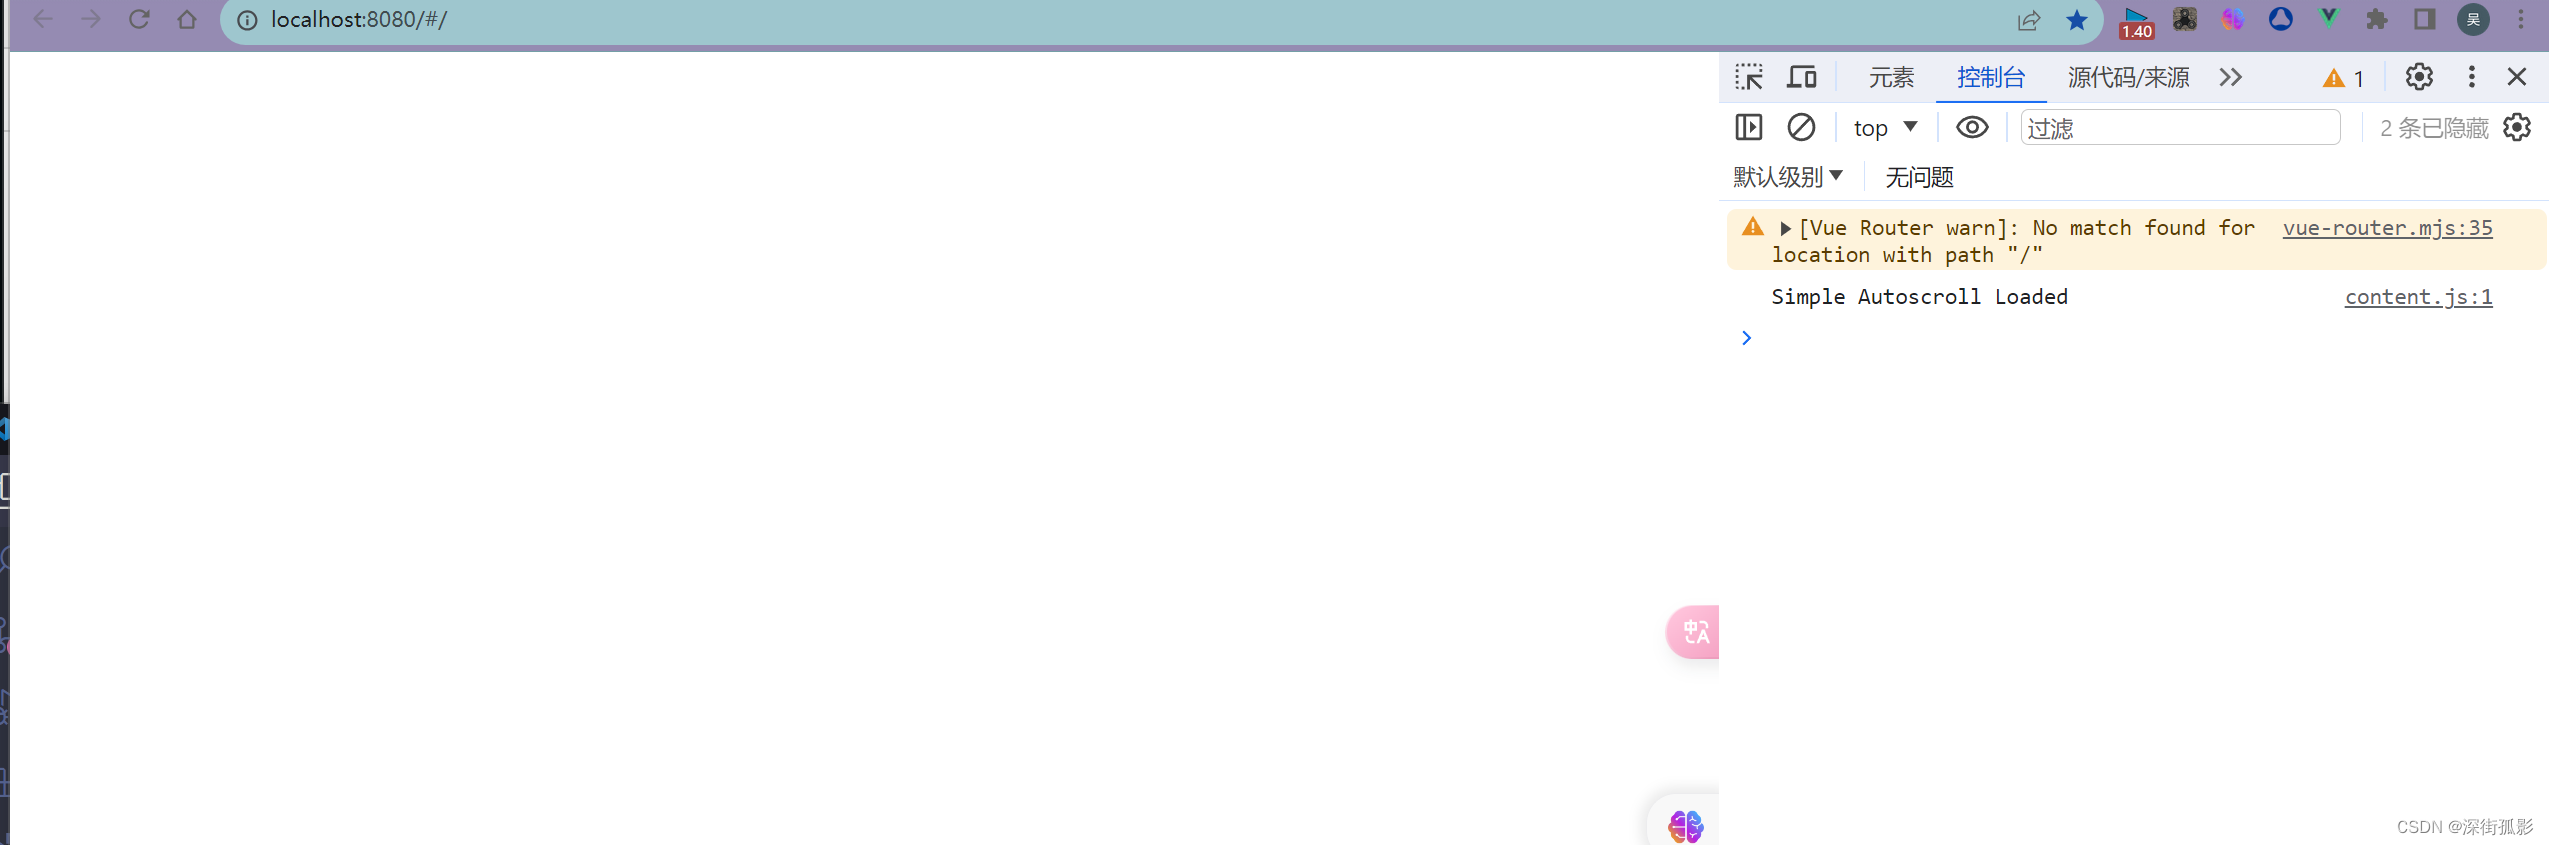
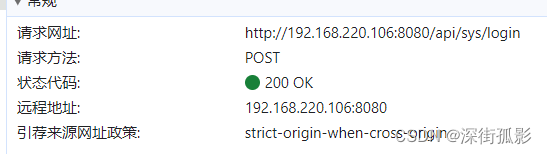
触发之后会得到以下错误:

该错误表示,当前请求的接口不存在。
出现这个问题的原因,是因为在前面配置环境变量时指定了 开发环境下,请求的 BaseUrl 为 /api ,所以真实发出的请求为:/api/sys/login 。
这样的一个请求会被自动键入到当前前端所在的服务中,所以最终就得到了 http://192.168.18.42:8081/api/sys/login 这样的一个请求路径。
而想要处理这个问题,那么可以通过指定 webpack DevServer 代理 的形式,代理当前的 url 请求。
而指定这个代理非常简单,是一种近乎固定的配置方案。
在 vue.config.js 中,加入以下代码:
module.exports = {
  devServer: {
    // 配置反向代理
    proxy: {
      // 当地址中有/api的时候会触发代理机制
      '/api': {
        // 要代理的服务器地址  这里不用写 api
        target: 'http://localhost:3004/',
        changeOrigin: true // 是否跨域
      }
    }
  },
  ...
}
重新启动服务,再次进行请求,即可得到返回数据
本地缓存处理方案
通常情况下,在获取到 token 之后,会把 token 进行缓存,而缓存的方式将会分为两种:
- 本地缓存:
LocalStorage - 全局状态管理:
Vuex
保存在 LocalStorage 是为了方便实现 自动登录功能
保存在 vuex 中是为了后面在其他位置进行使用
那么下面就分别来实现对应的缓存方案:
LocalStorage:
-
创建
utils/storage.js文件,封装三个对应方法:/** * @description: 存储数据 * @param {*} key * @param {*} value * @return {*} */ export const setItem = (key, value) => { // value 分为两种情况: // 1、基本数据类型 // 2、复杂数据类型 if (typeof value === "object") { value = JSON.stringify(value); } window.localStorage.setItem(key, value); } /** * @description: 获取数据 * @param {*} key * @return {*} */ export const getItem = (key) => { const data = window.localStorage.getItem(key) try { return JSON.parse(data) } catch (err) { return data } } /** * @description: 删除指定数据 * @param {*} key * @return {*} */ export const removeItem = (key) => { window.localStorage.removeItem(key) } /** * @description: 删除所有数据 * @param {*} key * @return {*} */ export const removeAllItem = () => { window.localStorage.clear() } -
在
vuex的user模块下,处理token的保存import { login } from '@/api/sys' import md5 from 'md5' import { setItem, getItem } from '@/utils/storage' import { TOKEN } from '@/constant' export default { namespaced: true, // 表示单独的模块不会合并到主模块中去 state: () => ({ token: getItem(TOKEN) || '' }), mutations: { setToken(state, token) { state.token = token setItem(TOKEN, token) } }, actions: { login(context, userInfo) { ... .then(data => { this.commit('user/setToken', data.data.data.token) console.log(data); // 保存登录时间 resolve() }) .catch(err => { reject(err) }) }) } }, } -
处理保存的过程中,需要创建
constant常量目录constant/index.jsexport const TOKEN = 'token'
此时,当点击登陆时,即可把 token 保存至 vuex 与 localStorage 中
响应数据的统一处理
保存了服务端返回的 token 。但是有一个地方比较难受,那就是在 vuex 的 user 模块 中,获取数据端的 token 数据,通过 data.data.data.token 的形式进行获取。
一路的 data. 确实让人比较难受,如果有过 axios 拦截器处理经验的同学应该知道,对于这种问题,可以通过 axios 响应拦截器 进行处理。
在 utils/request.js 中实现以下代码:
import axios from 'axios';
import {
  ElMessage
} from 'element-plus'

...

// 响应拦截器
service.interceptors.response.use(response => {
  const {
    success,
    message,
    data
  } = response.data
  // 需要判断当前请求是否成功
  // 成功返回解析后的数据
  // 失败(请求成功,业务失败),消息提示
  if (success) {
    return data
  } else {
    // 失败(请求成功,业务失败),消息提示
    ElMessage.error(message);
    return Promise.reject(new Error(message));
  }
}, error => {
  ElMessage.error(error.message); // 提示错误信息
  return Promise.reject(error);
})

export default service
此时,对于 vuex 中的 user 模块 就可以进行以下修改了:
this.commit('user/setToken', data.token)
登录后操作
那么截止到此时,距离登录操作还差最后一个功能就是 登录鉴权 。
只不过在进行 登录鉴权 之前得先去创建一个登录后的页面,也就是所说的登录后操作。
-
创建
layout/index.vue,写入以下代码:<template> <div class=""> layout 页面 </div> </template> <script setup> import { } from 'vue' </script> <style lang='scss' scoped></style> -
在
router/index中,指定对应路由表:const publicRoutes = [ ... { path: '/', component: () => import('@/layout/index') } ] -
在登录成功后,完成跳转
// 登录后操作
router.push('/')
登录鉴权解决方案
在处理了登陆后操作之后,接下来就来看一下最后的一个功能,也就是 登录鉴权
首先先去对 登录鉴权 进行一个定义,什么是 登录鉴权 呢?
当用户未登陆时,不允许进入除
login之外的其他页面。用户登录后,
token未过期之前,不允许进入login页面
而想要实现这个功能,那么最好的方式就是通过 路由守卫 来进行实现。
那么明确好了 登录鉴权 的概念之后,接下来就可以去实现一下
在 main.js 平级,创建 permission 文件
import router from '@/router'
import store from '@/store'

// 白名单
const whiteList = ['/login']

/**
 * @description: 路由前置守卫
 * @param {*} to  从哪个页面来
 * @param {*} from  要到哪个页面
 * @param {*} next  是否进入
 * @return {*}
 */
router.beforeEach((to, from, next) => {
  // 1. 用户已登录,则不允许进入 login
  // 2. 用户未登录,只允许进入 login
  // if (store.state.user.token) {
  if (store.getters.token) {
    if (to.path === '/login') {
      next('/');
    } else {
      next();
    }
  } else {
    // 2. 用户未登录,只允许进入 login
    if (whiteList.indexOf(to.path) > -1) {
      //  在白名单列表的页面可以不登陆正常进入
      next();
    } else {
      next('/login');
    }
  }
})
在此处使用到了 vuex 中的 getters ,此时的 getters 被当作 快捷访问 的形式进行访问
所以需要声明对应的模块,创建 store/getters
// 快捷访问
const getters = {
  token: state => state.user.token
}

export default getters
在 store/index 中进行导入:
import getters from './getters'
export default createStore({
  getters: getters,
  ...
})
在main.js中进行导入
// 导入路由鉴权
import './permission'
总结
两个大部分:
vue3的一些基本概念vue3的新特性- 全新的
script setup语法 - 最新的
ref优化
- 登录方案相关的业务代码
element-plus相关el-form表单- 密码框状态处理
- 后台登录解决方案
- 封装
axios模块 - 封装 接口请求 模块
- 封装登录请求动作
- 保存服务端返回的
token - 登录鉴权
- 封装
Layout架构解决方案与实现
暂时去学习后端了,等学完在继续


 4129
4129

 被折叠的 条评论
为什么被折叠?
被折叠的 条评论
为什么被折叠?
 到【灌水乐园】发言


