


 这是一个关于网络实验的介绍,主要内容包括:在R7上将环回接口重发布进OSPF,R2和R3进行双向重发布以避免环路,并通过调整优先级确保所有路径选择最优。实验最终实现R1到R7的负载均衡且无环路。
双向重发布实验
一、实验要求
1.两个协议间进行多点双向重发布
2.R7的环回没有宣告在OSPF协议中,而且是后期重发布进去
3.解决环路,所有路径选择最优,且存在备份
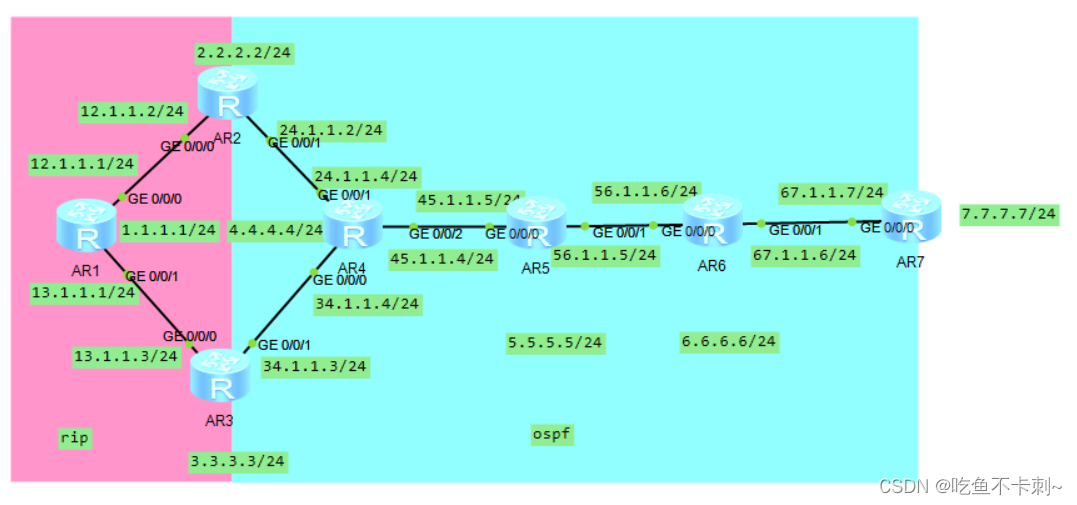
二、实验拓扑图及ip地址规划
三、实验思路及步骤
1、配置ip地址
R1
[R1]int lo0
[R1-LoopBack0]ip a 1.1.1.1 255.255.255.0
[R1-LoopBack0]int g0/0/0
[R1-GigabitEthernet0/0/0]ip a 12.1.1.1 255.255.255.0
Feb 10 2022 21:13:53-08:00 R1 %%01IFNET/4/LINK_STATE(l)[2]:The line protocol IP
on the interface GigabitEthernet0/0/0 has entered the UP state.
[R1-GigabitEthernet0/0/0]int g0/0/1
[R1-GigabitEthernet0/0/1]ip a 13.1.1.1 255.255.255.0
R2
[R2]int lo0
[R2-LoopBack0]ip a 2.2.2.2 255.255.255.0
[R2-LoopBack0]int g0/0/0
[R2-GigabitEthernet0/0/0]ip a 12.1.1.2 255.255.255.0
Feb 10 2022 21:17:21-08:00 R2 %%01IFNET/4/LINK_STATE(l)[0]:The line protocol IP
on the interface GigabitEthernet0/0/0 has entered the UP state.
[R2-GigabitEthernet0/0/0]int g0/0/1
[R2-GigabitEthernet0/0/1]ip a 24.1.1.2 255.255.255.0
Feb 10 2022 21:18:00-08:00 R2 %%01IFNET/4/LINK_STATE(l)[1]:The line protocol IP
on the interface GigabitEthernet0/0/1 has entered the UP state.
R3
[R3]int lo0
[R3-LoopBack0]ip a 3.3.3.3 255.255.255.0
[R3-LoopBack0]int g0/0/0
[R3-GigabitEthernet0/0/0]ip a 13.1.1.3 24
Feb 10 2022 21:19:10-08:00 R3 %%01IFNET/4/LINK_STATE(l)[0]:The line protocol IP
on the interface GigabitEthernet0/0/0 has entered the UP state.
[R3-GigabitEthernet0/0/0]int g0/0/1
[R3-GigabitEthernet0/0/1]ip a 34.1.1.3 24
Feb 10 2022 21:19:27-08:00 R3 %%01IFNET/4/LINK_STATE(l)[1]:The line protocol IP
on the interface GigabitEthernet0/0/1 has entered the UP state.
R4
[R4]int lo0
[R4-LoopBack0]ip a 4.4.4.4 255.255.255.0
[R4-LoopBack0]int g0/0/0
[R4-GigabitEthernet0/0/0]ip a 34.1.1.4 24
Feb 10 2022 21:20:28-08:00 R4 %%01IFNET/4/LINK_STATE(l)[0]:The line protocol IP
on the interface GigabitEthernet0/0/0 has entered the UP state.
[R4-GigabitEthernet0/0/0]int g0/0/1
[R4-GigabitEthernet0/0/1]ip a 24.1.1.4 24
[R4-GigabitEthernet0/0/1]
Feb 10 2022 21:20:41-08:00 R4 %%01IFNET/4/LINK_STATE(l)[1]:The line protocol IP
on the interface GigabitEthernet0/0/1 has entered the UP state.
[R4-GigabitEthernet0/0/1]int g0/0/2
[R4-GigabitEthernet0/0/2]ip a 45.1.1.4 24
[R4-GigabitEthernet0/0/2]
Feb 10 2022 21:22:37-08:00 R4 %%01IFNET/4/LINK_STATE(l)[2]:The line protocol IP
on the interface GigabitEthernet0/0/2 has entered the UP state.
R5
[R5]int lo0
[R5-LoopBack0]ip a 5.5.5.5 255.255.255.0
[R5-LoopBack0]int g0/0/0
[R5-GigabitEthernet0/0/0]ip a 45.1.1.5 24
Feb 10 2022 21:21:45-08:00 R5 %%01IFNET/4/LINK_STATE(l)[0]:The line protocol IP
on the interface GigabitEthernet0/0/0 has entered the UP state.
[R5-GigabitEthernet0/0/0]int g0/0/1
[R5-GigabitEthernet0/0/1]ip a 56.1.1.5 24
[R5-GigabitEthernet0/0/1]
Feb 10 2022 21:21:56-08:00 R5 %%01IFNET/4/LINK_STATE(l)[1]:The line protocol IP
on the interface GigabitEthernet0/0/1 has entered the UP state.
R6
[R6]int lo0
[R6-LoopBack0]ip a 6.6.6.6 255.255.255.0
[R6-LoopBack0]int g0/0/0
[R6-GigabitEthernet0/0/0]ip a 56.1.1.6 24
Feb 10 2022 21:23:28-08:00 R6 %%01IFNET/4/LINK_STATE(l)[0]:The line protocol IP
on the interface GigabitEthernet0/0/0 has entered the UP state.
[R6-GigabitEthernet0/0/0]int g0/0/1
[R6-GigabitEthernet0/0/1]ip a 67.1.1.6 24
Feb 10 2022 21:23:42-08:00 R6 %%01IFNET/4/LINK_STATE(l)[1]:The line protocol IP
on the interface GigabitEthernet0/0/1 has entered the UP state.
R7
[R7]int lo0
[R7-LoopBack0]ip a 7.7.7.7 255.255.255.0
[R7-LoopBack0]int g0/0/0
[R7-GigabitEthernet0/0/0]ip a 67.1.1.7 24
Feb 10 2022 21:24:42-08:00 R7 %%01IFNET/4/LINK_STATE(l)[0]:The line protocol IP
on the interface GigabitEthernet0/0/0 has entered the UP state.
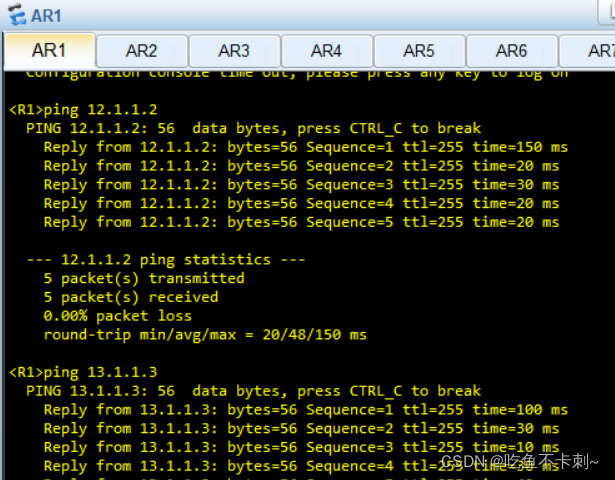
2、使用ping命令查看相邻路由是否接通
(这里用R1举例)
3、配置rip协议和ospf协议
R1
[R1]rip 1
[R1-rip-1]version 2
[R1-rip-1]network 1.0.0.0
[R1-rip-1]network 12.0.0.0
[R1-rip-1]network 13.0.0.0
R2
rip
[R2]rip 1
[R2-rip-1]version 2
[R2-rip-1]network 2.0.0.0
[R2-rip-1]network 12.0.0.0
ospf
[R2]ospf 1
[R2-ospf-1]area 0
[R2-ospf-1-area-0.0.0.0]net
[R2-ospf-1-area-0.0.0.0]network 24.1.1.0 0.0.0.255
R3
rip
[R3]rip 1
[R3-rip-1]version 2
[R3-rip-1]network 13.0.0.0
ospf
[R3]ospf 1
[R3-ospf-1]area 0
[R3-ospf-1-area-0.0.0.0]network 3.3.3.3 0.0.0.0
[R3-ospf-1-area-0.0.0.0]network 34.1.1.0 0.0.0.255
R4
[R4]ospf 1
[R4-ospf-1]area 0
[R4-ospf-1-area-0.0.0.0]network 4.4.4.4 0.0.0.0
[R4-ospf-1-area-0.0.0.0]network 24.1.1.0 0.0.0.255
[R4-ospf-1-area-0.0.0.0]network 34.1.1.0 0.0.0.255
[R4-ospf-1-area-0.0.0.0]network 45.1.1.0 0.0.0.255
R5
[R5]ospf 1
[R5-ospf-1]area 0
[R5-ospf-1-area-0.0.0.0]network 5.5.5.5 0.0.0.0
[R5-ospf-1-area-0.0.0.0]network 45.1.1.0 0.0.0.255
[R5-ospf-1-area-0.0.0.0]network 56.1.1.0 0.0.0.255
R6
[R6]ospf 1
[R6-ospf-1]area 0
[R6-ospf-1-area-0.0.0.0]network 6.6.6.6 0.0.0.0
[R6-ospf-1-area-0.0.0.0]network 56.1.1.0 0.0.0.255
[R6-ospf-1-area-0.0.0.0]network 67.1.1.0 0.0.0.255
R7
[R7]ospf 1
[R7-ospf-1]area 0
[R7-ospf-1-area-0.0.0.0]net
[R7-ospf-1-area-0.0.0.0]network 67.1.1.0 0.0.0.255
4、在R7上将R7的环回重发布进ospf
[R7-ospf-1]import-route direct
5、在R2、R3上做双向重发布
R2
[R2]ospf 1
[R2-ospf-1]import-route rip 1
[R2-ospf-1]q
[R2]rip 1
[R2-rip-1]import-route ospf 1
R3
[R3]ospf 1
[R3-ospf-1]import-route rip 1
[R3-ospf-1]q
[R3]rip 1
[R3-rip-1]import-route ospf 1
6、解决环路
环路产生原因:
R7将他的直连路由发布到OSPF协议中时,该条路由的preference是150,在华为设备中,OSPF的优先级是10,rip的优先级是100,将OSPF重发布之后的优先级为150,所以R7将路由重发布之后,R2将其重发布到了RIP协议中,然后RIP又将其洗白之后重发布到了OSPF协议中,使得原来150 的优先级变成了100,所以R4路由器选择信任了由R3发布过来到的优先级为100的路由,导致出现了环路,所以,在R5上,出现了到达R7的负载均衡,分别指向R4和R6。(借鉴于—网工blog)
解决办法:
将出环路由的preference加大,让其不被路由器信任:
R2
[R2]ip ip-prefix a index 10 permit 7.7.7.0 24       //创建名为a 序号为10的前缀列表抓取流量
[R2]route-policy a permit node 10       //创建名为a 大动作为允许 序号为10的路由策略
Info: New Sequence of this List.
[R2-route-policy]if-match ip-prefix a      //匹配名为a的前缀列表
[R2-route-policy]apply preference 151    //定义小动作为修改优先级为151
[R2]rip 1
[R2-rip-1]preference route-policy a   //进入rip调用名为a的路由策略修改优先级
R3
[R3]ip ip-prefix a index 10 permit 7.7.7.0 24
[R3]route-policy a permit node 10
Info: New Sequence of this List.
[R3-route-policy]if-match ip-prefix a
[R3-route-policy]apply preference 151
[R3-route-policy]q
[R3]rip 1
[R3-rip-1]preference route-policy a
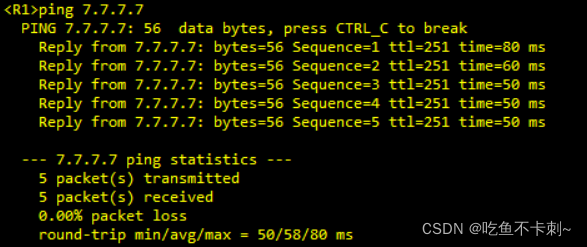
配置完成后,R1-R7为负载均衡,环路消失,并且可以ping通到7.7.7.7
7、所有路径选择最优
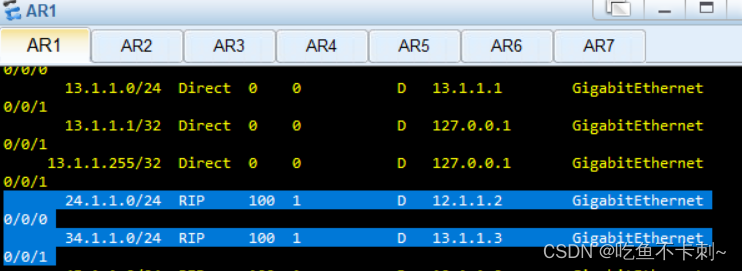
可以看出在R1向24和34网段是负载均衡,但是由拓扑图可以看出他们并不是负载均衡,R1向24网段走上为宜,R1向34网段走下为宜
R2配置
[R2]ip ip-prefix 1 index 10 permit 3.3.3.0 24
[R2]ip ip-prefix 1 index 20 permit 34.1.1.0 24
[R2]int g0/0/0
[R2-GigabitEthernet0/0/0]rip metricout ip-prefix 1 2
R3
[R3]ip ip-prefix 1 index 10 permit 24.1.1.0 24
[R3]int g0/0/0
[R3-GigabitEthernet0/0/0]rip metricout ip-prefix 1 2
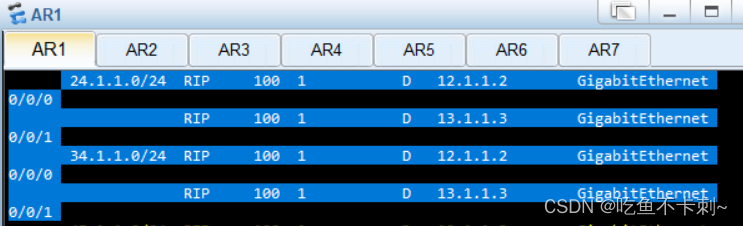
配置完成后查看R1路由表
至此,实验完成啦~


 被折叠的 条评论
为什么被折叠?
被折叠的 条评论
为什么被折叠?
 到【灌水乐园】发言


