


 本文详细介绍了SpringSecurity的使用,包括权限管理的概念、主流框架对比、创建HelloWorld工程,以及逐步实现SpringSecurity的配置,如设置登录、注销功能、访问控制,自定义错误页面,记住我功能及数据库登录认证。通过实例演示了如何配置和操作SpringSecurity,帮助读者深入理解SpringSecurity的权限管理机制。
一、用法简介
用户登录系统时 我们协助
SpringSecurity 把用户对应的角色、权限装配好,同时把各个资源所要求的权限信息设定好,剩下的“登录验证”和 “权限验证”都交给SpringSecurity
二、权限管理的概念
1.主体 principal
使用系统的用户或设备或从其他系统远程登录的用户等等。简单的说就是那个使用系统那个就是主体。
2.认证 authentication
权限管理系统确认一个主体的身份。简单的来说就是证明主体自己是谁。总体来说就是我们做的登录系统
3.授权 authorization
将操作系统“权限”“授予”给主体,这样主体就具备了操作系统中特定功能的能力。简单的说就是授权就是给用户分配权限。
三、权限管理的主流框架
1.SpringSecurity
spring的技术栈组成部分
通过提供完整可扩展的认证和授权支持保护应用程序
特点:
和spring无缝整合
完整的权限控制
专门为web开发而设计:
1.旧版本不能脱离web环境使用
2.新版本对整个框架进行了分层抽取,分成了核心模块和web模块,单独引入核心模块就可 以脱离web环境
重量级框架
2.Shiro

Apache旗下的轻量级权限控制框架
特点:
轻量级。shiro主张的理念是把复杂的事情变得简单。针对性能有更高要求的互联网应用有更好的表现。
通用性
好处:不局限于web环境,可以脱离web环境使用
缺陷: 在web环境下一些特定的需求需要手动编写代码定制。
四、创建HelloWorld工程
步骤:1.创建Maven的web工程
2.加入SpringMVC需要的环境
3.创建springmvc配置文件
4.在web.xml中配置DispatcherServlet
5.创建包
6. 加入准备好的文件到Hello工程中
五、在HelloWorld工程中加入SpringSecurity
1.加入SpringSecurity依赖
<
dependency
>
<
groupId
>org.springframework.security</
groupId
>
<artifactId>spring-security-web</artifactId>
<version>5.3.10.RELEASE</version>
</dependency>
<!-- SpringSecurity 配置 -->
<dependency>
<groupId>org.springframework.security</groupId>
<artifactId>spring-security-config</artifactId>
<version>5.3.10.RELEASE</version>
</dependency>
<!-- SpringSecurity 标签库 -->
<dependency>
<groupId>org.springframework.security</groupId>
<artifactId>spring-security-taglibs</artifactId>
<
version
>5.3.10.RELEASE</
version
>
</
dependency
>
2.
加入SpringSecurity控制权限的Filter
SpringSecurity使用的是过滤器Filter而不是 拦截器Interceptor,意味着SpringSecurity能够管理的不仅仅是SpringMVC中的handler请求,还包含web应用中的所有请求。例:项目中的静态资源也会被拦截,从而进行权限控制
<
filter
>
<
filter-name
>springSecurityFilterChain</
filter-name
>
<filter-class>org.springframework.web.filter.DelegatingFilterProxy</filter-class>
</filter>
<filter-mapping>
<filter-name>springSecurityFilterChain</filter-name>
<url-pattern>/*</url-pattern>
</
filter-mapping
>
注意:标签中必须是springSecurityFilterChain。因为springSecurityFilterChain在IOC容器中对应真正执行权限控制的二十几个Filter。只有这个名字才能加载到这些Filter
3.加入配置类
package com.pl.security.config;
import org.springframework.context.annotation.Configuration;
import org.springframework.security.config.annotation.web.configuration.EnableWebSecurity;
import org.springframework.security.config.annotation.web.configuration.WebSecurityConfigurerAdapter;
//注意:这个类一定要放在自动扫描的包下,不然无法生效
@Configuration //将这个类标记为配置类
@EnableWebSecurity //启用web环境下的权限控制功能
public class WebAppSecurityConfig extends WebSecurityConfigurerAdapter {
}
4.效果
所有的请求都被SpringSecurity拦截,要求登录才可以访问
静态资源也都被拦截,要求登录
登录失败也有错误提示
六
、SpringSecurity实验操作
1.放行首页和静态资源
在配置类中重写父类的configure(HTTPSecurity security)方法
@Override
protected void configure(HttpSecurity security) throws Exception {
security.authorizeRequests() //表示给请求授权
.antMatchers("/index.jsp") //针对/index.jsp路径进行授权
.permitAll() //可以无条件访问
.antMatchers("/layui/**").permitAll() //针对/layui目录下所有资源进行授权 都可以无条件访问
.anyRequest()
//
任意请求
.authenticated() //需要登录以后才能访问
;
}
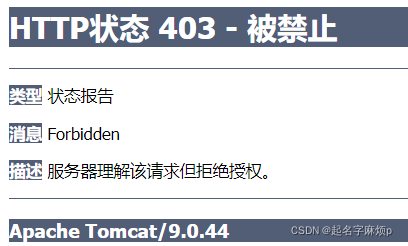
效果:未进行登录认证的请求会跳到错误403页面
2.未认证登录的请求跳转到登录页面
@Override
protected void configure(HttpSecurity security) throws Exception {
// super.configure(security); 注释掉取消父类中的默认规则
security.authorizeRequests() //表示给请求授权
.antMatchers("/index.jsp") //针对/index.jsp路径进行授权
.permitAll()
//
可以无条件访问
.antMatchers("/layui/**").permitAll() //针对/layui目录下所有资源进行授权 都可以无条件访问
.and()
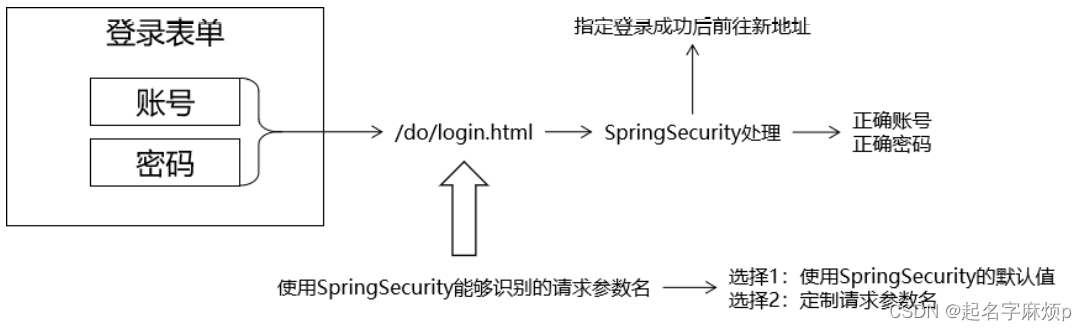
.formLogin() //使用表单形式登录
//关于loginPage()方法的特殊说明
//指定登录页的同时会影响到:“提交登录表单的地址”、“退出登录的地址”、“登录失败的地址”、
// /index.jsp GET - the login form 去登录页面
// /index.jsp POST - process the credentials and if valid authenticate the user 提交登录表单
// /index.jsp?error GET - redirect here for failed authentication attempts 登录失败
// /index.jsp?logout GET - redirect here after successfully logging out 退出登录
.loginPage(
"/index.jsp"
)
//
指定登录页面(如果没有指定会访问默认的登录页面)
//loginProcessingUrl() 方法指定登录地址,就会覆盖loginPage()方法中设定的默认值
.loginProcessingUrl(
"/do/login.html"
)
//
指定提交登录表单的地址
//.permitAll()
//放行
;
}
3.设置登录系统的账号和密码
3.1先对页面的表单设置
<p style="text-align: center">${SPRING_SECURITY_LAST_EXCEPTION.message}</p>
<form method="post" action="${pageContext.request.contextPath}/do/login.html">
<input type="hidden" name="${_csrf.parameterName}" value="${_csrf.token}">
........
</form>
SpringSecurity 账号密码默认的请求参数名分别为 username 、 password,所以要么修改表单项中name的属性值,要么修改配置。如果修改配置可以调用
usernameParameter()和
passwordParameter()方法
3.2 设置登录成功后默认前往的页面
@Override
protected void configure(HttpSecurity security) throws Exception {
// super.configure(security); 注释掉取消父类中的默认规则
security.authorizeRequests() //表示给请求授权
.antMatchers("/index.jsp") //针对/index.jsp路径进行授权
.permitAll() //可以无条件访问
.antMatchers("/layui/**").permitAll() //针对/layui目录下所有资源进行授权 都可以无条件访问
.and()
.authorizeRequests() //对请求进行授权
.anyRequest() //任意请求
.authenticated() //需要登录以后才能访问
.and()
.formLogin() //使用表单形式登录
//关于loginPage()方法的特殊说明
//指定登录页的同时会影响到:“提交登录表单的地址”、“退出登录的地址”、“登录失败的地址”、
// /index.jsp GET - the login form 去登录页面
// /index.jsp POST - process the credentials and if valid authenticate the user 提交登录表单
// /index.jsp?error GET - redirect here for failed authentication attempts 登录失败
// /index.jsp?logout GET - redirect here after successfully logging out 退出登录
.loginPage("/index.jsp") //指定登录页面(如果没有指定会访问默认的登录页面)
//loginProcessingUrl() 方法指定登录地址,就会覆盖loginPage()方法中设定的默认值
.loginProcessingUrl("/do/login.html") //指定提交登录表单的地址
//.permitAll() //登录地址本身也需要permitAll()放行
.usernameParameter("loginAcct") //定制登录账号的请求参数名
.passwordParameter("userPswd") //定制登录密码的请求参数名
.defaultSuccessUrl("/main.html") //设置登录成功后前往的地址
;
}
3.3 重写另外一个父类方法,来设置登录系统的账号和密码
@Override
protected void configure(AuthenticationManagerBuilder builder) throws Exception {
builder.inMemoryAuthentication() // 在内存中完成账号密码的检查
//.passwordEncoder(new MyPasswordEncoder())
//.password("123") // 指定密码
.withUser("tom") // 指定账号
.password(new BCryptPasswordEncoder().encode("123")) //指定密码
.roles("ADMIN") // 指定当前用户的角色
.authorities("SAVE","EDIT")
;
}
4.用户注销
通过调用HttpSecurity对象的一系列方法设置注销功能
logout()方法:开启注销功能
logoutUrl()方法:自定义注销功能的url地址
注:如果CSRF功能没有禁用,那么退出请求方式必须是POST请求方式。如果禁用了 CSRF功能则任何请求方式都可以
logoutSuccessUrl()方法:退出成功后前往URL地址
addLogoutHandler()方法:添加退出处理器
logoutSuccessHandler()方法:退出成功处理器
退出的表单:
<form id="logoutForm" action="${pageContext.request.contextPath }/do/logout.html" method="post">
<input type="hidden" name="${_csrf.parameterName}" value="${_csrf.token}"/>
</form>
<a id="logoutAnchor" href="">退出</a>
<script type="text/javascript">
window.onload = function() {
//给超链接的DOM对象绑定单击响应函数
document.getElementById("logoutAnchor").onclick = function() {
//提交包含CSRF参数的表单
document.getElementById("logoutForm").submit();
//取消超链接的默认行为
return false;
};
};
</script>
5.基于角色或者权限进行访问控制
通过HttpSecurity对象设置资源的角色要求
security.authorizeRequests() //表示给请求授权
.antMatchers(
"/index.jsp"
)
//
针对
/index.jsp
路径进行授权
.permitAll() //可以无条件访问
.antMatchers(
"/layui/**"
).permitAll()
//
针对
/layui
目录下所有资源进行授权 都可以无条件访问
.antMatchers(
"/level1/**"
)
//
针对
level1/**
路径设置访问要求
.hasRole("学徒")
//
要求用户具备学徒的角色才能访问
.antMatchers(
"/level2/**"
)
//
针对
level2/**
路径下设置访问要求
.hasAuthority("核心弟子")
//
要求用户具备核心弟子的角色才能访问
.and()
.authorizeRequests()
//
对请求进行授权
.anyRequest() //任意请求
.authenticated() //需要登录以后才能访问
.and()
.formLogin() //使用表单形式登录
.loginPage("/index.jsp") //指定登录页面(如果没有指定会访问默认的登录页面)
.loginProcessingUrl("/do/login.html") //指定提交登录表单的地址
.usernameParameter("loginAcct") //定制登录账号的请求参数名
.passwordParameter("userPswd") //定制登录密码的请求参数名
.defaultSuccessUrl("/main.html") //设置登录成功后前往的地址
.and()
.logout() //开启退出功能
.logoutUrl("/do/logout.html") //指定退出地址
.logoutSuccessUrl("/index.jsp") //指定退出成功去的地址
通过
AuthenticationManagerBuilder
设置登录时所具备的角色
builder.inMemoryAuthentication()
//
在内存中完成账号密码的检查
.passwordEncoder(new MyPasswordEncoder())
//.password("123") // 指定密码
.withUser("tom") // 指定账号
.password("123") //指定密码
.roles("ADMIN","学徒") // 指定当前用户的角色
.and()
.withUser("pl")
.password("123")
.authorities("SAVE","核心弟子")
;
当访问被拒绝后会看到403错误页面:
注意:要注意方法的优先级:anyRequest() 和 authenticated()要设置在 antMatchers()、hasRole()、hasAuthority()的后面,如果先调用那就会把
antMatchers()、hasRole()、hasAuthority()的设置覆盖,导致该设置无效。所以要先调用设置具体小范围,然后在调用大模糊范围设置
6.自定义403错误页面
HttpSecurity对象
.accessDeniedPage(
"/to/no/auth/page.html"
)
//
前往访问被拒绝的页面
.accessDeniedHandler(
new
AccessDeniedHandler
() {
@Override
public void handle(HttpServletRequest request, HttpServletResponse response, AccessDeniedException accessDeniedException) throws IOException, ServletException {
request.setAttribute("message","=== 抱歉!你无法访问这个资源!===");
request.getRequestDispatcher("/WEB-INF/views/no_auth.jsp").forward(request,response);
}
})
7.记住我-内存 版(Cookie)
HttpSecurity对象调用
rememberMe()方法
将登录表单中的checkbox的name设置为remember-me
如果不使用remember-me作为请求参数名称,可以使用
rememberMeParameter()方法定制
8.记住我-数据库 版
为了让服务器重启也不影响记住我登录功能,就将用户信息存入数据库中
步骤:导入依赖
配置数据源
创建数据库
注入数据源
启动令牌仓库功能:
JdbcTokenRepositoryImpl tokenRepository = new JdbcTokenRepositoryImpl();
tokenRepository
.setDataSource(
dataSource
);
HttpSecurity对象.
tokenRepository(
tokenRepository
);
注:需要进入JdbcTokenRepositoryImpl类中找到创建persistent_logins表的SQL语句建表
如下:
public static final
String
CREATE_TABLE_SQL
=
"create table persistent_logins (username varchar(64) not null, series varchar(64) primary key, token varchar(64) not null, last_used timestamp not null)"
;
9.查询数据库完成认证登录
1.SpringSecurity默认实现
builder.jdbcAuthentication().usersByUsernameQuery(
"tom"
);
在
usersByUsernameQuery(
"tom"
);方法中最终调用了JdbcDaoImpl类的方法查询数据库
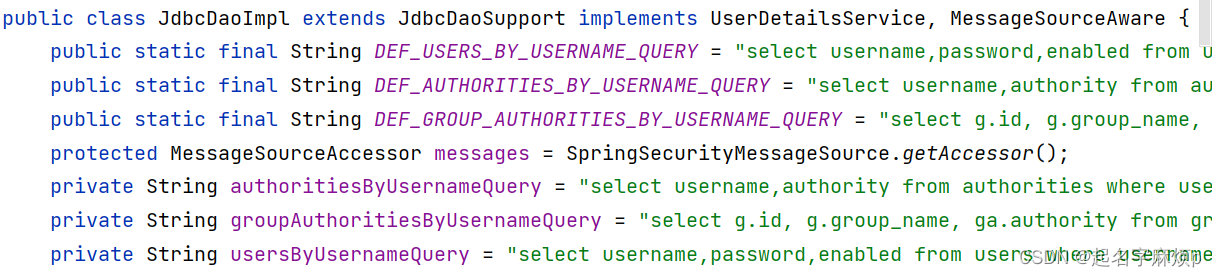
SpringSecurity的默认实现已经将SQL语句编码在了JdbcDaoImpl类中。这种情况下有三种方式选择:
按照JdbcDaoImpl类中的SQL语句设计表结构
修改JdbcDaoImpl的源码
不使用jdbcAuthentication()
2. 自定义数据库查询方式
builder.userDetailsService(
userDetailsService
)
其中
userDetailsService需要自定义实现U
serDetailsService接口中的类并进行自动装配
@Autowired
private JdbcTemplate jdbcTemplate;
//根据表单提交的用户名查询User对象,并装配角色、权限等信息
@Override
public UserDetails loadUserByUsername(
//表单提交的用户名
String username) throws UsernameNotFoundException {
//1.从数据库中查询User对象
String sql="SELECT id,loginacct,userpswd,username,email,createtime FROM t_admin WHERE username= ?";
List<User> userList = jdbcTemplate.query(sql, new BeanPropertyRowMapper<>(User.class), username);
User user = userList.get(0);
//2.给User设置角色权限信息
List<GrantedAuthority> authorities=new ArrayList<>();
authorities.add(new SimpleGrantedAuthority("ROLE_ADMIN"));
authorities.add(new SimpleGrantedAuthority("UPDATE"));
authorities.add(new SimpleGrantedAuthority("核心弟子"));
//3.把user对象和authorities封装到UserDetails中
String userpaswd = user.getUserpswd();
return new org.springframework.security.core.userdetails.User(username,userpaswd,authorities);
}
3. 使用自定义
U
serDetailsService
完成登录
builder.userDetailsService(
userDetailsService
);
10.应用自定义密码加密规则
自定义类实现
org.springframework.security.crypto.password.PasswordEncoder
类的接口
@Override
public String encode(CharSequence rawPassword) {
return privateEncode(rawPassword);
}
@Override
public boolean matches(CharSequence rawPassword, String encodedPassword) {
//1.对明文密码进行加密
String formPassword = privateEncode(rawPassword);
//2.声明数据库密码
String dataPassword=encodedPassword;
//3.比较
return Objects.equals(formPassword,dataPassword);
}
encode()方法是对明文密码进行加密
matches()方法是比较明文加密后的密码和密文
然后在配置类中应用加密规则
builder.userDetailsService(
userDetailsService
).passwordEncoder(passwordEncoder);
SpringSecurity提供了
BCryptPasswordEncoder
加密规则
BCryptPasswordEncoder 创 建 对 象 后 代 替 自 定 义 passwordEncoder 对 象 即 可 。 BCryptPasswordEncoder 在加密时通过加入随机盐值让每一次的加密结果都不同。能够 避免密码的明文被猜到。 而在对明文和密文进行比较时,BCryptPasswordEncoder 会在密文的固定位置取出 盐值,重新进行加密
测试:
public void
test
(){
//准备明文字符串
String password="123";
//准备密文字符串
String encodePassword="$2a$10$4ZPFToIKfYIkG.nWYjrtY.I.knAqbg/KqAliwLsQrroKmL5OKUoJO";
//创建一个BCryptPasswordEncoder对象
BCryptPasswordEncoder passwordEncoder = new BCryptPasswordEncoder();
//比较
boolean matches = passwordEncoder.matches(password, encodePassword);
//打印
System.out.println(matches ? "一致":"不一致");
}


 5万+
5万+

 被折叠的 条评论
为什么被折叠?
被折叠的 条评论
为什么被折叠?
 到【灌水乐园】发言


