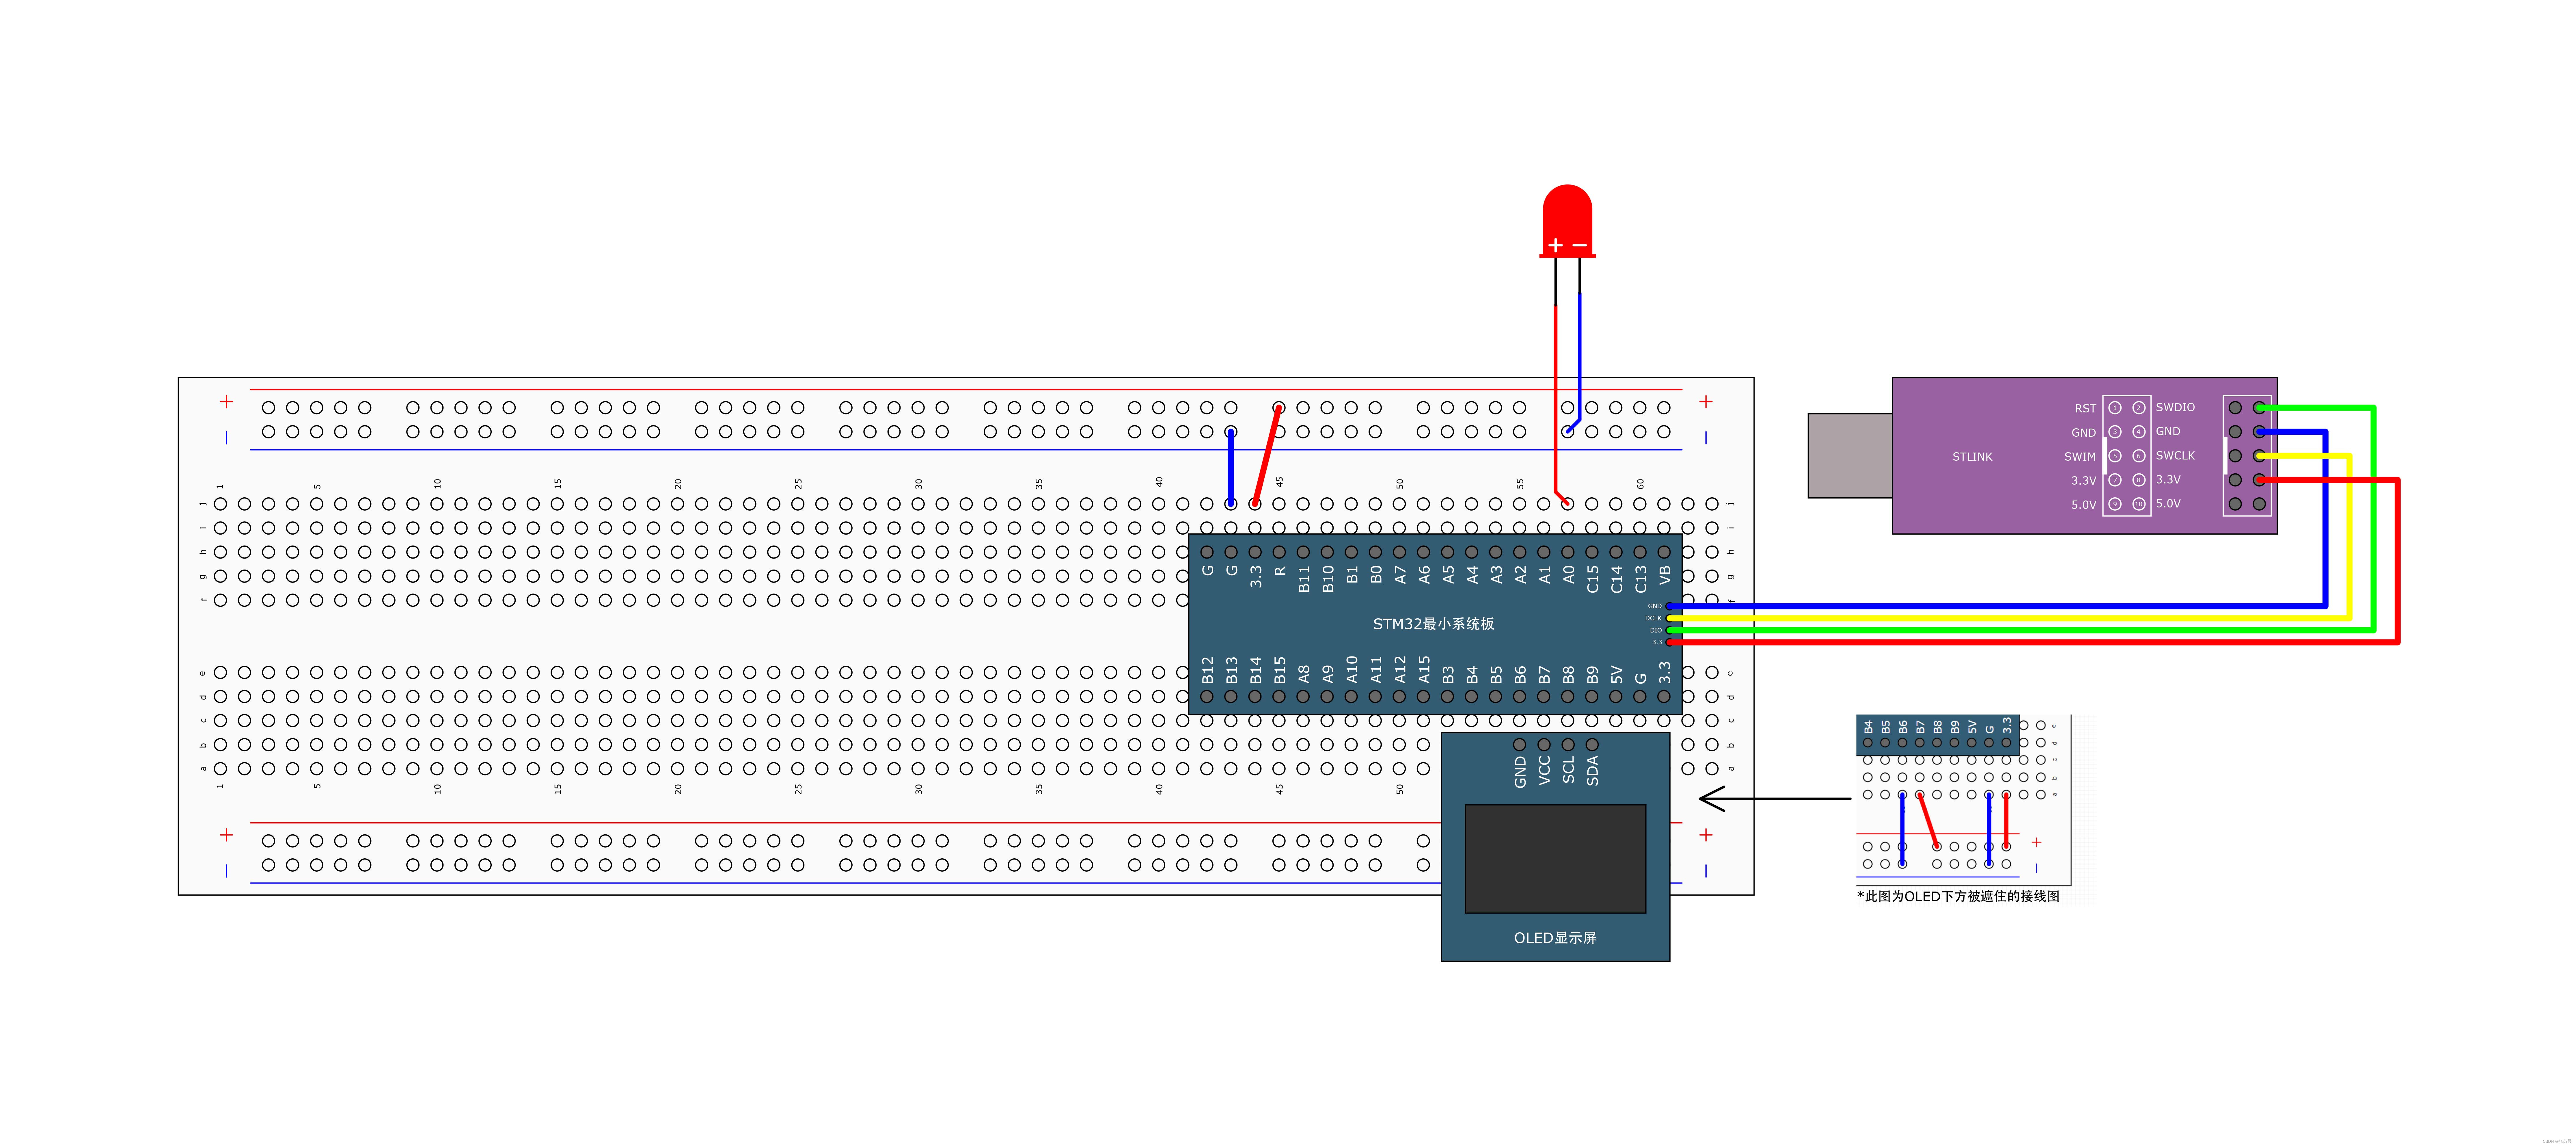
PWM呼吸灯:

pwm.h:
#ifndef __PWM_H
#define __PWM_H

void PWM_Init(void);
void PWM_SetCompare1(uint16_t Compare);

#endif
pwm.c:
#include "stm32f10x.h"                  // Device header

void PWM_Init(void)
{
	RCC_APB1PeriphClockCmd(RCC_APB1Periph_TIM2, ENABLE);
	RCC_APB2PeriphClockCmd(RCC_APB2Periph_GPIOA, ENABLE);

	GPIO_InitTypeDef GPIO_InitStructure;
	//为了让PWM和GPIO联合起来
	GPIO_InitStructure.GPIO_Mode = GPIO_Mode_AF_PP;
	GPIO_InitStructure.GPIO_Pin = GPIO_Pin_0;
	GPIO_InitStructure.GPIO_Speed = GPIO_Speed_50MHz;
	GPIO_Init(GPIOA, &GPIO_InitStructure);

	TIM_InternalClockConfig(TIM2);

	TIM_TimeBaseInitTypeDef TIM_TimeBaseInitStructure;
	TIM_TimeBaseInitStructure.TIM_ClockDivision = TIM_CKD_DIV1;
	TIM_TimeBaseInitStructure.TIM_CounterMode = TIM_CounterMode_Up;
	TIM_TimeBaseInitStructure.TIM_Period = 100 - 1;		//ARR
	TIM_TimeBaseInitStructure.TIM_Prescaler = 720 - 1;		//PSC
	TIM_TimeBaseInitStructure.TIM_RepetitionCounter = 0;
	TIM_TimeBaseInit(TIM2, &TIM_TimeBaseInitStructure);

	TIM_OCInitTypeDef TIM_OCInitStructure;
	TIM_OCStructInit(&TIM_OCInitStructure);
	TIM_OCInitStructure.TIM_OCMode = TIM_OCMode_PWM1;
	TIM_OCInitStructure.TIM_OCPolarity = TIM_OCPolarity_High;
	TIM_OCInitStructure.TIM_OutputState = TIM_OutputState_Enable;
	TIM_OCInitStructure.TIM_Pulse = 0;		//CCR
	TIM_OC1Init(TIM2, &TIM_OCInitStructure);

	TIM_Cmd(TIM2, ENABLE);
}

void PWM_SetCompare1(uint16_t Compare)
{
	TIM_SetCompare1(TIM2, Compare);
}
main.c:
#include "stm32f10x.h"                  // Device header
#include "Delay.h"
#include "OLED.h"
#include "PWM.h"

uint8_t i;

int main(void)
{
	OLED_Init();
	PWM_Init();
	while (1){
		for (i = 0; i <= 100; i++)
		{
			PWM_SetCompare1(i);
			Delay_ms(10);
		}
		for (i = 0; i <= 100; i++)
		{
			PWM_SetCompare1(100 - i);
			Delay_ms(10);
		}
	}
}
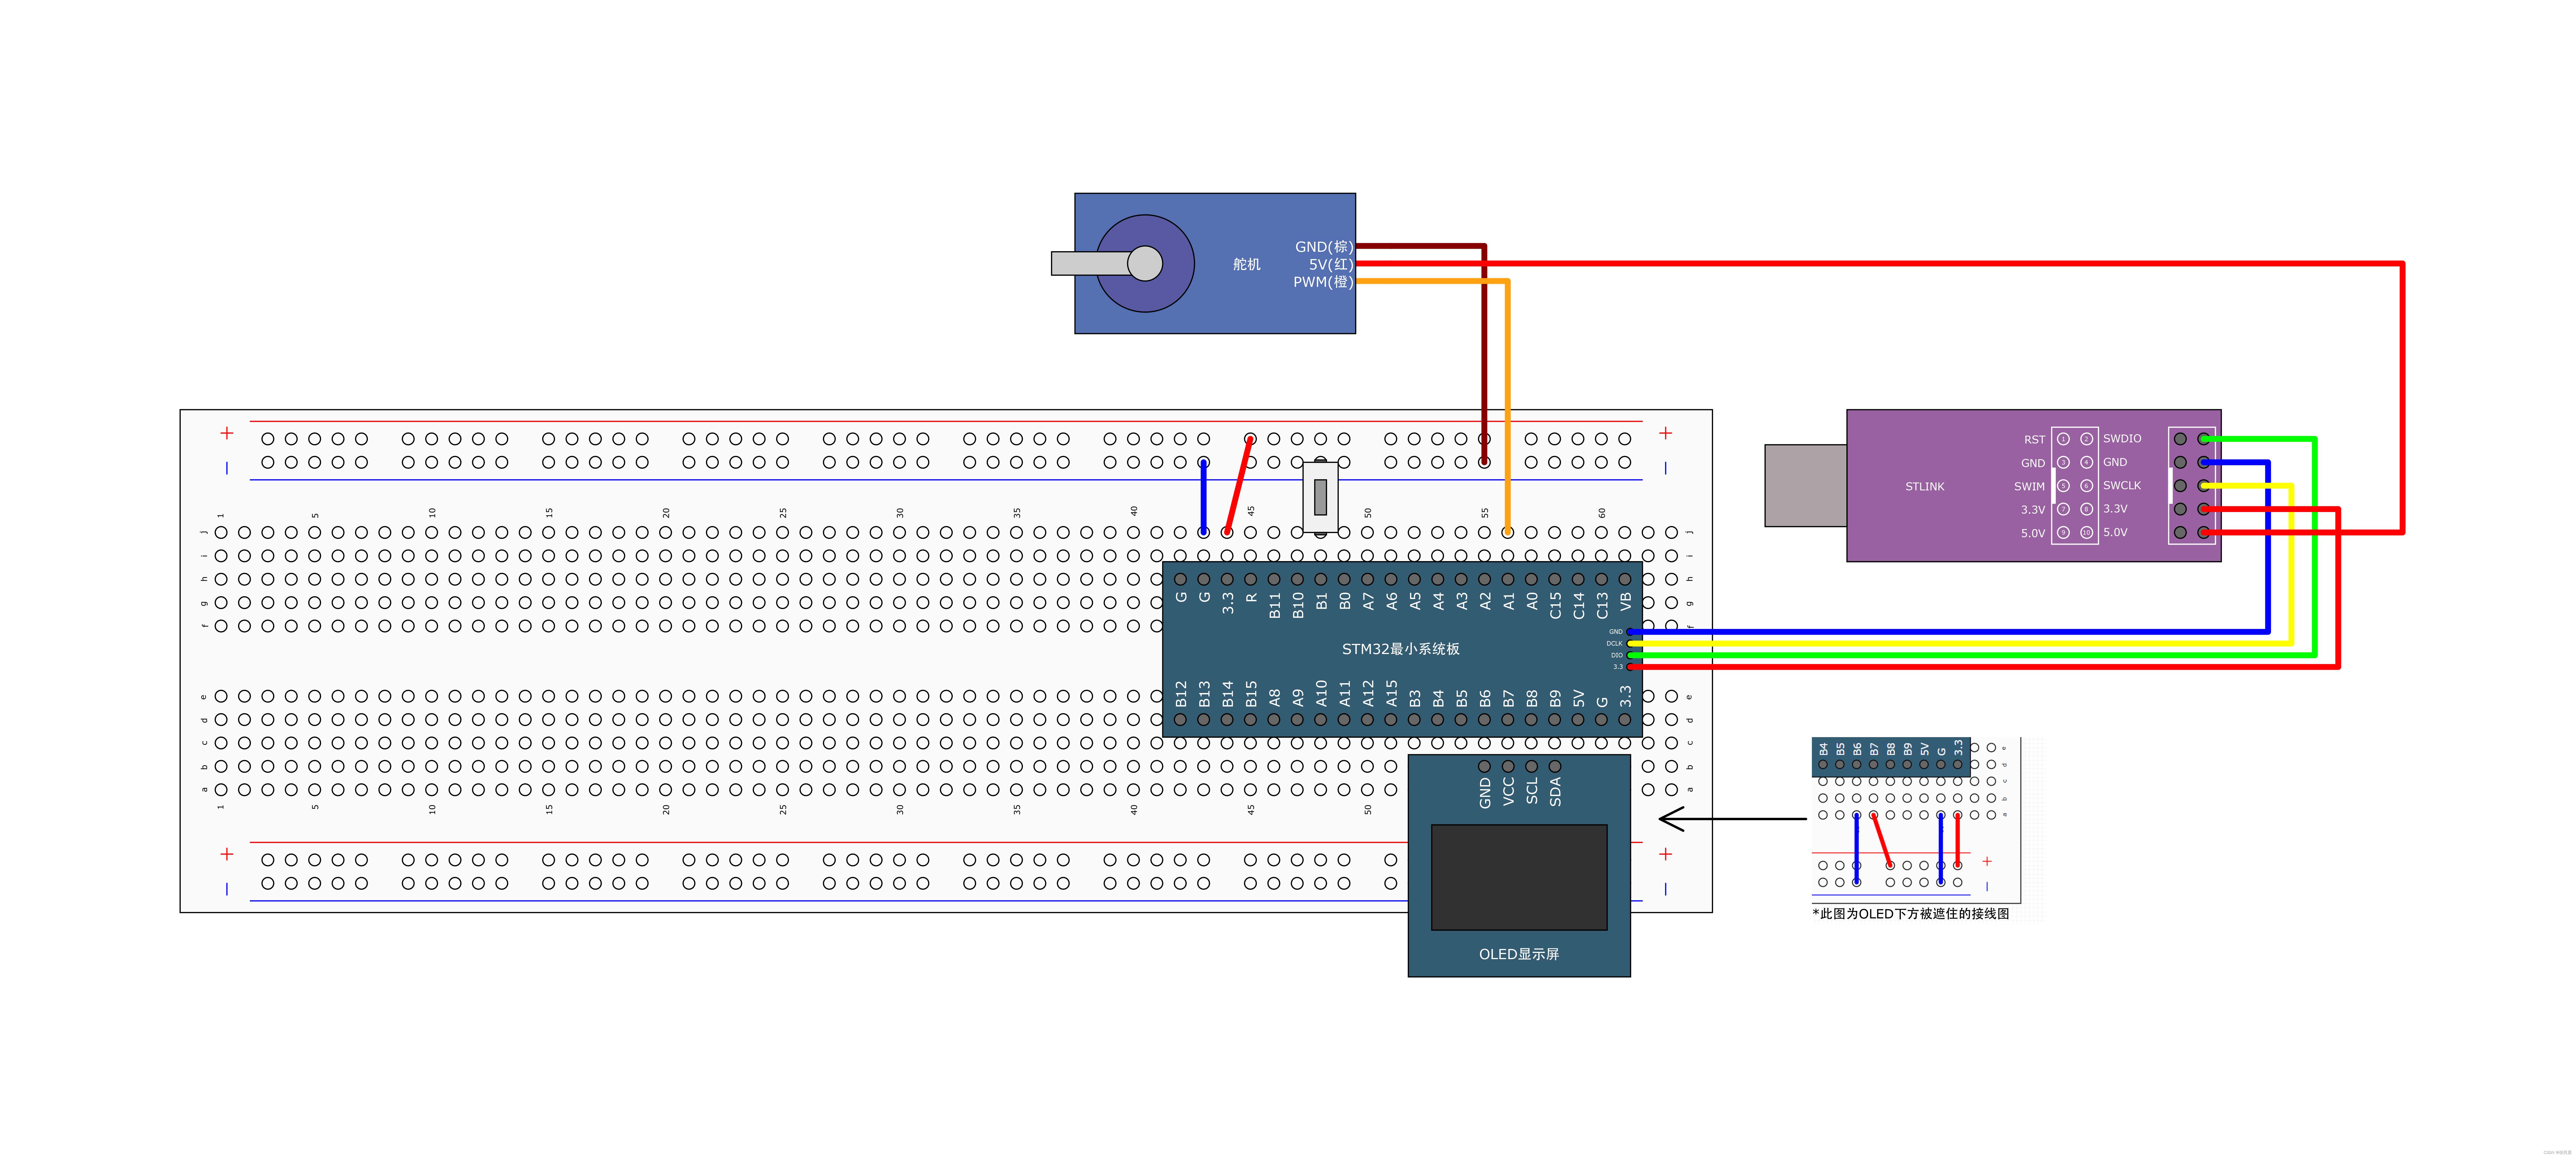
PWM舵机:

Servo.h:
#ifndef __SERVO_H
#define __SERVO_H

void Servo_Init(void);
void Servo_SetAngle(float Angle);

#endif
Servo.c:
#include "stm32f10x.h"                  // Device header
#include "PWM.h"

void Servo_Init(void)
{
	PWM_Init();
}

void Servo_SetAngle(float Angle)
{
	PWM_SetCompare2(Angle / 180 * 2000 + 500);
}
Key.c:
#include "stm32f10x.h"                  // Device header
#include "Delay.h"

void Key_Init(void)
{
	RCC_APB2PeriphClockCmd(RCC_APB2Periph_GPIOB, ENABLE);

	GPIO_InitTypeDef GPIO_InitStructure;
	GPIO_InitStructure.GPIO_Mode = GPIO_Mode_IPU;
	GPIO_InitStructure.GPIO_Pin = GPIO_Pin_1 | GPIO_Pin_11;
	GPIO_InitStructure.GPIO_Speed = GPIO_Speed_50MHz;
	GPIO_Init(GPIOB, &GPIO_InitStructure);
}

uint8_t Key_GetNum(void)
{
	uint8_t KeyNum = 0;
	if (GPIO_ReadInputDataBit(GPIOB, GPIO_Pin_1) == 0)
	{
		Delay_ms(20);
		while (GPIO_ReadInputDataBit(GPIOB, GPIO_Pin_1) == 0);
		Delay_ms(20);
		KeyNum = 1;
	}
	if (GPIO_ReadInputDataBit(GPIOB, GPIO_Pin_11) == 0)
	{
		Delay_ms(20);
		while (GPIO_ReadInputDataBit(GPIOB, GPIO_Pin_11) == 0);
		Delay_ms(20);
		KeyNum = 2;
	}

	return KeyNum;
}
main:
#include "stm32f10x.h"                  // Device header
#include "Delay.h"
#include "OLED.h"
#include "Servo.h"
#include "Key.h"

uint8_t KeyNum;
float Angle;

int main(void)
{
	OLED_Init();
	Servo_Init();
	Key_Init();

	OLED_ShowString(1, 1, "Angle:");

	while (1)
	{
		KeyNum = Key_GetNum();
		if (KeyNum == 1)
		{
			Angle += 30;
			if (Angle > 180)
			{
				Angle = 0;
			}
		}
		Servo_SetAngle(Angle);
		OLED_ShowNum(1, 7, Angle, 3);
	}
}
江科大的


 该代码示例展示了如何使用STM32的PWM功能实现呼吸灯效果,并通过PWM控制舵机调整角度。同时,还包含了一个按键输入功能,用于改变舵机的角度。在主函数中,程序会不断读取按键状态,根据按键输入增加或减少舵机的角度,并在OLED显示屏上显示当前角度值。


 4211
4211


