


 本文详细介绍了Vue.js中的前端路由实现原理和配置步骤,包括通过window.onhashchange监听URL变化、动态组件渲染、创建导航链接及监听地址栏变化。还展示了如何使用vue-router进行基本配置,如路由重定向、404页面设置,以及通过query和params传递参数。同时,提到了路由嵌套的概念,帮助理解更复杂的页面组织结构。
路由的基本概念
路由分为前端路由和后端路由.
后端路由就是前端所说的接口,是响应和请求的
前端路由就是: 就是一一对应关系的集合。简单讲就是一个url地址,对应哪个组件
简单理解前端路由工作原理
我们可以通过window.οnhashchange=()=>{}来监听URL中的hash值的变化
思路如下
- URL 地址栏中的 Hash 值发生了变化
- 前端js监听了到 Hash 地址的变化 window.οnhashchange=()=>{}
- 前端js把当前 Hash 地址对应的组件渲染都浏览器中
第一步
创建根组件和 三个页面级组件
<script>
import MyAbout from './views/my-about.vue'
import MyHome from './views/my-home.vue'
import MyMovie from './views/my-movie.vue'
export default {
  components: {
    MyHome,
    MyAbout,
    MyMovie
  }
}
</script>
第二步
通过动态组件, 控制要显示的组件
<template>
  <div>
    <h1>App组件</h1>
    <component :is="comName"></component>
  </div>
</template>

<script>
export default {
  // ...省略其他
  data () {
    return {
      comName: 'MyHome'
    }
  }
}
</script>
第三步:声明三个导航链接, 点击时修改地址栏的 hash 值
<template>
<div>
<h1>App组件</h1>
<a href="#/home">首页</a>
<a href="#/movie">电影</a>
<a href="#/about">关于</a>
<component :is="comName"></component>
</div>
</template>
第四步:
在 created 中, 监视地址栏 hash 时的变化, 一旦变化, 动态切换展示的组件
created () {
// onhashchange 是浏览器中的事件
  window.onhashchange = () => {
   // 一一对应关系的集合,就是路由
    switch(location.hash) {
      case '#/home':
        this.comName = 'my-home'
        break
      case '#/movie':
        this.comName = 'my-movie'
        break
      case '#/about':
        this.comName = 'my-about'
        break
    }
  }
},
vue中提供路由的基本使用与配置修改
-
安装 npm i vue-router@3.5.3 (vue2支持的版本)
-
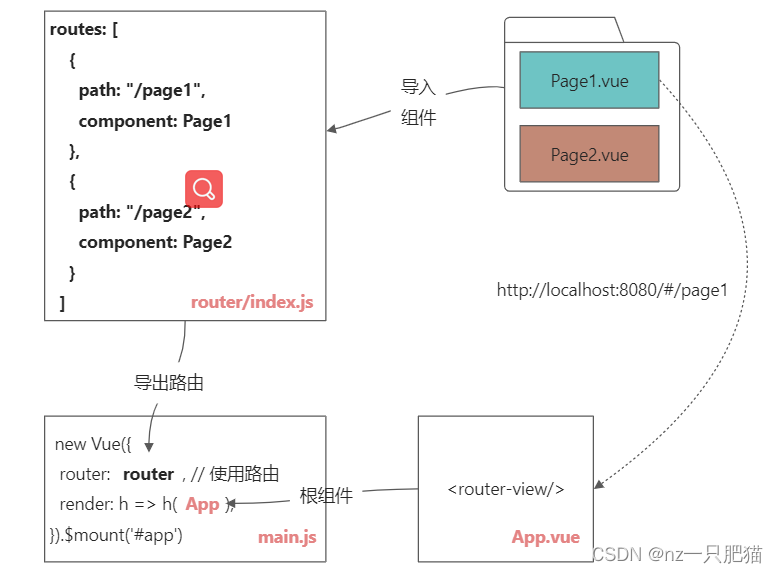
创建路由文件
router/index.js
// 配置路由
// 一段固定的代码
// 导入路由插件

import VueRouter from 'vue-router'
import Vue from 'vue'
// 使用插件 - 重要
Vue.use(VueRouter)

// 导入组件
import MyHome from '../-路由/pages/MyHome.vue'
import MyMovie from '../-路由/pages/MyMovie.vue'
import MyNews from '../-路由/pages/MyNews.vue'
import Page404 from '../-路由/pages/Page404.vue'

// 创建路由规则
const router = new VueRouter({
  routes: [
    {
      // 进入 / 路径,自动跳转到 /home
      path: '/',
      redirect: '/home'
    },
    // {
    //   // 进入 /a 路径,自动跳转到 /b
    //   path: '/a',
    //   redirect: '/b'
    // },
    {
      path: "/home", // 当浏览器访问 http://localhost:8080/#/home时,
      component: MyHome  // 装入组件 MyHome
    },
    {
      name: 'movie',
      path: "/movie", // 当浏览器访问 http://localhost:8080/#/movie时,
      component: MyMovie  // 装入组件 MyMovie
    },
    // news/:id 可以匹配如下地址:
    // http://localhost:8080/#/news       ==》 无法匹配
    // http://localhost:8080/#/news/123   ==》 id就是123
    // http://localhost:8080/#/news/3456  ==》 id就是3456
    {
      name:"news",
      // path: "/news/:id/:name", //
      path: "/news/:id", //
      component: MyNews  // 装入组件 MyNews
    },
    {
      // 所有的路由都不匹配,就默认匹配*,显示404
      path: '*',
      component: Page404//404组件
    }
  ]
})

// 导出
export default router
- 使用路由 在main.js中
import router from './router/index.js'

new Vue({
  router: router, // 使用路由
  render: h => h(App),
}).$mount('#app')
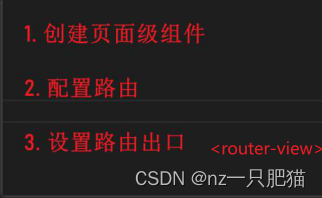
- 最重要的一步: 在那个页面级组件使用路由,就必须引入vue-router的内置组件
<router-view></router-view>
链接导航-router-link
作用: 用于提供路由链接,实现页面跳转
格式: 首页
激活类名: router-link-exact-active / router-link-active
要点:
● 是vue-router提供的组件
● router-link最终会渲染成a链接
● router-link自带链接导航高亮的功能
vue路由传参的方式
两种方式:
-
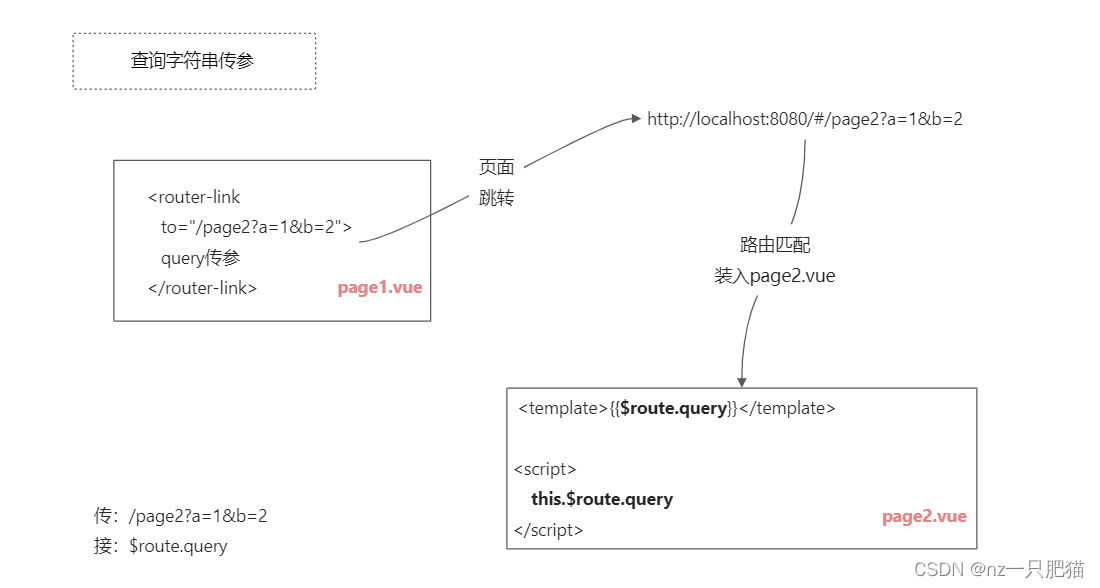
query传参。 适用场景:页面搜索
-
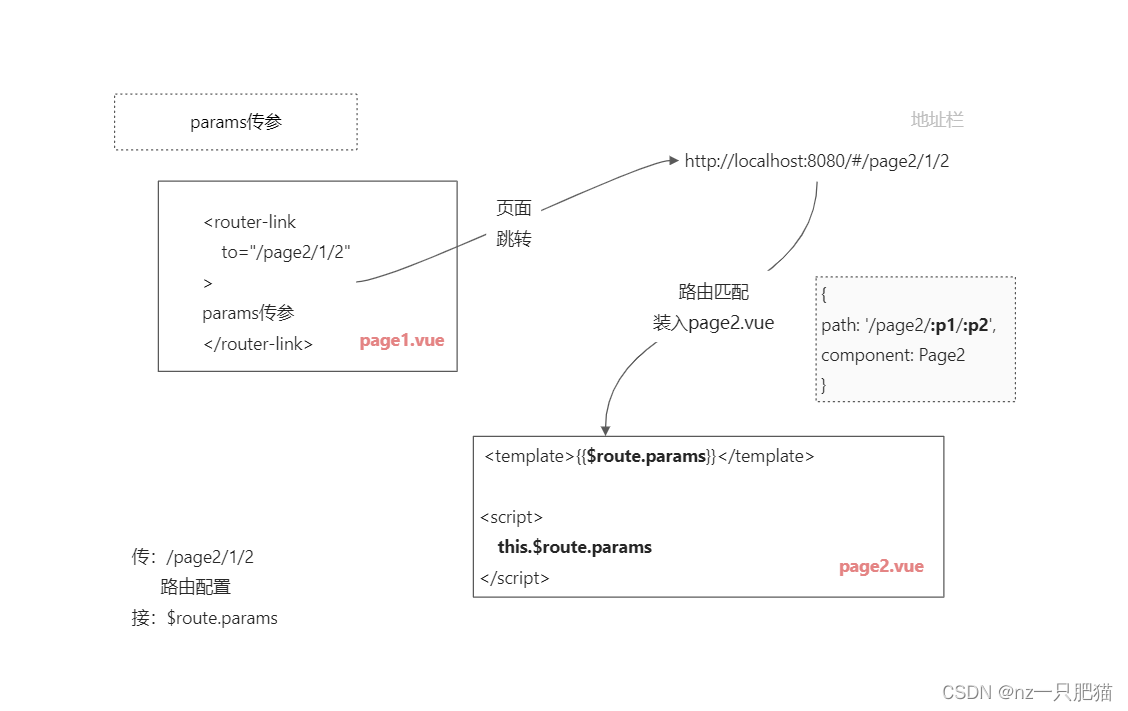
params传参。 适用场景:详情页
-
创建components/MyGoods.vue - 准备接收路由上传递的参数和值
<div>
    你要浏览的商品是: {{ $route.query.name }} {{ $route.params.goodsId}}
</div>
- 路由定义
{
    path: "/goods",
    component: MyGoods
  },
  {
    path: "/goods/:goodsId",
    component: MyGoods
  },
- 导航跳转, 传值给MyGoods.vue组件
<li><router-link to="/goods?name=外套">外套</router-link></li>
<li><router-link to="/goods/123">详情</router-link></li>
路由-重定向
在router/index.js - 修改配置
const routes = [
  {
    path: "/",
    redirect: "/home" // 重定向
  }
]
路由404
修改路由规则即可:
通过通配符*,设置404页面
 // this.$route this.$router 都是vue-router插件提供的功能
      // this.$route: 保存当前的路由信息。用做获取传递的参数

      // this.$router: 路由对象。router/index.js 中导出的对象
      //               提供各种路由相关的API。例如页面跳转

      this.$router.push('/news/123456')
      this.$router.push('/home')
      this.$router.push({path: '/home'})
      //  name是路由规则(router/index.js)中,每个路由规则都可以有名字
      this.$router.push({name: 'movie'})


      // 跳转并query传参-方式1
      this.$router.push("/movie?a=200&b=300")
      // 跳转并query传参-方式2
      this.$router.push({
          path: "/movie",
          query: {
              "a":2001,
              "b":3001
          }
      })

      // 跳转并params传参-方式1
      this.$router.push("/路由路径/值1/值2")
      this.$router.push('/news/123456')
      // 跳转并params传参-方式2
      this.$router.push({
          name: "news",
          params: {
            "id":1000
          }
      })
    }
路由的嵌套
路由嵌套
原理:router-view中再次包含router-view。
背景:一个组件内部包含的业务还是很复杂,需要再次进行拆分。
格式:
	 routes:[
  {
    path: '/page1',
    component: Page1, // 这个组件内部还有router-view
    children: [
      {
        path:'',  // path为空,表示当 #/page1时,显示 Page1组件+组件1
        component: 组件1  //
      },
      {
        path:'/xx1', // path以/开头,表示当 #/xx1时,显示 Page1组件+组件2
        component: 组件2
      },
      {
        path:'xx2', // path以/开头,表示当 /page1/xx2时,显示 Page1组件+组件3
        component: 组件3
      }
    ]
  }
]
** 总结 **


 被折叠的 条评论
为什么被折叠?
被折叠的 条评论
为什么被折叠?
 到【灌水乐园】发言


