


开发板:国信长天CT117E(STM32F103RBT6)
环 境 :标准库 V3.5 官方LCD模板
软 件 :Keil-MDK 4
文章目录
文章目录:
前言
在以前刚学51,或者别的平台使用按键开发的时候,常用的延时消抖是
keyValue = readKey();
if(keyValue != **** )
{
    Delay_Ms(5);
    keyValue = readKey();
    if(keyValue != ****)
    {
        // Operation when key pressed
    }
}
延时消抖就很简单,这里的 readKey() 和下面的 ReadInputDataBit 差不多,就读取高低电平值,赋值给 keyValue,然后判断有没有键按下,然后延时5ms再次判断,通过延时的方式以略去抖动。
这样的坏处是判断按键的时候整个程度都在等着那个 Delay_Ms(5),占用资源。同时,假如需要按一下加一,再按一次加一,这里很难完成按一次加一次的结果,这里假如用while来进行松手检测的话,则整个程序都等着按键,会比上面的Delay_Ms造成更大的等待,造成资源浪费。
我们可以使用状态机消抖来实现一个比较好的按键操作。
一、CT117E开发板独立按键电路
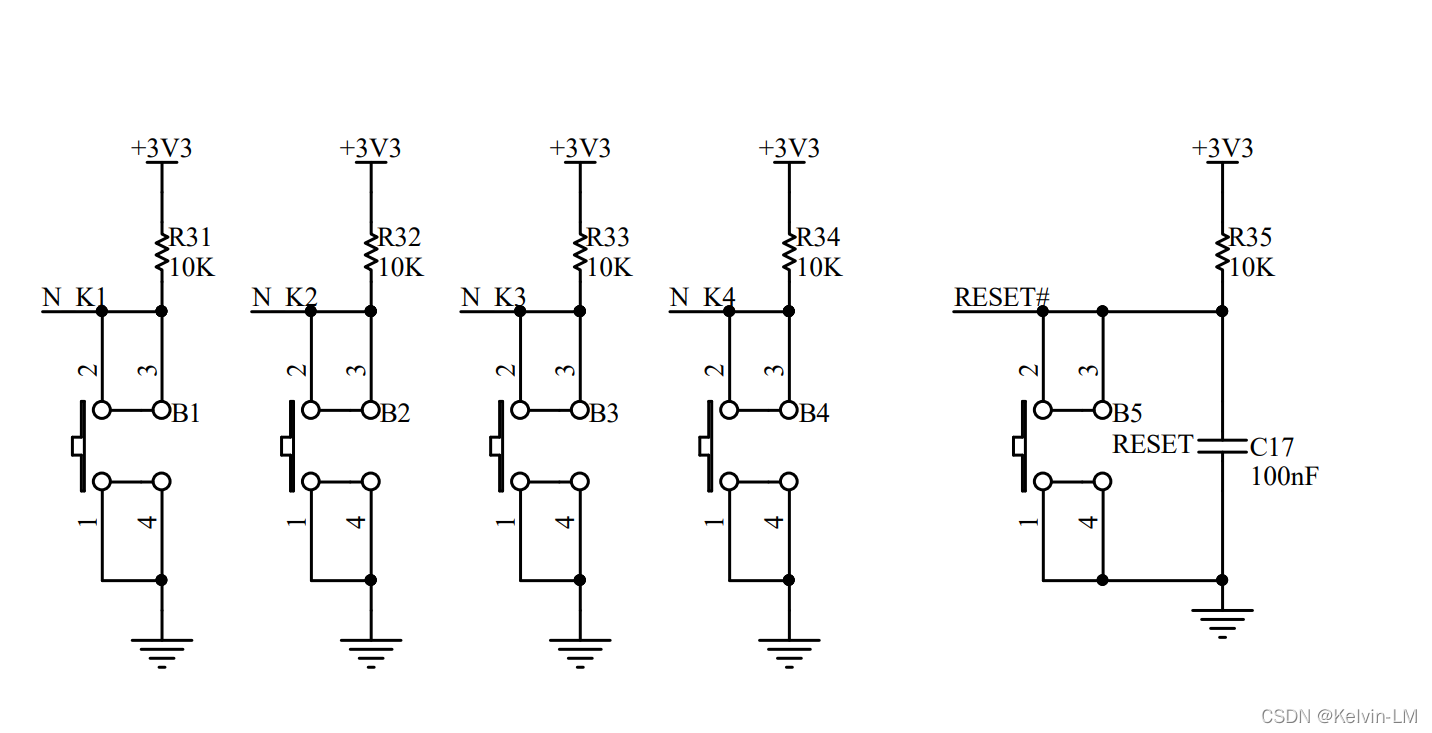
示按键电路以N_K1为例,其通过10K电阻上拉到Vcc,如果按键没按下去,与Vcc导通,读取N_K1即是高电平,如果按键按下,那么导通后接地,读取即是低电平。
按键分别接的是 N_K1-K4 这四个 IO 口,再开发板上通过跳线帽连接到 PA0, PA8, PB1 PB2。

众所周知这里按键存在抖动,抖动后才到达低电平,抖动时间一般认为 3ms 左右,因此需要消抖才能正确判断按键状态
二、建立独立按键库
1.按键状态机
首先我们需要一个初始化的函数:
// IO initialize
void Key_Init(){

    GPIO_InitTypeDef GPIO_InitStructure;

    RCC_APB2PeriphClockCmd( RCC_APB2Periph_GPIOA | RCC_APB2Periph_GPIOB , ENABLE);

    GPIO_InitStructure.GPIO_Pin   = GPIO_Pin_0 | GPIO_Pin_8;
    GPIO_InitStructure.GPIO_Mode  = GPIO_Mode_IN_FLOATING;
    GPIO_InitStructure.GPIO_Speed = GPIO_Speed_50Mhz;

  	GPIO_Init(GPIOA, &GPIO_InitStructure);

	GPIO_InitStructure.GPIO_Pin   = GPIO_Pin_1 | GPIO_Pin_2;
	GPIO_Init(GPIOB, &GPIO_InitStructure);
}
初始化需要用到的PA0, PA8, PB1, PB2这些 IO 口,输入模式设为浮空输入,因为已有上拉电阻。假如没有上拉电阻可以配置为 IPU 模式。
然后我们使用 GPIO_ReadInputDataBit(GPIO_TypeDef* GPIOx, uint16_t GPIO_Pin) 这个库函数来获取高低电平
/**
  * @brief  Reads the specified input port pin.
  * @param  GPIOx: where x can be (A..G) to select the GPIO peripheral.
  * @param  GPIO_Pin:  specifies the port bit to read.
  *   This parameter can be GPIO_Pin_x where x can be (0..15).
  * @retval The input port pin value.
  */
uint8_t GPIO_ReadInputDataBit(GPIO_TypeDef* GPIOx, uint16_t GPIO_Pin)
{
  uint8_t bitstatus = 0x00;

  /* Check the parameters */
  assert_param(IS_GPIO_ALL_PERIPH(GPIOx));
  assert_param(IS_GET_GPIO_PIN(GPIO_Pin));

  if ((GPIOx->IDR & GPIO_Pin) != (uint32_t)Bit_RESET)
  {
    bitstatus = (uint8_t)Bit_SET;
  }
  else
  {
    bitstatus = (uint8_t)Bit_RESET;
  }
  return bitstatus;
}
为了后续的方便,这里我们使用宏定义来简化,这里 KB1 - KB4 就是读取到的四个 IO 口的高低电平状态
// Individual Key state
#define KB1	GPIO_ReadInputDataBit(GPIOA,GPIO_Pin_0)
#define KB2	GPIO_ReadInputDataBit(GPIOA,GPIO_Pin_8)
#define KB3 GPIO_ReadInputDataBit(GPIOB,GPIO_Pin_1)
#define KB4 GPIO_ReadInputDataBit(GPIOB,GPIO_Pin_2)
然后,我们把四个按键的数值变成一个四位16进制数,这样只要判断keyInput这个16进制数就可以判断按键的状态,能够更方便后续的操作
// Make four key as one hexadecimal number
#define keyInput  KB1 | (KB2<<1) | (KB3<<2) | (KB4<<3) | 0xf0
然后我们定义按键的状态,以方便我们理解以及后续状态的判断
// State
#define keyPressed  0  // whether pressed
#define keyShiver   1  // whether shivering
#define keyBounced  2  // whether bounced up
然后编写按键读取函数unsigned char Key_Read()。首先我们定义一个静态变量key_state,以及key_press,key_return。这里读一次keyInput的值,即相当于 KB1-4 这时都读进来。
	static char key_state = 0;
	unsigned char key_press, key_return = 0;

	// read the hexadecimal number
	key_press = keyInput;
然后判断状态,假如没有键盘按下,那么在需要判断是否按下的keyPressed状态,会判断 if (key_press!=0xff) ,然后如果有键按下则进入需要判断抖动的keyShiver状态,如果没有则直接break跳出switch判断。
switch (key_state)
{
	// whether any button pressed
	case keyPressed :
		if (key_press!=0xff) key_state = keyShiver ;
	break;
}
如果在这里按下了按键,则进入下面这里。在5ms后读取到keyShiver状态后,switch会跳进keyShiver,此时会再次判断有无按下,如果没有,则重新赋值key_state到需要判断是否按下的keyPressed状态,如果真的有键按下,则此时已经消抖,只需要读取键值,再根据读取到的值判断哪个键被按下了,从而给返回值赋值对应的按键。
switch (key_state)
{
    // whether any button shivered
    case keyShiver :
		if (key_press == 0xff)
            key_state = keyPressed;
        else
		{
			if(key_press==0xfe) key_return = 1;  //KB1
			if(key_press==0xfd) key_return = 2;  //KB2
			if(key_press==0xfb) key_return = 3;  //KB3
			if(key_press==0xf7) key_return = 4;  //KB4
			key_state = keyBounced;
		}
	break;
}
然后判断按键是否弹起。如果按键弹起,则重新将key_state归位位需要判断按键是否弹起的状态,如果没弹起则按下状态会一直保持。
switch(key_state)
{
    // whether any button bounce up
	case keyBounced:
		if (key_press==0xff) key_state = keyPressed ;
	break;
}
最后加上返回值,即完成了整个函数,如下:
unsigned char Key_Read(void)
{
	static char key_state = 0;
	unsigned char key_press, key_return = 0;

	// read the hexadecimal number
	key_press = keyInput;

	switch (key_state)
	{
		// whether any button pressed
		case keyPressed :
			if (key_press!=0xff) key_state = keyShiver ;
		break;

		// whether any button shivered
		case keyShiver :
			if (key_press == 0xff)
				key_state = keyPressed;
			else
			{
				if(key_press == 0xfe)
                    key_return = 1;  //KB1
				if(key_press == 0xfd)
                    key_return = 2;  //KB2
				if(key_press == 0xfb)
                    key_return = 3;  //KB3
				if(key_press == 0xf7)
                    key_return = 4;  //KB4
				key_state = keyBounced;
			}
		break;

		// whether any button bounce up
		case keyBounced:
			if (key_press==0xff) key_state = keyPressed ;
		break;
	}

	// In the function the key only return once
	return key_return;
}
2.简化:三行代码法
 https://blog.youkuaiyun.com/qq_28997735/article/details/88381179
使用上述的三行代码法:
#define KB1	GPIO_ReadInputDataBit(GPIOA,GPIO_Pin_0)
#define KB2	GPIO_ReadInputDataBit(GPIOA,GPIO_Pin_8)
#define KB3 GPIO_ReadInputDataBit(GPIOB,GPIO_Pin_1)
#define KB4 GPIO_ReadInputDataBit(GPIOB,GPIO_Pin_2)

#define KEYPORT  KB1 | (KB2<<1) | (KB3<<2) | (KB4<<3) | 0xf0

unsigned char Trg, Cont;

void Key_Read( void )
{
    unsigned char ReadData = (KEYPORT)^0xff;
    Trg = ReadData & (ReadData ^ Cont);
    Cont = ReadData;
}
有异或还有与,看着很难理解。
(1)假如没有按键按下
那么 KEYPORT = 0xff = 0xff,因此异或为 0 ,ReadData = 0
而 ReadData = 0,0与上任何数都是0,因此 Trg = 0
所以 Cont = ReadData = 0
(2)假如 KB1 按下
那么 KEYPORT = 0xfe ≠ 0xff,因此 0xfe ^ 0xff = 0x01 ,ReadData = 0x01
此时 Trg = 0x01 & (0x01 ^ 0x00) = 0x01,因此Trg = 0x01
而 Cont = ReadData = 0x01
(3)按下的 KB1 没松手
那么 KEYPORT 不变。 0xfe ^ 0xff = 0x01 ,ReadData 依旧是 0x01
此时 Trg = 0x01 & (0x01 ^ 0x01) = 0x00,因此Trg = 0
而 Cont = ReadData = 0x01
因此Trg只有一次触发
(4)按下的 KB1 松手了
那么 KEYPORT = 0xff,ReadData = 0
此时 Trg = 0 & (0 ^ 0x01) = 0
而Cont = ReadData = 0
关于消抖的话,由于即使抖动,按下后也仅会触发一次,而如果抬起,则一定在5ms之后。因此可以规避掉。
最后判断对应按键即可,此方法同时也可以判断长按键。
/***********************************************
Name    : Key_Read
Function: (1) No key  : ReadData=0;Trg=0;Cont=0;
					(2) D0 is 0 : KEYPORT=0xfe; ReadDate=0x01; Trg=0x01&(0x01^0x00) = 0x01; Cont=0x01;
					(3) when D0 is always 0 : Trg=0x01&(0x01^0x01)=0 ; Cont=0x01;
					(4) when D0 is 1: Trg=0x00&(0x00^0x01)=0 Cont=0;
Example:
		if(Trg & 0x80)   // one key

		if(Cont & 0x80)  // long key
		{
			time_count++;
			if(time_count==100)
			{
				time_count=0;
				SendString("long !\r\n");
			}
		}
************************************************/
三、独立按键使用
1. 逐个点灯
2. 使用按键控制灯的亮灭与蜂鸣器开关
总结
这两个按键的方法都做到了没有延时,即不占用CPU过多资源,不干扰while(1)中的正常运行。同时,按键按下可以做到单次触发,同时可以进行长按键的判断。


 931
931

 被折叠的 条评论
为什么被折叠?
被折叠的 条评论
为什么被折叠?
 到【灌水乐园】发言


