


 本文介绍如何使用JMeter进行远程测试,以模拟更多用户并减轻单一客户端的压力。文章详细解释了配置客户端与服务器、启动服务器及客户端的具体步骤。
Remote Testing
https://jmeter.apache.org/usermanual/remote-test.html
中文版:
13. 远程测试
如果您的 JMeter 客户端机器在性能方面无法模拟足够多的用户来对您的服务器施加压力或在网络级别受到限制,则可以选择从单个 JMeter 客户端控制多个远程 JMeter 引擎。通过远程运行 JMeter,您可以在许多低端计算机上复制测试,从而在服务器上模拟更大的负载。JMeter 客户端的一个实例可以控制任意数量的远程 JMeter 实例,并从它们收集所有数据。这提供了以下功能:
将测试样本保存到本地机器
从一台机器管理多个 JMeterEngines
无需将测试计划复制到每个服务器 - 客户端将其发送到所有服务器
注意:所有服务器都运行相同的测试计划。JMeter 不会在服务器之间分配负载,每个服务器都运行完整的测试计划。因此,如果您设置 1000 个线程并拥有 6 个 JMeter 服务器,您最终会注入 6000 个线程。
但是,远程模式确实比独立运行相同数量的 CLI 模式测试使用更多的资源。如果使用了许多服务器实例,客户端 JMeter 可能会过载,客户端网络连接也会过载。这已通过切换到剥离模式(见下文)得到改善,但您应该始终检查您的客户端是否超载。
请注意,虽然您可以在应用程序服务器上执行 JMeterEngine,但您需要注意这样一个事实,即这将增加应用程序服务器上的处理开销,因此您的测试结果会受到一定程度的影响。推荐的方法是将一台或多台机器与您配置为运行 JMeter 引擎的应用程序服务器位于同一以太网段。这将最大限度地减少网络对测试结果的影响,而不会影响应用服务器本身的性能。
步骤 0:配置节点
确保所有节点(客户端和服务器):
正在运行完全相同版本的 JMeter。
在所有系统上使用相同版本的 Java。使用不同版本的 Java 可能可行,但不鼓励使用。
拥有用于 RMI over SSL的有效密钥库,或者您已禁用 SSL。
如果测试使用任何数据文件,请注意这些文件不会由客户端发送,因此请确保这些文件在每台服务器上的相应目录中可用。如有必要,您可以通过编辑 每个服务器上的user.properties或system.properties文件来为属性定义不同的值。这些属性将在服务器启动时被选取,并可用于测试计划以影响其行为(例如连接到不同的远程服务器)。或者,在测试使用的任何数据文件中使用不同的内容(例如,如果每个服务器必须使用唯一的 ID,则在数据文件之间划分这些 ID)
第一步:启动服务器
要在远程节点中运行 JMeter,请通过运行JMETER_HOME/bin/jmeter-server (unix) 或JMETER_HOME/bin/jmeter-server.bat (windows) 脚本在您希望运行的所有机器上启动 JMeter 服务器组件。
请注意,除非使用不同的 RMI 端口,否则每个节点上只能有一个 JMeter 服务器。
JMeter 服务器应用程序自己启动 RMI 注册表;无需单独启动 RMI 注册表。
默认情况下,RMI 为 JMeter 服务器引擎使用动态端口。这可能会导致防火墙出现问题,因此您可以定义 JMeter 属性server.rmi.localport来控制此端口号。它将用作服务器引擎的本地端口号。
第 2 步:将服务器 IP 添加到客户端的属性文件
编辑控制 JMeter 机器上的属性文件。在JMETER_HOME/bin/jmeter.properties 中,找到名为“ remote_hosts ”的属性并添加正在运行的 JMeter 服务器的 IP 地址的值。可以添加多个这样的服务器,以逗号分隔。
请注意,您可以使用-R 命令行选项 来指定要使用的远程主机。这与使用-r和-Jremote_hosts={serverlist} 的效果相同。例如
jmeter -Rhost1,127.0.0.1,host2
如果您定义 JMeter 属性server.exitaftertest=true,则服务器将在运行单个测试后退出。另请参阅-X标志(如下所述)
步骤 3a:从 GUI 客户端启动 JMeter 客户端以检查配置
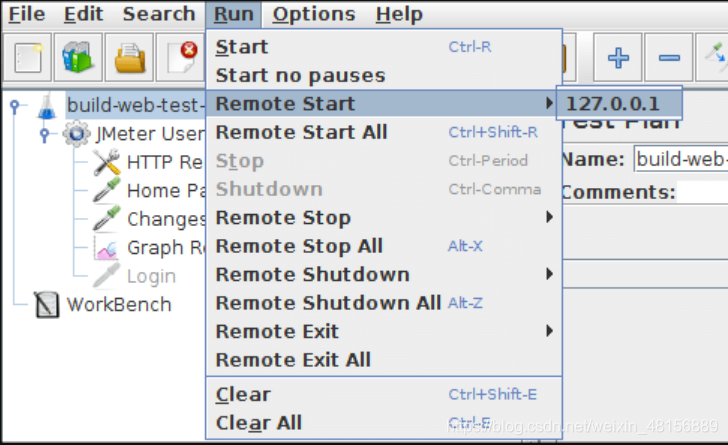
现在您已准备好启动控制 JMeter 客户端。对于 MS-Windows,使用脚本“ bin/jmeter.bat ”启动客户端。对于 UNIX,请使用脚本“ bin/jmeter ”。您会注意到 Run 菜单包含两个新的子菜单:“Remote Start”和“Remote Stop”(见图 1)。这些菜单包含您在属性文件中设置的客户端。使用远程启动和停止而不是普通的 JMeter 启动和停止菜单项。
图 1 - 运行菜单
步骤 3b:从 CLI 模式客户端启动 JMeter
GUI 模式应该只用于调试,作为更好的选择,您应该从 CLI 模式(命令行)客户端在远程服务器上启动测试。执行此操作的命令是:
jmeter -n -t script.jmx -r
要么
jmeter -n -t script.jmx -R server1,server2,...
其他可能有用的标志:
-Gproperty=值
在所有服务器中定义一个属性(可能出现多次)
-X
在测试结束时退出远程服务器。
第一个示例将在 JMeter 属性remote_hosts中定义的任何服务器上开始测试;
第二个示例将从服务器列表中定义remote_hosts,然后在远程服务器上开始测试。
当所有远程服务器都停止时,命令行客户端将退出。
- Remote Testing
In the event that your JMeter client machine is unable, performance-wise, to simulate enough users to stress your server or is limited at network level, an option exists to control multiple, remote JMeter engines from a single JMeter client. By running JMeter remotely, you can replicate a test across many low-end computers and thus simulate a larger load on the server. One instance of the JMeter client can control any number of remote JMeter instances, and collect all the data from them. This offers the following features:
Saving of test samples to the local machine
Management of multiple JMeterEngines from a single machine
No need to copy the test plan to each server - the client sends it to all the servers
Note: The same test plan is run by all the servers. JMeter does not distribute the load between servers, each runs the full test plan. So if you set 1000 Threads and have 6 JMeter server, you end up injecting 6000 Threads.
However, remote mode does use more resources than running the same number of CLI mode tests independently. If many server instances are used, the client JMeter can become overloaded, as can the client network connection. This has been improved by switching to Stripped modes (see below) but you should always check that your client is not overloaded.
Note that while you can execute the JMeterEngine on your application server, you need to be mindful of the fact that this will be adding processing overhead on the application server and thus your testing results will be somewhat tainted. The recommended approach is to have one or more machines on the same Ethernet segment as your application server that you configure to run the JMeter Engine. This will minimize the impact of the network on the test results without impacting the performance of the application server itself.
Step 0: Configure the nodes
Make sure that all the nodes (client and servers) :
are running exactly the same version of JMeter.
are using the same version of Java on all systems. Using different versions of Java may work but is discouraged.
have a valid keystore for RMI over SSL, or you have disabled the use of SSL.
If the test uses any data files, note that these are not sent across by the client so make sure that these are available in the appropriate directory on each server. If necessary you can define different values for properties by editing the user.properties or system.properties files on each server. These properties will be picked up when the server is started and may be used in the test plan to affect its behaviour (e.g. connecting to a different remote server). Alternatively use different content in any datafiles used by the test (e.g. if each server must use unique ids, divide these between the data files)
Step 1: Start the servers
To run JMeter in remote node, start the JMeter server component on all machines you wish to run on by running the JMETER_HOME/bin/jmeter-server (unix) or JMETER_HOME/bin/jmeter-server.bat (windows) script.
Note that there can only be one JMeter server on each node unless different RMI ports are used.
The JMeter server application starts the RMI registry itself; there is no need to start RMI registry separately.
By default, RMI uses a dynamic port for the JMeter server engine. This can cause problems for firewalls, so you can define the JMeter property server.rmi.localport to control this port number. it will be used as the local port number for the server engine.
Step 2: Add the server IP to your client’s Properties File
Edit the properties file on the controlling JMeter machine. In JMETER_HOME/bin/jmeter.properties, find the property named “remote_hosts” and add the value of your running JMeter server’s IP address. Multiple such servers can be added, comma-delimited.
Note that you can use the -R command line option instead to specify the remote host(s) to use. This has the same effect as using -r and -Jremote_hosts={serverlist}. E.g.
jmeter -Rhost1,127.0.0.1,host2
If you define the JMeter property server.exitaftertest=true, then the server will exit after it runs a single test. See also the -X flag (described below)
Step 3a: Start the JMeter Client from a GUI client to check configuration
Now you are ready to start the controlling JMeter client. For MS-Windows, start the client with the script “bin/jmeter.bat”. For UNIX, use the script “bin/jmeter”. You will notice that the Run menu contains two new sub-menus: “Remote Start” and “Remote Stop” (see figure 1). These menus contain the client that you set in the properties file. Use the remote start and stop instead of the normal JMeter start and stop menu items.
Figure 1 - Run Menu
Figure 1 - Run Menu
Step 3b: Start the JMeter from a CLI mode Client
GUI mode should only be used for debugging, as a better alternative, you should start the test on remote server(s) from a CLI mode (command-line) client. The command to do this is:
jmeter -n -t script.jmx -r
or
jmeter -n -t script.jmx -R server1,server2,…
jmeter -n -t script.jmx -R server1,server2,…
Other flags that may be useful:
-Gproperty=value
define a property in all the servers (may appear more than once)
-X
Exit remote servers at the end of the test.
The first example will start the test on whatever servers are defined in the JMeter property remote_hosts;
The second example will define remote_hosts from the list of servers and then start the test on the remote servers.
The command-line client will exit when all the remote servers have stopped.


 被折叠的 条评论
为什么被折叠?
被折叠的 条评论
为什么被折叠?
 到【灌水乐园】发言


