


 本文详细介绍了SpringSecurity的认证和授权过程。在认证部分,讲解了登录校验流程、认证原理,包括自定义登录接口、数据库校验用户以及退出登录的实现。在授权部分,阐述了如何限制访问资源所需的权限以及封装权限信息。整个过程结合了数据库、JWT和Redis进行用户身份验证。
2.认证
2.1登录校验流程
2.2认证原理
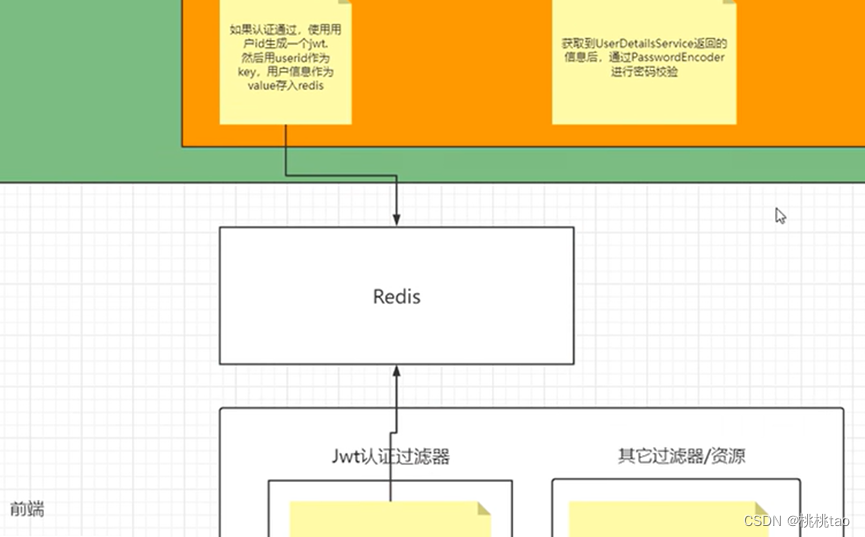
*源码流程:
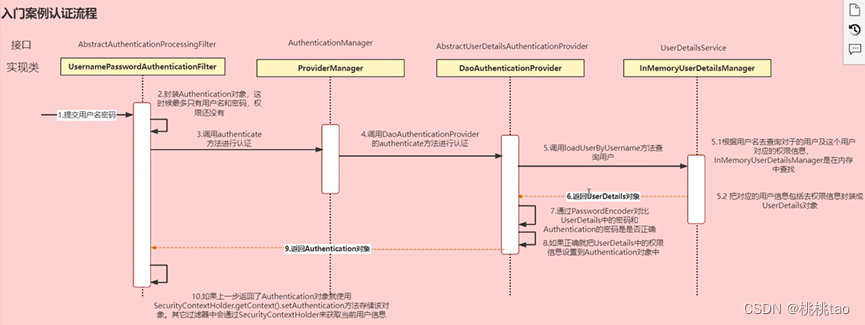
*自定义认证流程:
*校验流程:
*认证和校验连接:
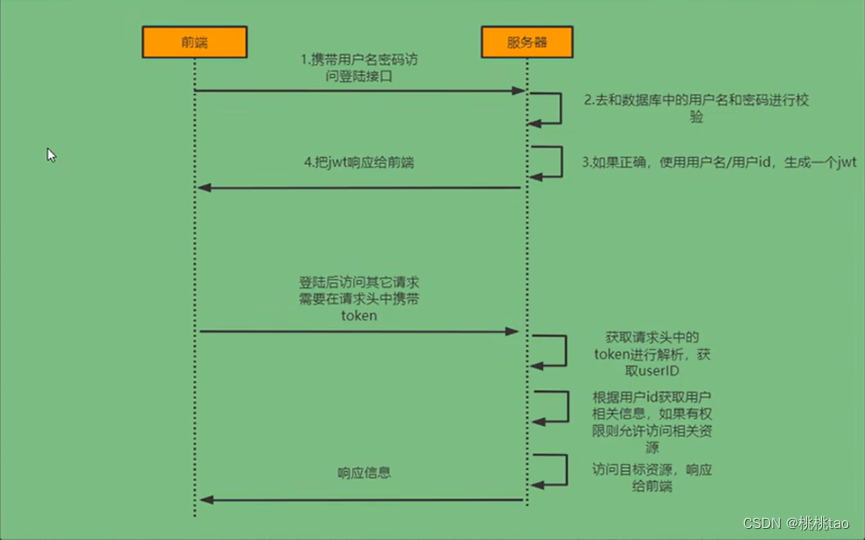
2.3思路分析
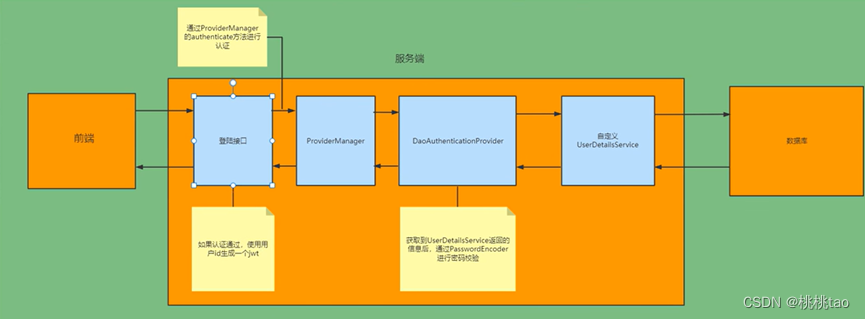
*登录:
自定义登录接口,调用ProviderManager的方法进行认证à自定义UserDetilService,在这个实现类中查询数据库
如果认证通过,则生成jwt,并把用户信息存到redis中
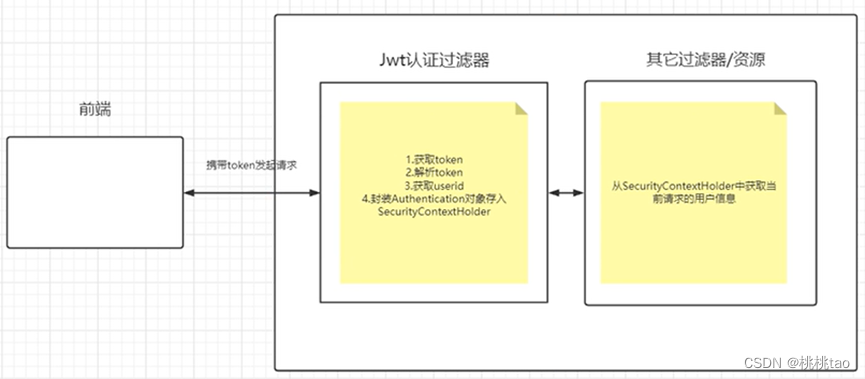
*校验:
定义jwt认证过滤器,获取token并解析token,得到其中的useridà利用userid从redis中获取用户信息à存入到SecurityContextHolder
2.4认证实现
2.4.1初始化
2.4.1.1创建springboot工程
2.4.1.2导入依赖
<dependencies>
    <!--test-->
   <dependency>
       <groupId>org.springframework.boot</groupId>
       <artifactId>spring-boot-starter-test</artifactId>
       <version>2.7.10-SNAPSHOT</version>
   </dependency>
    <!--web-->
    <dependency>
        <groupId>org.springframework.boot</groupId>
        <artifactId>spring-boot-starter-web</artifactId>
    </dependency>
    <!--lombok-->
    <dependency>
        <groupId>org.projectlombok</groupId>
        <artifactId>lombok</artifactId>
        <optional>true</optional>
    </dependency>
    <!--SpringSecurity-->
    <dependency>
        <groupId>org.springframework.boot</groupId>
        <artifactId>spring-boot-starter-security</artifactId>
        <version>3.0.3</version>
    </dependency>
    <!--redis-->
    <dependency>
        <groupId>org.springframework.boot</groupId>
        <artifactId>spring-boot-starter-data-redis</artifactId>
        <version>2.6.1</version>
    </dependency>
    <!--fastjson-->
    <dependency>
        <groupId>com.alibaba</groupId>
        <artifactId>fastjson</artifactId>
        <version>1.2.33</version>
    </dependency>
    <!--jwt-->
    <dependency>
        <groupId>io.jsonwebtoken</groupId>
        <artifactId>jjwt</artifactId>
        <version>0.9.1</version>
    </dependency>
<!--MyBatis-puls-->
<dependency>
    <groupId>com.baomidou</groupId>
    <artifactId>mybatis-plus-boot-starter</artifactId>
    <version>3.5.3.1</version>
</dependency>
<!--mysql-->
<dependency>
    <groupId>mysql</groupId>
    <artifactId>mysql-connector-java</artifactId>
    <version>8.0.18</version>
</dependency>
	<!--jdk8版本之后要添加的4个依赖-->
<dependency>
    <groupId>javax.activation</groupId>
    <artifactId>activation</artifactId>
    <version>1.1</version>
</dependency>
<dependency>
    <groupId>javax.xml.bind</groupId>
    <artifactId>jaxb-api</artifactId>
    <version>2.3.0</version>
</dependency>
<dependency>
    <groupId>com.sun.xml.bind</groupId>
    <artifactId>jaxb-impl</artifactId>
    <classifier>2.3.0</classifier>
</dependency>
<dependency>
    <groupId>com.sun.xml.bind</groupId>
    <artifactId>jaxb-core</artifactId>
    <classifier>2.3.0</classifier>
</dependency>
</dependencies>
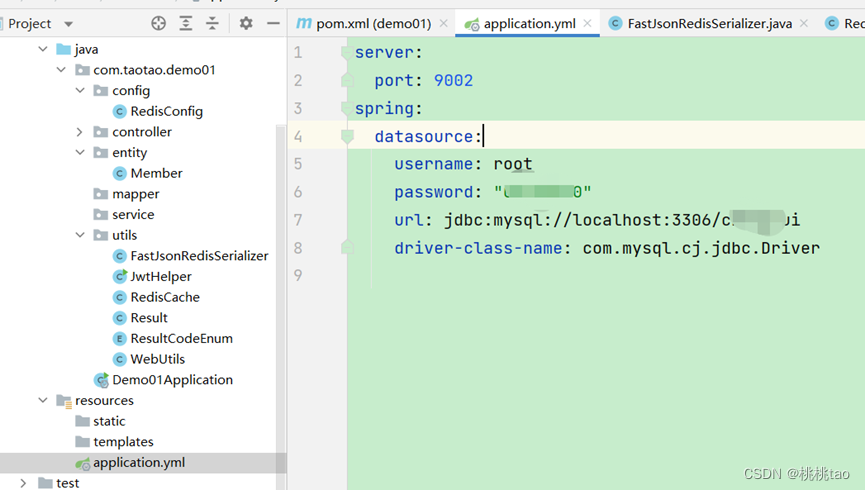
2.4.1.3数据库配置
2.4.2准备工具类
2.4.2.1创建redis序列化工具
package com.taotao.demo01.utils;

import com.alibaba.fastjson.JSON;
import com.alibaba.fastjson.parser.ParserConfig;
import com.alibaba.fastjson.serializer.SerializerFeature;
import com.fasterxml.jackson.databind.JavaType;
import com.fasterxml.jackson.databind.type.TypeFactory;
import org.springframework.data.redis.serializer.RedisSerializer;
import org.springframework.data.redis.serializer.SerializationException;

import java.nio.charset.Charset;

public class FastJsonRedisSerializer<T> implements RedisSerializer<T>
{

    public static final Charset DEFAULT_CHARSET = Charset.forName("UTF-8");

    private Class<T> clazz;

    static
    {
        ParserConfig.getGlobalInstance().setAutoTypeSupport(true);
    }

    public FastJsonRedisSerializer(Class<T> clazz)
    {
        super();
        this.clazz = clazz;
    }

    @Override
    public byte[] serialize(T t) throws SerializationException
    {
        if (t == null)
        {
            return new byte[0];
        }
        return JSON.toJSONString(t, SerializerFeature.WriteClassName).getBytes(DEFAULT_CHARSET);
    }

    @Override
    public T deserialize(byte[] bytes) throws SerializationException
    {
        if (bytes == null || bytes.length <= 0)
        {
            return null;
        }
        String str &
最低0.47元/天 解锁文章


 被折叠的 条评论
为什么被折叠?
被折叠的 条评论
为什么被折叠?
 到【灌水乐园】发言


