


 本文介绍了车牌定位的详细步骤,包括图像拉伸、二值化处理、边缘检测、车牌区域筛选及字符分割,展示了如何通过颜色识别和图像处理技术定位和切割车牌。

import cv2
import numpy as np
from PIL import Image
import os.path
from skimage import io, data
def stretch(img):
'''
图像拉伸函数
'''
maxi = float(img.max())
mini = float(img.min())
for i in range(img.shape[0]):
for j in range(img.shape[1]):
img[i, j] = (255 / (maxi - mini) * img[i, j] - (255 * mini) / (maxi - mini))
return img
def dobinaryzation(img):
'''
二值化处理函数
'''
maxi = float(img.max())
mini = float(img.min())
x = maxi - ((maxi - mini) / 2)
# 二值化,返回阈值ret 和 二值化操作后的图像thresh
ret, thresh = cv2.threshold(img, x, 255, cv2.THRESH_BINARY)
# 返回二值化后的黑白图像
return thresh
def find_rectangle(contour):
'''
寻找矩形轮廓
'''
y, x = [], []
for p in contour:
y.append(p[0][0])
x.append(p[0][1])
return [min(y), min(x), max(y), max(x)]
def locate_license(img, afterimg):
'''
定位车牌号
'''
contours, hierarchy = cv2.findContours(img, cv2.RETR_EXTERNAL, cv2.CHAIN_APPROX_SIMPLE)
# 找出最大的三个区域
block = []
for c in contours:
# 找出轮廓的左上点和右下点,由此计算它的面积和长度比
r = find_rectangle(c)
a = (r[2] - r[0]) * (r[3] - r[1]) # 面积
s = (r[2] - r[0]) * (r[3] - r[1]) # 长度比
block.append([r, a, s])
# 选出面积最大的3个区域
block = sorted(block, key=lambda b: b[1])[-3:]
# 使用颜色识别判断找出最像车牌的区域
maxweight, maxindex = 0, -1
for i in range(len(block)):
b = afterimg[block[i][0][1]:block[i][0][3], block[i][0][0]:block[i][0][2]]
# BGR转HSV
hsv = cv2.cvtColor(b, cv2.COLOR_BGR2HSV)
# 蓝色车牌的范围
lower = np.array([100, 50, 50])
upper = np.array([140, 255, 255])
# 根据阈值构建掩膜
mask = cv2.inRange(hsv, lower, upper)
# 统计权值
w1 = 0
for m in mask:
w1 += m / 255
w2 = 0
for n in w1:
w2 += n
# 选出最大权值的区域
if w2 > maxweight:
maxindex = i
maxweight = w2
return block[maxindex][0]
def find_license(img):
'''
预处理函数
'''
# m = 400 * img.shape[0] / img.shape[1]
#
# # 压缩图像
# img = cv2.resize(img, (400, int(m)), interpolation=cv2.INTER_CUBIC)
# BGR转换为灰度图像
gray_img = cv2.cvtColor(img, cv2.COLOR_BGR2GRAY)
# 灰度拉伸
stretchedimg = stretch(gray_img)
'''进行开运算,用来去除噪声'''
r = 16
h = w = r * 2 + 1
kernel = np.zeros((h, w), np.uint8)
cv2.circle(kernel, (r, r), r, 1, -1)
# 开运算
openingimg = cv2.morphologyEx(stretchedimg, cv2.MORPH_OPEN, kernel)
# 获取差分图,两幅图像做差 cv2.absdiff('图像1','图像2')
strtimg = cv2.absdiff(stretchedimg, openingimg)
# 图像二值化
binaryimg = dobinaryzation(strtimg)
# canny边缘检测
canny = cv2.Canny(binaryimg, binaryimg.shape[0], binaryimg.shape[1])
'''消除小的区域,保留大块的区域,从而定位车牌'''
# 进行闭运算
kernel = np.ones((5, 19), np.uint8)
closingimg = cv2.morphologyEx(canny, cv2.MORPH_CLOSE, kernel)
# 进行开运算
openingimg = cv2.morphologyEx(closingimg, cv2.MORPH_OPEN, kernel)
# 再次进行开运算
kernel = np.ones((11, 5), np.uint8)
openingimg = cv2.morphologyEx(openingimg, cv2.MORPH_OPEN, kernel)
# 消除小区域,定位车牌位置
rect = locate_license(openingimg, img)
return rect, img
def cut_license(afterimg, rect):
'''
图像分割函数
'''
# 转换为宽度和高度
rect[2] = rect[2] - rect[0]
rect[3] = rect[3] - rect[1]
rect_copy = tuple(rect.copy())
rect = [0, 0, 0, 0]
# 创建掩膜
mask = np.zeros(afterimg.shape[:2], np.uint8)
# 创建背景模型 大小只能为13*5,行数只能为1,单通道浮点型
bgdModel = np.zeros((1, 65), np.float64)
# 创建前景模型
fgdModel = np.zeros((1, 65), np.float64)
# 分割图像
cv2.grabCut(afterimg, mask, rect_copy, bgdModel, fgdModel, 5, cv2.GC_INIT_WITH_RECT)
mask2 = np.where((mask == 2) | (mask == 0), 0, 1).astype('uint8')
img_show = afterimg * mask2[:, :, np.newaxis]
return img_show
def deal_license(licenseimg):
'''
车牌图片二值化
'''
# 车牌变为灰度图像
gray_img = cv2.cvtColor(licenseimg, cv2.COLOR_BGR2GRAY)
# 均值滤波 去除噪声
kernel = np.ones((3, 3), np.float32) / 9
gray_img = cv2.filter2D(gray_img, -1, kernel)
# 二值化处理
ret, thresh = cv2.threshold(gray_img, 120, 255, cv2.THRESH_BINARY)
return thresh
def find_end(start, arg, black, white, width, black_max, white_max):
end = start + 1
for m in range(start + 1, width - 1):
if (black[m] if arg else white[m]) > (0.98 * black_max if arg else 0.98 * white_max):
end = m
break
return end
if __name__ == '__main__':
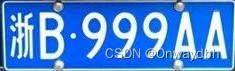
img = cv2.imread('car2.jpg', cv2.IMREAD_COLOR)
# 预处理图像
rect, afterimg = find_license(img)
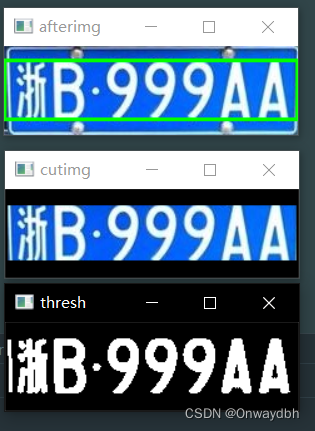
# 框出车牌号
cv2.rectangle(afterimg, (rect[0], rect[1]), (rect[2], rect[3]), (0, 255, 0), 2)
cv2.imshow('afterimg', afterimg)
# 分割车牌与背景
cutimg = cut_license(afterimg, rect)
cv2.imshow('cutimg', cutimg)
# 二值化生成黑白图
thresh = deal_license(cutimg)
cv2.imshow('thresh', thresh)
cv2.waitKey(0)
# 分割字符
'''
判断底色和字色
'''
# 记录黑白像素总和
white = []
black = []
height = thresh.shape[0] # 263
width = thresh.shape[1] # 400
# print('height',height)
# print('width',width)
white_max = 0
black_max = 0
# 计算每一列的黑白像素总和
for i in range(width):
line_white = 0
line_black = 0
for j in range(height):
if thresh[j][i] == 255:
line_white += 1
if thresh[j][i] == 0:
line_black += 1
white_max = max(white_max, line_white)
black_max = max(black_max, line_black)
white.append(line_white)
black.append(line_black)
print('white', white)
print('black', black)
# arg为true表示黑底白字,False为白底黑字
arg = True
if black_max < white_max:
arg = False
n = 1
start = 1
end = 2
s_width = 28
s_height = 28
while n < width - 2:
n += 1
# 判断是白底黑字还是黑底白字 0.05参数对应上面的0.95 可作调整
if (white[n] if arg else black[n]) > (0.02 * white_max if arg else 0.02 * black_max):
start = n
end = find_end(start, arg, black, white, width, black_max, white_max)
n = end
if end - start > 5:
cj = thresh[1:height, start:end]
# new_image = cj.resize((s_width,s_height),Image.BILINEAR)
# cj=cj.reshape(28, 28)
print("%s.jpg" % (n))
# 保存分割的图片 by cayden
# cj.save("%s.jpg" % (n))
infile = "%s.jpg" % (n)
io.imsave(infile, cj)
# im = Image.open(infile)
# out=im.resize((s_width,s_height),Image.BILINEAR)
# out.save(infile)
cv2.imshow('cutlicense', cj)
cv2.waitKey(0)
cv2.waitKey(0)
cv2.destroyAllWindows()


 795
795

 被折叠的 条评论
为什么被折叠?
被折叠的 条评论
为什么被折叠?
 到【灌水乐园】发言


