


数据集
数据集下载
链接:https://pan.baidu.com/s/1ypNNQkR1_ZK-_KO92x6Phw?pwd=6753
提取码:6753
图片1 -->NZPP 一个样本对应四个目标值
NZPP ---【13,25,15,15】
使用one-hot编码转换
第一个位置:[0,0,0,0,0,0,0,0,0,0,0,0,0,1,0,0,0,0,0,0,0,0,0,0,0,0]
第二个位置:[0,0,0,0,0,0,0,0,0,0,0,0,0,0,0,0,0,0,0,0,0,0,0,0,0,1]
第三个位置:[0,0,0,0,0,0,0,0,0,0,0,0,0,0,0,1,0,0,0,0,0,0,0,0,0,0,]
第四个位置:[0,0,0,0,0,0,0,0,0,0,0,0,0,0,0,1,0,0,0,0,0,0,0,0,0,0,]
如何衡量损失?
softmax交叉熵 ---适合一个样本对应一个目标值
sigmoid交叉熵 ---每个类别独立且不互相排斥 适合多个目标值情况
准确率如何计算?
核心:对比真实值和预测值最大值所在位置是否一致
本案例要比对4个26列 4个所有一致才能说明识别正确
y_predict[None,4,26]
tf.argmax(y_predict,axis = 2) 将返回[[True],[True],[True],[True]]等结果
判断全是True才能返回True ---->tf.reduce_all()
流程分析
6000张图片
1)读取图片数据
filename --->标签值
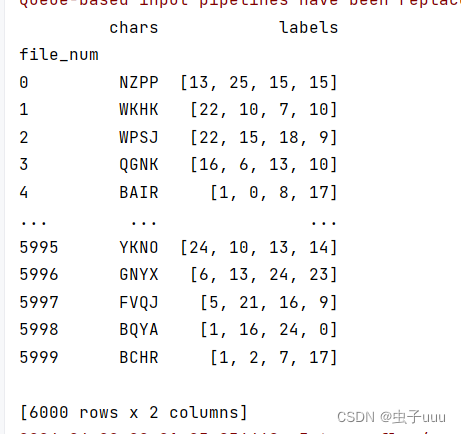
2)解析CSV文件,将标签值处理成数字形式 例 NZPP ---[13,25,15,15]
3)将filename和标签值联系起来
4)构建卷积神经网络 --->y_predict
5)构造损失函数 sigmoid交叉熵损失
6)优化损失
7)计算准确率
8)开启会话、开启线程
代码实现
import tensorflow as tf
import glob
import pandas as pd
import numpy as np
tf.compat.v1.disable_eager_execution()
# 1) 读取图片数据filename --标签值
def read_pic():
"""
读取图片数据
:return:
"""
#1、构建文件名队列
file_names = glob.glob("./tmp/GenPics/*.jpg")
# print("file_names:\n",file_names)
file_queue = tf.compat.v1.train.string_input_producer(file_names)
# 2、读取与解码
reader = tf.compat.v1.WholeFileReader()
filename,image = reader.read(file_queue)
# 解码
decoded = tf.image.decode_jpeg(image)
# 更新图像,将图片形状确定下来
decoded.set_shape([20,80,3])
# 修改图像类型
image_cast = tf.cast(decoded,tf.float32)
# 批处理
filename_batch,image_batch = tf.compat.v1.train.batch([filename,image_cast],batch_size=100,num_threads=1,capacity=200)
return filename_batch,image_batch
# 2) 解析CSV使得成为 将标签值NZPP->[13, 25, 15, 15]
def parse_csv():
"""
解析CSV文件,建立文件名和标签值对应表格
:return:
"""
csv_data = pd.read_csv("./tmp/GenPics/labels.csv", names=["file_num", "chars"], index_col="file_num")
labels = []
for label in csv_data["chars"]:
tmp = []
for letter in label:
tmp.append(ord(letter) - ord("A"))
labels.append(tmp)
csv_data["labels"] = labels
print(csv_data)
return csv_data
# 3)将filename和标签值联系起来
def filename2label(filenames, csv_data):
"""
将filename和标签值联系起来
:param filenames:
:param csv_data:
:return:
"""
labels = []
# 将b'文件名中的数字提取出来并索引相应的标签值
for filename in filenames:
digit_str = "".join(list(filter(str.isdigit, str(filename))))
label = csv_data.loc[int(digit_str), "labels"]
labels.append(label)
#print("labels:\n", labels)
return np.array(labels)
# 4)构建卷积神经网络
def create_weights(shape):
return tf.Variable(initial_value=tf.compat.v1.random_normal(shape=shape, stddev=0.01))
def create_model(x):
"""
构建卷积神经网络
:param x:[None, 20, 80, 3]
:return:
"""
# 1)第一个卷积大层
with tf.compat.v1.variable_scope("conv1"):
# 卷积层
# 定义filter和偏置
conv1_weights = create_weights(shape=[5, 5, 3, 32])
conv1_bias = create_weights(shape=[32])
conv1_x = tf.nn.conv2d(input=x, filters=conv1_weights, strides=[1, 1, 1, 1], padding="SAME") + conv1_bias
# 激活层
relu1_x = tf.nn.relu(conv1_x)
# 池化层
pool1_x = tf.nn.max_pool(input=relu1_x, ksize=[1, 2, 2, 1], strides=[1, 2, 2, 1], padding="SAME")
# 2)第二个卷积大层
with tf.compat.v1.variable_scope("conv2"):
# [None, 20, 80, 3] --> [None, 10, 40, 32]
# 卷积层
# 定义filter和偏置
conv2_weights = create_weights(shape=[5, 5, 32, 64])
conv2_bias = create_weights(shape=[64])
conv2_x = tf.nn.conv2d(input=pool1_x, filters=conv2_weights, strides=[1, 1, 1, 1], padding="SAME") + conv2_bias
# 激活层
relu2_x = tf.nn.relu(conv2_x)
# 池化层
pool2_x = tf.nn.max_pool(input=relu2_x, ksize=[1, 2, 2, 1], strides=[1, 2, 2, 1], padding="SAME")
# 3)全连接层
with tf.compat.v1.variable_scope("full_connection"):
# [None, 10, 40, 32] -> [None, 5, 20, 64]
# [None, 5, 20, 64] -> [None, 5 * 20 * 64]
# [None, 5 * 20 * 64] * [5 * 20 * 64, 4 * 26] = [None, 4 * 26]
x_fc = tf.reshape(pool2_x, shape=[-1, 5 * 20 * 64])
weights_fc = create_weights(shape=[5 * 20 * 64, 4 * 26])
bias_fc = create_weights(shape=[104])
y_predict = tf.matmul(x_fc, weights_fc) + bias_fc
return y_predict
if __name__ == "__main__":
filename,image = read_pic()
csv_data = parse_csv()
# 1、准备数据
x = tf.compat.v1.placeholder(tf.float32, shape=[None, 20, 80, 3])
y_true = tf.compat.v1.placeholder(tf.float32, shape=[None, 4 * 26])
# 2、构建模型
y_predict = create_model(x)
# 3、构造损失函数
loss_list = tf.nn.sigmoid_cross_entropy_with_logits(labels=y_true, logits=y_predict)
loss = tf.reduce_mean(loss_list)
# 4、优化损失
optimizer = tf.compat.v1.train.AdamOptimizer(learning_rate=0.001).minimize(loss)
# 5、计算准确率
equal_list = tf.reduce_all(
tf.equal(tf.argmax(tf.reshape(y_predict, shape=[-1, 4, 26]), axis=2),
tf.argmax(tf.reshape(y_true, shape=[-1, 4, 26]), axis=2)), axis=1)
accuracy = tf.reduce_mean(tf.cast(equal_list, tf.float32))
# 初始化变量
init = tf.compat.v1.global_variables_initializer()
# 开启会话
with tf.compat.v1.Session() as sess:
# 初始化变量
sess.run(init)
coord = tf.compat.v1.train.Coordinator()
threads = tf.compat.v1.train.start_queue_runners(sess=sess, coord=coord)
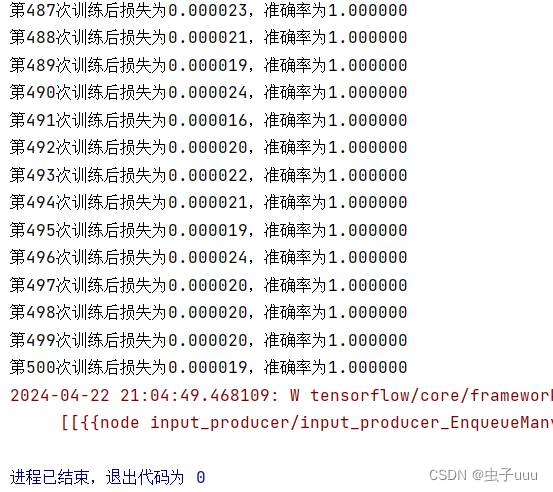
for i in range(500):
filename_value, image_value = sess.run([filename, image])
# print("filename_value:\n",filename_value)
# print("image_value:\n",image_value)
labels = filename2label(filename_value, csv_data)
# 将标签值转换成one-hot
labels_value = tf.reshape(tf.one_hot(labels, depth=26), [-1, 4 * 26]).eval()
_, error, accuracy_value = sess.run([optimizer, loss, accuracy],
feed_dict={x: image_value, y_true: labels_value})
print("第%d次训练后损失为%f,准确率为%f" % (i + 1, error, accuracy_value))
# 回收线程
coord.request_stop()
coord.join(threads)
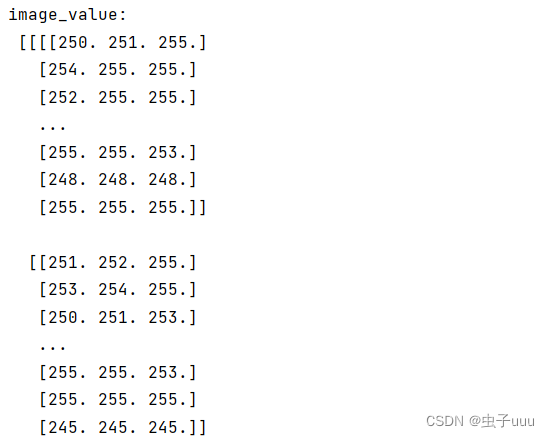
数据读取解码

解析CSV文件,文件名与标签值对应起来,
训练结果:


 8201
8201

 被折叠的 条评论
为什么被折叠?
被折叠的 条评论
为什么被折叠?
 到【灌水乐园】发言


