


一、创建一个boot项目,完成之后引入依赖:
  <dependencies>
        <dependency>
            <groupId>org.springframework.boot</groupId>
            <artifactId>spring-boot-starter-web</artifactId>
        </dependency>

        <dependency>
            <groupId>org.projectlombok</groupId>
            <artifactId>lombok</artifactId>
            <optional>true</optional>
        </dependency>
        <dependency>
            <groupId>mysql</groupId>
            <artifactId>mysql-connector-java</artifactId>
            <version>8.0.20</version>
        </dependency>
        <!--数据库连接池-->
        <dependency>
            <groupId>com.alibaba</groupId>
            <artifactId>druid</artifactId>
            <version>1.1.23</version>
            <scope>compile</scope>
        </dependency>

        <dependency>
            <groupId>org.springframework.boot</groupId>
            <artifactId>spring-boot-starter-test</artifactId>
            <scope>test</scope>
        </dependency>

        <!-- 工作流 -->
        <dependency>
            <groupId>org.camunda.bpm.springboot</groupId>
            <artifactId>camunda-bpm-spring-boot-starter-rest</artifactId>
            <version>${camunda.version}</version>
        </dependency>
        <dependency>
            <groupId>org.camunda.bpm.springboot</groupId>
            <artifactId>camunda-bpm-spring-boot-starter</artifactId>
            <version>${camunda.version}</version>
            <exclusions>
                <exclusion>
                    <artifactId>mybatis</artifactId>
                    <groupId>org.mybatis</groupId>
                </exclusion>
            </exclusions>
        </dependency>
        <dependency>
            <groupId>org.camunda.bpm.springboot</groupId>
            <artifactId>camunda-bpm-spring-boot-starter-webapp</artifactId>
            <version>${camunda.version}</version>
        </dependency>
        <dependency>
            <groupId>com.iflytek.site</groupId>
            <artifactId>technical_common</artifactId>
            <version>1.0.0-SNAPSHOT</version>
        </dependency>
    </dependencies>

    <build>
        <plugins>
            <plugin>
                <groupId>org.springframework.boot</groupId>
                <artifactId>spring-boot-maven-plugin</artifactId>
                <configuration>
                    <excludes>
                        <exclude>
                            <groupId>org.projectlombok</groupId>
                            <artifactId>lombok</artifactId>
                        </exclude>
                    </excludes>
                </configuration>
            </plugin>
        </plugins>
    </build>
 2、yml配置文件
 server:
  port: 8010
  servlet:
    context-path: /

spring:
  datasource:
    name: test
    url: jdbc:mysql://localhost:3306/demo?useUnicode=true&characterEncoding=UTF8&serverTimezone=GMT%2B8&useSSL=false&allowPublicKeyRetrieval=true&nullCatalogMeansCurrent=true
    username: root
    password: 123456

    #使用druid数据源===============================
    type: com.alibaba.druid.pool.DruidDataSource
    driver-class-name: com.mysql.cj.jdbc.Driver
    filters: stat
    maxActive: 20
    initialSize: 1
    maxWait: 60000
    minIdle: 1
    timeBetweenEvictionRunsMillis: 60000
    minEvictableIdleTimeMillis: 300000
    validationQuery: select 'x'
    testWhileIdle: true
    testOnBorrow: false
    testOnReturn: false
    poolPreparedStatements: true
    maxOpenPreparedStatements: 20
camunda:
  bpm:
    process-engine-name: route-bpm
    auto-deployment-enabled: false
    admin-user:
      id: demo
      password: demo
    database:
      schema-update: false
    job-execution:
      enabled: false
    metrics:
      enabled: false
      db-reporter-activate: false
二、打开下载地址 https://camunda.com/download/modeler/
1、下载camunda-modeler
2、画流程图如下:

3、启动项目:camunda_demo
4、流程图与项目绑定
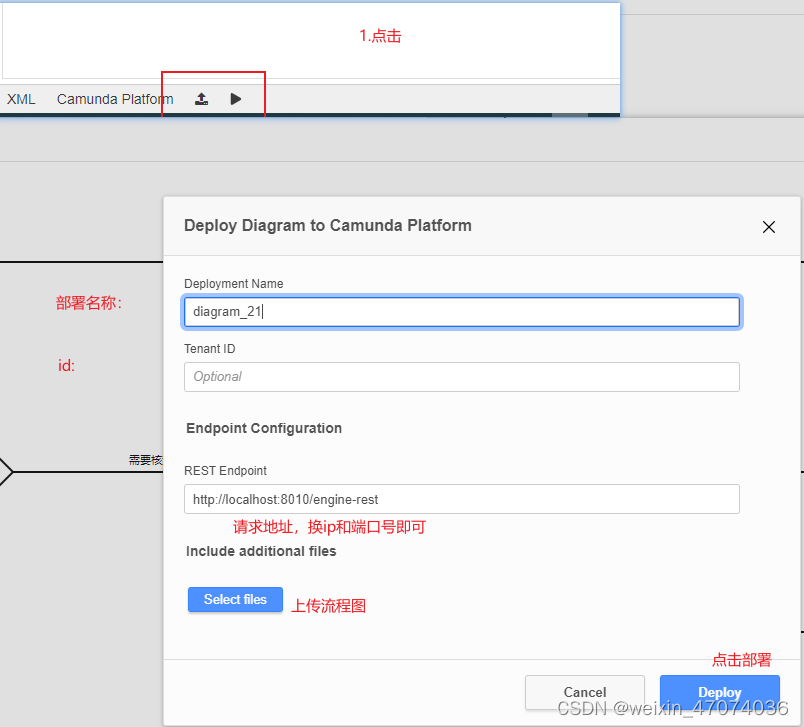
5.部署流程图:
1、请求地址bpm/addWorkFlow。
2、参数:流程图名称和流程图文件
6.启动流程:
1、根据业务启动流程即可
7.具体方法在tssp-restructure这个项目的BpmServiceImpl类中


 被折叠的 条评论
为什么被折叠?
被折叠的 条评论
为什么被折叠?
 到【灌水乐园】发言


