


1、安装一下vim,即使用不上编辑配置文件的时候也会比较方便
sudo apt install vim
2、更换阿里源
sudo vim /etc/apt/sources.list
然后将下面的内容复制到里面
deb http://mirrors.aliyun.com/ubuntu/ bionic main restricted universe multiverse
deb-src http://mirrors.aliyun.com/ubuntu/ bionic main restricted universe multiverse
deb http://mirrors.aliyun.com/ubuntu/ bionic-security main restricted universe multiverse
deb-src http://mirrors.aliyun.com/ubuntu/ bionic-security main restricted universe multiverse
deb http://mirrors.aliyun.com/ubuntu/ bionic-updates main restricted universe multiverse
deb-src http://mirrors.aliyun.com/ubuntu/ bionic-updates main restricted universe multiverse
deb http://mirrors.aliyun.com/ubuntu/ bionic-proposed main restricted universe multiverse
deb-src http://mirrors.aliyun.com/ubuntu/ bionic-proposed main restricted universe multiverse
deb http://mirrors.aliyun.com/ubuntu/ bionic-backports main restricted universe multiverse
deb-src http://mirrors.aliyun.com/ubuntu/ bionic-backports main restricted universe multiverse
保存退出,然后更新一下
sudo apt update
sudo apt upgrade
3、中文输入法
我这边常用的是谷歌拼音,安装谷歌拼音之前先装一下Fcitx,谷歌拼音是基于Fcitx的;
sudo apt install fcitx
然后安装谷歌拼音
sudo apt install fcitx-googlepinyin
右上角设置里面如下图,选择管理已安装的语言

点开红框处选择fcitx

重启电脑即可生效。
4.微信
微信我用的wine版本的微信,效果还可以,首先要安装wine,网页版的微信很难用,而且很多微信号不支持微信网页版;
sudo apt install git
先安装一下git
git clone https://gitee.com/wszqkzqk/deepin-wine-for-ubuntu.git
下载微信deb文件,文件链接如下
https://pan.baidu.com/s/1wVPl9QIE_KFXjngpcrO8PA
密钥mjsm
然后安装
sudo dpkg -i deepin.com.wechat_2.6.8.65deepin0_i386.deb
网上的很多链接都用的阿里源的,阿里源的wine微信好像被删了,我这边找了很久找到了一个可以用的
之后就可以使用了,使用的时候会有文字和显示的一些小Bug,去如下链接解决:
https://blog.youkuaiyun.com/yukun_hh/article/details/105412330?utm_medium=distribute.pc_relevant_download.none-task-blog-baidujs-1.nonecase&depth_1-utm_source=distribute.pc_relevant_download.none-task-blog-baidujs-1.nonecase
5.ssh密钥的生成以及git用户名邮箱
git config --global user.email “your_email@example.com”
git config --global user.name “name”
ssh-keygen -t rsa -C “your_email@example.com”
下面两条命令不必输入,个人记录
eval "
(
s
s
h
−
a
g
e
n
t
−
s
)
"
s
s
h
−
a
d
d
6.
谷歌浏览器
w
g
e
t
h
t
t
p
s
:
/
/
d
l
.
g
o
o
g
l
e
.
c
o
m
/
l
i
n
u
x
/
d
i
r
e
c
t
/
g
o
o
g
l
e
−
c
h
r
o
m
e
−
s
t
a
b
l
e
c
u
r
r
e
n
t
a
m
d
64.
d
e
b
s
u
d
o
d
p
k
g
−
i
g
o
o
g
l
e
−
c
h
r
o
m
e
−
s
t
a
b
l
e
c
u
r
r
e
n
t
a
m
d
64.
d
e
b
7.
安装
o
p
e
n
v
p
n
s
u
d
o
a
p
t
−
g
e
t
i
n
s
t
a
l
l
o
p
e
n
v
p
n
8.
安装
N
D
K
工具
h
t
t
p
s
:
/
/
d
e
v
e
l
o
p
e
r
.
a
n
d
r
o
i
d
.
g
o
o
g
l
e
.
c
n
/
n
d
k
/
d
o
w
n
l
o
a
d
s
/
下载工具,解压
v
i
m
/
.
b
a
s
h
r
c
输入
e
x
p
o
r
t
N
D
K
H
O
M
E
=
/
h
o
m
e
/
a
b
d
s
/
t
o
o
l
s
/
a
n
d
r
o
i
d
−
n
d
k
−
r
21
e
−
l
i
n
u
x
−
x
8
6
6
4
/
a
n
d
r
o
i
d
−
n
d
k
−
r
21
e
e
x
p
o
r
t
P
A
T
H
=
(ssh-agent -s)" ssh-add 6.谷歌浏览器 wget https://dl.google.com/linux/direct/google-chrome-stable_current_amd64.deb sudo dpkg -i google-chrome-stable_current_amd64.deb 7.安装openvpn sudo apt-get install openvpn 8.安装NDK工具 https://developer.android.google.cn/ndk/downloads/ 下载工具,解压 vim ~/.bashrc 输入 export NDK_HOME=/home/abds/tools/android-ndk-r21e-linux-x86_64/android-ndk-r21e export PATH=
(ssh−agent−s)"ssh−add6.谷歌浏览器wgethttps://dl.google.com/linux/direct/google−chrome−stablecurrentamd64.debsudodpkg−igoogle−chrome−stablecurrentamd64.deb7.安装openvpnsudoapt−getinstallopenvpn8.安装NDK工具https://developer.android.google.cn/ndk/downloads/下载工具,解压vim /.bashrc输入exportNDKHOME=/home/abds/tools/android−ndk−r21e−linux−x8664/android−ndk−r21eexportPATH=PATH:$NDK_HOME
/home/abds/tools/android-ndk-r21e-linux-x86_64/android-ndk-r21e这个你输入自己的路径
然后输入ndk-build -v看一下
-------------------------------------2024.8.1----------------
Ubuntu 20.04 安装deepin-wine
步骤1:下载官方deepin-wine软件包(网上教程中使用了阿里云镜像,但是由于授权问题,阿里云镜像中已经没有这些软件了,需要到deepin官方去下载)
wget https://packages.deepin.com/deepin/pool/non-free/d/deepin-wine/deepin-wine_2.18-22~rc0_all.deb
wget https://packages.deepin.com/deepin/pool/non-free/d/deepin-wine/deepin-wine32_2.18-22~rc0_i386.deb
wget https://packages.deepin.com/deepin/pool/non-free/d/deepin-wine/deepin-wine32-preloader_2.18-22~rc0_i386.deb
wget https://packages.deepin.com/deepin/pool/non-free/d/deepin-wine-helper/deepin-wine-helper_1.2deepin8_i386.deb
wget https://packages.deepin.com/deepin/pool/non-free/d/deepin-wine-plugin/deepin-wine-plugin_1.0deepin2_amd64.deb
wget https://packages.deepin.com/deepin/pool/non-free/d/deepin-wine-plugin-virtual/deepin-wine-plugin-virtual_1.0deepin3_all.deb
wget https://packages.deepin.com/deepin/pool/non-free/d/deepin-wine-uninstaller/deepin-wine-uninstaller_0.1deepin2_i386.deb
wget https://packages.deepin.com/deepin/pool/non-free/u/udis86/udis86_1.72-2_i386.deb
wget https://packages.deepin.com/deepin/pool/non-free/d/deepin-wine/deepin-fonts-wine_2.18-22~rc0_all.deb
wget https://packages.deepin.com/deepin/pool/non-free/d/deepin-wine/deepin-libwine_2.18-22~rc0_i386.deb
wget https://packages.deepin.com/deepin/pool/main/libj/libjpeg-turbo/libjpeg62-turbo_1.5.1-2_amd64.deb
wget https://packages.deepin.com/deepin/pool/main/libj/libjpeg-turbo/libjpeg62-turbo_1.5.1-2_i386.deb
步骤2:添加32位支持
sudo dpkg --add-architecture i386
步骤3:刷新apt缓存信息(必需要执行这一步,由于之前没有执行,在安装过程中被安装包的依赖蹂躏了一遍又一遍)
sudo apt-get update
步骤4:开始安装
dpkg -i *.deb
步骤5:安装依赖
apt install -fy
解决输入显示乱码黑条问题
sudo apt install fonts-wqy-microhei fonts-wqy-zenhei xfonts-wqy
Ubuntu 微信提示wine system tray的窗口和图标解决
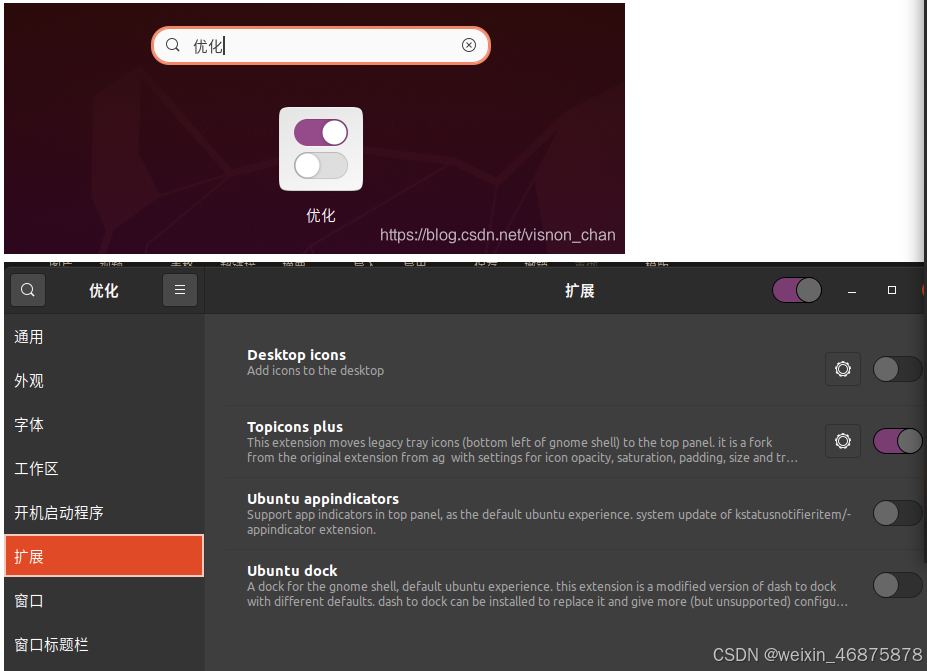
apt install gnome-tweak-tool
apt install gnome-shell-extension-top-icons-plus
reboot
搜索优化,点击扩展,打开topicons,再次登陆微信就没的wine system tray的窗口


 被折叠的 条评论
为什么被折叠?
被折叠的 条评论
为什么被折叠?
 到【灌水乐园】发言


