


 本文详细介绍了MyBatis-Plus的快速使用步骤,包括创建SpringBoot项目、配置数据库、创建实体类、定义Mapper接口以及进行CRUD操作。此外,还展示了如何配置MyBatis日志,并提供了各种操作方法的示例,如insert、update、delete和select。MyBatis-Plus作为MyBatis的增强工具,简化了XML配置,提升了开发效率。
文章目录
前言
在持久层框架中 mybatis应用比较多,而且比重在主键的上升。通常项目的组合是SSM。mybatis之所以火,是因为他的灵活,使用方便,优化比较容易。
mybatis的直接执行sql语句,sql语句是写在xml文件中,使用mybatis需要多个xml配置文件,在一定程度上比较繁琐。一般数据库的操作倒要涉及到CRUD。
mybatis-plus是在mybatis上的增强,减少了xml的配置,几乎不用编写xml就可以做到单表的CRUD,很是方便,极大提供了开发的效率。
一、什么是mybatis-plus
MyBatis-Plus(简称MP)是一个Mybatis的增强工具,在Mybatis的基础上只做增强不做改变,为简化开发、提高效率而生。
官网:https://baomidou.com/
二、快速使用
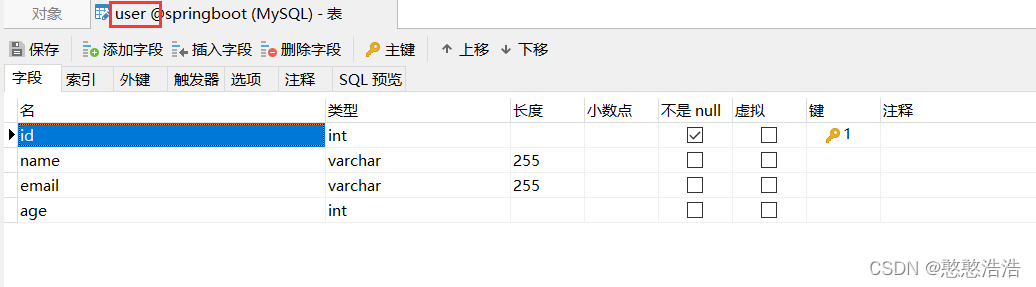
1.数据库表
2.创建SpringBoot项目
3.pom.xml
<dependencies>
        <dependency>
            <groupId>org.springframework.boot</groupId>
            <artifactId>spring-boot-starter</artifactId>
        </dependency>
        <dependency>
            <groupId>org.springframework.boot</groupId>
            <artifactId>spring-boot-starter-web</artifactId>
        </dependency>
        <dependency>
            <groupId>mysql</groupId>
            <artifactId>mysql-connector-java</artifactId>
            <scope>runtime</scope>
        </dependency>
        <dependency>
            <groupId>org.springframework.boot</groupId>
            <artifactId>spring-boot-starter-test</artifactId>
            <scope>test</scope>
        </dependency>
        <!-- mybatis-plus -->
        <dependency>
            <groupId>com.baomidou</groupId>
            <artifactId>mybatis-plus-boot-starter</artifactId>
            <version>3.0.5</version>
        </dependency>
4.application.yml
spring:
  datasource:
    driver-class-name: com.mysql.cj.jdbc.Driver
    url: jdbc:mysql://localhost:3306/springboot?useUnicode=true&characterEncoding=utf-8
    username: root
    password: 123456
5.创建实体类User
package com.suyv.pojo;

import com.baomidou.mybatisplus.annotation.IdType;
import com.baomidou.mybatisplus.annotation.TableId;

public class User {
    // 指定主键
    @TableId(value = "id",type = IdType.AUTO)
    private Integer id;
    private String name;
    private String email;
    private int age;

    public User() {
    }

    public User(String name, String email, int age) {
        this.name = name;
        this.email = email;
        this.age = age;
    }

    public User(Integer id, String name, String email, int age) {
        this.id = id;
        this.name = name;
        this.email = email;
        this.age = age;
    }

    @Override
    public String toString() {
        return "User{" +
                "id=" + id +
                ", name='" + name + '\'' +
                ", email='" + email + '\'' +
                ", age=" + age +
                '}';
    }

    public Integer getId() {
        return id;
    }

    public void setId(Integer id) {
        this.id = id;
    }

    public String getName() {
        return name;
    }

    public void setName(String name) {
        this.name = name;
    }

    public String getEmail() {
        return email;
    }

    public void setEmail(String email) {
        this.email = email;
    }

    public int getAge() {
        return age;
    }

    public void setAge(int age) {
        this.age = age;
    }
}
@Table设置主键,IdType.AUTO使用自动增长产生主键。
6.mapper
package com.suyv.mapper;

import com.baomidou.mybatisplus.core.mapper.BaseMapper;
import com.suyv.pojo.User;

public interface UserMapper extends BaseMapper<User> {
}
继承Mybatis Plus中的BaseMapper,在UserMapper中使用MP中的方法,实现CRUD。
7.添加扫描mapper注解
package com.suyv;

import org.mybatis.spring.annotation.MapperScan;
import org.springframework.boot.SpringApplication;
import org.springframework.boot.autoconfigure.SpringBootApplication;

@SpringBootApplication
@MapperScan(value = "com.suyv.mapper")
public class Ch01PlusPrimaryApplication {

    public static void main(String[] args) {
        SpringApplication.run(Ch01PlusPrimaryApplication.class, args);
    }

}
8.测试
package com.suyv.test;

import com.suyv.mapper.UserMapper;
import com.suyv.pojo.User;
import org.junit.jupiter.api.Test;
import org.springframework.beans.factory.annotation.Autowired;
import org.springframework.boot.test.context.SpringBootTest;

@SpringBootTest
public class Test01 {

    @Autowired
    private UserMapper userMapper;

    @Test
    public void test01(){
        User user = new User("张三","zhangsan@163.com",25);
        int row = userMapper.insert(user);
        System.out.println("insert user result = " + row);
    }
}
三、配置mybatis日志
mybatis-plus:
  configuration:
    log-impl: org.apache.ibatis.logging.stdout.StdOutImpl
四、CRUD基本用法
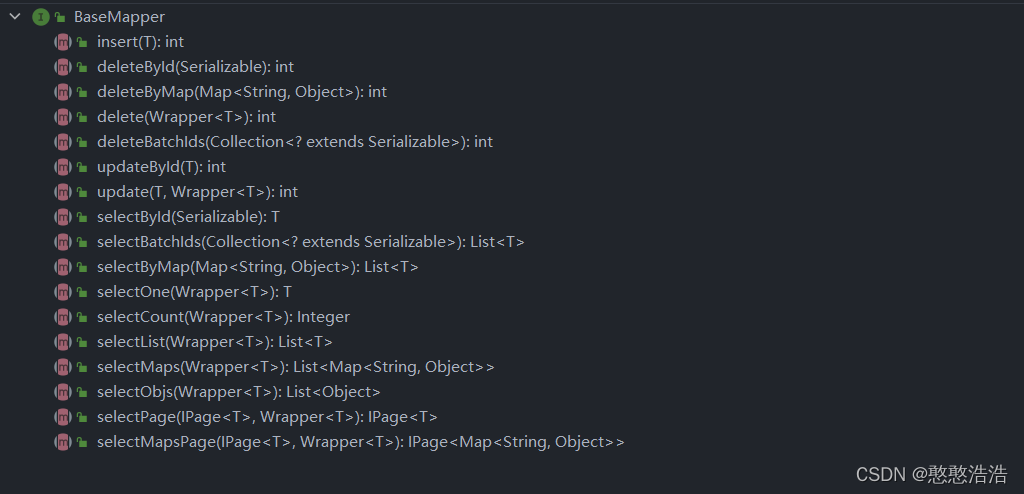
CRUD的操作来自于BaseMapper中的方法。BaseMapper中共有17个方法,CRUD操作都有多个不同参数的方法。继承BaseMapper可以使用其中的方法列表。
BaseMapper方法列表:
1.insert操作
    @Test
    public void test01(){
        User user = new User("张三","zhangsan@163.com",25);
        int row = userMapper.insert(user);
        System.out.println("insert user result = " + row);
    }
注:insert()返回值为int,返回值是数据插入成功的行数,成功的记录数。
2.update操作
	// 根据id更新记录
    @Test
    public void test02(){
        User user = new User("李四","lisl@163.com",29);
        user.setId(2);
        int row = userMapper.updateById(user);
        System.out.println("update user result = " + row);
    }

注:null的字段不更新。
	// 根据id更新记录,当为null时不更新
    @Test
    public void test03(){
        User user = new User();
        System.out.println("user:" + user);
        user.setId(2);
        user.setEmail("lisi@163.com");
        int row = userMapper.updateById(user);
        // name没有赋值,为null,所以没有出现在SQL语句中;age有默认的0,所以被修改了数据
        System.out.println("update user result = " + row);
    }

3.delete操作
1)deleteById:按主键删除。
	// 根据id删除
    @Test
    public void test04(){
        int row = userMapper.deleteById(2);
        System.out.println("delete user result = " + row);
    }
2)根据Map中条件删除
	// 根据Map删除
    @Test
    public void test05(){
        Map<String,Object> map = new HashMap<>();
        map.put("age",20);
        map.put("name","李四");
        int row = userMapper.deleteByMap(map);
        // DELETE FROM user WHERE name = ? AND age = ?
    	// 删除条件封装在Map中,key是列名,value是值,多个key之间用and连接
        System.out.println("delete user result = " + row);
    }
3)批量删除
	// 批量删除
    @Test
    public void test06(){
        List<Integer> lists = new ArrayList<>();
        lists.add(3);
        lists.add(4);
        lists.add(5);
        int row = userMapper.deleteBatchIds(lists);
        System.out.println("delete user result = " + row);
    }
4.select操作
1)根据id主键查询
	// 根据id查询,没有查询结果,不会报错
    @Test
    public void test07(){
        User user = userMapper.selectById(2);
        System.out.println("select user result = " + user);
    }
2)批量查询记录
	// 根据id批量查询
    @Test
    public void test08(){
        List<Integer> lists = new ArrayList<>();
        lists.add(1);
        lists.add(2);
        List<User> users = userMapper.selectBatchIds(lists);
        for(User user:users){
            System.out.println("select user result = " + user);
        }
    }
注:根据id查询记录,把需要查询的多个id存入到List,调用selectBatchIds(),传入list,返回值也是List。
3)使用Map的条件查询
	// 使用Map进行条件查询
    @Test
    public void test09(){
        Map<String,Object> map = new HashMap<>();
        map.put("name","李四");
        map.put("age",20);
        List<User> users = userMapper.selectByMap(map);
        for(User user:users){
            System.out.println("select user result = " + user);
        }
    }
注:把要查询的条件字段put到Map,key是字段,value是条件值。多个条件是and连接。调用selectByMap(),传入Map作为参数,返回值是List集合。


 被折叠的 条评论
为什么被折叠?
被折叠的 条评论
为什么被折叠?
 到【灌水乐园】发言


