


文章目录

简介
JetCache是一个基于Java的缓存系统封装,提供统一的API和注解来简化缓存的使用。 JetCache提供了比SpringCache更加强大的注解,可以原生的支持TTL、两级缓存、分布式自动刷新,还提供了Cache接口用于手工缓存操作。
当前有四个实现,RedisCache、TairCache(此部分未在github开源)、CaffeineCache(in memory)和一个简易的LinkedHashMapCache(in memory),要添加新的实现也是非常简单的。
全部特性:
- 通过统一的API访问Cache系统
- 通过注解实现声明式的方法缓存,支持TTL和两级缓存
- 通过注解创建并配置Cache实例
- 针对所有Cache实例和方法缓存的自动统计
- Key的生成策略和Value的序列化策略是可以配置的
- 分布式缓存自动刷新,分布式锁 (2.2+)
- 异步Cache API (2.2+,使用Redis的lettuce客户端时)
- Spring Boot支持
环境
JetCache需要JDK1.8、Spring Framework4.0.8以上版本。
Spring Boot为可选,需要1.1.9以上版本。
如果不使用注解(仅使用jetcache-core),Spring Framework也是可选的,此时使用方式与Guava/Caffeine cache类似。
代码示例
pom.xml
    <parent>
        <groupId>org.springframework.boot</groupId>
        <artifactId>spring-boot-starter-parent</artifactId>
        <version>2.1.7.RELEASE</version>
        <relativePath/>
    </parent>
    <dependencies>
        <dependency>
            <groupId>com.alicp.jetcache</groupId>
            <artifactId>jetcache-starter-redis</artifactId>
<!--            <version>2.6.0</version>-->
            <version>2.4.4</version>
        </dependency>
    </dependencies>
配置文件
application.yml
# jetCache 配置
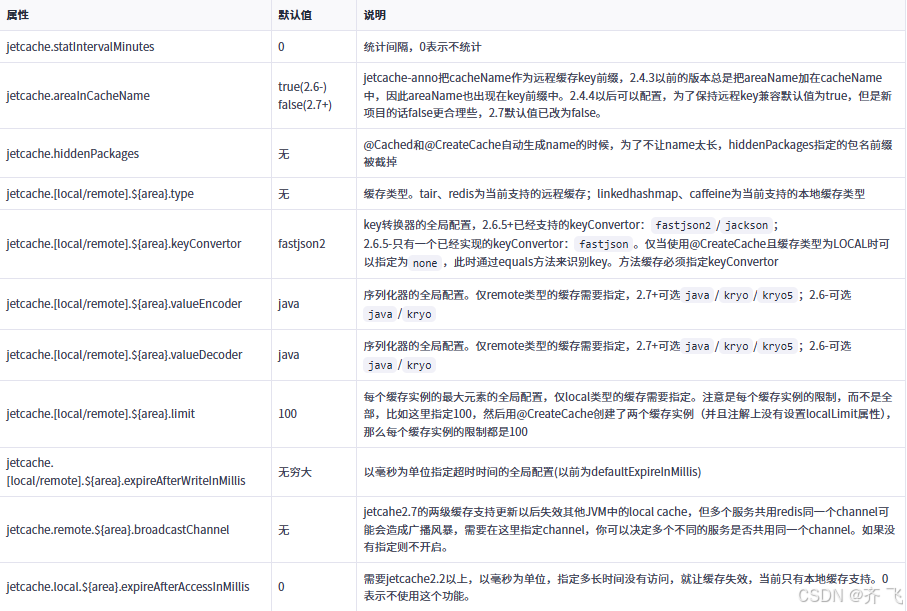
jetcache:
# 指定统计间隔,以分钟为单位,默认0:表示不统计
statIntervalMinutes: 5
# areaName 是否作为缓存 key 前缀,默认 True
areaInCacheName: false
# 本地缓存方案
local:
# 区域 area 名
default:
# 缓存类型,已支持可选:linkedhashmap、caffeine
type: caffeine
# key 转换器的全局配置,当前只有:fastjson
keyConvertor: fastjson
# 每个缓存实例的最大元素的全局配置,仅 local 类型的缓存需要指定
limit: 100
# jetCache2.2 以上,以毫秒为单位,指定多长时间没有访问,就让缓存失效,当前只有本地缓存支持。0表示不使用这个功能
expireAfterAccessInMillis: 30000
# 远程缓存方案
remote:
# 区域 area 名
default:
# 缓存类型,已支持可选:redis、tair
type: redis
# key 转换器的全局配置,当前只有:fastjson
keyConvertor: fastjson
# 序列化器的全局配置。仅remote类型的缓存需要指定,可选java和kryo
valueEncoder: java
valueDecoder: java
# redis ip 地址
host: 127.0.0.1
# redis 端口号
port: 6379
# host 和 port 也可以用 url 配置:如下
# uri: redis://localhost:6379/1?timeout=5s
# 如果 redis 有设置密码需要加上 password
password: 123456
# 以毫秒为单位指定超时时间的全局配置
expireAfterWriteInMillis: 5000
# 集群模式
# mode: MasterSlave # (主从模式)
poolConfig:
minIdle: 5
maxIdle: 20
maxTotal: 50
相关属性说明
启动类
添加 @EnableCreateCacheAnnotation 和 @EnableMethodCache(basePackages = “com.xx”)
@EnableCreateCacheAnnotation:开启Jetcache缓存
@EnableMethodCache(basePackages = “com.xx”):配置缓存方法扫描路径
import com.alicp.jetcache.anno.config.EnableCreateCacheAnnotation;
import com.alicp.jetcache.anno.config.EnableMethodCache;
import org.mybatis.spring.annotation.MapperScan;
import org.springframework.boot.SpringApplication;
import org.springframework.boot.autoconfigure.SpringBootApplication;
import org.springframework.boot.autoconfigure.jdbc.DataSourceAutoConfiguration;
import org.springframework.context.annotation.ComponentScan;
import org.springframework.scheduling.annotation.EnableScheduling;

/**
 * @description:
 * @author: qf
 * @version: 1.0
 */
@MapperScan({"com.qf.mapper.**"})
@ComponentScan(basePackages = {"com.qf.**"})
@SpringBootApplication
//---------- 开启jetcache ----------
@EnableCreateCacheAnnotation
@EnableMethodCache(basePackages = "com.qf")
public class TestApplication {
    public static void main(String[] args) {
        SpringApplication.run(TestApplication.class, args);
    }
}
Controller
这里使用注解的方式使用缓存
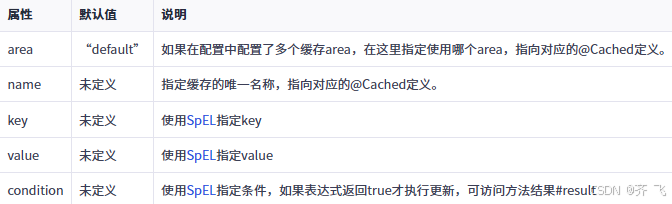
@Cached添加缓存
    @Cached(name = "jetcache:qf:findById", key = "#id", expire = 3600, timeUnit = TimeUnit.SECONDS, cacheType = CacheType.BOTH)
    @GetMapping("findById")
    public Order findById(String id) {
        System.out.println("执行 findById");
        Order order = new Order();
        order.setId(id);
        order.setName("zs-findById");
        return order;
    }
@Cached属性解释:
name:缓存名称为 jetcache:qf:findById,指定缓存的唯一名称,不是必须的,如果没有指定,会使用类名+方法名。
key:使用接口中传入的 id 作为缓存键
expire,timeUnit:缓存过期时间为 3600 ,单位为秒
cacheType:使用本地缓存和分布式缓存组合成两级缓存。还包括CacheType.REMOTE、CacheType.LOCAL、CacheType.BOTH。
注意:如果返回为实体类时,需要要实现Serializable接口。
/**
 * @author qbh
 * @since 2024/12/19 19:07
 */
@Data
public class Order implements Serializable {
    private static final long serialVersionUID = 1L;
    private String id;
    private String name;
}
修改接口传递的属性值
如果想要修改接口的属性值,如前台发送一个时间的字符串,想要将2024-12-20 00:00:00转为20241220000000
@Cached(name = "jetcache:qf:findList", key = "#time.replaceAll(':', '').replaceAll('-', '').replaceAll(' ', '')", expire = 3600, timeUnit = TimeUnit.SECONDS, cacheType = CacheType.BOTH)
@GetMapping("findList")
public String findList(String time) {
    System.out.println("执行 findById");
    Order order = new Order();
    order.setId(System.currentTimeMillis()+"");
    order.setName("zs-findList");
    return order.toString();
}
多个接口属性值组成key
@Cached(name = "jetcache:qf:test",
        key = "#id + '_' + #code + '_' + #time",
        expire = 300, timeUnit = TimeUnit.SECONDS, cacheType = CacheType.BOTH)
@GetMapping("test")
public String test(@RequestParam("id") @NotNull(message = "scan 不能为空") String id,
        @RequestParam("code") @NotNull(message = "device 不能为空") String code,
        @RequestParam("time") @NotNull(message = "time 不能为空") String time) {
    String params = DateUtil.formatDateTime(new Date()) + " : " + id + " : " + code + " : " + time;
    System.out.println(params);
    return params;
}
接口属性值为实体类
@Cached(name = "jetcache:qf:findById2", key = "#order.id", expire = 3600, timeUnit = TimeUnit.SECONDS, cacheType = CacheType.BOTH)
@GetMapping("findById2")
public Order findById2(Order order) {
    System.out.println("执行 findById2");
    return order;
}
@CacheUpdate更新缓存
    @CacheUpdate(name="jetcache:qf:findById", key="#id", value="#order")
    @GetMapping("updateCache")
    public Order updateCache(String id, Order order) {
        System.out.println("执行 updateCache");
        order.setId(id);
        order.setName("zs-updateCache");
        return order;
    }
@CacheInvalidate移除缓存
    @CacheInvalidate(name="jetcache:qf:findById", key="#id")
    @GetMapping("deleteCache")
    public String deleteCache(String id) {
        System.out.println("执行 deleteCache");
        return true+"";
    }
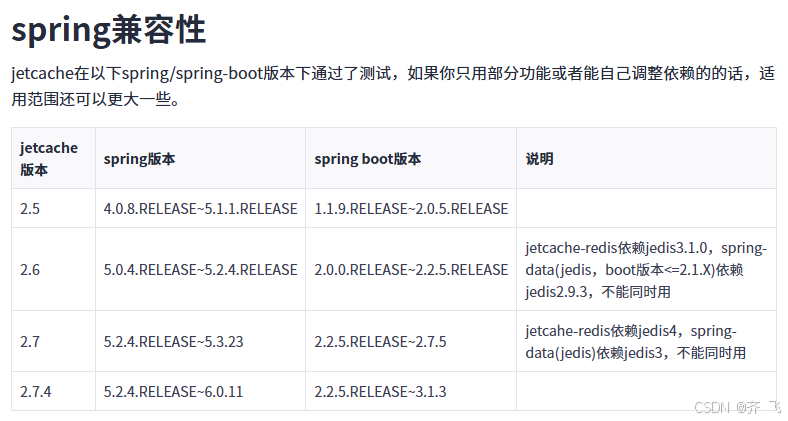
版本冲突问题
一开始使用Jetcache的版本为2.6.0,spring-boot-starter-parent使用的版本为2.1.7.RELEASE,启动项目时发生版本不兼容报错。
将Jetcache使用的版本改为2.4.4解决问题。
org.springframework.beans.factory.BeanCreationException: Error creating bean with name 'redisAutoInit' defined in class path resource [com/alicp/jetcache/autoconfigure/RedisAutoConfiguration.class]: Post-processing of merged bean definition failed; nested exception is java.lang.IllegalStateException: Failed to introspect Class [com.alicp.jetcache.autoconfigure.RedisAutoConfiguration$RedisAutoInit] from ClassLoader [sun.misc.Launcher$AppClassLoader@18b4aac2]
    at org.springframework.beans.factory.support.AbstractAutowireCapableBeanFactory.doCreateBean(AbstractAutowireCapableBeanFactory.java:570) ~[spring-beans-5.1.9.RELEASE.jar:5.1.9.RELEASE]
    at org.springframework.beans.factory.support.AbstractAutowireCapableBeanFactory.createBean(AbstractAutowireCapableBeanFactory.java:515) ~[spring-beans-5.1.9.RELEASE.jar:5.1.9.RELEASE]
    at org.springframework.beans.factory.support.AbstractBeanFactory.lambda$doGetBean$0(AbstractBeanFactory.java:320) ~[spring-beans-5.1.9.RELEASE.jar:5.1.9.RELEASE]
    at org.springframework.beans.factory.support.DefaultSingletonBeanRegistry.getSingleton(DefaultSingletonBeanRegistry.java:222) ~[spring-beans-5.1.9.RELEASE.jar:5.1.9.RELEASE]
 ...
附件
@Cached属性说明表

@CacheUpdate属性说明表
@CacheInvalidate属性说明表


 339
339

 被折叠的 条评论
为什么被折叠?
被折叠的 条评论
为什么被折叠?
 到【灌水乐园】发言


