


文章引导
前言
简介:IT自动化和DevOps软件(2013年推出),基于Python研发。实现了批量操作系统配置,批量程序部署,批量运行命令等功能。实现:自动部署APP、自动化管理配置项、自动化执行交付、自动化(AWS)云服务管理。
Ansible:本质就是一个命令,参数较多(可以配合很多模块或者软件使用),YUM也基于Python语言写成。
优点:只需要SSH和Python即可使用,无客户端(就一种命令)。
特性:模块化设计,调用特定的模块完成特定任务(如配置模块、装包模块、启动服务模块等)。基于Python语言实现(三个包):paramiko、PyYAML(半结构化语言)、Jinja2。其模块支持JSON等标准输出格式,可以采用任何编程语言重写。
部署:部署简单(yum install)、主从模式工作、支持自定义模块(自己写模块)、支持playbook(ansible的任务集,如脚本)、易于使用、支持多层部署、支持异构IT环境。
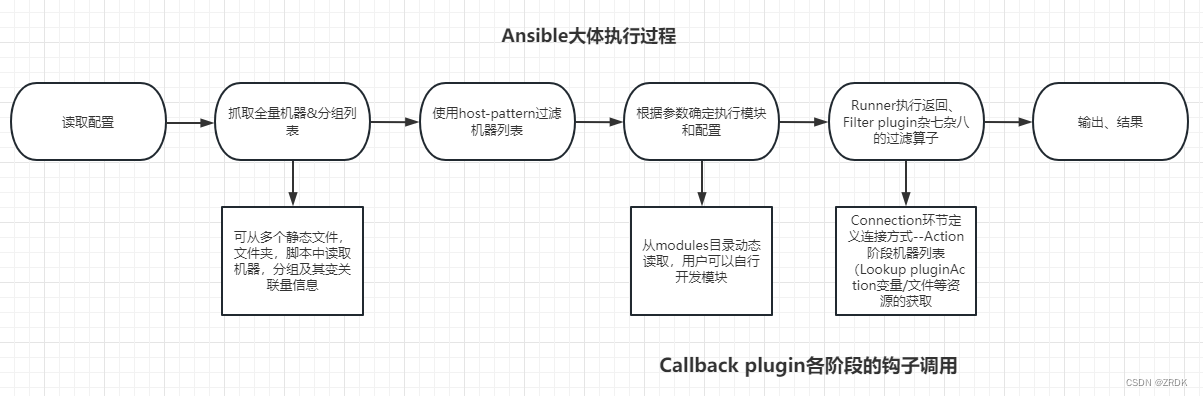
调用大体的流程图
基础环境
| CPU架构 | 系统版本 | 内核版本 | ansible版本 |
|---|---|---|---|
| x86_64 | CentOS 7.8 | 3.10.0 | 2.9.27 |
| x86_64 | CentOS 7.8 | 3.10.0 | 2.9.27 |
| x86_64 | CentOS 7.8 | 3.10.0 | 2.9.27 |
需要的Python依赖(基本上都是系统自卑好了的)
对于Python 2.6和2.7以上
Cenots7全系2.7
Cenots6全系2.6
建议关闭SElinux,如果开启了SElinux那么需要安装libselinux-python
安装
- 通过
yum install安装,安装ansible之前必须先安装epel-release
[root@docker ansible]# yum -y install epel-release
[root@docker ansible]# yum -y install  ansible
......
已安装:
  ansible.noarch 0:2.9.27-1.el7

作为依赖被安装:
  PyYAML.x86_64 0:3.10-11.el7             python-babel.noarch 0:0.9.6-8.el7       python-cffi.x86_64 0:1.6.0-5.el7
  python-enum34.noarch 0:1.0.4-1.el7      python-idna.noarch 0:2.4-1.el7          python-jinja2.noarch 0:2.7.2-4.el7
  python-markupsafe.x86_64 0:0.11-10.el7  python-paramiko.noarch 0:2.1.1-9.el7    python-ply.noarch 0:3.4-11.el7
  python-pycparser.noarch 0:2.14-1.el7    python-setuptools.noarch 0:0.9.8-7.el7  python2-cryptography.x86_64 0:1.7.2-2.el7
  python2-httplib2.noarch 0:0.18.1-3.el7  python2-jmespath.noarch 0:0.9.4-2.el7   python2-pyasn1.noarch 0:0.1.9-7.el7
  sshpass.x86_64 0:1.06-2.el7

完毕!
- 内网离线安装
外网电脑上下载ansible的rpm包,并移动到内网电脑上,使用yum或者rpm进行安装。
yum install --downloadonly --downloaddir=/root/ansible ansible
- 验证版本
[root@ks8-master ansible]# ansible --version
ansible 2.9.27
  config file = /etc/ansible/ansible.cfg
  configured module search path = [u'/root/.ansible/plugins/modules', u'/usr/share/ansible/plugins/modules']
  ansible python module location = /usr/lib/python2.7/site-packages/ansible
  executable location = /usr/bin/ansible
  python version = 2.7.5 (default, Apr  2 2020, 13:16:51) [GCC 4.8.5 20150623 (Red Hat 4.8.5-39)]
- 修改配置文件,取消ansible的配置文件中
inventory的注释(在第十四行),取消ansible的配置文件中host_key_checking的注释(第七十一行)然后保存退出。如下图:
inventory是定义托管主机地址配置文件路径名,指定的配置文件,写入远程主机的地址。
格式:
[组名称]
主机名称或ip地址,其他参数
host_key_checking是ssh主机key验证配置参数,如果为false不需要输入yes,如果是true需要等待输入yes,不然每次要输入yes很麻烦。
[root@ks8-master ~]# cat /etc/ansible/ansible.cfg | grep inventory
inventory      = /etc/ansible/hosts
# if inventory variables overlap, does the higher precedence one win
#inventory_plugins  = /usr/share/ansible/plugins/inventory
# These values may be set per host via the ansible_module_compression inventory
# Controls which files to ignore when using a directory as inventory with
#inventory_ignore_extensions = ~, .orig, .bak, .ini, .cfg, .retry, .pyc, .pyo
[inventory]
# enable inventory plugins, default: 'host_list', 'script', 'auto', 'yaml', 'ini', 'toml'
# ignore these extensions when parsing a directory as inventory source
# ignore files matching these patterns when parsing a directory as inventory source
# If 'true' unparsed inventory sources become fatal errors, they are warnings otherwise.
[root@ks8-master ~]# cat /etc/ansible/ansible.cfg | grep host_key_checking
host_key_checking = False
- 更改hosts文件,这文件中都是被注释的,需要自己添加组名和组成员(服务器),最好使用服务器的名称,不建议用ip地址,不方便管理。下面是以k8s集群作为一个组,来进行管理。
[root@ks8-master ansible]# vim /etc/ansible/hosts
#如我添加的是k8s集群
[kubernetes]	#这个是组名,下面三个是组成员
ks8-master
k8s-node1
k8s-node2
k8s-node3
如:db服务器20台,一台一台的增加是很麻烦的,那么只要db服务器命名是有规划的和规范的,那么可以使用给的一个参数来快捷的把服务器添加进来
## db-[99:101]-node.example.com   示例
[db]			#组名称
db[1-20]		#意思就是有db1到db20,一共20机器。
基础命令
1. 基本实例语法
ansible 主机集合 -m 模块名称 -a 模块参数
	- 主机集合 主机名或者分组名,多个使用“逗号”分隔
	- -m 模块名称,默认command模块
	- -a or --args 模块参数
其他参数
    - -i inventor文件路径或可以执行脚本
    - -k 使用交互式登录密码
    - -e 定义变量
    - -v 显示详细信息
示例一:命令演示:ansible all/组名称/某一台主机 --list 三种可以列出,可以组和组用英文逗号(ansible 组名称,组名称 --list),组和某一组成员或者成员和成员,这五种都可以。all是所以组和主机依次列出来。
[root@ks8-master ansible]# ansible all --list	#列出所有组成员(所有主机)
  hosts (4):
    ks8-master
    k8s-node1
    k8s-node2
    k8s-node3

[root@ks8-master ansible]# ansible kubernetes --list  #列出组名称为kubernetes里面的组成员(主机)
  hosts (4):
    ks8-master
    k8s-node1
    k8s-node2
    k8s-node3
示例二:ansible kubernetes -m ping,ping命令并不是去ping主机通不通,而是测试ssh的连通性。-k有弊端(每台主机密码一致),如果不一致那么就需要服务器之间免密登录(最常用,见下方实现免密钥登录)。注意:需要在hosts配置文件里面写入DNS映射。
[root@ks8-master ansible]# ansible kubernetes -m ping -k
SSH password:
ks8-master | SUCCESS => {
    "ansible_facts": {
        "discovered_interpreter_python": "/usr/bin/python"
    },
    "changed": false,
    "ping": "pong"
}
k8s-node3 | SUCCESS => {
    "ansible_facts": {
        "discovered_interpreter_python": "/usr/bin/python"
    },
    "changed": false,
    "ping": "pong"
}
k8s-node1 | SUCCESS => {
    "ansible_facts": {
        "discovered_interpreter_python": "/usr/bin/python"
    },
    "changed": false,
    "ping": "pong"
}
k8s-node2 | SUCCESS => {
    "ansible_facts": {
        "discovered_interpreter_python": "/usr/bin/python"
    },
    "changed": false,
    "ping": "pong"
}
配置证书文件实现免密钥登录(这样适合用于服务器主机密码不同场景),注意:因为使用ssh-keygen生成密钥,最好把密钥的名字重新命令,不然会覆盖以前的密钥(这样以前别人做的免密登录就废了)。私钥默认名字为id_rsa,这里改成了test。
[root@ks8-master .ssh]# ssh-keygen -t rsa -b 2048 -N '' -f test #创建一个空密码名为test的密钥
Generating public/private rsa key pair.
Your identification has been saved in key.
Your public key has been saved in key.pub.
The key fingerprint is:
SHA256:1lbh5TuFOy5lvlBU+mLVvQubDAfja5mYAP4cmFR3T3w root@ks8-master
The key's randomart image is:
+---[RSA 2048]----+
|       . . .o.. .|
|      . . ..o= Eo|
|     o     oo.* =|
|    o +  ...o. *.|
|     + oS oo o@..|
|      o.o.o BB++.|
|       o o =o+o. |
|          .  o . |
|              .  |
+----[SHA256]-----+

#拷贝密钥到其他的服务器主机
[root@ks8-master .ssh]# ssh-copy-id -i test.pub k8s-node1
/usr/bin/ssh-copy-id: INFO: Source of key(s) to be installed: "test.pub"
/usr/bin/ssh-copy-id: INFO: attempting to log in with the new key(s), to filter out any that are already installed
/usr/bin/ssh-copy-id: INFO: 1 key(s) remain to be installed -- if you are prompted now it is to install the new keys
root@k8s-node1's password:

Number of key(s) added: 1

Now try logging into the machine, with:   "ssh 'k8s-node1'"
and check to make sure that only the key(s) you wanted were added.
......
#用私钥去连接,密钥验证通过连接上了。
[root@ks8-master .ssh]# ssh -i test k8s-node1
Last login: Mon Jun 26 00:11:28 2023 from 10.64.95.15
配置ansible使用密钥登录。需要新增两段。
语法:
“组:vars”([kubernetes:vars])
参数=位置(ansible_ssh_private_key_file="/root/.ssh/test" )
[root@ks8-master ansible]# vim /etc/ansible/hosts  #添加组使用密钥文件。
#如下列示例,新加上两段,注意以前的组和组成员不要删除
[kubernetes:vars]		#组名字:vars,也可以把组改为all,这样所有组都可以使用密钥登录。
ansible_ssh_private_key_file="/root/.ssh/test"		#指定私钥的所在路径

[root@ks8-master ansible]# ansible kubernetes -m ping
k8s-node1 | SUCCESS => {
    "ansible_facts": {
        "discovered_interpreter_python": "/usr/bin/python"
    },
    "changed": false,
    "ping": "pong"
}
k8s-node2 | SUCCESS => {
    "ansible_facts": {
        "discovered_interpreter_python": "/usr/bin/python"
    },
    "changed": false,
    "ping": "pong"
}
k8s-node3 | SUCCESS => {
    "ansible_facts": {
        "discovered_interpreter_python": "/usr/bin/python"
    },
    "changed": false,
    "ping": "pong"
}
配置ansible使用密钥登录,并指定端口。原有的主机名后面+空格+参数
语法:
(主机+空格+参数)k8s-node3 ansible_ssh_port=22,
[root@ks8-master ansible]# vim  /etc/ansible/hosts
#是对一台主机,进行端口号修改。如果是一个组端口号都有变化,那么使用组配置去修改,如上诉的修改ssh密钥登录一个道理。
[kubernetes]
#ks8-master
k8s-node1
k8s-node2
k8s-node3 ansible_ssh_port=22
动态组,如果想管理一组机器(比如有db组和web组服务器),那么就需要以下示例
[root@ks8-master ~]# vim /etc/ansible/hosts			#修改配置文件
[k8s:children]		#加上children分组
kubernetes			#这个是组名了,不是主机名了

##通过命令查看,k8s的组可以把kubernetes里面主机解析出来。
[root@ks8-master ~]# ansible k8s --list-hosts
  hosts (3):
    k8s-node1
    k8s-node2
    k8s-node3
动态主机
因需求的不确定性和不相同,那么可以根据配置文件加载顺序,创建自定义配置文件,来满足某一个需求的条件。
配置加载顺序:
1.首先检查ABSIBLE_CONFIG变量定义的配置文件
2.其次检查当前目录下的./ansible.cfg文件
3.再次检查当前用户家目录下~/ansible.cfg文件
4.最后检查/etc/ansible/ansible.cfg文件
下列是在用户目录下创建了一个ansible配置文件,并自己去命名了一个host文件(如果离开了当前ansible.cfg文件的同级目录,那么就会执行失败)。
[root@ks8-master ansiblecfg]# cat /home/ansiblecfg/ansible.cfg
[defaults]
#至少需要三个配置就是默认配置[defaults]、inventory的配置文件指定的位置、host_key_checking
#可以绝对路径,也可以相对路径,下列就代表当前配置文件下的host-tests文件
#注意不要在参数后面加注释不然会被识别成参数,造成失败!如:inventory = host-test #这是注释
inventory      =  host-test
host_key_checking = False

[root@ks8-master ansiblecfg]# cat /home/ansiblecfg/host-test

[test]
k8s-node1
k8s-node2

[test2]
k8s-node3

##输出配置的主机
[root@ks8-master ansiblecfg]# ansible test --list-hosts
  hosts (2):
    k8s-node1
    k8s-node2
[root@ks8-master ansiblecfg]# ansible test2 --list-hosts
  hosts (1):
    k8s-node3
注意:上面演示的是inventory指定的静态配置host文件,也可以使用python写脚本变成动态配置host文件(test.py)。
使用python定义动态host文件
- 创建py文件,写入要管理的组和主机
#!/usr/bin/python#指定一个执行解析器python
#ansible是识别json的,所以这里用python生产一个jsoni
import json#因python自带json模块,所以导入json模块
hostlist = {}#定义一个组变量
#定义web3和web4组
#定义每个组里面的主机
print json.dumps(hostlist)#然后转成json格式输出 - 给脚本赋予执行权限,并输出一个json格式的内容
[root@ks8-master ansiblecfg]# cat host-python.py
#!/usr/bin/python
import json

hostlist = {}
hostlist["web3"] = ["k8s-node1"]
hostlist["web4"] = ["k8s-node2","k8s-node3"]
print json.dumps(hostlist)
[root@ks8-master ansiblecfg]# chmod 755 host-python.py
[root@ks8-master ansiblecfg]# ./host-python.py
{"web3": ["k8s-node1"], "web4": ["k8s-node2", "k8s-node3"]}
- 修改配置文件,然参数指向py脚本
[root@ks8-master ansiblecfg]# cat ansible.cfg
[defaults]
#可以绝对路径,也可以相对路径,下列就代表当前配置文件下的host-tests文件
#注意不要在参数后面加注释不然会被识别成参数,造成失败!如:inventory = host-test #这是注释
inventory      =  host-python.py
host_key_checking = False
- 使用ansible命令输出主机
[root@ks8-master ansiblecfg]# ansible web3 --list-hosts
  hosts (1):
    k8s-node1
[root@ks8-master ansiblecfg]# ansible web4 --list-hosts
  hosts (2):
    k8s-node2
    k8s-node3
模块
1. 上文提到ping,就是ping模块,ping模块没有参数,就只有命令ping。
命令格式:ansible hostlist -m modules -a arge
hostlist:组名、主机名
-m :模块名(modules)
-a:模块参数(没有参数,可以省略)arge
[root@ks8-master ~]# ansible kubernetes -m ping
k8s-node3 | SUCCESS => {
    "ansible_facts": {
        "discovered_interpreter_python": "/usr/bin/python"
    },
    "changed": false,
    "ping": "pong"
}
k8s-node1 | SUCCESS => {
    "ansible_facts": {
        "discovered_interpreter_python": "/usr/bin/python"
    },
    "changed": false,
    "ping": "pong"
}
k8s-node2 | SUCCESS => {
    "ansible_facts": {
        "discovered_interpreter_python": "/usr/bin/python"
    },
    "changed": false,
    "ping": "pong"
}
2. ansible-doc模块(重要的命令)
ansible-doc
 -模块的手册相当于shell的man,很重要。
 -ansible-doc -l			列出所有模块
 -ansible-doc modulename 	查看帮助
示例
##列出ansible所有模块
[root@ks8-master ~]# ansible-doc -l
fortios_router_community_list                                 Configure community lists in Fortinet's FortiOS and FortiGa...
azure_rm_devtestlab_info                                      Get Azure DevTest Lab facts
ecs_taskdefinition                                            register a task definition in ecs
avi_alertscriptconfig                                         Module for setup of AlertScriptConfig Avi RESTful Object
tower_receive                                                 Receive assets from Ansible Tower
netapp_e_iscsi_target                                         NetApp E-Series manage iSCSI target configuration
azure_rm_acs                                                  Manage an Azure Container Service(ACS) instance
fortios_log_syslogd2_filter                                   Filters for remote system server in Fortinet's FortiOS and ...
junos_rpc                                                     Runs an arbitrary RPC over NetConf on an Juniper JUNOS devi...
na_elementsw_vlan                                             NetApp Element Software Manage VLAN
pn_ospf                                                       CLI command to add/remove ospf protocol to a vRouter
pn_snmp_vacm                                                  CLI command to create/modify/delete snmp-vacm
cp_mgmt_service_sctp                                          Manages service-sctp objects on Check Point over Web Servic...
onyx_ospf                                                     Manage OSPF protocol on Mellanox ONYX network devices
icx_command                                                   Run arbitrary commands on remote Ruckus ICX 7000 series swi...
cs_snapshot_policy                                            Manages volume snapshot policies on Apache CloudStack based...
nxos_install_os                                               Set boot options like boot, kickstart image and issu
cnos_static_route                                             Manage static IP routes on Lenovo CNOS network devices
win_eventlog                                                  Manage Windows event logs
vmware_category                                               Manage VMware categories
......
##统计ansible的所有模块数量
[root@ks8-master ~]# ansible-doc -l |wc -l
3387
3. 执行远程命令command模块
 - 用法:
ansible host pattern -m command -a "args"
 - 查看所有机器负载
ansible all -m command -a "uptime"
 -  查看日期和时间
ansible all -m command -a "date +%F_%T"
示例:
##查看kubernetes组下所有主机的负载
[root@ks8-master ~]# ansible kubernetes -m command -a "uptime"
k8s-node1 | CHANGED | rc=0 >>
 18:03:49 up 2 days,  9:56,  1 user,  load average: 0.18, 0.18, 0.23
k8s-node2 | CHANGED | rc=0 >>
 18:03:49 up 2 days,  9:56,  1 user,  load average: 0.12, 0.27, 0.30
k8s-node3 | CHANGED | rc=0 >>
 18:03:49 up 2 days,  9:56,  1 user,  load average: 0.04, 0.06, 0.05

##查看所有组下面的所有主机的时间
k8s-node3 | CHANGED | rc=0 >>
2023-06-27_18:08:44
k8s-node1 | CHANGED | rc=0 >>
2023-06-27_18:08:44
k8s-node2 | CHANGED | rc=0 >>
2023-06-27_18:08:44
command模块注意事项:-a跟上的命令里面不能有(< > | & set 等字符),command不能解析系统变量。该模块不启动shell直接在ssh进程中执行,所以使用到的shell命令执行都会失败(shell变量也不行)。
示例:
[root@ks8-master ~]# ansible k8s-node1 -m command -a 'ps -ef | grep java'
k8s-node1 | FAILED | rc=1 >>
error: garbage option

Usage:
 ps [options]

 Try 'ps --help <simple|list|output|threads|misc|all>'
  or 'ps --help <s|l|o|t|m|a>'
 for additional help text.

For more details see ps(1).non-zero return code
4. shell模块(可以代替command不能执行shell命令的模块)。shell的用法和command基本一样,区别时shell模块时通过/bin/sh进行执行命令,可以执行任意命令,但是还是不不能执行交互式命令(如 vim top 等)
示例:
[root@ks8-master ~]# ansible k8s-node1 -m shell -a 'ps -ef | grep ssh'
k8s-node1 | CHANGED | rc=0 >>
root      1086     1  0 6月25 ?       00:00:00 /usr/sbin/sshd -D
root     16612  1086  0 18:19 ?        00:00:00 sshd: root@pts/0
root     17994 17975  0 18:20 pts/0    00:00:00 /bin/sh -c ps -ef | grep ssh
root     17996 17994  0 18:20 pts/0    00:00:00 grep ssh
shell模块原理,如下图所示,单双引号区别
[root@ks8-master ~]# ansible k8s-node2 -m shell -a "echo ${HOSTNAME}"
k8s-node2 | CHANGED | rc=0 >>
ks8-master
[root@ks8-master ~]# ansible k8s-node2 -m shell -a 'echo ${HOSTNAME}'
k8s-node2 | CHANGED | rc=0 >>
k8s-node2
shell中:单引号会使变量失效,单引号内容是什么就输出什么。双引号中可以有变量,有什么变量就会输出变量的值。
双引号:
- 本地 local shell 先执行命令,变量替换,因主机名是ks8-master,那么
"echo ${HOSTNAME}"输出为echo ks8-master,然后交给ansible - ansible再执行命令:收到结果为
echo ks8-master的参数, - 在目标主机上执行
echo ks8-master - 所以最终输出结果为
echo ks8-master
当然可以在变量前面添加一个转义符就可以变量转换一次到底正确输出效果
[root@ks8-master ~]# ansible k8s-node2 -m shell -a "echo ${HOSTNAME}"
k8s-node2 | CHANGED | rc=0 >>
ks8-master
[root@ks8-master ~]# ansible k8s-node2 -m shell -a "echo \${HOSTNAME}"
k8s-node2 | CHANGED | rc=0 >>
k8s-node2
单引号:
- 本地 local shell 先执行命令,因为是单引号,不能替换,那么
'echo ${HOSTNAME}'输出还是为echo ${HOSTNAME},然后交给ansible - ansible再执行命令:收到结果为
echo ${HOSTNAME}的参数, - 在目标主机上执行
echo ${HOSTNAME},远程shell(remote shell) 执行命令 - 所以最终输出结果为
echo ks8-node2
ansible如果没有指定绝对路径来创建文件或者目录那么一定是在用户目录下。ansible在执行一段命令完成后会关闭连接,下次再来连接又是新的一次连接了不会存储上次位置。
[root@ks8-master ~]# ansible k8s-node1 -m shell -a 'touch testfile'
[WARNING]: Consider using the file module with state=touch rather than running 'touch'.  If you need to use command because
file is insufficient you can add 'warn: false' to this command task or set 'command_warnings=False' in ansible.cfg to get rid
of this message.
k8s-node1 | CHANGED | rc=0 >>
##查看目标主机的root目录里的文件
[root@ks8-master ~]# ansible k8s-node1 -m shell -a 'ls'
k8s-node1 | CHANGED | rc=0 >>
testfile
如果需要在别的地方创建目录那么就需要chdir代替cd命令,相当于指定目录下执行。
[root@ks8-master ~]# ansible k8s-node1 -m shell -a 'chdir=/tmp pwd'
k8s-node1 | CHANGED | rc=0 >>
/tmp
5. script模块,在本地使用脚本代替大量且复杂的命令来批量执行。脚本不限于shell,只要指定Sha-bang解释器的脚本都可以运行
[root@ks8-master ~]# ansible k8s-node1 -m script -a 'ls.sh'
k8s-node1 | CHANGED => {
    "changed": true,
    "rc": 0,
    "stderr": "Shared connection to k8s-node1 closed.\r\n",
    "stderr_lines": [
        "Shared connection to k8s-node1 closed."
    ],
    "stdout": "251\r\n 19:40:13 up 2 days, 11:32,  2 users,  load average: 0.28, 0.39, 0.32\r\n",
    "stdout_lines": [
        "251",
        " 19:40:13 up 2 days, 11:32,  2 users,  load average: 0.28, 0.39, 0.32"
    ]
}
6. 其他模块
service模块
 - name:必须项,服务名称
 - enabled:是否开机启动,yes|no
 - sleep:执行restarted,会在stop和start之间沉睡几秒钟
 - state:对当前服务执行启动、停止、重启、重新加载等操作(started、stopped、restarted、reloaded)
ansible web1 -m service -a 'name=sshd enabled=yes state=started'

yum模块
 - 使用yum包管理器来管理软件包
 - name:要进行操作的软件包名字(多个包用逗号隔开)
 - 	state:动作(installed(install)、removed(remove))
ansible web1 -m yum -a 'name=mariadb-server state=installed'

copy模块
 - 复制文件到远程主机
 - src:复制本地文件到远程主机,复制目录不带/号,复制目录下的带/号。
 - dest:必选项,远程主机的绝对路径,如果源文件是一个目录,那么路径必须是目录
ansible web1 -m copy -a 'src=/home/123 dest=/home/'		#复制目录
ansible k8s-node1 -m copy -a 'src=/home/123/5.txt dest=/home/123'		#复制文件

lineinfile模块
 - 类似sed的一种行编辑替换模块
 - path:目标文件
 - regexp 正则表达式,要修改的行
 - line 最终修改的结果
##修改web1主机上的/home/123/5.txt,找到test开头的行,替换成test666666
ansible web1 -m lineinfile -a 'path="/home/123/5.txt" regexp="^test" line="test666666"'

replace模块
 - path:目标文件
 - regexp 正则表达式,要修改的行
 - replace 要修改的地方
##修改web1主机上的/home/123/5.txt,找到test结尾的行,并且把test改为4
ansible web1 -m replace -a 'path="/home/123/5.txt" regexp="test$" replace="4"'

setup模块
 - 主要用于获取主机信息,palybooks里经常会用的另一个参数gather_facts与该模块相关,setup模块下经常用于filter参数
 - filter 过滤所需的信息
##通过web1 返回的信息使用grep筛选
ansible web1 -m setup | grep hostname
##通过web1返回信息使用filter来筛选关于有ansible_*_mb的信息
ansible web1 -m setup  -a "filter=ansible_*_mb"
ansible必备
1. ansible-doc是ansible模块的文档说明(linux的man类似)
2. ansible-console是为用户提供的交互式工具,可以在ansible-console虚拟出来的终端上像shell一样使用ansible内置的各种命令。
3. ansible-galaxy从github上下载管理Roles的一款工具(与python的pip类似)
4. ansible-palybook是日常应用中使用频率最高的命令,工作机制:通过读取先编写好的playbook文件实现批量管理,可以立即为按一定条件组成的ansible任务集
5. ansible-vault主要用于配置文件的加密,如编写的palybook文件中包含敏感信息,可以把这个文件加密
6. ansible-pull 有两个工作模式pull/push,默认使用push模式工作。pull和push工作模式机制相反。场景:大量机器需要配置。灵活性欠佳,效率很高。


 5621
5621

 被折叠的 条评论
为什么被折叠?
被折叠的 条评论
为什么被折叠?
 到【灌水乐园】发言


