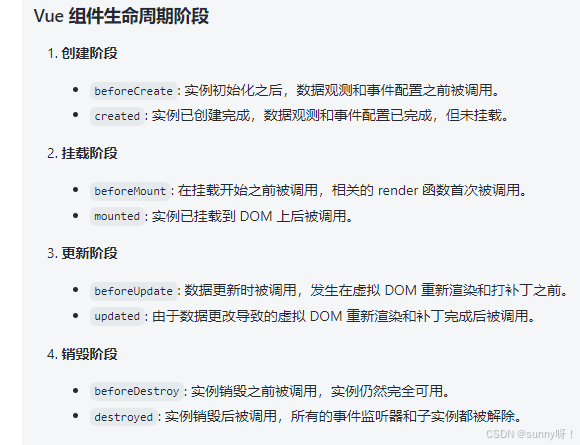
1.有关路由router
1.路由的组合构成

Vue.use(Router);
const router = new Router({
  routes,
});

2.路由钩子函数befoEach()
router.beforeEach((to, from, next) => {
  iView.LoadingBar.start()
  const token = getToken()
  if (!token && to.name !== LOGIN_PAGE_NAME) {
    // 未登录且要跳转的页面不是登录页
    next({
      name: LOGIN_PAGE_NAME // 跳转到登录页
    })
  } else if (!token && to.name === LOGIN_PAGE_NAME) {
    // 未登陆且要跳转的页面是登录页
    next() // 跳转
  } else if (token && to.name === LOGIN_PAGE_NAME) {
    // 已登录且要跳转的页面是登录页
    next({
      name: homeName // 跳转到homeName页
    })
  }
})
3.路由页面关系
[
  {
    path: '/login',
    name: 'login',
    meta: {
      title: 'Login - 登录',
      hideInMenu: true
    },
    component: () => import('@/view/login/login.vue')
  },
  {
    path: '/',
    name: '_home',
    redirect: '/home',
    component: Main,
    meta: {
      hideInMenu: false,
      notCache: true
    },
    children: [
      {
        path: '/home',
        name: 'home',
        meta: {
          hideInMenu: false,
          title: '首页',
          notCache: true,
          icon: 'iconfont icon-shouye'
        },
        component: () => import('@/view/single-page/home')
      }
    ]
  },

]

4.跳转路由方式与传参
 goDetails(postIds) {
      const id = postIds;
      const title = postIds ? `编辑兑换商品` : '新增兑换商品';
      const name = 'exchange-info'
      const route = {
        name,
        query: {
          id, title
        },
        meta: {
          title: title
        }
      }
      this.$refs.myTableList.saveSeekInfo()
      this.$router.push(route);
    },
5.获取路由传的参数
this.$route.query.id

6.区分router与route的区别
// router
定义:router 是一个实例,管理应用的路由配置和导航。
功能:它负责定义路由规则、处理导航、管理路由状态等。通过 router 实例,你可以添加、删除或修改路由,控制整个应用的路由行为。
用法:
在 main.js 中创建并配置 router 实例。
使用 router.push()、router.replace() 等方法进行导航。
//route
定义:route 是与当前路由相关的信息对象。
功能:它包含了当前路由的信息,例如 URL、参数、查询字符串等。每当路由发生变化时,route 对象会更新,以反映当前的路由状态。
用法:
在组件内部,可以通过 this.$route 访问当前路由的信息。
2.有关vuex和本地缓存
1.vuex

import Vue from 'vue';
import Vuex from 'vuex';

Vue.use(Vuex);

export default new Vuex.Store({
  state: {
    count: 0
  },
  mutations: {
    increment(state) {
      state.count++;
    },
    decrement(state) {
      state.count--;
    }
  },
  actions: {
    increment({ commit }) {
      commit('increment');
    },
    decrement({ commit }) {
      commit('decrement');
    }
  },
  getters: {
    currentCount(state) {
      return state.count;
    }
  }
});

简单使用
 computed: {
    currentCount() {
      return this.$store.getters.currentCount; // 使用 getter 获取状态
    }
  },
  methods: {
    increment() {
      this.$store.commit('increment');
    },
    decrement() {
      this.$store.commit('decrement');
    },
    incrementAfterDelay() {
      this.$store.dispatch('incrementAsync');
    }
  }


2.本地储存
localStorage:数据会一直保留,直到用户手动删除或者通过代码清除。即使浏览器关闭后,数据仍然存在。
sessionStorage:数据仅在当前会话中有效。浏览器关闭后,数据会被清除。这意味着如果用户关闭标签页或浏览器窗口,存储的数据将不再可用。

// 存储对象
const user = { name: 'John', age: 30 };
window.localStorage.setItem('user', JSON.stringify(user));

// 读取对象
const storedUser = JSON.parse(localStorage.getItem('user'));


// 删除数据
localStorage.removeItem('key');

// 清空所有数据
localStorage.clear();
3.有关动态样式渲染:style和:class
1.有关style的用法

 <span :style="{color: itId===item.commentId ? 'red' : ''}"></span>

 <div :style="{width: width+'px', height: height+'px', lineHeight: height+'px'}"></div>

2.有关class的使用

 <div @click="tabSubSorts(0)" :class="['sorts', leftSku.sortType ? '' : 'sortsAtc']"></div>

 <div :style="{top: `${offset}%`}" :class="[`${prefix}-pane`, 'bottom-pane']">/></div>

 <div class="look" :class="row.importWmsEnable==0?'disLook':'look'" ></div>
4.有关组件封装和父组件子组件传参

1.引入组件(父组件)
<template>
  <div>
  <add-line ref="addLine" @updata="getList"  :data="data"></add-line>
  </div>
</template>
<script>

import addLine from "./line-component/add-line.vue";
export default {
  name: "customerLine",
  components: { SetStaffExamination, addLine, lineDetail, ImgViewer },
methods:{
getList(params){

}
}
2.调组件的方法
 this.$refs.addLine.showDrawerValue('')
3.接受父组件的传值(子组件)

<template>
  <div>

  </div>
</template>
<script>

export default {
  name: "customerLine",
   props: {
            data: {
                type: Number,
                default: 0
            }
        },

}
4.向父组件传值并调用父组件的方法

 this.$emit('updata' ,'1111')
5.有关常用组件iview和elementui
1.iview官网
https://v4.iviewui.com/components/poptip

2.element-ui官网
https://element.eleme.cn/#/zh-CN/component/installation
6.有关echarts的使用和技巧
1.echarts的官网

https://echarts.apache.org/handbook/zh/get-started/

2.快速上手,一个简单的案例

<div id="chartLineBox" ></div>

let option = {
  xAxis: {
    data: ['Mon', 'Tue', 'Wed', 'Thu', 'Fri', 'Sat', 'Sun']
  },
  yAxis: {},
  series: [
    {
      type: 'bar',
      data: [23, 24, 18, 25, 27, 28, 25]
    }
  ]
};
this.chartLine = this.$echarts.init(document.getElementById('chartLineBox'))
this.chartLine.setOption(option)

this.chartLine.resize()

3.案例集合链接
https://www.isqqw.com/


 被折叠的 条评论
为什么被折叠?


