注解的使用
引入外部的properties文件
首先创建配置文件

创建beans6.xml
<?xml version="1.0" encoding="UTF-8"?>
<beans xmlns="http://www.springframework.org/schema/beans"
       xmlns:xsi="http://www.w3.org/2001/XMLSchema-instance"
       xsi:schemaLocation="http://www.springframework.org/schema/beans http://www.springframework.org/schema/beans/spring-beans.xsd">

       <bean id="druid" class="com.alibaba.druid.pool.DruidDataSource">
           <property name="driverClassName" value="com.mysql.jdbc.Driver"></property>
           <property name="url" value="jdbc:mysql://localhost:3306/maclu"></property>
           <property name="username" value="root"></property>
           <property name="password" value="123456"></property>
       </bean>
</beans>
测试
    @Test
    public void Tses15(){
        ClassPathXmlApplicationContext context = new ClassPathXmlApplicationContext("beans6.xml");
        DruidDataSource druid = context.getBean("druid", DruidDataSource.class);
        DruidPooledConnection connection = null;
        try {
            connection = druid.getConnection();
            System.out.println(connection);
        } catch (SQLException e) {
            e.printStackTrace();
        }finally {
            try {
                connection.close();
            } catch (SQLException e) {
                e.printStackTrace();
            }
        }
    }
结果

或者先添加druid的pom依赖
   <!-- https://mvnrepository.com/artifact/com.alibaba/druid -->
    <dependency>
      <groupId>com.alibaba</groupId>
      <artifactId>druid</artifactId>
      <version>1.2.6</version>
    </dependency>
创建beans7.xml
<?xml version="1.0" encoding="UTF-8"?>
<beans xmlns="http://www.springframework.org/schema/beans"
       xmlns:xsi="http://www.w3.org/2001/XMLSchema-instance"
       xmlns:context="http://www.springframework.org/schema/context"
       xsi:schemaLocation="http://www.springframework.org/schema/beans http://www.springframework.org/schema/beans/spring-beans.xsd http://www.springframework.org/schema/context https://www.springframework.org/schema/context/spring-context.xsd">


       <context:property-placeholder location="classpath:db.properties"></context:property-placeholder>
       <bean id="druid" class="com.alibaba.druid.pool.DruidDataSource">
           <property name="driverClassName" value="${jdbc.driverClassName}"></property>
           <property name="url" value="${jdbc.url}"></property>
           <property name="username" value="${jdbc.username}"></property>
           <property name="password" value="${jdbc.password}"></property>
       </bean>
</beans>
结果
依赖注入
1)Spring配置文件引入context约束
<?xml version="1.0" encoding="UTF-8"?>
<beans xmlns="http://www.springframework.org/schema/beans"
       xmlns:xsi="http://www.w3.org/2001/XMLSchema-instance"
       xmlns:context="http://www.springframework.org/schema/context"
       xmlns:aop="http://www.springframework.org/schema/aop"
       xmlns:c="http://www.springframework.org/schema/c"
       xmlns:util="http://www.springframework.org/schema/util"
       xmlns:p="http://www.springframework.org/schema/p"
       xsi:schemaLocation="http://www.springframework.org/schema/beans http://www.springframework.org/schema/beans/spring-beans.xsd
		http://www.springframework.org/schema/context http://www.springframework.org/schema/context/spring-context-4.3.xsd
		http://www.springframework.org/schema/aop http://www.springframework.org/schema/aop/spring-aop-4.3.xsd
		http://www.springframework.org/schema/util http://www.springframework.org/schema/util/spring-util-4.3.xsd">


</beans>
2)Spring配置文件中开启注解扫描
<?xml version="1.0" encoding="UTF-8"?>
<beans xmlns="http://www.springframework.org/schema/beans"
       xmlns:xsi="http://www.w3.org/2001/XMLSchema-instance"
       xmlns:context="http://www.springframework.org/schema/context"
       xmlns:aop="http://www.springframework.org/schema/aop"
       xmlns:c="http://www.springframework.org/schema/c"
       xmlns:util="http://www.springframework.org/schema/util"
       xmlns:p="http://www.springframework.org/schema/p"
       xsi:schemaLocation="http://www.springframework.org/schema/beans http://www.springframework.org/schema/beans/spring-beans.xsd
		http://www.springframework.org/schema/context http://www.springframework.org/schema/context/spring-context-4.3.xsd
		http://www.springframework.org/schema/aop http://www.springframework.org/schema/aop/spring-aop-4.3.xsd
		http://www.springframework.org/schema/util http://www.springframework.org/schema/util/spring-util-4.3.xsd">


    <context:component-scan base-package="com.cqucc" />

</beans>
在classpath中的扫描组件:component-scan,他能够在classpath中自动扫描,自动检查和实例化具有特定注解的组件。
特定组件包括
- @Component :组件通用注解,标识一个受Spring管理的组件
- @Controller :常用于对表现标注
- @Service:常用于对服务层(业务层)标注
- @Repository:常用于对持久层标注
@Component、@Controller、@Service和@Repository功能一样,可以互换,我们使用不同注解主要为了区分被注解的类处在不同的业务层,使逻辑更加清晰。
它们使用方法:
(1)标注在类上
(2)@Component("name")等于@Component(value="user")
(3)@Component相当于@Component("className")
3)案例
Users类
package com.cqucc.pojo;

import org.springframework.stereotype.Component;

@Component
public class Users {

    private Integer userid;
    private String usernama;
    private String password;
    public Users (){
        System.out.println("这是无参构造方法");
    }

    public Users(Integer userid, String usernama, String password) {
        System.out.println("这是有参构造方法");
        this.userid = userid;
        this.usernama = usernama;
        this.password = password;
    }

    public void say(){
        System.out.println("hello");
    }

    public String getPassword() {
        return password;
    }

    public void setPassword(String password) {
        this.password = password;
    }

    public String getUsernama() {
        return usernama;
    }

    public void setUsernama(String usernama) {
        this.usernama = usernama;
    }

    public Integer getUserid() {
        return userid;
    }

    public void setUserid(Integer userid) {
        this.userid = userid;
    }

    @Override
    public String toString() {
        return "Users{" +
                "userid=" + userid +
                ", usernama='" + usernama + '\'' +
                ", password='" + password + '\'' +
                '}';
    }
}
编写测试类:
      @Test
    public void Tses(){
        ApplicationContext act = new ClassPathXmlApplicationContext("beans8.xml");
        Users users = act.getBean(Users.class);
        Users users2 = act.getBean("users",Users.class);
        System.out.println(users);
        System.out.println(users2);

    }
测试结果

注:在注解中value属性值可以省略不写,
    @Test
    public void Tses17(){
        ClassPathXmlApplicationContext context = new ClassPathXmlApplicationContext("beans8.xml");
        DeptAction deptAction =  context.getBean(DeptAction.class);
        System.out.println(deptAction);
        deptAction.show();
        DeptService deptService = context.getBean(DeptService.class);
        System.out.println(deptService);
        deptService.show();
        DeptDao deptDao =  context.getBean(DeptDao.class);
        System.out.println(deptDao);
    }
,首字母小写
4)属性注入
4.1@Autowired
自动注入的方式进行注入,默认根据类的名称来进行装配
DeptDao类
package com.cqucc.dao;

import org.springframework.stereotype.Repository;

@Repository
public class DeptDao {

    public void show(){
        System.out.println("dept执行了");
    }
}
DeptService 类
package com.cqucc.service;

import com.cqucc.dao.DeptDao;
import org.springframework.beans.factory.annotation.Autowired;
import org.springframework.stereotype.Service;

@Service
public class DeptService {
    @Autowired
    private DeptDao deptDao;
    public void show(){
        System.out.println("service执行了");
        deptDao.show();
    }
}
DeptAction 类
package com.cqucc.action;

import com.cqucc.service.DeptService;
import org.springframework.beans.factory.annotation.Autowired;
import org.springframework.stereotype.Controller;

@Controller
public class DeptAction {
    @Autowired
    private DeptService deptService;
    public void show(){
        System.out.println("action执行了");
        deptService.show();
    }
}
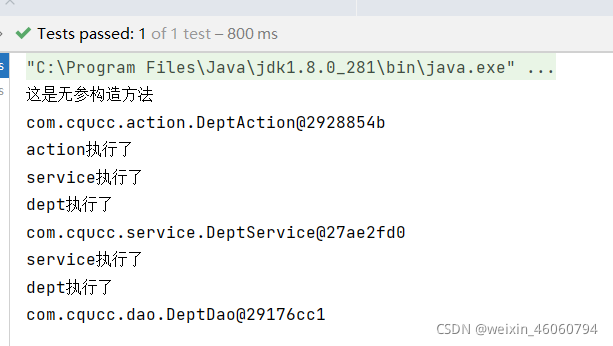
测试类
    @Test
    public void Tses17(){
        ClassPathXmlApplicationContext context = new ClassPathXmlApplicationContext("beans8.xml");
        DeptAction deptAction =  context.getBean(DeptAction.class);
        System.out.println(deptAction);
        deptAction.show();
        DeptService deptService = context.getBean(DeptService.class);
        System.out.println(deptService);
        deptService.show();
        DeptDao deptDao =  context.getBean(DeptDao.class);
        System.out.println(deptDao);
    }
测试结果

@Autowired注意事项:
默认情况下,所有使用@Autowired注解的属性都需要被设置。当Spring找不到匹配的bean装配属性时,会抛出异常。
如去掉DeptAction 类中的的@Autowired时
package com.cqucc.action;

import com.cqucc.service.DeptService;
import org.springframework.beans.factory.annotation.Autowired;
import org.springframework.stereotype.Controller;

@Controller
public class DeptAction {

    private DeptService deptService;
    public void show(){
        System.out.println("action执行了");
        deptService.show();
    }
}

//测试方法
    @Test
    public void Tses17(){
        ClassPathXmlApplicationContext context = new ClassPathXmlApplicationContext("beans8.xml");
        DeptAction deptAction =  context.getBean(DeptAction.class);
        System.out.println(deptAction);
        deptAction.show();

    }
测试结果

4.2 @Qualifier
@Autowired是按照类型进行匹配,如果当前@Autowired标注的依赖在容器中只能找到一个实例一致对应的话,那还好。可是,要是能够同时找到多个或者同一类型的对象实例,那该怎么办?可以使用@Qualifier对依赖注入的条件做进一步限定。如下
定义接口
package com.cqucc.dao;

public interface DeptDaoInter {
    public void show();
}
实现接口的两个类
package com.cqucc.dao.Impl;

import com.cqucc.dao.DeptDaoInter;
import org.springframework.stereotype.Repository;

@Repository
public class DeptDao implements DeptDaoInter {

    public void show(){
        System.out.println("dept执行了");
    }
}
package com.cqucc.dao.Impl;

import com.cqucc.dao.DeptDaoInter;
import org.springframework.stereotype.Repository;

@Repository
public class DeptDao1 implements DeptDaoInter {

    public void show(){
        System.out.println("dept1执行了");
    }
}
测试类
    @Test
    public void test18(){
        ApplicationContext context = new ClassPathXmlApplicationContext("beans9.xml");
        DeptService deptService = context.getBean(DeptService.class);
        System.out.println(deptService);
    }
结果:

当添加 @Qualifier("deptDao1")后
package com.cqucc.service;


import com.cqucc.dao.DeptDaoInter;
import org.springframework.beans.factory.annotation.Autowired;
import org.springframework.beans.factory.annotation.Qualifier;
import org.springframework.stereotype.Service;

@Service
public class DeptService {
    @Autowired
    @Qualifier("deptDao1")
    private DeptDaoInter deptDaoInter;
    public void show(){
        System.out.println("service执行了");
        deptDaoInter.show();
    }
}
测试结果

4.3 @Resource
@Resource(name = "deptDao1")相当于@Autowired+@Qualifier("name")
package com.cqucc.service;

import com.cqucc.dao.DeptDaoInter;
import org.springframework.beans.factory.annotation.Autowired;
import org.springframework.beans.factory.annotation.Qualifier;
import org.springframework.stereotype.Service;

import javax.annotation.Resource;

@Service
public class DeptService {
//    @Autowired
//    @Qualifier("deptDao1")
    @Resource(name = "deptDao1")
    private DeptDaoInter deptDaoInter;
    public void show(){
        System.out.println("service执行了");
        deptDaoInter.show();
    }
}
测试结果

5)包含(不包含)组件
<context:component-scan>提供了两个子标签
- <context:include-filter>
- <context:exclude-filter>
在说明这两个子标签前,先说一下<context:component-scan>有一个use-default-filters属性,该属性默认为true,这就意味着会扫描指定包下的全部的标有Spring注解的类,并注册成bean。也就是@Component,@Controller,@Service,@Reposity等。所以如果仅仅是在配置文件中这么写
<context:component-scan base-package="com.*"/>
use-default-filter此时为true那么会对base-package包或者子包下的所有的进行java类进行扫描,并把匹配的java类注册成bean。
可以发现这种扫描的粒度有点太大,如果你只想扫描指定包下面的Controller,该怎么办?此时子标签<context:incluce-filter>就起到了勇武之地。如下所示
        <context:component-scan base-package="com.cqucc" use-default-filters="false">
            <context:include-filter type="annotation" expression="org.springframework.stereotype.Controller"/>
        </context:component-scan>
这样就会只扫描base-package包或者子包下所有@Controller下的java类,并注册成bean。
去访问除了@Controller以为的类会包下面的错误

如果不想扫描指定包下面的Controller时,需要使用<context:exclude-filter>标签
    <context:component-scan base-package="com.cqucc">
        <context:exclude-filter type="annotation" expression="org.springframework.stereotype.Controller"/>
    </context:component-scan>
去访问@Controller以为的类会包下面的错误
6)无配置注解
@Configuration用于定义配置类,可替换xml配置文件,被注解的类内部包含有一个或多个被@Bean注解的方法,这些方法将会被AnnotationConfigApplicationContext或AnnotationConfigWebApplicationContext类进行扫描,并用于构建bean定义,初始化Spring容器。
注意:@Configuration注解的配置类有如下要求:
@Configuration不可以是final类型;
@Configuration不可以是匿名类;
嵌套的configuration必须是静态类。
如下:
package com.cqucc.config;

import org.springframework.context.annotation.ComponentScan;
import org.springframework.context.annotation.Configuration;

@Configuration
@ComponentScan(basePackages = {"com.cqucc"})
public class SpringConfig {
    public SpringConfig(){
        System.out.println("容器启动初始化...");
    }
}
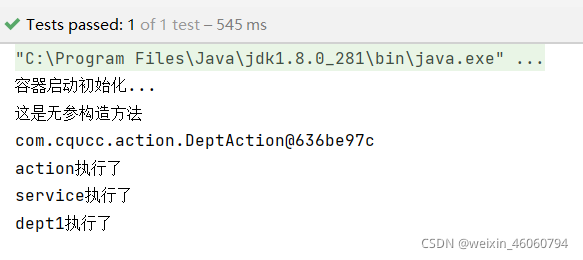
测试类
    @Test
    public void test20(){
        ApplicationContext context = new AnnotationConfigApplicationContext(SpringConfig.class);
        DeptAction action = context.getBean(DeptAction.class);
        System.out.println(action);
        action.show();
    }
结果


 1891
1891

 被折叠的 条评论
为什么被折叠?


