


 本文档详细介绍了如何在Linux环境下下载、安装MongoDB 3.2.10版本,包括基础配置、创建配置文件、启动服务以及用户管理。重点讲解了创建root、admin和普通用户的过程,以及不同权限用户的验证和权限限制。此外,还强调了在启用权限验证后,必须以特定方式启动MongoDB服务。
文章目录
一、下载软件包
wget https://fastdl.mongodb.org/linux/mongodb-linux-x86_64-rhel62-3.2.10.tgz
需要其他版本,可进官网下载
二、安装mongodb
2.1 基础配置
#解压
tar xf mongodb-linux-x86_64-rhel62-3.2.10.tgz
#复制到/usr/bin
cp -r mongodb-linux-x86_64-rhel62-3.2.10/ /usr/bin/mongo
#创建mongod和mongo的软链接(配置环境变量也可以)
ln -s /usr/bin/mongo/bin/mongo /usr/bin/mongoclient
ln -s /usr/bin/mongo/bin/mongod /usr/bin/mongod
#创建数据目录和存放日志的目录
cd /usr/bin/mongo/ && mkdir data logs -p
2.2 创建配置文件(基础)
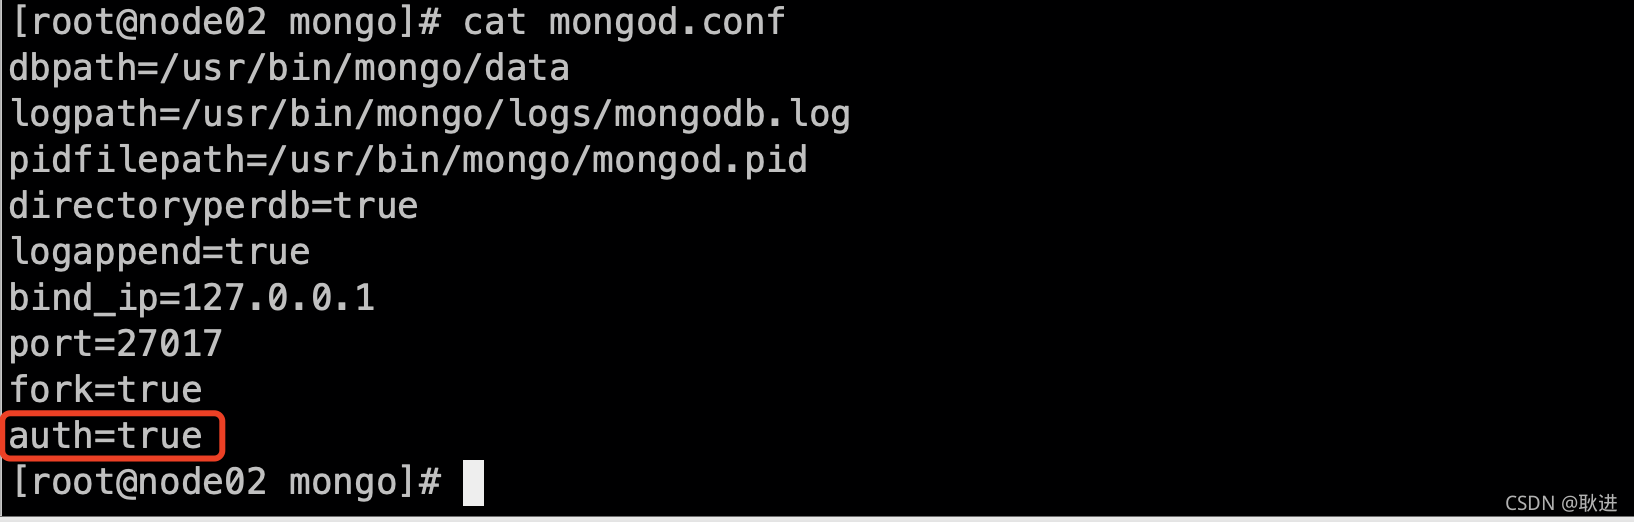
[root@node02 mongo]# cat mongod.conf
dbpath=/usr/bin/mongo/data
logpath=/usr/bin/mongo/logs/mongodb.log
pidfilepath=/usr/bin/mongo/mongod.pid
directoryperdb=true
logappend=true
bind_ip=127.0.0.1
port=27017
fork=true  #以守护进程方式启用
2.3 启动mongodb
mongod -f /usr/bin/mongo/mongod.conf

2.4 进入mongo

三、用户相关
3.1 创建用户
3.1.1 root用户
use admin
db.createUser({"user":"root","pwd":"root",roles:["root"]})
3.1.2 管理员admin
db.createUser({"user":"admin","pwd":"admin","customData":{"name":"gengjin"},roles:[{role:"userAdminAnyDatabase",db:"admin"}]})
3.1.3 普通用户
db.createUser({
       "user":"gengjin",
       "pwd":"gengjin",
       "customData":{"name":"gengjin","age":18},
       roles:[
           {"role":"readWrite",db:"gengjin"},
           {"role":"read",db:"hello"},
           ]
}
)
3.2 查看用户
> use admin
switched to db admin
> show users;
{
        "_id" : "admin.root",
        "user" : "root",
        "db" : "admin",
        "roles" : [
                {
                        "role" : "root",
                        "db" : "admin"
                }
        ]
}
{
        "_id" : "admin.admin",
        "user" : "admin",
        "db" : "admin",
        "customData" : {
                "name" : "gengjin"
        },
        "roles" : [
                {
                        "role" : "userAdminAnyDatabase",
                        "db" : "admin"
                }
        ]
}
{
        "_id" : "admin.gengjin",
        "user" : "gengjin",
        "db" : "admin",
        "customData" : {
                "name" : "gengjin",
                "age" : 18
        },
        "roles" : [
                {
                        "role" : "readWrite",
                        "db" : "gengjin"
                },
                {
                        "role" : "read",
                        "db" : "hello"
                }
        ]
}
>
3.3 验证用户
3.3.1 启动方式
虽然用户创建好了,但是我们必须指定mongodb以–auth的方式启动,启动命令行加上–auth,或者配置文件加一行也行
 然后重启mongodb,最后不要kill,use到admin库,使用shutdownServer()即可

3.3.2 验证root用户
可以看到,如果不认证用户,那将操作不了,并且登陆用户必须use到admin库下
[root@node02 mongo]# mongoclient
MongoDB shell version: 3.2.10
connecting to: test
> show dbs #未进行认证,没有权限操作
2021-09-24T16:59:11.065+0800 E QUERY    [thread1] Error: listDatabases failed:{
        "ok" : 0,
        "errmsg" : "not authorized on admin to execute command { listDatabases: 1.0 }",
        "code" : 13
} :
_getErrorWithCode@src/mongo/shell/utils.js:25:13
Mongo.prototype.getDBs@src/mongo/shell/mongo.js:62:1
shellHelper.show@src/mongo/shell/utils.js:761:19
shellHelper@src/mongo/shell/utils.js:651:15
@(shellhelp2):1:1

>
> use admin
switched to db admin
> db.auth("root","root")
1
> show dbs
admin  0.000GB
hello  0.000GB
kobe   0.001GB
local  0.000GB
>
> use local         #并且root用户可以查看local库。
switched to db local
> show tables
startup_log
>
>
3.3.3 验证admin用户
[root@node02 mongo]# mongoclient
MongoDB shell version: 3.2.10
connecting to: test
> use admin
switched to db admin
> db.auth("admin","admin")
1
> show dbs
admin  0.000GB
hello  0.000GB
kobe   0.001GB
local  0.000GB
>
>
> use local
switched to db local
> show tables  #admin用户是不能查看local库的
2021-09-24T17:01:49.254+0800 E QUERY    [thread1] Error: listCollections failed: {
        "ok" : 0,
        "errmsg" : "not authorized on local to execute command { listCollections: 1.0, filter: {} }",
        "code" : 13
} :
_getErrorWithCode@src/mongo/shell/utils.js:25:13
DB.prototype._getCollectionInfosCommand@src/mongo/shell/db.js:773:1
DB.prototype.getCollectionInfos@src/mongo/shell/db.js:785:19
DB.prototype.getCollectionNames@src/mongo/shell/db.js:796:16
shellHelper.show@src/mongo/shell/utils.js:754:9
shellHelper@src/mongo/shell/utils.js:651:15
@(shellhelp2):1:1

>
3.3.4 验证普通用户(gengjin)
该用户权限
> db.runCommand({usersInfo:"gengjin"})
{
        "users" : [
                {
                        "_id" : "admin.gengjin",
                        "user" : "gengjin",
                        "db" : "admin",
                        "customData" : {
                                "name" : "gengjin",
                                "age" : 18
                        },
                        "roles" : [
                                {
                                        "role" : "readWrite",
                                        "db" : "gengjin"
                                },
                                {
                                        "role" : "read",
                                        "db" : "hello"
                                }
                        ]
                }
        ],
        "ok" : 1
}
>
测试
[root@node02 mongo]# mongoclient
MongoDB shell version: 3.2.10
connecting to: test
>
> use admin
switched to db admin
>
> db.auth("gengjin","gengjin")
1
>
> show dbs   #可以看到该用户是没有查看库目录的权限的
2021-09-24T17:05:44.129+0800 E QUERY    [thread1] Error: listDatabases failed:{
        "ok" : 0,
        "errmsg" : "not authorized on admin to execute command { listDatabases: 1.0 }",
        "code" : 13
} :
_getErrorWithCode@src/mongo/shell/utils.js:25:13
Mongo.prototype.getDBs@src/mongo/shell/mongo.js:62:1
shellHelper.show@src/mongo/shell/utils.js:761:19
shellHelper@src/mongo/shell/utils.js:651:15
@(shellhelp2):1:1

>
> use hello     #测试hello库,我们看上面的建用户语句中,gengjin对hello库只有read的权限
switched to db hello
> show tables;
numbers
> db.numbers.find()  #查看没有问题
{ "_id" : ObjectId("614d8b7192f5d980dd1439a6"), "num" : 1 }
{ "_id" : ObjectId("614d8b7192f5d980dd1439a7"), "num" : 2 }
{ "_id" : ObjectId("614d8b7192f5d980dd1439a8"), "num" : 3 }
{ "_id" : ObjectId("614d8b7192f5d980dd1439a9"), "num" : 4 }
{ "_id" : ObjectId("614d8b7192f5d980dd1439aa"), "num" : 5 }
{ "_id" : ObjectId("614d8b7192f5d980dd1439ab"), "num" : 6 }
{ "_id" : ObjectId("614d8b7192f5d980dd1439ac"), "num" : 7 }
{ "_id" : ObjectId("614d8b7192f5d980dd1439ad"), "num" : 8 }
{ "_id" : ObjectId("614d8b7192f5d980dd1439ae"), "num" : 9 }
{ "_id" : ObjectId("614d8b7192f5d980dd1439af"), "num" : 10 }
{ "_id" : ObjectId("614d8b7192f5d980dd1439b0"), "num" : 11 }
{ "_id" : ObjectId("614d8b7192f5d980dd1439b1"), "num" : 12 }
{ "_id" : ObjectId("614d8b7192f5d980dd1439b2"), "num" : 13 }
{ "_id" : ObjectId("614d8b7192f5d980dd1439b3"), "num" : 14 }
{ "_id" : ObjectId("614d8b7192f5d980dd1439b4"), "num" : 15 }
{ "_id" : ObjectId("614d8b7192f5d980dd1439b5"), "num" : 16 }
{ "_id" : ObjectId("614d8b7192f5d980dd1439b6"), "num" : 17 }
{ "_id" : ObjectId("614d8b7192f5d980dd1439b7"), "num" : 18 }
{ "_id" : ObjectId("614d8b7192f5d980dd1439b8"), "num" : 19 }
{ "_id" : ObjectId("614d8b7192f5d980dd1439b9"), "num" : 20 }
Type "it" for more
> db.numbers.update({"num":1},{$set:{"num":2}})
WriteResult({
        "writeError" : {
                "code" : 13,
                "errmsg" : "not authorized on hello to execute command { update: \"numbers\", updates: [ { q: { num: 1.0 }, u: { $set: { num: 2.0 } }, multi: false, upsert: false } ], ordered: true }"
        }          #更新报权限的报错
})
> use gengjin  #测试gengjin库,我们看上面的建用户语句中,gengjin对gengjin库有read和write的权限
switched to db gengjin
> show tables;
kobe
> db.kobe.find()
{ "_id" : ObjectId("614d9671656d8e267212a5ad"), "name" : 24 }
{ "_id" : ObjectId("614d9675656d8e267212a5ae"), "name" : 23 }
{ "_id" : ObjectId("614d9677656d8e267212a5af"), "name" : 25 }
{ "_id" : ObjectId("614d96bcc88677c8a06fbd0a"), "name" : 24 }
> db.kobe.update({"name":24},{$set:{"name":27}})  #我们发现更新是没有问题的
WriteResult({ "nMatched" : 1, "nUpserted" : 0, "nModified" : 1 })
> db.kobe.find()
{ "_id" : ObjectId("614d9671656d8e267212a5ad"), "name" : 27 }
{ "_id" : ObjectId("614d9675656d8e267212a5ae"), "name" : 23 }
{ "_id" : ObjectId("614d9677656d8e267212a5af"), "name" : 25 }
{ "_id" : ObjectId("614d96bcc88677c8a06fbd0a"), "name" : 24 }
>


 412
412

 被折叠的 条评论
为什么被折叠?
被折叠的 条评论
为什么被折叠?
 到【灌水乐园】发言


