


文章目录
Core Technologies :: Spring Framework

Spring Framework
Spring IoC
- Inversion of Control
- 控制反转,一种面向对象的编程思想,将类与类之间的依赖关系交给容器进行处理
- 减少Bean之间的耦合度
- 被Spring管理的bean默认是单例的
- Dependency Injection
- 依赖注入,IoC思想的实现方式
- 在需要使用某一对象时,无需创建该对象,依赖于外部容器,由外部容器创建后传递进来
- IoC Container
- IoC容器,实现依赖注入的关键
- 本质上是一个工厂,用来管理所有的对象以及依赖关系
- org.springframework.beans 和 org.springframework.context都是IoC Container
- 开发时主要使用org.springframework.context.ApplicationContext接口,负责实例化、配置和组装beans.

Spring IoC注解
| 注解 | 解释 |
|---|---|
| @Autowired | 用于注入Bean,该注解能写在成员变量、Set方法、构造器中> ⚠️:在Spring Framework4.3以后,@Autowired 如果目标bean一开始只定义一个构造函数,则不再需要对此类构造函数进行注解,但是如果有多个构造函数可用,并且没有默认构造函数,则必须至少对其中一个构造函数进行注解,以便于指示容器使用哪一个构造函数。 |
| @Qualifier | 用于声明Bean的名称,可以引用Bean的自定义名称,也可以引用默认名称(类名首字母改小写) |
| @Bean | 用于装配第三方的Bean(Jar包中的Bean等等),也能装配自定义的Bean |
| @Configuration | 用于声明配置类,该注解是基于@Component实现的 |
| @Primary | 优先分配 |
| @Scope | 默认单例 @Scope(“singleton”) 多个实例 @Scope(“prototype”) |
Example
定义数据访问组件AlphaDao、业务组件AlphaService、控制器AlphaController,并通过注解的方式将它们委托给Spring容器,将AlphaDao注入给AlphaService,将AlphaService注入给AlphaController,并在AlphaController中调用AlphaService,以实现查询数据的请求
public interface AlphaDao{
    String select();
}
@Repository("alphaDaoMyBatis")
// 优先装配
@Primary
public class AlphaDaoMybatisImpl implements AlphaDao{
    @Override
    public String select() {
        return "MyBatis";
    }
}
@Service
public AlphaService{
    @Autowired
    private AlphaDao alphaDao;
    public String find(){
        return alphaDao.select();
    }
}
@Controller
@RequestMapping("/alpha")
public AlphaController{
    @Autowired
    private AlphaService alphaService;

    @RequestMapping("data")
    @ResponseBody
    public String getData(){
        return alphaService.find();
    }
}
@Test
public void testApplicationContext(){
    System.out.println(applicationContext);

    AlphaDao alphaDao = applicationContext.getBean(AlphaDao.class);
    System.out.println(alphaDao.select());

    // alphaDao = (AlphaDao) applicationContext.getBean("alphaHibernate");
    alphaDao = applicationContext.getBean("alphaMyBatis", AlphaDao.class);
    System.out.println(alphaDao.select());
}
Spring MVC
- 三层架构
- 表现层、业务层、数据访问层
- MVC(主要解决表现层问题)
- Model:模型层
- View:视图层
- Controller:控制层
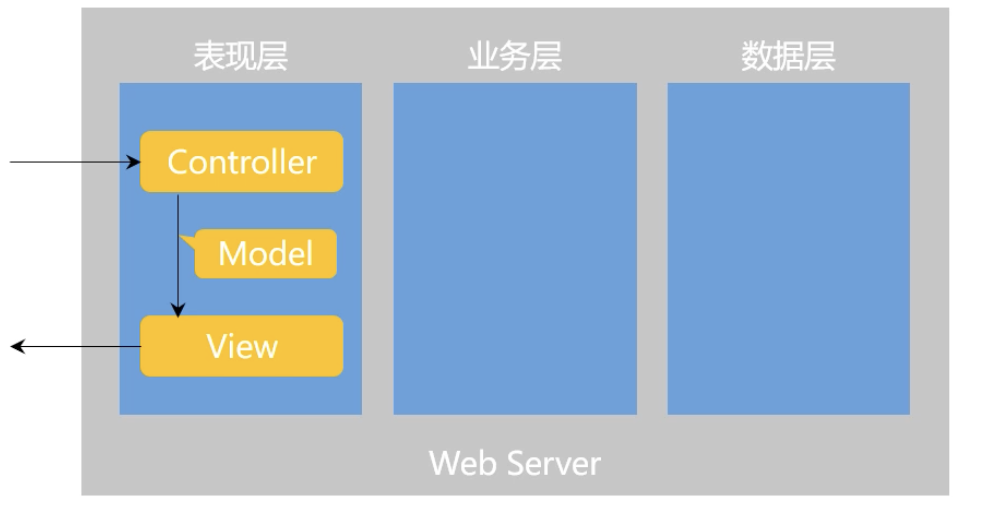
- 核心组件
- 前段控制器:DispatcherServlet

- 具体流程:

Controller处理请求与响应
处理GET及POST类型的请求
// GET请求
// students?current=1&limit=20
@RequestMapping(path = "/students", method = RequestMethod.GET)
@ResponseBody
// 参数名保持一致即可匹配,没有参数需要加注解
public String getStudents(
        // 参数注入
        @RequestParam(name = "current", required = false, defaultValue = "1") int current,
        @RequestParam(name = "limit", required = false, defaultValue = "10") int limit){
    System.out.println(current);
    System.out.println(limit);
    return "some students";
}
// /student/123
@RequestMapping(path = "/student/{id}", method = RequestMethod.GET)
@ResponseBody
public String getStudent(@PathVariable("id") int id){
    System.out.println(id);
    return "a student";
}

// POST请求
@RequestMapping(path = "/student", method = RequestMethod.POST)
@ResponseBody
// 参数名与html中表单input属性名对应
// http://localhost:8080/community/html/student.html
public String saveStudent(String name, int age){
    System.out.println(name);
    System.out.println(age);
    return "success";
}
向浏览器响应HTML格式的数据
// 响应HTML数据,由前端控制器调度,需返回model和view
@RequestMapping(path = "/teacher", method = RequestMethod.GET)
public ModelAndView getTeacher(){
    ModelAndView mav = new ModelAndView();
    mav.addObject("name", "张三");
    mav.addObject("age",30);
    // 设置templates下的模版,不用写.html
    mav.setViewName("/demo/view");
    return mav;
}
// 前端控制器实例化model,返回view视图
@RequestMapping(path = "school", method = RequestMethod.GET)
public String getSchool(Model model){
model.addAttribute("name", "nku");
    model.addAttribute("age", 110);
    // 返回view.html 动态模版
    return "/demo/view";
}
向浏览器响应JSON格式的数据
// 响应JSON(异步请求)
// Java对象 -> JSON字符串 -> JS对象
@RequestMapping(path = "/emp", method = RequestMethod.GET)
@ResponseBody
public Map<String, Object> getEmp(){
    Map<String, Object> emp = new HashMap<>();
    emp.put("name", "zhangsan");
    emp.put("age", 21);
    return emp;
}

@RequestMapping(path = "/emps", method = RequestMethod.GET)
@ResponseBody
public List<Map<String, Object>> getEmps(){
    List<Map<String, Object>> list = new ArrayList<>();
    Map<String, Object> emp = new HashMap<>();
    emp.put("name", "zhangsan");
    emp.put("age", 21);
    list.add(emp);

    emp = new HashMap<>();
    emp.put("name", "lisi");
    emp.put("age", 11);
    list.add(emp);
    return list;
}
Spring MVC注解
| 注解 | 使用 | 解释 |
|---|---|---|
| @ResponseBody | @ResponseBody | 可以用于同步请求和异步请求中。 当你在控制器(Controller)方法上使用@ResponseBody注解时,Spring MVC会将方法的返回值作为响应体(Response Body)直接写入HTTP响应中,而不会通过视图解析器(View Resolver)解析成视图(View)。这在处理AJAX请求(异步请求)时非常有用,但也可以用于同步请求中。 |
| @RequestMapping | @RequestMapping(path = “/student/{id}”, method = RequestMethod.GET) | 可以声明类或方法的访问路径,还可以声明请求的方式 |
| @PathVariable | @RequestMapping(path = “/student/{id}”, method = RequestMethod.GET) public String getStudent(@PathVariable(“id”) int id){} | 可以将请求路径中的参数,绑定到控制器中方法的参数 |
| @RequestParam | public String getStudents( @RequestParam(name = “current”, required = false, defaultValue = “1”) int current, @RequestParam(name = “limit”, required = false, defaultValue = “10”) int limit ){} | 可以将请求对象中的参数,绑定到控制器中方法的参数 |
| @Value | // 从application.properties中获取domain @Value(“${community.path.domain}”) private String domain; | 用于注入外部化属性 |
| @PostConstruct @PostDestroy | @PostConstruct public void init(){ System.out.println(“init AlphaService”); } @PreDestroy public void destroy(){ System.out.println(“销毁 AlphaService”); } | 设置构造之后调用和销毁前调用的方法 |
Thymeleaf
- 模版引擎:根据模版文件和Model生成动态的HTML
- ${name}表达式是在服务器返回的Modle中提取返回值,所以是在Response中提取,而Request是从浏览器向服务端发送的请求,而我们在服务端接收到Request请求后通过requestMapping映射到controller中的方法中的参数列表来获取到请求参数
Thymeleaf加载动态模版
<!doctype html>
<html lang="en" xmlns:th="http://www.thymeleaf.org">
<p th:text="${name}"></p>
<p th:text="${age}"></p>
// 响应HTML数据,由前端控制器调度,需返回model和view
@RequestMapping(path = "/teacher", method = RequestMethod.GET)
public ModelAndView getTeacher(){
    ModelAndView mav = new ModelAndView();
    // 属性名与html模版中的表单对应
    mav.addObject("name", "张三");
    mav.addObject("age",30);
    // 设置templates下的模版,不用写.html
    mav.setViewName("/demo/view");
    return mav;
}
// 前端控制器自动实例化model,返回view视图
@RequestMapping(path = "school", method = RequestMethod.GET)
public String getSchool(Model model){
    model.addAttribute("name", "nku");
    model.addAttribute("age", 110);
    // 返回view.html 动态模版
    return "/demo/view";
}
细节
- 遍历集合: th:each=“obj:${list}”
Ref
Mybatis
核心组件
- SqlSessionFactory:用于创建SqlSession的工厂类
- SqlSession:Mybatis的核心组件,用于向数据库执行SQL
- 主配置文件:XML配置文件,可以对MyBatis的底层行为做出详细的配置
Mapper接口
DAO接口,只需要写接口就行,由Mapper映射器实现
Mapper接口用于定义数据库访问行为,但它不一定需要使用@Mapper注解进行标记。除了使用 @Mapper注解,还可以通过在配置文件(如mybatis-config.xml)中添加对应的Mapper接口类来注册
注入UserMapper即可使用
package com.nowcoder.community.dao;

import com.nowcoder.community.entity.User;
import org.apache.ibatis.annotations.Mapper;

@Mapper
public interface UserMapper {
    User selectById(int id);

    User selectByName(String username);

    User selectByEmail(String email);

    int insertUser(User user);

    int updateStatus(int id, int status);

    int updateHeader(int id, String headerUrl);

    int updatePassword(int id, String password);
}
Mapper映射器
用于编写SQL,并将SQL和实体类映射的组件,采用XML、注解均可实现
<?xml version="1.0" encoding="UTF-8" ?>
<!DOCTYPE mapper
PUBLIC "-//mybatis.org//DTD Mapper 3.0//EN"
"https://mybatis.org/dtd/mybatis-3-mapper.dtd">
<!-- namespace属性,用于声明该配置文件所对应的接口 -->
<mapper namespace="com.nowcoder.community.dao.UserMapper">
  <!-- 用于定义可以复用的SQL片段 -->
  <sql id="insertFields">
    username, password, salt, email, type, status, activation_code, header_url, create_time
  </sql>
  <sql id="selectFields">
    id, username, password, salt, email, type, status, activation_code, header_url, create_time
  </sql>
  <!-- 与方法名对应-->
  <!-- 可以利用resultType属性声明返回值类型 -->
  <select id="selectById" resultType="User">
    select <include refid="selectFields"></include>
    from user
    where id = #{id}
  </select>

  <select id="selectByName" resultType="User">
    select <include refid="selectFields"></include>
    from user
    where username = #{username}
  </select>

  <select id="selectByEmail" resultType="User">
    select <include refid="selectFields"></include>
    from user
    where email = #{email}
  </select>
	<!-- 利用parameterType声明传入参数类型,
  keyProperty用于指定主键在POJO中对应的属性名,需要配合数据库的自增主键来使用。-->
  <!-- #{username}用于从传入参数中获取username字段的值 -->
  <insert id="insertUser" parameterType="User" keyProperty="id">
    insert into user (<include refid="insertFields"></include>)
    values(#{username}, #{password}, #{salt}, #{email}, #{type}, #{status}, #{activationCode}, #{headerUrl}, #{createTime})
  </insert>

  <update id="updateStatus">
    update user set status = #{status} where id = #{id}
  </update>

  <update id="updateHeader">
    update user set header_url = #{headerUrl} where id = #{id}
  </update>

  <update id="updatePassword">
    update user set password = #{password} where id = #{id}
  </update>

</mapper>
注解
- 在编写MyBatis的Mapper接口时,可以用@Param注解为参数取别名,当方法只有一个参数时,并且该参数应用在上时,就必须用@Param注解为该参数取别名
Ref
SpringBoot
Spring Boot整合Mybatis配置文件
- 在Spring Boot中,已经内置了对多种连接池的支持,如HikariCP、Tomcat JDBC Connection Pool等。所以在Spring Boot环境中,可以通过DataSourceProperties对连接池进行配置。
# ServerProperties
server.port=8080
server.servlet.context-path=/community

# ThymeleafProperties
# close cache in development
spring.thymeleaf.cache=false

# DataSourceProperties
spring.datasource.driver-class-name=com.mysql.cj.jdbc.Driver
spring.datasource.url=jdbc:mysql://localhost:3306/community?characterEncoding=utf-8&useSSL=false&serverTime=Hongkong
spring.datasource.username=root
spring.datasource.password=***
# connect pool
spring.datasource.type=com.zaxxer.hikari.HikariDataSource
spring.datasource.hikari.maximum-pool-size=15
# Minimum idle connection
spring.datasource.hikari.minimum-idle=5
spring.datasource.hikari.idle-timeout=30000

# MybatisProperties
mybatis.mapper-locations=classpath:mapper/*.xml
mybatis.type-aliases-package=com.nowcoder.community.entity
mybatis.configuration.use-generated-keys=true
# header_url <==> headerUrl 🌟
# 带下划线的字段是数据库的字段,驼峰命名则是JavaEntity
mybatis.configuration.map-underscore-to-camel-case=true

# logger 日志级别,debug
# logging.level.com.nowcoder.community=debug


 被折叠的 条评论
为什么被折叠?
被折叠的 条评论
为什么被折叠?
 到【灌水乐园】发言


