


SpringMVC里面,所谓的数据绑定就是将请求带过来的表单数据绑定到执行方法的参数变量.
实际开发中,SpringMVC作为表现层框架,肯定会接受前台页面传递过来的参数,SpringMVC提供了丰富的接受参数的方法
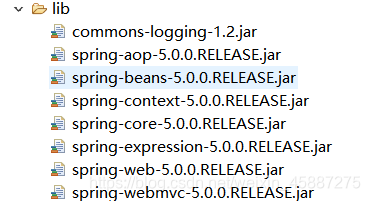
需要配置的jar包
web.xml配置
<?xml version="1.0" encoding="UTF-8"?>
<web-app xmlns:xsi="http://www.w3.org/2001/XMLSchema-instance" xmlns="http://xmlns.jcp.org/xml/ns/javaee" xsi:schemaLocation="http://xmlns.jcp.org/xml/ns/javaee http://xmlns.jcp.org/xml/ns/javaee/web-app_4_0.xsd" id="WebApp_ID" version="4.0">

	<!-- 设置请求参数字符编码过滤 -->
	<filter>
		<filter-name>CharacterEncodingFilter</filter-name>
		<filter-class>org.springframework.web.filter.CharacterEncodingFilter</filter-class>
		<init-param>
			<param-name>encoding</param-name>
			<param-value>UTF-8</param-value>
		</init-param>
	</filter>

	<filter-mapping>
		<filter-name>CharacterEncodingFilter</filter-name>
		<url-pattern>/*</url-pattern>
	</filter-mapping>


	<!-- 配置SpringMVC的前端控制器 (总控)
		之前所有请求,都访问Servlet
		现在:所有请求都要经过SpringMVC

	-->

	<servlet>
		<servlet-name>MVC</servlet-name>
		<servlet-class>org.springframework.web.servlet.DispatcherServlet</servlet-class>

		<!-- 初始化参数读取springmvc.xml配置文件 -->
		<init-param>
			<param-name>contextConfigLocation</param-name>
			<param-value>classpath:springmvc.xml</param-value>
		</init-param>

		<!-- 容器初始化启动时机,tomacat服务器启动就启动 -->
		<load-on-startup>1</load-on-startup>

	</servlet>

	<servlet-mapping>
		<servlet-name>MVC</servlet-name>
		<!--
			使用 通配符*+后缀
			如 : *.do(推荐),*.action *.mvc
		 -->

		<url-pattern>*.do</url-pattern>
	</servlet-mapping>

</web-app>
SpringMVC.xml配置
<?xml version="1.0" encoding="UTF-8"?>
<beans xmlns="http://www.springframework.org/schema/beans"
	xmlns:xsi="http://www.w3.org/2001/XMLSchema-instance"
	xmlns:mvc="http://www.springframework.org/schema/mvc"
	xmlns:context="http://www.springframework.org/schema/context"
	xsi:schemaLocation="http://www.springframework.org/schema/mvc http://www.springframework.org/schema/mvc/spring-mvc.xsd
		http://www.springframework.org/schema/beans http://www.springframework.org/schema/beans/spring-beans.xsd
		http://www.springframework.org/schema/context http://www.springframework.org/schema/context/spring-context.xsd">


	<!-- 配置Spring注解配置包扫描  -->
	<context:component-scan base-package="com.ywq.springmvc"/>

	<!-- 配置SpringMVC的注解驱动 -->
	<mvc:annotation-driven/>

	<!-- 处理静态资源,将静态资源处理交给Tomcat -->
	<mvc:default-servlet-handler/>

</beans>
<!-- 配置Spring注解配置包扫描  -->
<context:component-scan base-package="com.ywq.springmvc"/>

<!-- 配置SpringMVC的注解驱动 -->
<mvc:annotation-driven/>

<!-- 处理静态资源,将静态资源处理交给Tomcat -->
<mvc:default-servlet-handler/>
1.原始方式request.getParameter()
SpringMVC可以注入HttpServletRequest对象,直接使用getParameter参数接受
<!--  原始方式request.getParameter() -->
<fieldset>
	<legend> 原始方式request.getParameter()</legend>
	<form action="${pageContext.request.contextPath}/request/method1.do" method="get">
		账号: <input name="username"><br>
		年龄: <input name="age"><br>
		<button type="submit">提交</button>
	</form>
</fieldset>
/*
  *
  * @RequestMapping 请求注解,设置当前控制对应方法在浏览器访问的资源名称
  *
  * 协议+主机+端口+上下文路径+资源
  *
  * http://localhost:8080/springmvc/method1
  *
  * 属性说明
  *  value:设置当前方法在浏览器访问的资源名称
  *   如果只有一个value属性可以省略
  *  method:请求方法的设置
  *   GET:POST
  *   除了表单的post请求和ajax的post请求以外,其他都是get请求
  * params:参数限制
  * */
 /*
  *
  * 可以在控制器的方法中直接注入各种Web组件对象
  * HttpServletRequest 请求对象
  * HttpServletResponse 响应对象
  * HttpSession 会话对象
  * ServletContext 应用上下文对象
  *
  *
  *
  * */

@RequestMapping(value="/method1",method=RequestMethod.POST) //资源名称
public void method1(HttpServletRequest req,HttpServletResponse resp,HttpSession session) {
		 //原始方式request.getParameter()
	String username = req.getParameter("username");
	String age = req.getParameter("age");
	System.out.println(username);
	System.out.println(age);
}
2.方法形参与前台参数同名
在请求方法形参上,声明和表单字段名相同的参数名(可以自动同名匹配,然后进行封装)
<fieldset>
	<legend>方法形参与前台参数同名</legend>
	<form action="${pageContext.request.contextPath}/request/method2.do" method="post">
		账号: <input name="username"><br>
		年龄: <input name="age"><br>
		<button type="submit">提交</button>
	</form>
</fieldset>
//方法形参与前台参数同名
@RequestMapping(value="/method2",method=RequestMethod.POST)
public ModelAndView method2(String username,String age) {
	System.out.println(username);
	System.out.println(age);
	return null;
}
3.方法形参与前台参数不同名
<fieldset>
	<legend>方法形参与前台参数不同名</legend>
	<form action="${pageContext.request.contextPath}/request/method3.do" method="post">
		账号: <input name="name"><br>
		年龄: <input name="age"><br>
		<button type="submit">提交</button>
	</form>
</fieldset>
// 方法形参与前台参数不同同名
// 解决方案使用 : @RequestParam("前台表单对应的名")
@RequestMapping(value = "/method3", method = RequestMethod.POST)
public ModelAndView method3(@RequestParam("name") String username, String age) {
	System.out.println(username);
	System.out.println(age);
	return null;
}
4.接收数组
<fieldset>
	<legend>接收数组或集合</legend>
	<form action="${pageContext.request.contextPath}/request/method4.do" method="post">
		账号: <input name="name"><br>
		年龄: <input name="age"><br>
		爱好: <input type="checkbox" name="hobbys" value="java">java
		<input type="checkbox" name="hobbys" value="html">html<br>
		<button type="submit">提交</button>
	</form>
</fieldset>
// 接收数组
	@RequestMapping(value = "/method4", method = RequestMethod.POST)
	public ModelAndView method4(String[] hobbys) {
		System.out.println(Arrays.toString(hobbys));
		return null;
	}
5.对象传参
后台并不能直接接受集合参数,需要将集合设置到对应的JavaBean中,通过JavaBean接受集合参数
public class User {
	private String username;
	private String password;
	private String email;
	private String phone;
	private String[] hobby;
}
<fieldset>
	<legend>接受对象,表单参数名必须和后台pojo对象对应的属性名相同</legend>
	<form action="${pageContext.request.contextPath}/request/method5.do" method="get">
		账号: <input name="username"><br>
		密码: <input type="password" name="password"><br>
		邮箱: <input name="email"><br>
		电话: <input name="phone"><br>
		爱好:<input type="checkbox" name="hobby" value="java">java
		<input type="checkbox" name="hobby" value="C">C
		<input type="checkbox" name="hobby" value="C++">C++<br/>
		<button type="submit">提交</button>
	</form>
</fieldset>
// 对象传参->对象中有集合
	@RequestMapping(value = "/method5", method = RequestMethod.POST)
	public ModelAndView method4(User user) {
		System.out.println(user);
		return null;
	}
6.接受参数封装成Map集合
Map集合接受参数,自动把表单的参数名称做为key,把表单的值作为value封装到map集合中
缺点 :map集合只能接受单值的数据,因为map的key是唯一的,无法存储key相同,有多个值的数据
<fieldset>
	<legend>接受参数封装成Map集合</legend>
	<form action="${pageContext.request.contextPath}/request/method6.do" method="post">
		账号: <input name="username"><br>
		密码: <input name="password"><br>
		邮箱: <input name="email"><br>
		电话: <input name="phone"><br>
          <button type="submit">提交</button>
	</form>
</fieldset>
// 接受参数封装成Map集合
	@RequestMapping(value = "/method6", method = RequestMethod.POST)
	public ModelAndView method6(@RequestParam Map<String,Object> map) {
		System.out.println("map:"+map);
		return null;
	}
7.RESTful风格支持
    <a href="${pageContext.request.contextPath}/request/product1?id=13501568">
    <img border="1" src="${pageContext.request.contextPath}/lbw.jpg" width="200px">
    </a>

        <a href="${pageContext.request.contextPath}/request/product2/156151325.html">
    <img border="1" src="${pageContext.request.contextPath}/pdd.jpg" width="200px">
    </a>
@RequestMapping("/product1")
	public ModelAndView method1(Long id) {
		System.out.println("id:"+id);
		return null;

	}

	@RequestMapping("/product2/{productId}.html")
	public ModelAndView method2(@PathVariable("productId") Long id) {
		System.out.println("id:"+id);
		return null;

	}


 1万+
1万+

 被折叠的 条评论
为什么被折叠?
被折叠的 条评论
为什么被折叠?
 到【灌水乐园】发言


