


 本文详细介绍了Vue.js中的单页面应用(SPA)和路由机制。通过定义组件、配置路由、创建路由实例,展示了如何构建Vue路由并实现页面间的导航。同时,讲解了`render`函数的作用,以及`$mount`方法在Vue实例挂载中的应用。此外,还涉及到App.vue组件、各个子组件以及router/index.js的配置,强调了路由在页面跳转和组件复用中的核心作用。
SPA 单页面应用Single-Page Application
Vue路由:可以理解为页面跳转,标签导航,跳转到了一个组件,而这个页面包含了这个组件,所以就显示在了这个页面,或将组件显示在了你想要显示的地方。
如果是这样一个思路的话我们就可以
写若干个组件,然后用多个组件拼成一个页面,达到复用的目的。
总共需要5步(模块化机制编程)
1.定义路由组件
创建了3个组件Home,List,About,就是点进去显示的模板是什么样子。
当然多个页面还可以传值,移步vue组件,如:props,template
 const Home = { template: '<div>home</div>' }
 const List = { template: '<div>list</div>' }
 const About = { template: '<div>about</div>' }
2.定义路由
path路径,这里都是自定义的,与组件名对应。
component组件,这里就写组件名。
 const routes = [
   { path: '/home', component: Home },
   { path: '/list', component: List },
   { path: '/about', component: About }
 ]
3.创建a路由实例
创建a路由实例,与上面的routes对应上
  const a = new VueRouter({
    routes: routes
  })
4.创建和挂载根实例
挂载a路由到Vue根实例。
  const app = new Vue({
    router: a
  }).$mount('#app')
5.Vue路由实例内容
<!DOCTYPE html>
<html>
<head>
  <meta charset="utf-8">
  <script src="https://cdn.staticfile.org/vue/2.4.2/vue.min.js"></script>
  <script src="https://cdn.staticfile.org/vue-router/2.7.0/vue-router.min.js"></script>
  <title>路由</title>
</head>
<body>
<div id="app">
  <h1>Hello, Vue.js!</h1>
  <p>
    <!-- 使用 router-link 组件来导航. -->
    <!-- 通过传入 `to` 属性指定链接. -->
    <!-- <router-link> 默认会被渲染成一个 `<a>` 标签 -->
    <router-link to="/home">Home</router-link>
    <router-link to="/list">List</router-link>
    <router-link to="/about">About</router-link>
  </p>
  <!-- 路由出口 -->
  <!-- 路由匹配到的组件将渲染在这里 -->
  <router-view></router-view>
</div>

<script>
  // 0. 如果使用模块化机制编程,導入Vue和VueRouter,要调用 Vue.use(VueRouter)

  // 1. 定义(路由)组件。
  // 可以从其他文件 import 进来
  const Home = { template: '<div>home</div>' }
  const List= { template: '<div>list</div>' }
  const About = { template: '<div>about</div>' }

  // 2. 定义路由
  // 每个路由应该映射一个组件。 其中"component" 可以是
  // 通过 Vue.extend() 创建的组件构造器,
  // 或者,只是一个组件配置对象。
  // 我们晚点再讨论嵌套路由。
  const routes = [
    { path: '/home', component: Home },
    { path: '/list', component: List }
    { path: '/about', component: About },
  ]

  // 3. 创建 router 实例,然后传 `routes` 配置
  // 你还可以传别的配置参数, 不过先这么简单着吧。
  const a = new VueRouter({
    routes: routes
  })

  // 4. 创建和挂载根实例。
  // 记得要通过 router 配置参数注入路由,
  // 从而让整个应用都有路由功能
  const app = new Vue({
    router: a
  }).$mount('#app')

  // 现在,应用已经启动了!
</script>
</body>
</html>
反推回去再过一遍:
页面加载后,创建Vue实例叫app,id="app"的div就被vue监管了,然后vue发现里面有一个路由a实例,名字是routes,然后通过routes又找到了路由下面的三个路径,/home,/list,/about然后当点击每个路由都加载组件template中的内容。
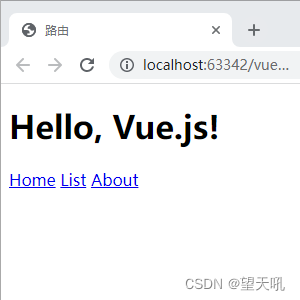
出来就是这个样子
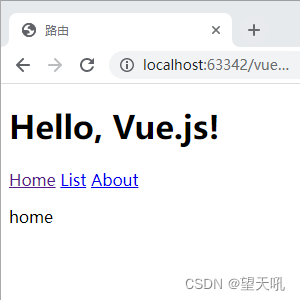
点进去就是这样
然而
真正的Vue创建的框架应该这样写
先说main.js
// 导入Vue对象
import Vue from 'vue'
// 导入App.vue组件,.vue可省略不写
import App from './App.vue'
// 导入router目录下所有路由
import a from './router'

// 阻止启动生产消息(启动时console多显示一条信息)
Vue.config.productionTip = false

// 创建Vue实例
new Vue({
  // 配置router,完整写法router : a
  router: a,
  render: h => h(App)
}).$mount('#app') // 挂载id='app'
render: h => h(App)啥意思
是下面内容的缩写
render: function (createElement) {
    return createElement(App);
进一步缩写为(ES6 语法):
render (createElement) {
    return createElement(App);
再进一步缩写为:
render (h){
    return h(App);
}
按照 ES6 箭头函数的写法,就得到了:
render: h => h(App)
render是啥?
Vue 推荐在绝大多数情况下使用 template 来创建你的 HTML。然而在一些场景中,你真的需要 JavaScript的完全编程的能力,这就是 render 函数,它比 template 更接近编译器。
Vue 通过建立一个虚拟 DOM 对真实 DOM 发生的变化保持追踪。 render函数提供了一个参数createElement(可以简写为h),用来生成DOM,其有三个参数:
第一个参数:{String | Object | Function},必要参数,一个HTML标签字符串,组件选项对象,或者一个返回值类型为 String/Object 的函数。
第二个参数:{Object},可选参数,一个包含模板相关属性的数据对象,这样,您可以在 template 中使用这些属性。
第三个参数:{String | Array},可选参数,子节点 (VNodes),由createElement()构建而成,或使用字符串来生成“文本节点”。
个人理解:createElement 函数是用来生成 HTML DOM 元素的,也就是上文中的 generate HTML structures,也就是 Hyperscript,这样作者才把 createElement 简写成 h。
.$mount(‘#app’)啥意思
在Vue构造函数时,需要配置一个el属性,如果没有没有el属性时,可以使用.$mount(‘#app’)进行挂载。
配置了el属性:
new Vue({
 el:"#app",
 router: a
});
如果没有配置el属性,可以使用手动挂载$mount(“#app”)
new Vue({
  router: a,
  render: h => h(App)
}).$mount('#app')
基本上就是这个意思
再说App.vue
它其实就是首页啊,进来的时候直接就访问这页,也可以设置成登录页,或者挂一些组件。
App.vue
<template>
  <div id="app">
    <nav>
      <router-link to="/home">主页</router-link> |
      <router-link to="/list">列表</router-link> |
      <router-link to="/about">关于</router-link>
    </nav>
    <router-view/>
  </div>
</template>

<style>
#app {
  font-family: Avenir, Helvetica, Arial, sans-serif;
  -webkit-font-smoothing: antialiased;
  -moz-osx-font-smoothing: grayscale;
  text-align: center;
  color: #2c3e50;
}

nav {
  padding: 30px;
}

nav a {
  text-decoration-line: none;
  font-weight: bold;
  color: #2c3e50;
}

nav a.router-link-exact-active {
  text-decoration-line: none;
  color: #40b783;
}
</style>
样式就不多说了,里面配置了三个路由,就好像是页面跳转,但是页面并没有跳转,而是把组件显示在了<router-view/>这个位置
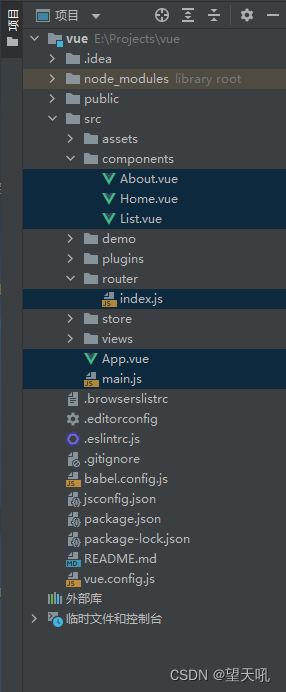
然后说components/Home,List,About
然后我就写了3个Vue组件,Vue组件模板里面写上相关文字。
Home.vue主页
<template>
  <div>
    Home
  </div>
</template>

<script>
export default {
  // eslint-disable-next-line vue/multi-word-component-names
  name: 'Home'
}
</script>

<style scoped>

</style>
List.vue列表
<template>
  <div>
    List
  </div>
</template>

<script>
export default {
  // eslint-disable-next-line vue/multi-word-component-names
  name: 'List'
}
</script>

<style scoped>

</style>
About.vue关于
<template>
  <div>
    About
  </div>
</template>

<script>
export default {
  // eslint-disable-next-line vue/multi-word-component-names
  name: 'About'
}
</script>

<style scoped>

</style>
最后说router/index.js
前端和组件都弄好了,接下来最重要的就是路由了
1.引入Vue根实例
2.引入Router组件
3.引入components组件
4.定义路由
5.创建和挂载a路由实例
用Home举例
path对应的就是App.vue里面<router-link to="/home">,
name对应的就是components/Home.vue里面的name: 'Home'
component对应的就是组件的名字Home
import Vue from 'vue'
import Router from 'vue-router'
import Home from '../components/Home.vue'
import List from '../components/List.vue'
import About from '../components/About.vue'

Vue.use(Router)

const routes = [
  {
    path: '/home',
    name: 'Home',
    component: Home
  },
  {
    path: '/list',
    name: 'List',
    component: List
  },
  {
    path: '/about',
    name: 'About',
    component: About
  }
]

const router = new Router({
  routes
})

export default router


 457
457

 被折叠的 条评论
为什么被折叠?
被折叠的 条评论
为什么被折叠?
 到【灌水乐园】发言


