


目录
一、进程和线程的基本认识
1.进程的基本认识
进程是一个具有一定独立功能的程序在一个数据集上的一次动态执行的过程,是操作系统进行资源分配和调度的一个独立单位,独占内存空间,保持各自的运行状态,相互之间互不干扰,进程是并发执行程序在执行过程资源分配和管理的基本单位,是应用程序运行的载体。
2.线程的基本认识
在程序执行某一个任务时,此任务被称作线程,线程有时候被称为轻量级的进程,它是一个程序执行的最小单位,一个进程可以拥有多个线程,多个线程之间共享进程的地址空间以及一些进程级别的其他资源但是各个线程拥有自己的栈空间。
二、线程的创建
1.继承Thread类
- 继承Thread类,重写run方法
class MyThread extends Thread{
    @Override
    public void run() {
        System.out.println("hello world");
    }
}
public class TestDemo1 {
    public static void main(String[] args) throws Exception {
      Thread thread = new MyThread();//实例化线程对象
      thread.start();//启动线程
   }
}- 实现Runnable接口,重写run()方法
class MyRunnable implements Runnable{
    @Override
    public void run() {
        System.out.println("implemnts Runnable to get a thread");
    }
}
public class TestDemo{
   public static void main(String[] args) throws Exception {
    Thread thread = new Thread(new MyRunnable());//线程对象
        thread.start();//启动线程
    }
}- 匿名线程,匿名类
public class TestDemo1 {
    public static void main(String[] args) throws Exception {
new Thread("watchTv"){
     @Override
     public void run() {
         System.out.println("watch TV");
     }
 }.start();
   }
}- 实现Callable接口,重写call()方法
class MyCallable implements Callable <Integer>{
@Override
public Integer call() throws Exception {
int sum=0;
for (int i=0;i<10000;i++){
sum+=i;
}
return sum;
}
}
public class TestDemo1 {
public static void main(String[] args) throws Exception {
Callable<Integer> callable=new MyCallable();
FutureTask<Integer> task=new FutureTask<>(callable);
//创建线程
Thread thread=new Thread(task);
thread.start();
Integer result = task.get();
System.out.println(result);
}
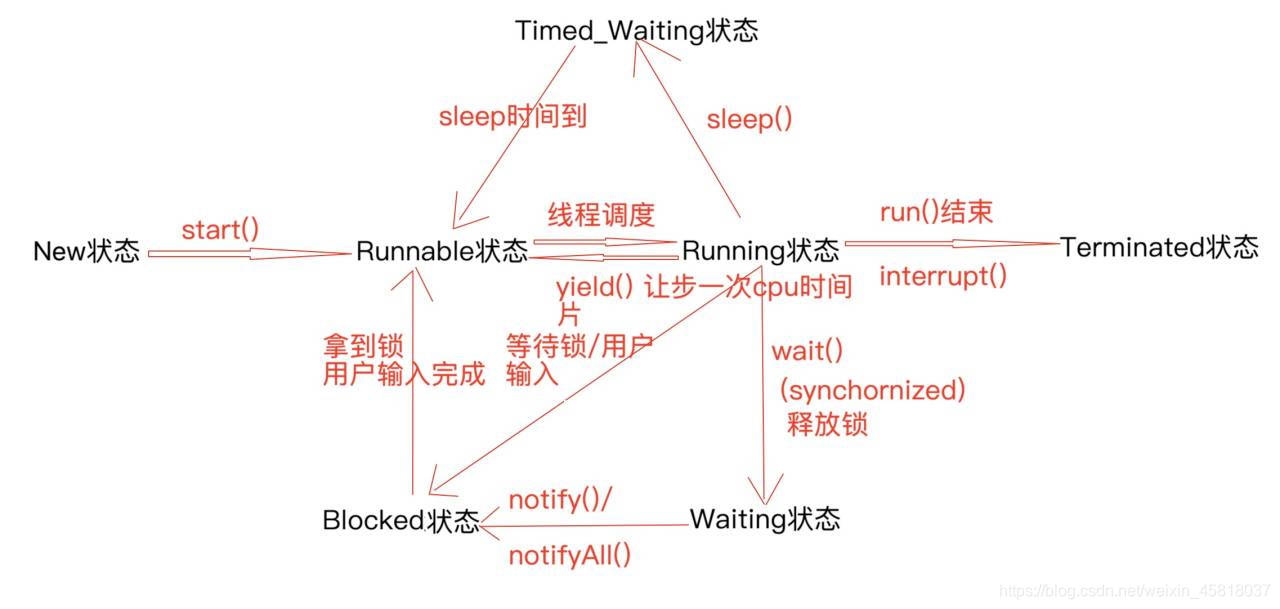
}三、线程的六状态
生命周期:
NEW (新建状态): new Thread() 创建线程对象
RUNNABLE(就绪状态) :线程对象此时调用start方法,此时在JVM进程中创建了一个线程 线程并不是一经创建就直接得到执行,需要等到操作系统的其他资源.
BLOCKED(阻塞状态):等到一个监视器锁进入到同步代码块或者同步方法中,代码块/ 方法某一个时刻只允许一个线程去执行,其他线程只能等待,这种情况下的等待的线程会从 RUNNABLE状态转换到BLOCKED状态 Object.wait()
WAITING(等待状态):调用Object.wait()/join()/LockSupport.park()等方法 此时线程从RUNNABLE状态装换到WAITING状态 TIMD_WAITING(睡眠状态):调用带超时参数的Thread.sleep(long millis)/Object.wait(long timeout)/ join(long millis)/LockSupport.parkNanos()/LockSupport.parkUnit()等方法都会使的当前线程进入到 TIMD_WAITING状态
TERMINATED(终止状态):是线程的最终状态
六种状态的关系图
四、线程中常用的方法
1.start() 用来启动一个线程 将其添加到线程组当中 此时线程处于Runnable状态
2.sleep() sleep方法使得当按线程指定毫秒级得休眠,暂停执行 不会放弃monitor锁得使用权 TineUnit对sleep进行了封装,省去了时间单位换算步骤
  //sleep()使用
    new Thread(){
        @Override
        public void run() {
            try {
                Thread.sleep(5000);
                System.out.println("子线程运行结束");
            } catch (InterruptedException e) {
                e.printStackTrace();
            }
        }
    }.start();
    try {
        Thread.sleep(200);
        System.out.println("主线程运行结束");
    } catch (InterruptedException e) {
        e.printStackTrace();
    }
}
3.yield() 属于启发式方法 线程A.yield() 会提醒调度器 线程A愿意放弃本次CPU资源,如果CPU资源不紧张得情况下, 处理器会忽略这种提示
/**
 * yield方法
 *
 */
public class YieldMethod {
    class MyThread extends Thread {
        @Override
        public void run() {

            long beginTime=System.currentTimeMillis();
            int count=0;
            for(int i=0;i<50000000;i++){
                count = count+(i+1);
                Thread.yield();
            }
            long endTime=System.currentTimeMillis();
            System.out.println("用时:"+(endTime-beginTime)+"(ms)");

        }
    }
    public static void main(String[] args) {
        Thread t1=new YieldMethod().new MyThread();
        t1.start();
    }
}
4.join() 含义:thread B中调用了thread A.join() ,此时thread B进入到等待状态 直到当前thread A结束自己生命周期或者达到join方法的超时时间
 //join()使用
 //t1 输出
 Thread t1=new Thread("t1") {
     @Override
     public void run() {
         for (int i = 0; i < 10; i
             System.out.println("t
         }
         try {
             TimeUnit.MILLISECONDS
         } catch (InterruptedExcep
             e.printStackTrace();
         }
     }
 };
 t1.start();
 //t2 输出
 Thread t2 = new Thread("t2") {
     @Override
     public void run() {
         try {
             t1.join();
         } catch (InterruptedExcep
             e.printStackTrace();
         }
         for (int i = 0; i < 10; i
             System.out.println("t
         }
         try {
             TimeUnit.MILLISECONDS
         } catch (InterruptedExcep
         }
     }
 };
 t2.start();
 //主线程输出
 try {
     t2.join();
     for (int i = 0; i < 10; i++)
         System.out.println("threa
     }
 } catch (InterruptedException e)
     e.printStackTrace();
 }
5.实现线程中断的方法
- interrupt() 将Java线程当中的终止状态位置为true Thread A :sleep()/join()/wait() throw InterruptedException e 可中断方法 以上方法都会使得当前进入阻塞状态,另外一个线程调用被阻塞线程interrupt 打断当前的这种阻塞状态,抛出一个InterruptedException的异常,这样的可中断方法 并不是结束当前被阻塞的线程的生命周期,只是打断了当前线程的阻塞状态 Thread B :thread A对象.interrupt()
- b.isInterrupted() 判断中断状态位是否为true
- interrupted() 判断中断状态位是否为true 区别在于interrupted()调用之后会擦除线程interrupt标识
//interrupt使用
Thread thread=new Thread(){
    @Override
    public void run() {
        try {
            TimeUnit.SECONDS.sleep(1);
        } catch (InterruptedException e) {
            System.out.println("I am be interrupted !");
        }
    }
};
thread.start();
try {
    TimeUnit.MILLISECONDS.sleep(100);
} catch (InterruptedException e) {
    e.printStackTrace();
}
thread.interrupt();

//interrupted使用
  Thread thread=  new  Thread(){
            @Override
            public void run() {
                while (true){

                }
            }
        };
        thread.start();
        try {
            TimeUnit.MILLISECONDS.sleep(2);
        } catch (InterruptedException e) {
            e.printStackTrace();
        }
        System.out.println(thread.isInterrupted());
        thread.interrupt();
        System.out.println(thread.isInterrupted());
6. wait/notify/notifyAll
wait 调用该synchornized同步代码块或方法当中,使得当前线程进入阻塞状态
otify/notifyAll唤醒当前的阻塞


 4062
4062

 被折叠的 条评论
为什么被折叠?
被折叠的 条评论
为什么被折叠?
 到【灌水乐园】发言


