


 本文详细介绍了如何在Linux集群上运行Hadoop MapReduce程序,包括源程序修改、jar包打包、集群启动及执行wordcount程序。同时,深入探讨了Hadoop序列化的优势和Writable接口的实现,展示了如何对bean对象进行序列化,以及在MapReduce中统计手机号流量的案例。
MapReduce集群运行
之前的wordcount是在本地运行的,本地模式。利用的是hadoop的jar包。
如果用linux集群应该怎么做?
1. 修改源程序
需要加入插件
<build>
        <plugins>
            <plugin>
                <artifactId>maven-compiler-plugin</artifactId>
                <version>3.6.1</version>
                <configuration>
                    <source>1.8</source>
                    <target>1.8</target>
                </configuration>
            </plugin>
            <plugin>
                <artifactId>maven-assembly-plugin</artifactId>
                <configuration>
                    <descriptorRefs>
                        <descriptorRef>jar-with-dependencies</descriptorRef>
                    </descriptorRefs>
                </configuration>
                <executions>
                    <execution>
                        <id>make-assembly</id>
                        <phase>package</phase>
                        <goals>
                            <goal>single</goal>
                        </goals>
                    </execution>
                </executions>
            </plugin>
        </plugins>
    </build>
 		//设置输入路径输出路径
        //args[0] 表示传进来的第一个参数
        FileInputFormat.setInputPaths(job, new Path(args[0]));
        //args[1] 表示传进来的第二个参数
        FileOutputFormat.setOutputPath(job, new Path(args[1]));
2. 将程序打成jar包

3. 修改jar包名字
修改不带依赖的jar包名称为wc.jar,并拷贝该jar包到Hadoop集群的/opt/module/hadoop-3.1.3路径
4. 启动Hadoop集群
sbin/start-dfs.sh
sbin/start-yarn.sh
5. 执行wordcount程序
hadoop jar wc.jar com.atguigu.mapreduce.wordcount.WordCountDriver /user/atguigu/input /user/atguigu/output
这里的WordCountDriver是全类名
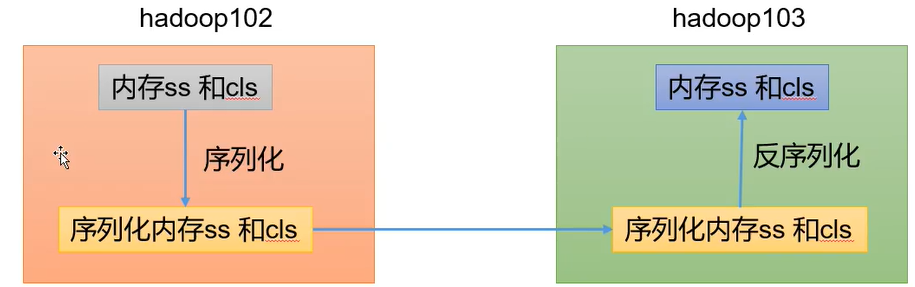
序列化
1. 序列化概述
- 为什么不用Java自带的 Serializable 序列化框架呢?
Serializable会加各种校验信息/头/继承体系。
Serializable是重量级的
- 使用Hadoop自己的序列化的原因
只需要加个简单校验即可,结构紧凑,存储空间少。传送快速,不像Serializable需要加很多东西;互操作性:支持多语言的使用。
2. Writable接口中实现序列化
write 序列化
readFields 反序列化
Hadoop的序列化,轻量级!传输快!
但这里的Hadoop Writable类型,并不满足企业需求,如bean.
具体实现bean对象序列化的步骤分为以下步骤:
3. 实现bean对象序列化
在企业开发中往往常用的基本序列化类型不能满足所有需求,比如在Hadoop框架内部传递一个bean对象,那么该对象就需要实现序列化接口。
具体实现bean对象序列化步骤如下7步。
(1)必须实现Writable接口
(2)反序列化时,需要反射调用空参构造函数,所以必须有空参构造
public FlowBean() {
	super();
}
(3)重写序列化方法
@Override
public void write(DataOutput out) throws IOException {
	out.writeLong(upFlow);
	out.writeLong(downFlow);
	out.writeLong(sumFlow);
(4)重写反序列化方法
@Override
public void readFields(DataInput in) throws IOException {
	upFlow = in.readLong();
	downFlow = in.readLong();
	sumFlow = in.readLong();
}
(5)注意反序列化的顺序和序列化的顺序完全一致
(6)要想把结果显示在文件中,需要重写toString(),可用"\t"分开,方便后续用。
(7)如果需要将自定义的bean放在key中传输,则还需要实现Comparable接口,因为MapReduce框中的Shuffle过程要求对key必须能排序。详见后面排序案例。
@Override
public int compareTo(FlowBean o) {
	// 倒序排列,从大到小
	return this.sumFlow > o.getSumFlow() ? -1 : 1;
}
之前写MapReduce的wordcount案例时,那个Map的<key,val,key,val> 的第二个key其实是默认支持排序的,当时我们用的Text,里面就实现了comparable接口
4. 序列化案例实操
统计每一个手机号耗费的总上行流量、总下行流量、总流量
重点关注:
- 输入是什么类型
- 输出是什么类型
Map阶段
-
读取一行数据,切分字段
-
抽取手机号、上行流量、下行流量
-
以手机号为key,bean对象为value输出,即context.write(手机号,bean)
-
bean对象要想能够传输,必须实现序列化接口
Reduce阶段
累加上行流量和下行流量得到总流量
phone_data文件的数据
1	13736230513	192.196.100.1	www.atguigu.com	2481	24681	200
2	13846544121	192.196.100.2			264	0	200
3 	13956435636	192.196.100.3			132	1512	200
4 	13966251146	192.168.100.1			240	0	404
5 	18271575951	192.168.100.2	www.atguigu.com	1527	2106	200
6 	84188413	192.168.100.3	www.atguigu.com	4116	1432	200
7 	13590439668	192.168.100.4			1116	954	200
8 	15910133277	192.168.100.5	www.hao123.com	3156	2936	200
9 	13729199489	192.168.100.6			240	0	200
10 	13630577991	192.168.100.7	www.shouhu.com	6960	690	200
11 	15043685818	192.168.100.8	www.baidu.com	3659	3538	200
12 	15959002129	192.168.100.9	www.atguigu.com	1938	180	500
13 	13560439638	192.168.100.10			918	4938	200
14 	13470253144	192.168.100.11			180	180	200
15 	13682846555	192.168.100.12	www.qq.com	1938	2910	200
16 	13992314666	192.168.100.13	www.gaga.com	3008	3720	200
17 	13509468723	192.168.100.14	www.qinghua.com	7335	110349	404
18 	18390173782	192.168.100.15	www.sogou.com	9531	2412	200
19 	13975057813	192.168.100.16	www.baidu.com	11058	48243	200
20 	13768778790	192.168.100.17			120	120	200
21 	13568436656	192.168.100.18	www.alibaba.com	2481	24681	200
22 	13568436656	192.168.100.19			1116	954	200
目的:统计这份文件的上行流量,下行流量以及总流量。
1.FlowBean的编写
package com.atguigu.mapreduce.writable;

import org.apache.hadoop.io.Writable;

import java.io.DataInput;
import java.io.DataOutput;
import java.io.IOException;

/**
 * 1.定义类实现writable接口
 * 2.重写序列化和反序列化方法
 * 3.重写空参构造
 * 4.tostring方法
 * @author:whd
 * @createTime: 2021/11/12
 */
public class FlowBean implements Writable {


    //上行流量
    private long upFlow;
    //下行流量
    private long downFlow;
    //总流量
    private long sumFlow;

    //空参构造,用于反序列化
    public FlowBean() {
    }

    //序列化
    @Override
    public void write(DataOutput out) throws IOException {
        //序列化顺序定了,反序列化的顺序就必须一致
        out.writeLong(upFlow);
        out.writeLong(downFlow);
        out.writeLong(sumFlow);

    }

    //反序列化
    @Override
    public void readFields(DataInput in) throws IOException {
        this.upFlow = in.readLong();
        this.downFlow = in.readLong();
        this.sumFlow = in.readLong();
    }

    //重写toString方法
    @Override
    public String toString() {
        return upFlow +"\t" + downFlow + "\t" + sumFlow;
    }

    public long getUpFlow() {
        return upFlow;
    }

    public void setUpFlow(long upFlow) {
        this.upFlow = upFlow;
    }

    public long getDownFlow() {
        return downFlow;
    }

    public void setDownFlow(long downFlow) {
        this.downFlow = downFlow;
    }

    public long getSumFlow() {
        return sumFlow;
    }

    public void setSumFlow(long sumFlow) {
        this.sumFlow = sumFlow;
    }

    public void setSumFlow() {
        this.sumFlow = this.upFlow+this.downFlow;
    }
}
2.编写Mapper
package com.atguigu.mapreduce.writable;import org.apache.hadoop.io.LongWritable;import org.apache.hadoop.io.Text;import org.apache.hadoop.mapreduce.Mapper;import java.io.IOException;/** * @author:whd * @createTime: 2021/11/12 */public class FlowMapper extends Mapper<LongWritable, Text,Text,FlowBean> { private Text outK = new Text(); private FlowBean outV= new FlowBean(); @Override protected void map(LongWritable key, Text value, Mapper<LongWritable, Text, Text, FlowBean>.Context context) throws IOException, InterruptedException { //1.获取一行 String line = value.toString(); //2.进行切割 String[] split = line.split("\t"); //3.抓取数据 //手机号 String phone = split[1]; //从后往前取 //上行流量 int len = split.length; String up = split[len - 3]; String down = split[len - 2]; //4.封装 outK.set(phone); outV.setUpFlow(Long.parseLong(up)); outV.setDownFlow(Long.parseLong(down)); //方法自动计算了,需要写在up,down设置完之后再加 outV.setSumFlow(); //5.写出 context.write(outK,outV); }}
3.编写Reduce
package com.atguigu.mapreduce.writable;import org.apache.hadoop.io.Text;import org.apache.hadoop.mapreduce.Reducer;import java.io.IOException;/** * @author:whd * @createTime: 2021/11/12 */public class FlowReduce extends Reducer<Text,FlowBean,Text,FlowBean> { //outValue private FlowBean outV = new FlowBean(); @Override protected void reduce(Text key, Iterable<FlowBean> values, Reducer<Text, FlowBean, Text, FlowBean>.Context context) throws IOException, InterruptedException { //1.遍历集合累加值 long totalUp = 0; long totalDown = 0; for (FlowBean value : values) { totalUp += value.getUpFlow(); totalDown += value.getDownFlow(); } //2.封装outK,outV outV.setUpFlow(totalUp); outV.setDownFlow(totalDown); outV.setSumFlow(); //3.写出 context.write(key,outV); }}
4. 编写Driver
输入路径和输出路径需要自行修改。
package com.atguigu.mapreduce.writable;import org.apache.hadoop.conf.Configuration;import org.apache.hadoop.fs.Path;import org.apache.hadoop.io.Text;import org.apache.hadoop.mapreduce.Job;import org.apache.hadoop.mapreduce.lib.input.FileInputFormat;import org.apache.hadoop.mapreduce.lib.output.FileOutputFormat;import java.io.IOException;/** * 驱动代码 * @author:whd * @createTime: 2021/11/12 */public class FlowDriver { public static void main(String[] args) throws IOException, InterruptedException, ClassNotFoundException { //1.获取job Configuration conf = new Configuration(); Job job = Job.getInstance(conf); //2.设置jar job.setJarByClass(FlowDriver.class); //3.关联mapper Reducer job.setMapperClass(FlowMapper.class); job.setReducerClass(FlowReduce.class); //4.设置mapper 输出key和value类型 job.setMapOutputKeyClass(Text.class); job.setMapOutputValueClass(FlowBean.class); //5.设置最终数据输出的key和value类型 job.setOutputKeyClass(Text.class); job.setOutputValueClass(FlowBean.class); //6.设置数据的输入路径和输出路径 FileInputFormat.setInputPaths(job, new Path("F:\\01centos\\资料\\11_input\\inputflow")); FileOutputFormat.setOutputPath(job, new Path("F:\\hadoopDemo\\output2")); //7.提交Job,true打印的日志信息更多 boolean result = job.waitForCompletion(true); System.exit(result ? 0 : 1); }}
MapReduce框架原理
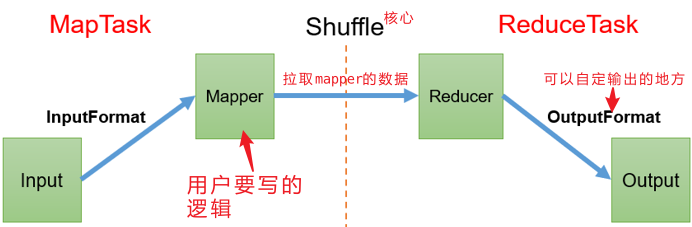
3.1 InputFormat数据输入
MapTask个数,决定了我的并行度。相互之间不进行信息的交换。
MapTask并不是越多越好,开启MapTask有前置工作。那么多少合适?
- 数据块:Block是HDFS物理上把数据分成一块一块。数据块是HDFS存储数据单位。
- 数据切片:数据切片只是在逻辑上对输入进行分片,并不会在磁盘上将其切分成片进行存储。数据切片是MapReduce程序计算输入数据的单位,一个切片会对应启动一个MapTask
数组切片与MapTask并行度决定机制
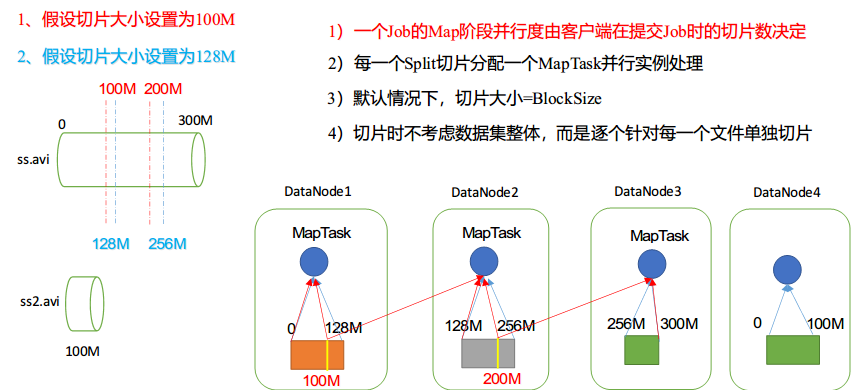
默认情况下,切片大小 = 块大小
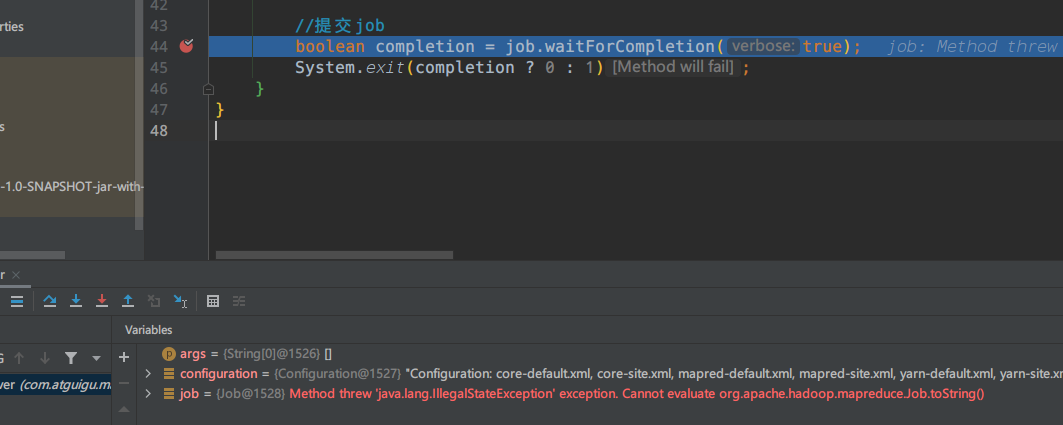
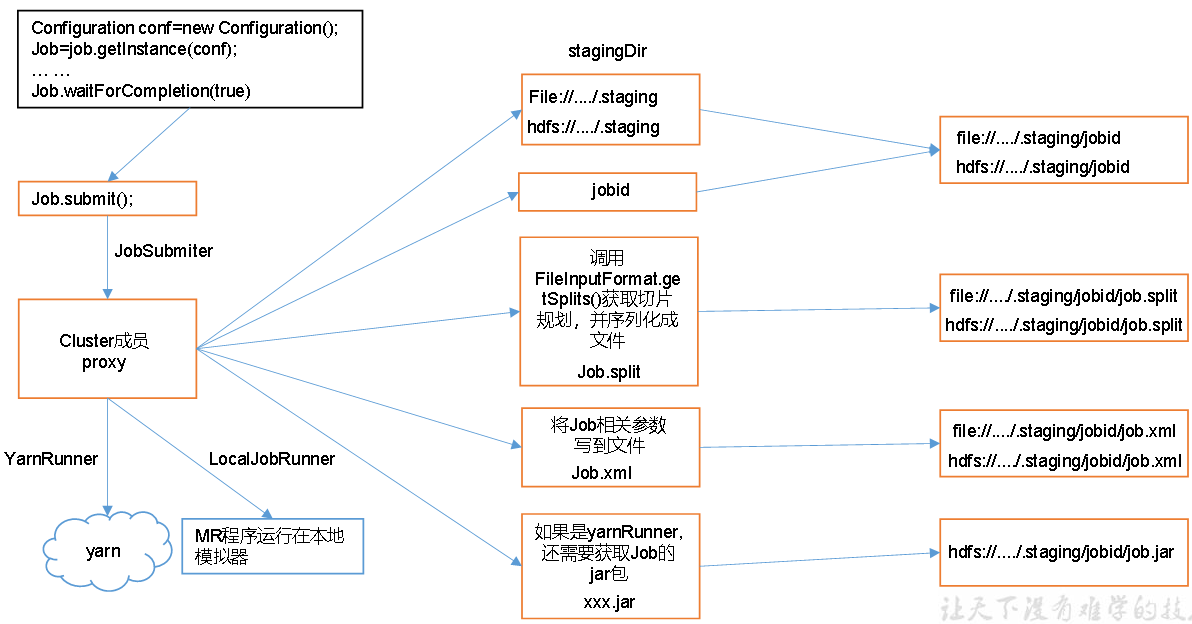
job提交流程源码
以下分析过程是我自己跟进一步步截图分析的,如果有些地方有误,欢迎指出改正。
在此处打断点,这里是提交的入口,debug运行
boolean completion = job.waitForCompletion(true);
断点停在此处
点击强制进入
我们接下来要看的提交,打个断点

在submit处强制进入
提前打好断点,以免手快跳出
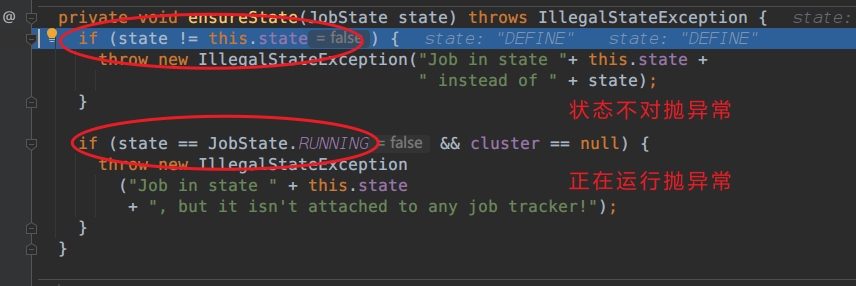
ensureState(JobState.DEFINE); 确保你的状态是对的
强制进入看一眼
跳出
接下来进入到 setUseNewAPI();
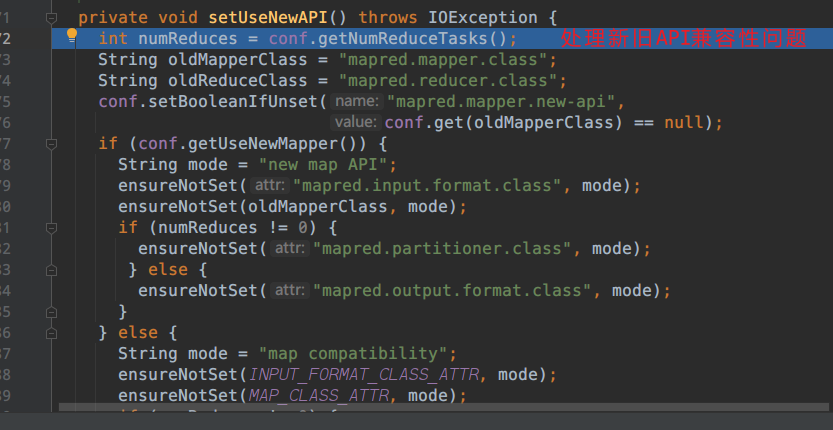
Hadoop1.x和Hadoop2.x的兼容性处理
yarn客户端和本地客户端的问题
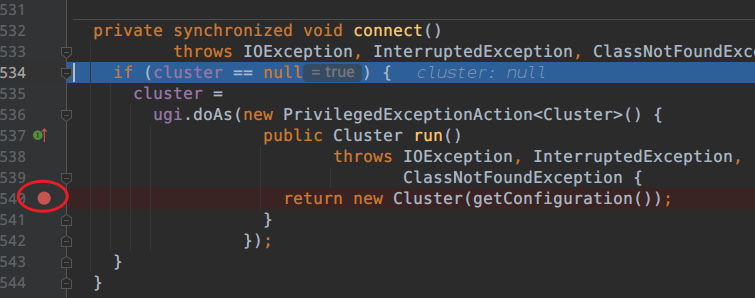
跳出,接下来进入到connect();
现在的代码是本地模式,跟集群没有关系。那么这里连接的其实是本地的客户端。
进入发现。
进入Cluster.class
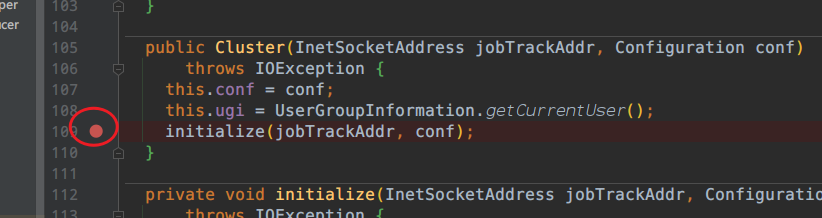
初始化处断点
进入initialize(jobTrackAddr, conf);
执行下去发现

yarn和local客户端
我们在本地运行就用到了local客户端
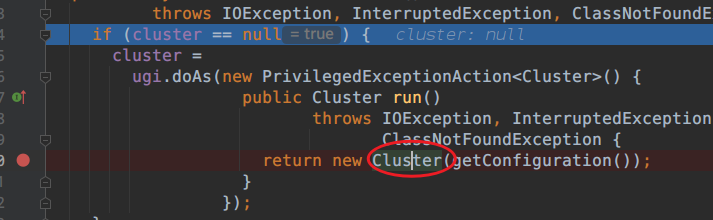
跳出这些,回到最初的地方:
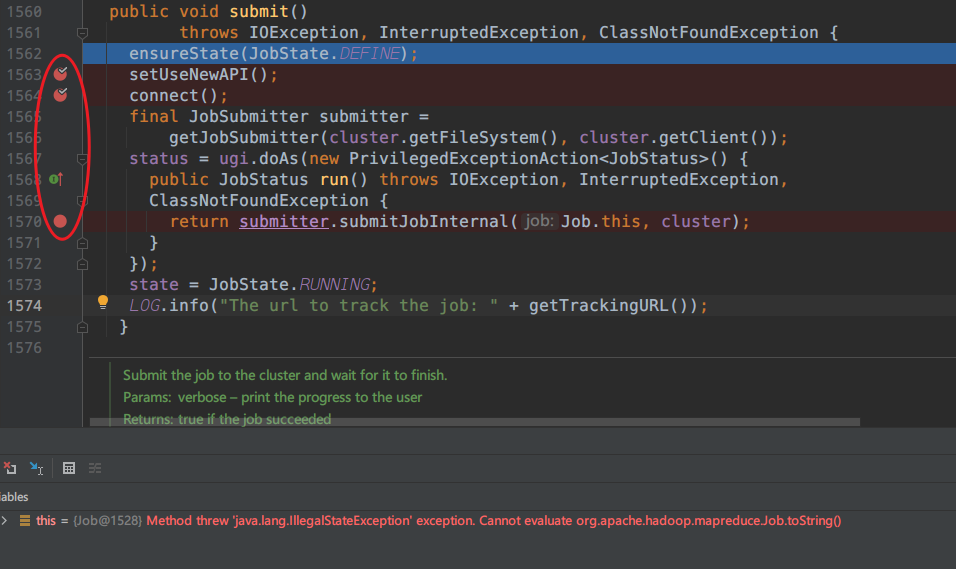
public void submit() throws IOException, InterruptedException, ClassNotFoundException { ensureState(JobState.DEFINE); setUseNewAPI(); connect(); final JobSubmitter submitter = getJobSubmitter(cluster.getFileSystem(), cluster.getClient()); status = ugi.doAs(new PrivilegedExceptionAction<JobStatus>() { public JobStatus run() throws IOException, InterruptedException, ClassNotFoundException { return submitter.submitJobInternal(Job.this, cluster); } }); state = JobState.RUNNING; LOG.info("The url to track the job: " + getTrackingURL()); }
核心代码:
return submitter.submitJobInternal(Job.this, cluster);
进入这里面,第一下进入的是job.this
再进一次,才是正确的地方。
打上断点
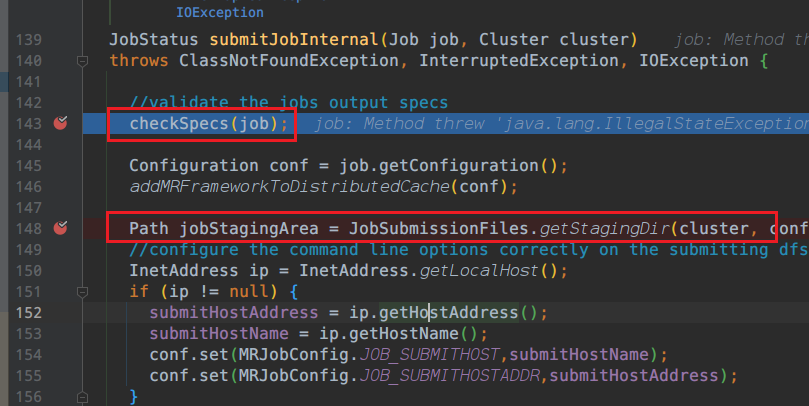
进去看一下干了什么事情
进入这里
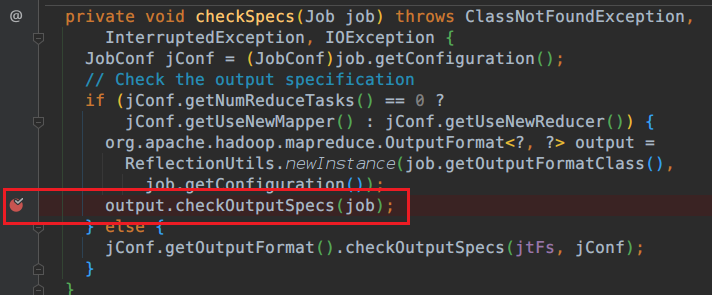
里面代码是关于输出路径,和判断路径是否存在?路径是否存在?
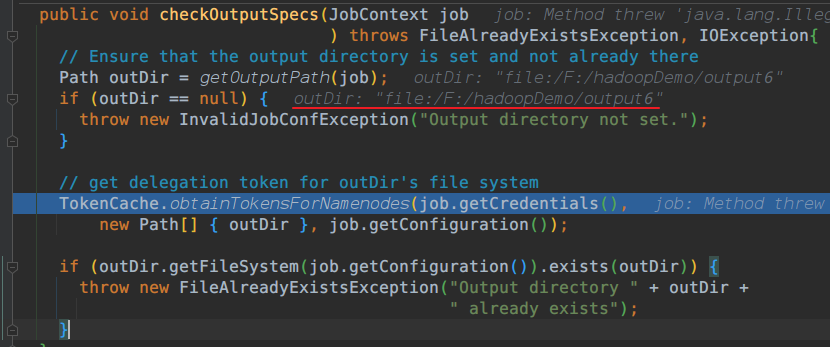
回到submitJobInternal
继续往下走
Path jobStagingArea = JobSubmissionFiles.getStagingDir(cluster, conf);
这句代码提交的是

找到发现F:\tmp\hadoop\mapred\staging\Administrator476294551\.staging
路径下确实有这个文件
这是一个临时路径,目前是空的
继续走
到
JobID jobId = submitClient.getNewJobID(); job.setJobID(jobId);
给你创建了一个jobId
job_local476294551_0001
提交每个任务都会有一个独一无二的jobId
执行到
JobID jobId = submitClient.getNewJobID(); job.setJobID(jobId); Path submitJobDir = new Path(jobStagingArea, jobId.toString()); JobStatus status = null;
处,发现给你创建了一个路径
file:/tmp/hadoop/mapred/staging/Administrator476294551/.staging/job_local476294551_0001
在下面有这么两行代码需要重点关注
copyAndConfigureFiles(job, submitJobDir); Path submitJobFile = JobSubmissionFiles.getJobConfPath(submitJobDir);

继续进入
进入到这
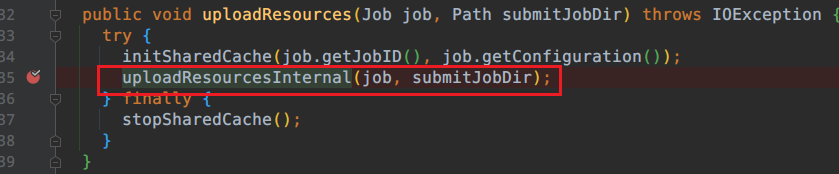
继续进入到uploadResourcesInternal方法中
发现有一句代码
mkdirs(jtFs, submitJobDir, mapredSysPerms);
然后在本地就出现了一个路径
F:\tmp\hadoop\mapred\staging\Administrator476294551\.staging\job_local476294551_0001
到这里,uploadFiles方法,向集群提交东西。如果我们搭建在集群上去上传,这里就应该用的是集群的jar包,目前是本地模式,里面的jobjar实际就在本地。
uploadFiles(job, files, submitJobDir, mapredSysPerms, replication, fileSCUploadPolicies, statCache); uploadLibJars(job, libjars, submitJobDir, mapredSysPerms, replication, fileSCUploadPolicies, statCache); uploadArchives(job, archives, submitJobDir, mapredSysPerms, replication, archiveSCUploadPolicies, statCache); uploadJobJar(job, jobJar, submitJobDir, replication, statCache); addLog4jToDistributedCache(job, submitJobDir);
这里就是说明一件事,提交内容的时候,如果你是本地模式,不会提交jar包,但是如果是集群模式,它是会提交的。
跳出,回到jobSubmitter
int maps = writeSplits(job, submitJobDir);
这句代码一定要打好断点
切片,这里是重要的点
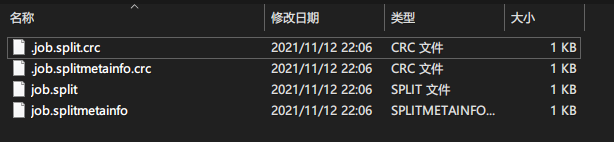
跳到下一句
文件中立即就出现了四个切片
conf.setInt(MRJobConfig.NUM_MAPS, maps);
这句代码设置了切片的个数
其中MRJobConfig.NUM_MAPS
实际上是 public static final String NUM_MAPS = "mapreduce.job.maps";
切片个数决定了你未来mapTask的个数
继续往下走
到writeConf(conf, submitJobFile);
跳过这句后,文件就会多了一个 job.xml

一共提交三样东西 split切片信息 ,xml,jar包
然后state标记为running
return isSuccessful()输出success
这就是整个提交流程


 被折叠的 条评论
为什么被折叠?
被折叠的 条评论
为什么被折叠?
 到【灌水乐园】发言


