


Ng查漏补缺
- 1、什么是反向代理
- 2、nginx详解(基础)
- 3、nginx常用的参数说明(重要)
- 4、基本命令
- 5、nginx进阶
- 6、nginx在實際開發中的使用例子
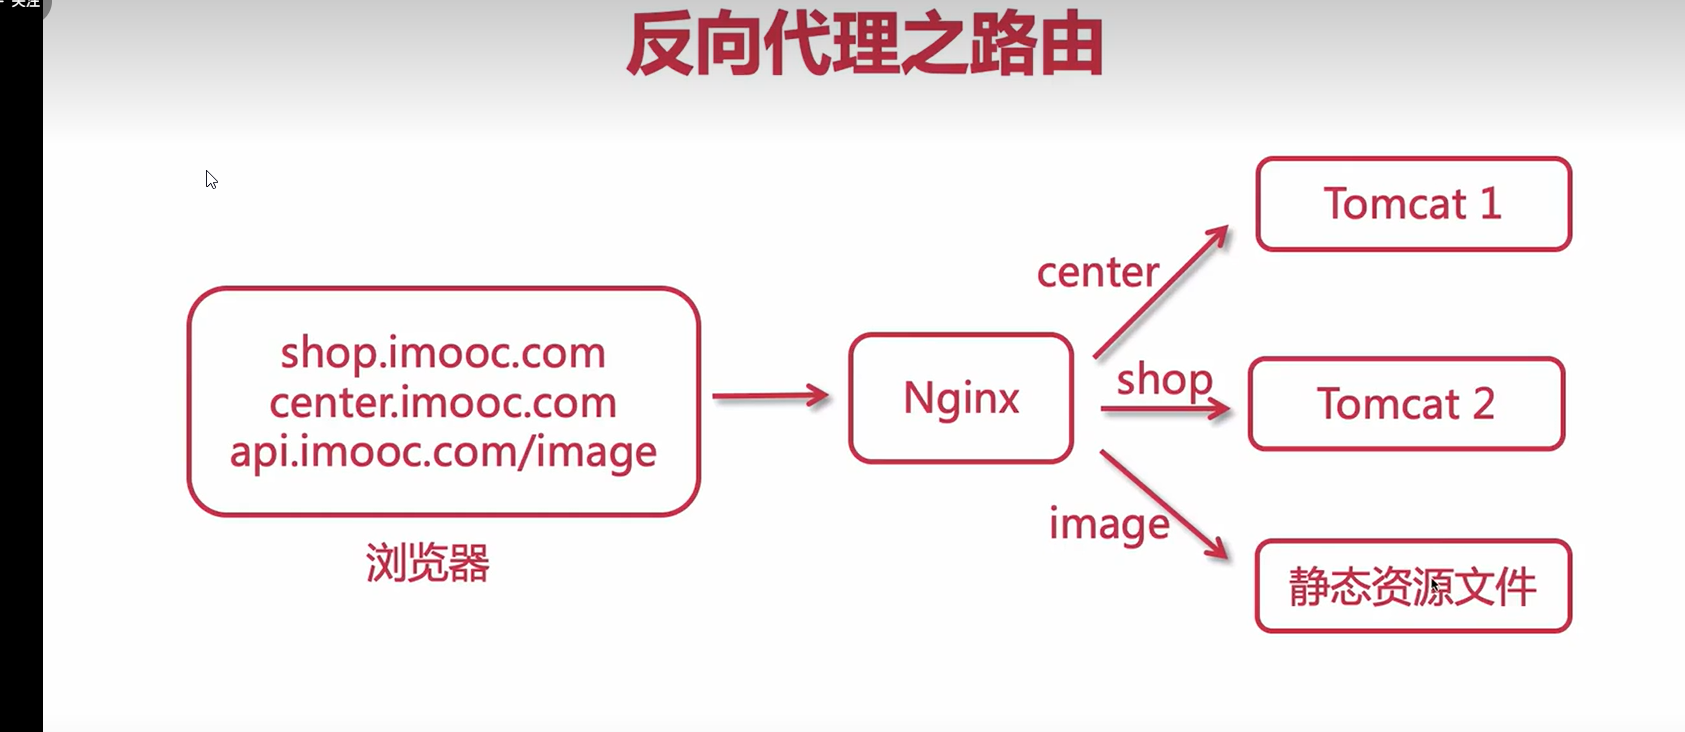
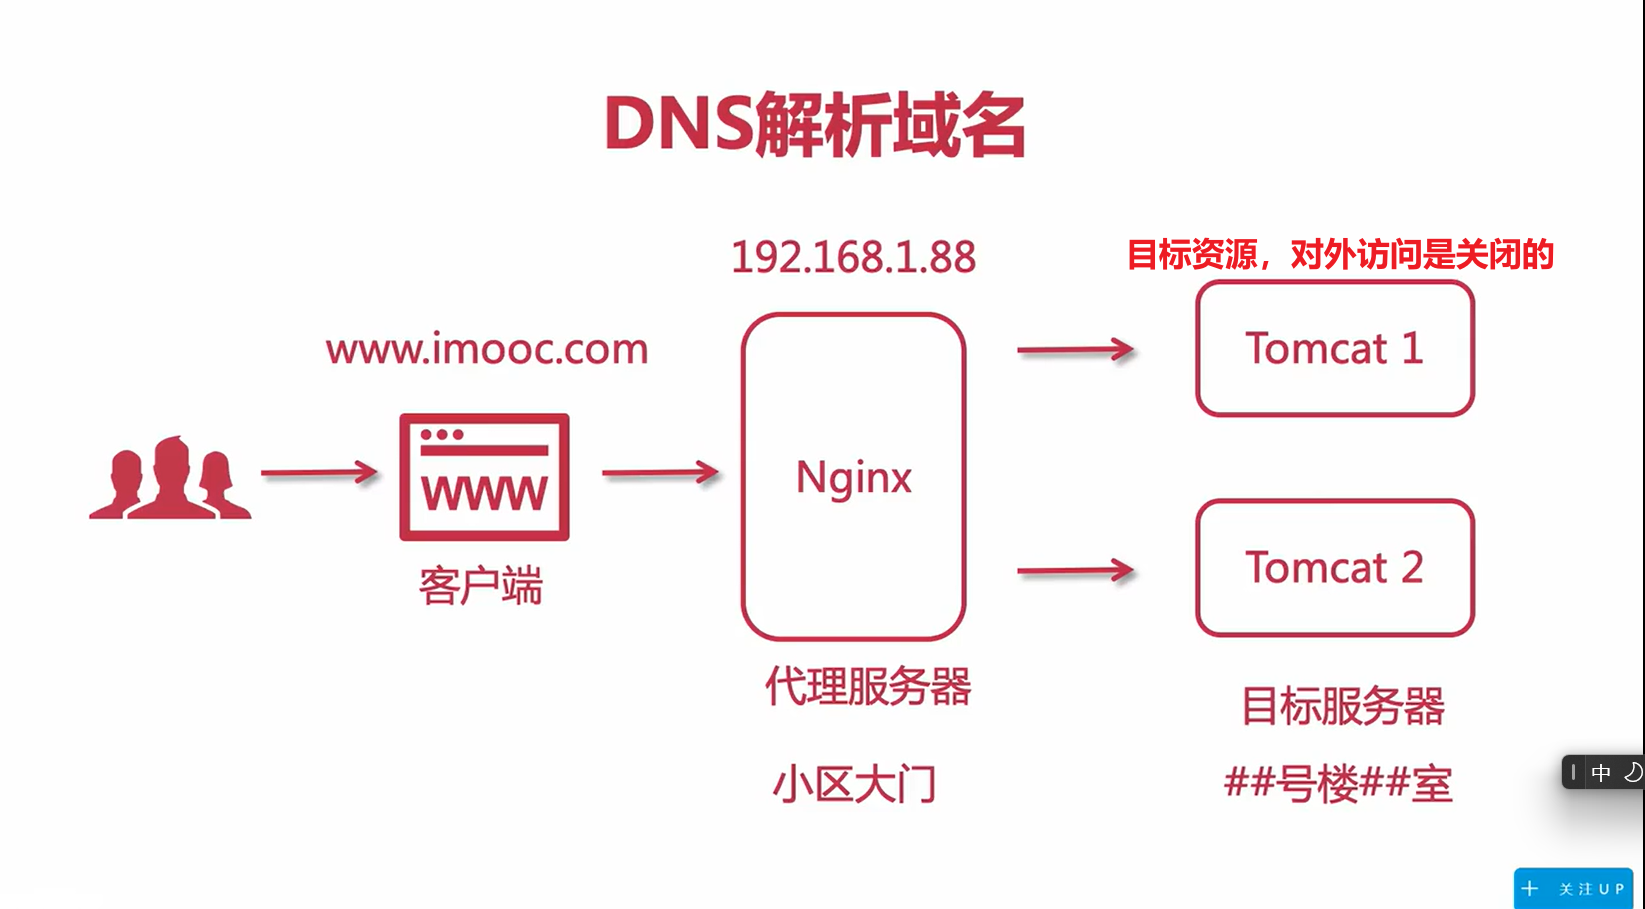
1、什么是反向代理
用户请求目标服务器,是由代理服务器决定访问哪个ip
2、nginx详解(基础)
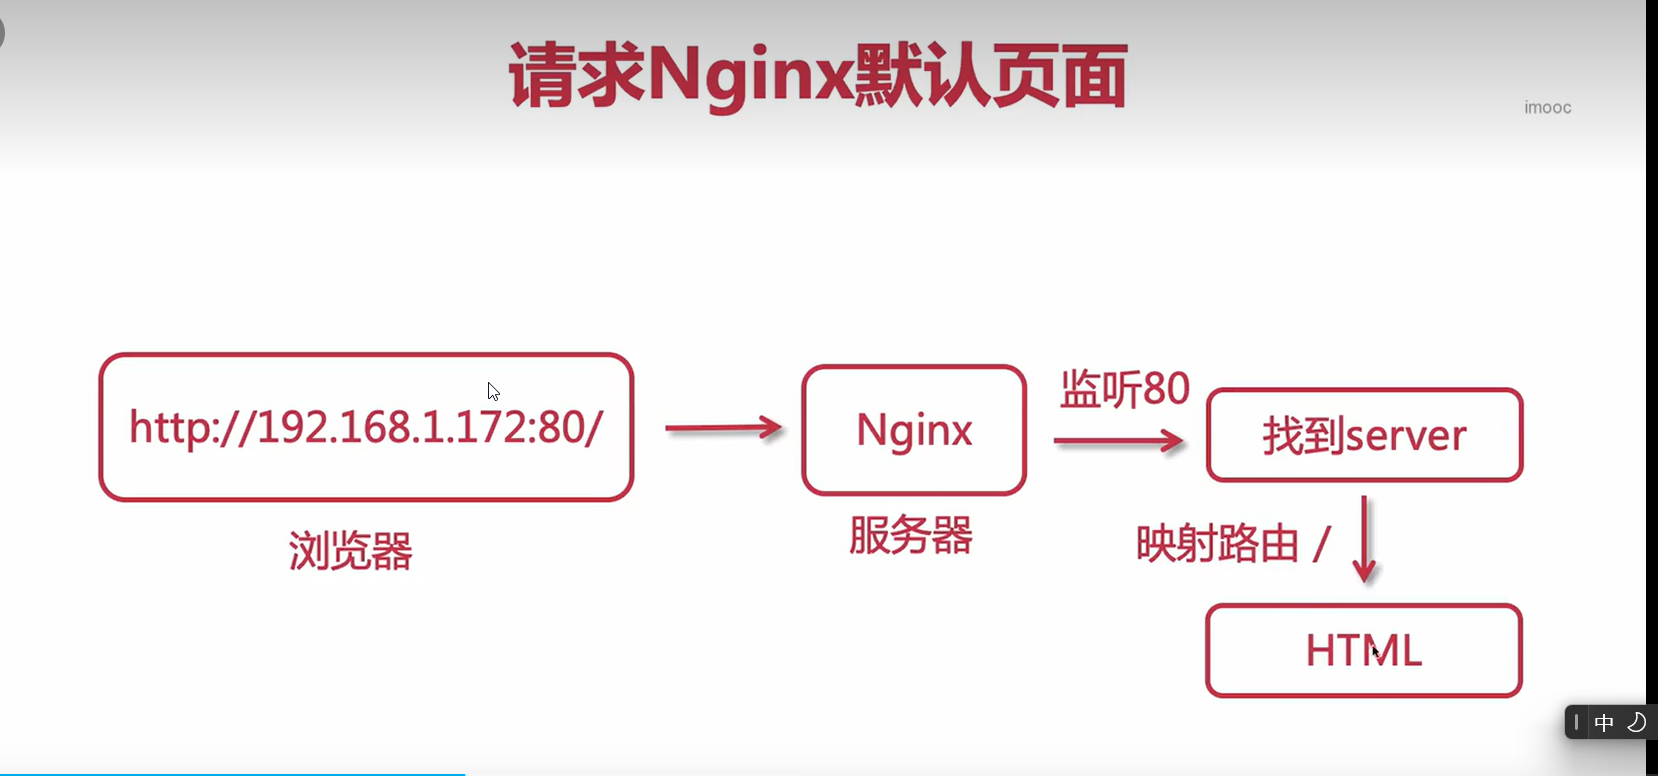
2.1访问服务器时,nginx执行流程
2.2 server配置解析【重要】
2.2.1 标准的配置例子
/**
	其实phpstudy设置多个域名的原理就是设置多个server配置块(使用nginx的前提)
**/

//每一个server就表示每一个请求转发的处理
server #网站配置区域
{
   listen 80;     #默认监听80端口
   server_name www.lulu.com;    #该配置对应的访问域名,即你访问这个域名才会使用到本块server配置)——(host文件上指定ip映射的域名)
   #同一个ip可以映射多个不同的域名,相应的的就可以使用多个server配置来解析不同地址的文件资源

    //只要是请求根目录及其以下的请求(即http://example.com/、http://example.com/about.html),都会运用这个配置去访问指定的资源
    location / {
            root html;
            #指向访问根目录(这里html是相对路径,即默认网站根目录为:/usr/local/nginx/html)
            index index.thml index.htm;  #配置默认首页(index),只要这个目录有index.html就会默认打开
    }
    error_page 500 502 503 504  /50x.html;    #出现对应http状态码时,使用50x.html回应客户
    location = /50x.thml {
    root    html;     #指定对应目录
    }
}
2.2.2 location的匹配规则解析(例子默认使用80端口)
/ ** 精准匹配(=) ** /
location = / {    #只在访问根域名www.example.com会转发
	root html;
	index imooc.html index.htm;
}

//当浏览器访问www.example.com/imooc/img/face.png
//能够读取这张图片的资源,则图片的路径是/imooc/img/face.png
location = /imooc/img/face.png{
	root /home;  //指定使用/home路径来当作解析文件的根路径
}

/ ** 正则表达式(~* / ~) ** /
说明:*代表不区分大小写

//不区分大小写的正则匹配,匹配所有的.png文件
location ~* \.png$ {
    root /home/images;
}

//只要访问的域名符合"\.(GIF|png|bmp|jpg|jpeg)"的规则,就会被映射到/home/images里面
location ~* \.(GIF|png|bmp|jpg|jpeg){
	root /home/images
}


/ ** 以某个字符路径开头请求(^~) ** /
location ^~ /imooc/img{
	root /home/images
}
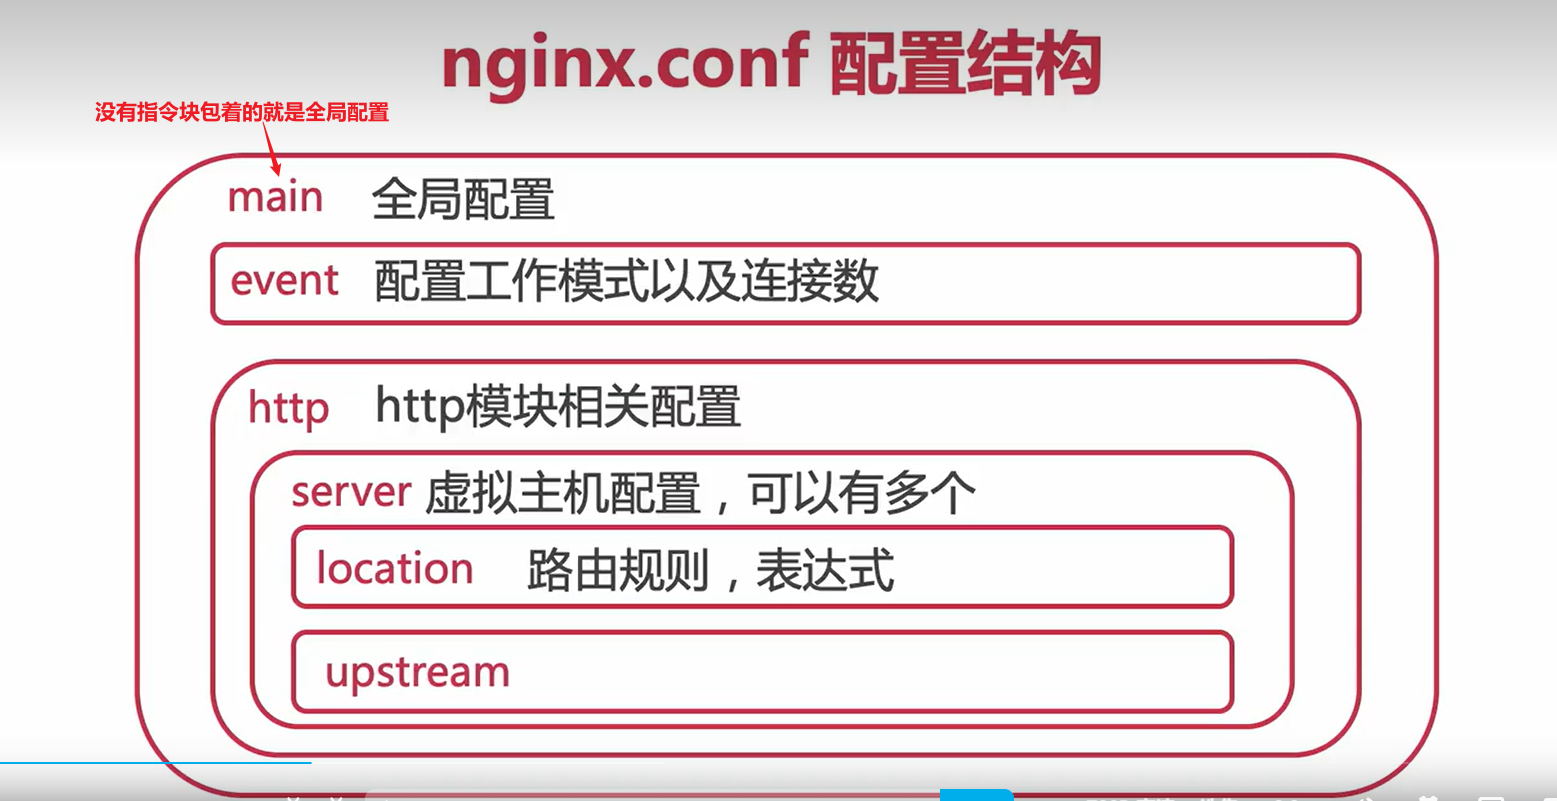
2.3 nginx.conf 配置结构
注意整个配置可以直接include来导入

//直接在全局配置那里include server的所有配置(抽离出来)
include server.config
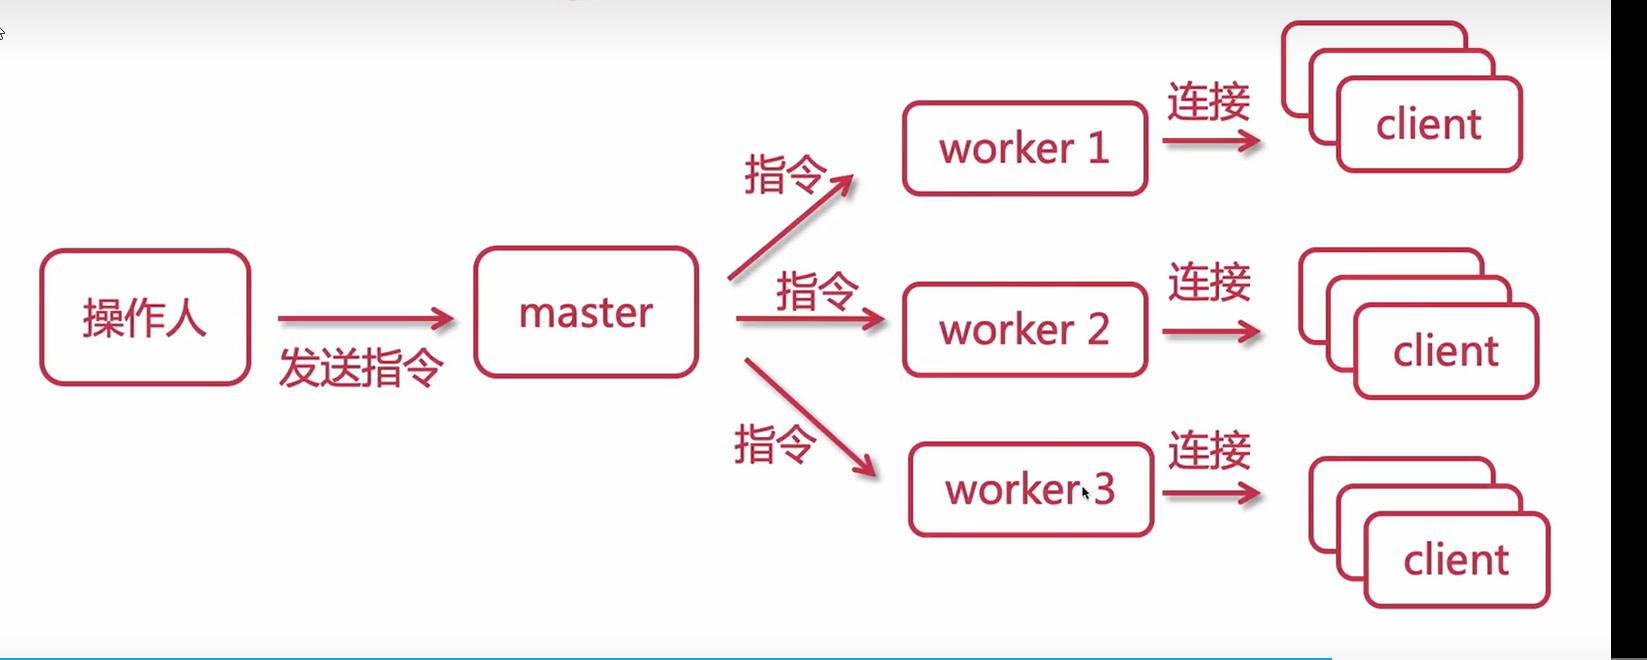
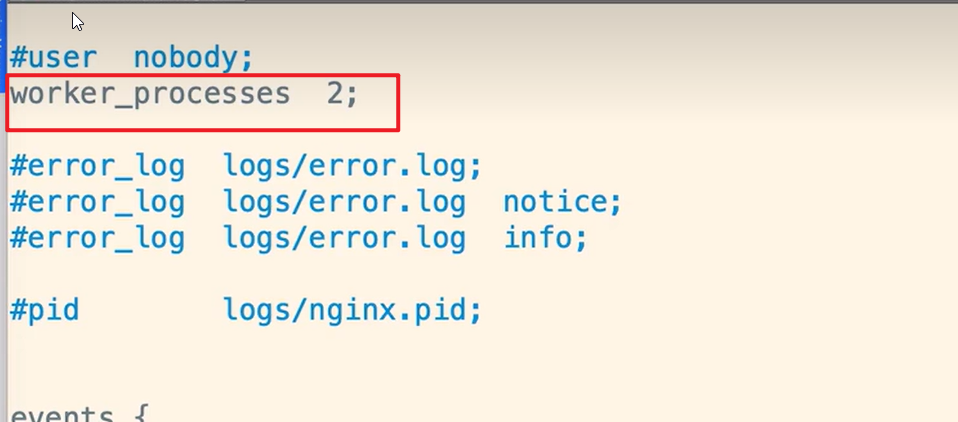
2.4 nginx的进程模型
- master进程:主进程
- worker进程:工作进程
每一个worker是一个独立的进程,不同worker之间相互独立互不影响
对应配置:
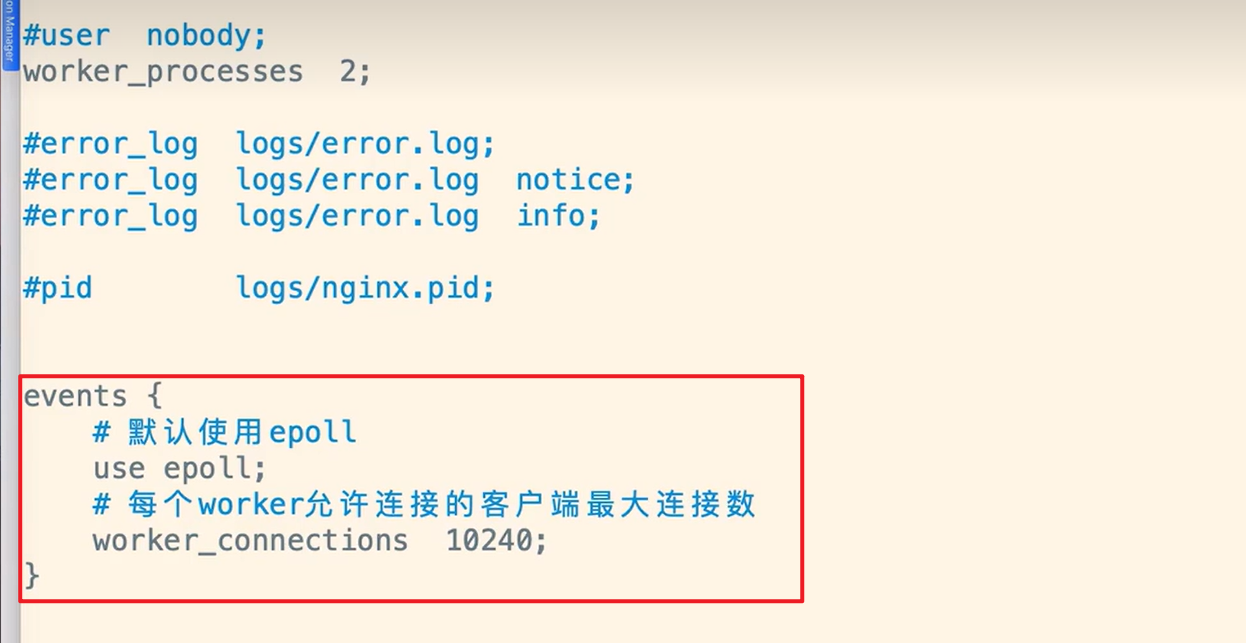
2.5 nginx事件处理
多路复用模式: 是一个非阻塞异步的事件处理机制,所以一个worker可以不用等待某个client处理完之后就处理下一个client的请求

对应配置:
2.6 DNS解析域名【重要】
本地模拟DNS域名解析的功能就是使用host文件来配置ip地址到端口的映射
并且hosts 文件的解析优先级高于 DNS 解析
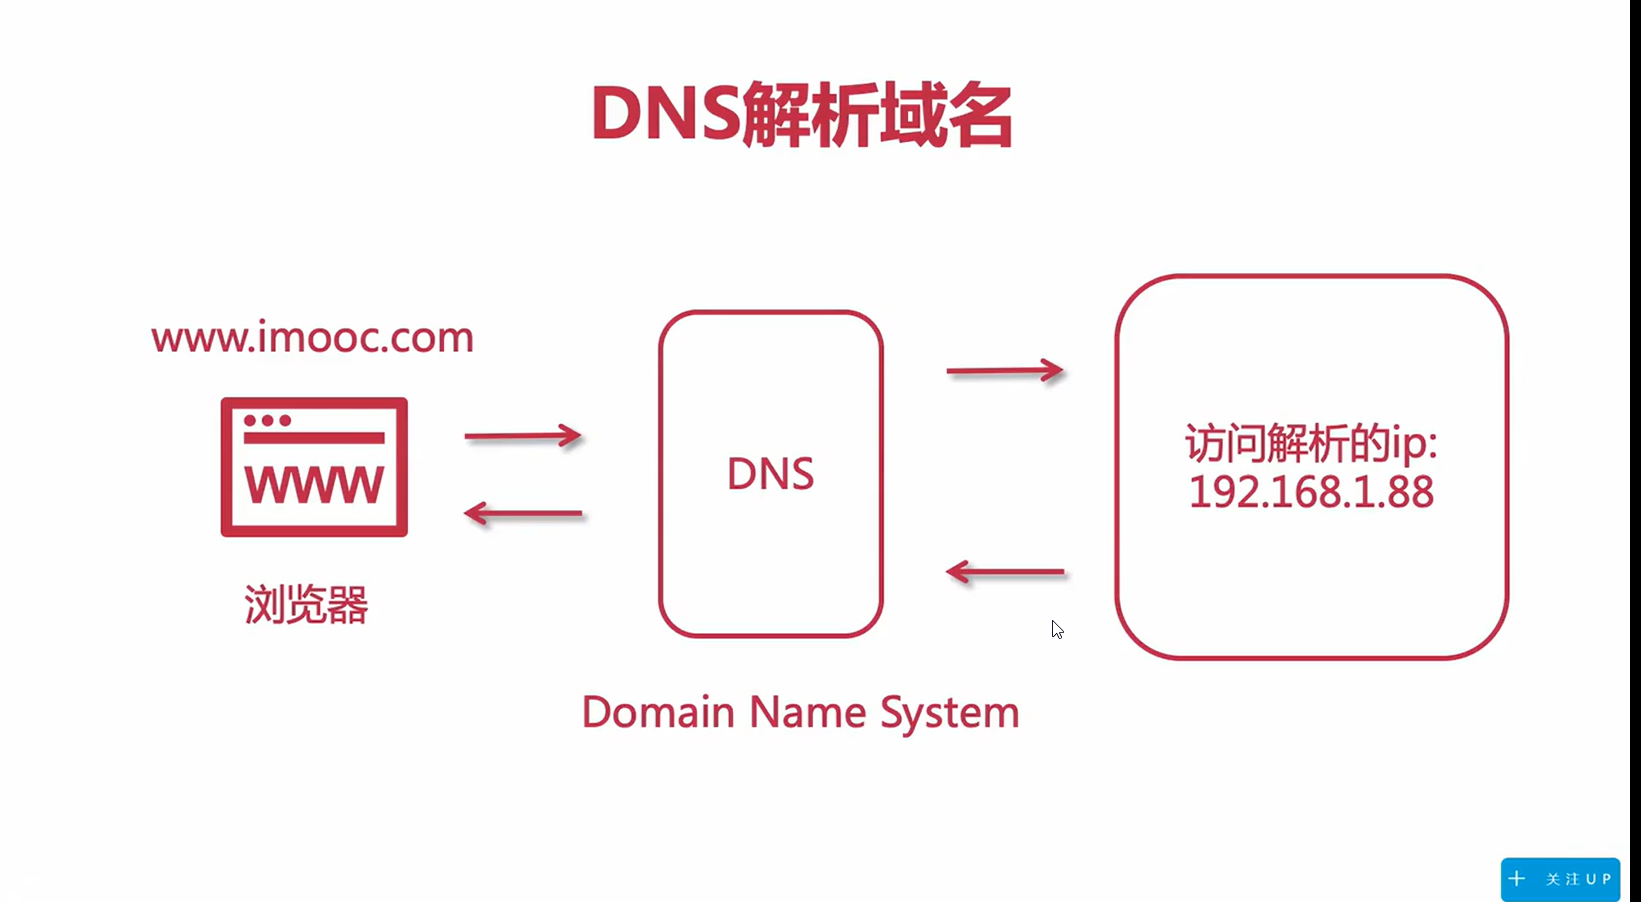
用户请求后端的一个过程
2.7 Nginx的跨域
标准情况下,在www.imooc.com这个域名对应的服务器下是不允许访问别的服务器上的接口或资源
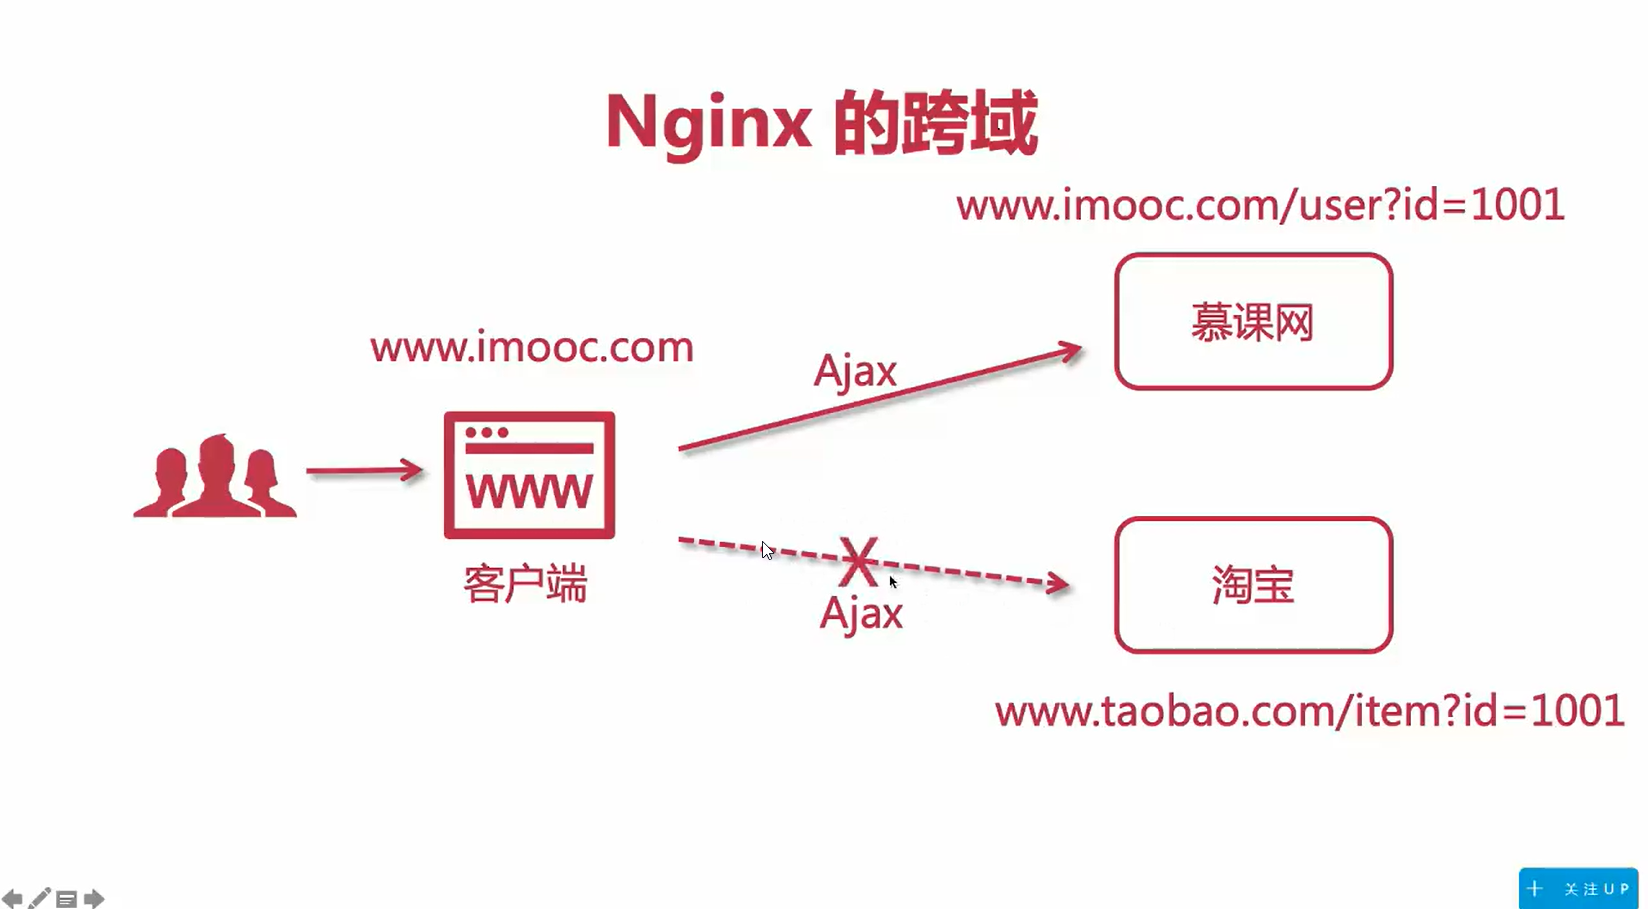
设置响应头(Request headers),解决跨域问题(可以后端加配置,可以nginx实现)
-
Access-Control-Allow-Origin : 用于设置允许跨域请求源地址 (预检请求和正式请求在跨域时候都会验证)
-
Access-Control-Allow-Headers : 跨域允许携带的特殊头信息字段 (只在预检请求验证)
-
Access-Control-Allow-Methods :跨域允许的请求方法或者说HTTP动词 (只在预检请求验证)
-
Access-Control-Allow-Credentials : 是否允许跨域使用cookies,如果要跨域使用cookies,可以添加上
//使用
server {
    listen 22222;
    server_name localhost;
    location / {
        if ($request_method = 'OPTIONS') {
            add_header Access-Control-Allow-Origin 'http://localhost:8080';
            add_header Access-Control-Allow-Headers 'content-type,authorization';
            add_header Access-Control-Allow-Methods 'PUT';#为这么只加在这个if中,不再下面的if也加上?因为这里只有预检请求会校验,当然你加上也没事。
            return 204;
        }
        if ($request_method != 'OPTIONS') {
            add_header Access-Control-Allow-Origin 'http://localhost:8080' always;
        }
        proxy_pass http://localhost:59200;
    }
}
2.8 设置Nginx防盗链(valid referers)
配置说明:
-
valid_referers: 此关键字定义了白名单,即本机自身访问允许;
-
$invalid_referer: 此为内置变量,通过判断上一行中的valid_referers值会返回0或者1,
- none : 代表请求头中没有referer信息,这一般是直接在浏览器输入图片网址;
- blocked :代表被防火墙过滤标记过的请求。如果访问来源不在白名单内,则返回403错误
server {
    listen  80;
    charset utf-8;
    server_name  good.linuxds.com;
    location / {
        root   /usr/share/nginx/good;
        index  index.html;
        access_log  /var/log/nginx/good.access.log  main;
        error_log   /var/log/nginx/good.error.log  warn;
        valid_referers none blocked good.linuxds.com;
        if ($invalid_referer) {
            return 403;
        }
  }
}
2.9 nginx配置负载均衡【重要】(upstream代码块、proxy_pass)
upstream常用参数:
-
weight: 后端服务器权重,默认为1,权重越大接收的请求越多。例:weight=5
-
max_fails: 检查节点的健康状态并允许请求失败的次数,达到该次数就将节点下线。默认为1,0表示禁止失败尝试。例:max_fails=2
-
fail_timeout: max_fails失败次数达到限制后暂停该节点服务的时间,默认是10秒。例:fail_timeout=10s
-
backup: 热备配置,当服务池中所有服务器均出现问题后会自动上线backup服务器
-
down: 标志服务器不可用,不参与负载均衡。这个参数通常配合IP_HASH使用
-
max_conns: 限制最大连接数,通常对后端服务器硬件不一致的情况进行配置
-
keepalive: 限制空闲长连接的最大数量
-
keepalive_timeout: 空闲长连接的最长保持时间
-
keepalive_requests: 每个长连接最多可以处理的请求数
http {        #upstream模块包含在http模块下
	#配置上游服务器
	# 配置了多台其实已经实现了负载均衡
	upstream myserver{   #定义upstream名字,下面会引用
		server 192.168.1.173:8080; #可以写域名
		server 192.168.1.174:8080
		server 192.168.1.175:8080
	}

	server{
		listen 80;
		server_name www.tomcats.com

		location / {
			# 通过proxy_pass来引用对应upstream配置的内容(注意要加上http://前缀)
			proxy_pass http://myserver  # 引用upstream
		}
	}
}

/** upstream 配置示例 **/

upstream linuxe_backend {
  server 192.168.1.110 down;  #标记该源站后端已不可用
  server 192.168.1.120 backup;  #其他节点挂了后该节点自动上线
  server 192.168.1.130 max_failes=1 fail_timeout=10s weight-5;
  server backend1.linuxe.cn 8080 weight=3
  keepalive 32;  #最多允许32个长连接
  keepalive_timeout 30s;  #每个长连接保持30秒
  keepalive_requests 100;  #每个长连接允许100个请求
}
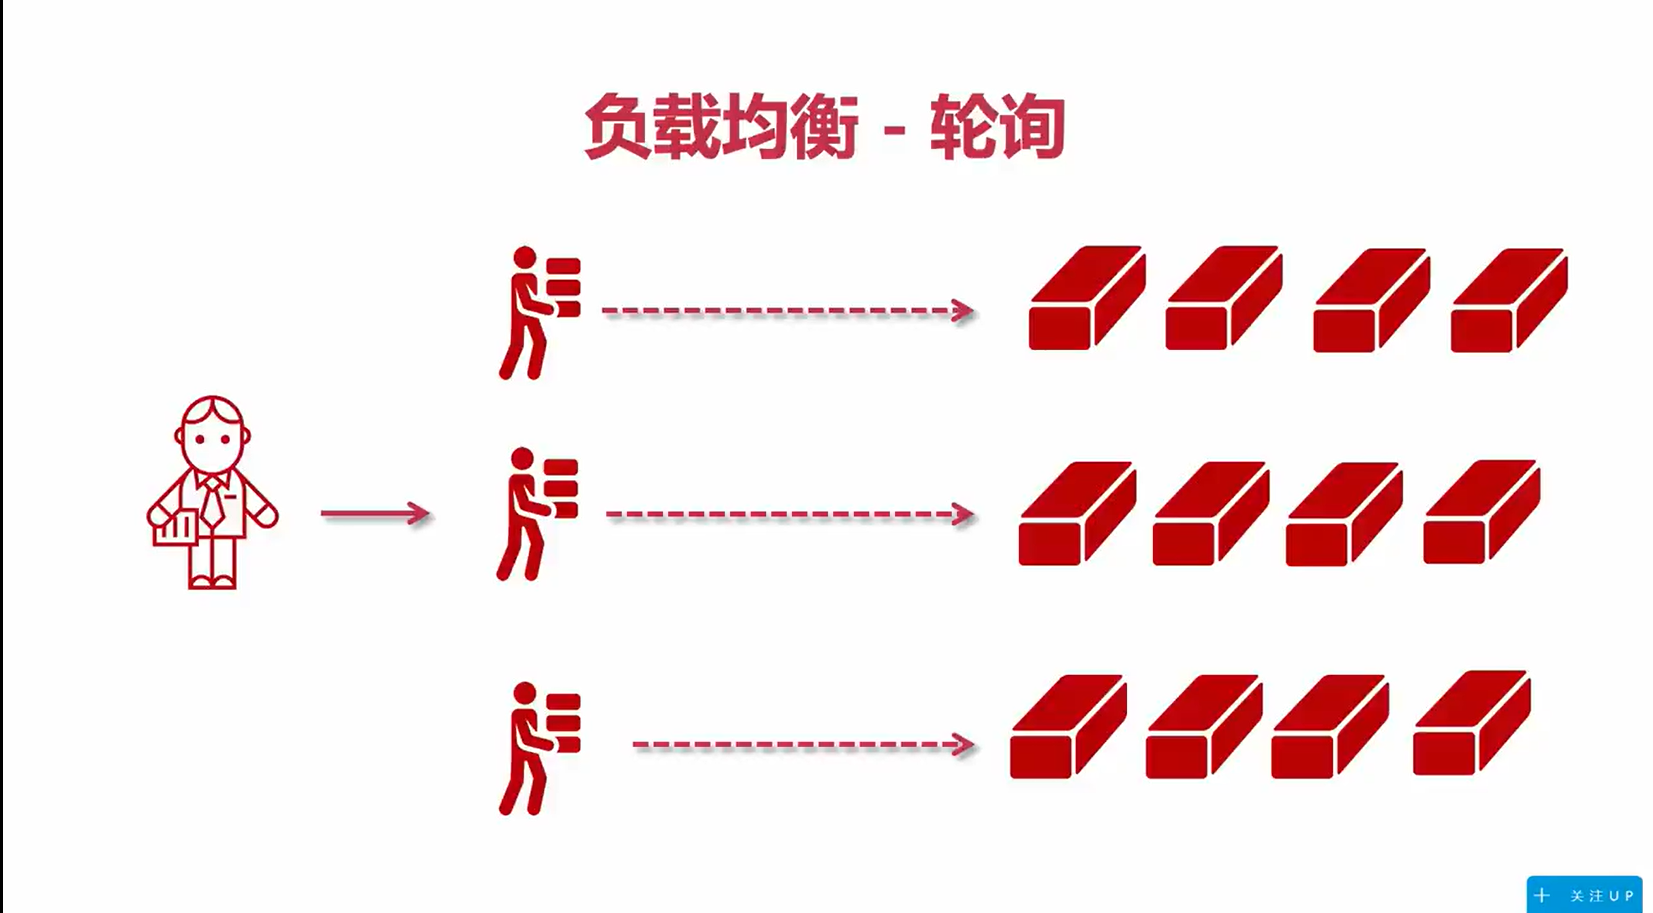
2.9.1 负载均衡的策略
- 1、轮询: (默认策略)
- 2、加权轮询 (设置weight属性)
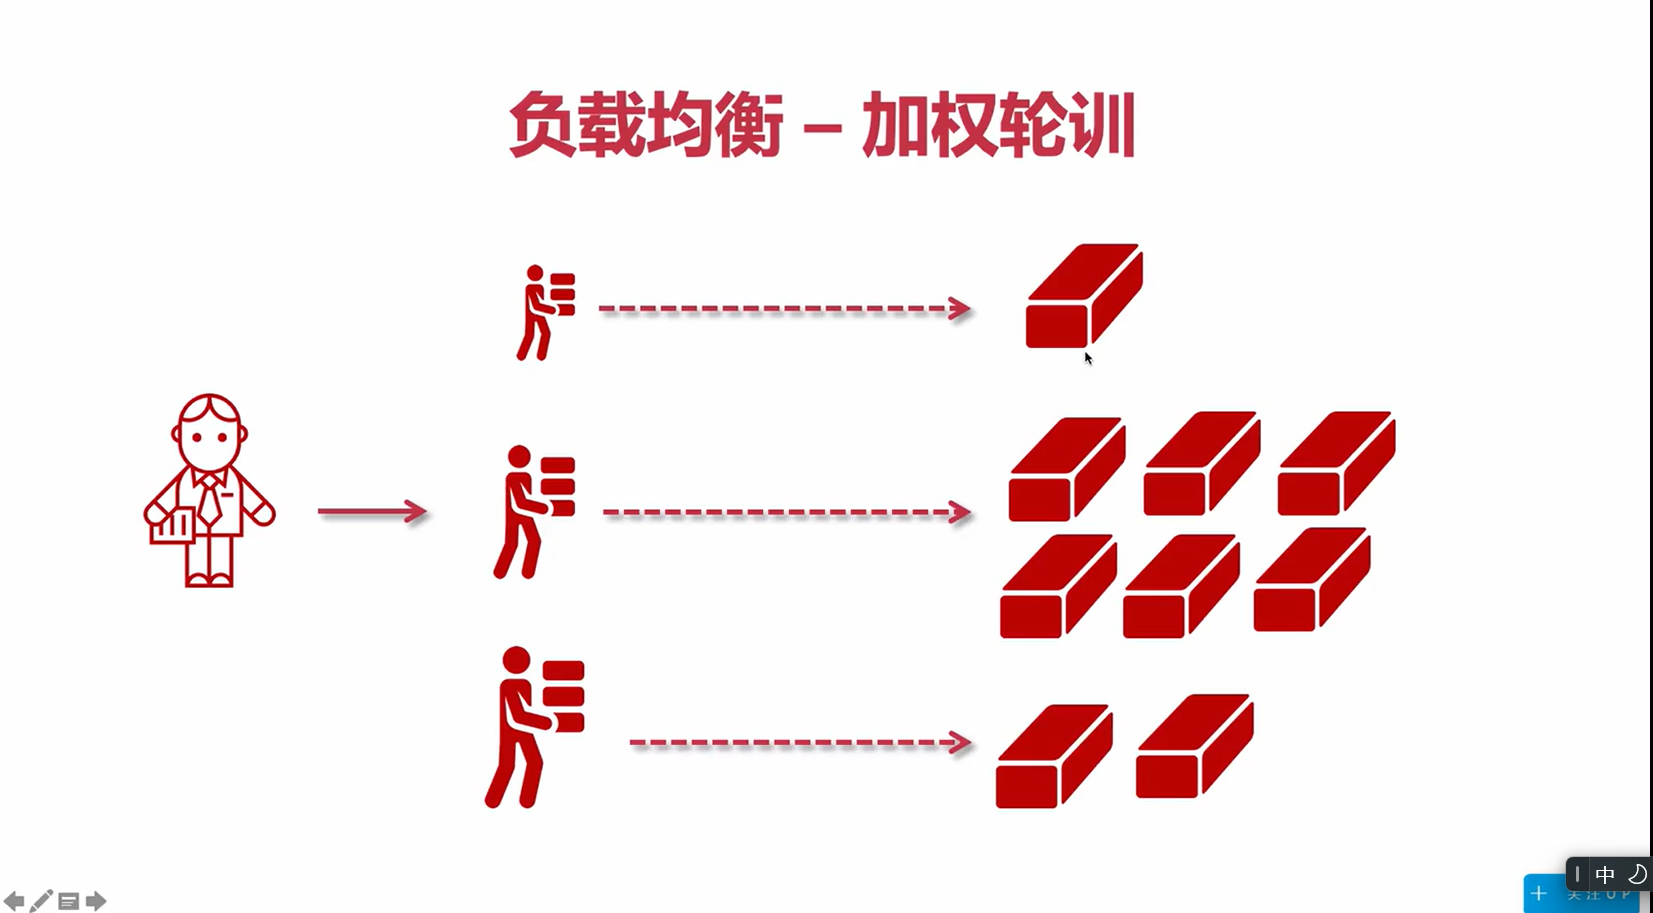
upstream tomcats{
	servert 192.168.1.173:8080 weight=1;
	servert 192.168.1.173:8080;
	servert 192.168.1.173:8080 weight=2;
	servert 192.168.1.173:8080 weight=5;
}
server{
   listen 80;
   server_name www.tomcats.com;
   location / {
   	root /home;
   }
}
- 3、ip_hash(节点增加时,有可能会导致用户访问不会原来的服务器上)
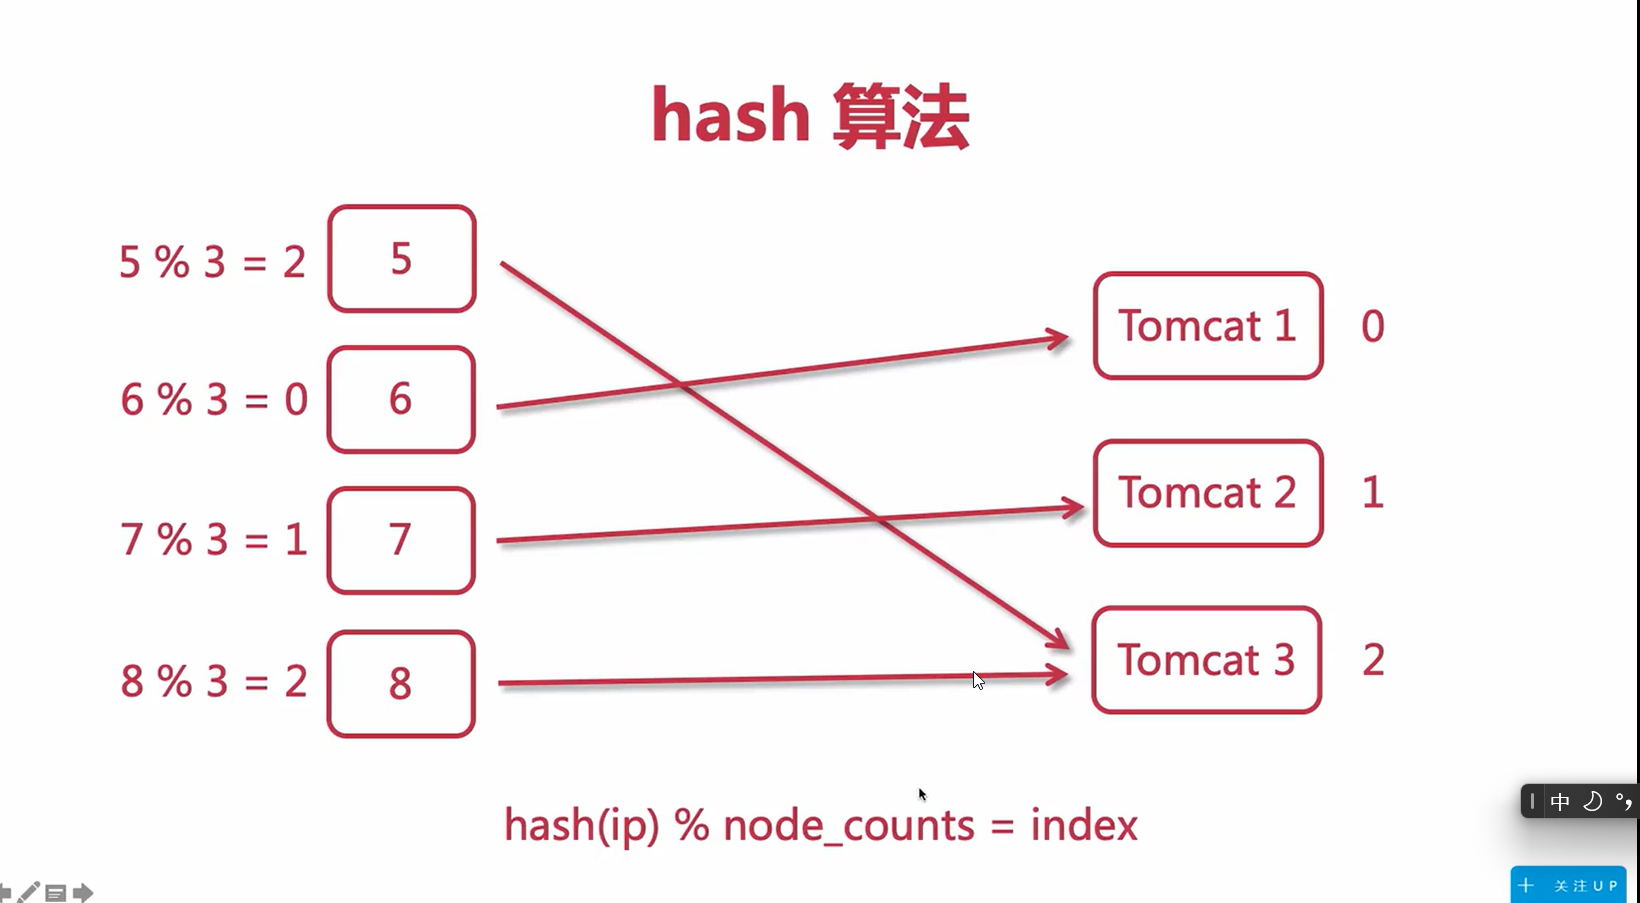
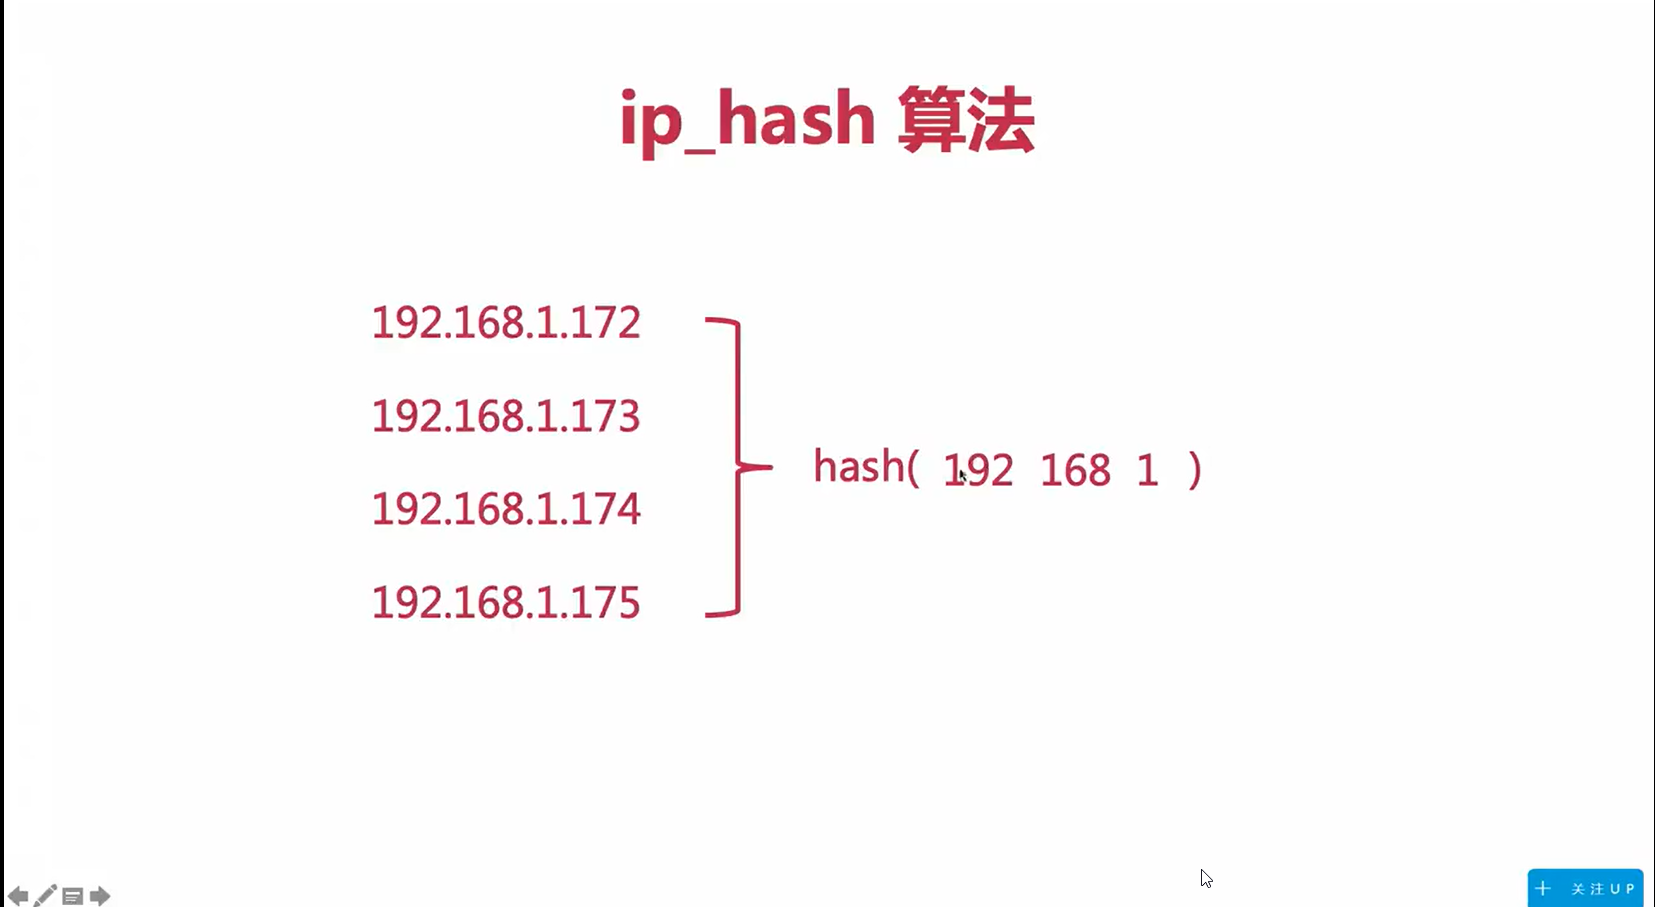
//根据前三段来进行hash的转化,最后一段不参与
upstream backserver {
	ip_hash;
	server 192.168.0.14:88;
	server 192.168.0.15:80;
}
优化hash算法带来的问题: 一致性哈希算法
- 4、url_hash(根据访问url)
//使用hash $request_uri;
upstream backserver {
   hash $request_uri;
   server 192.168.0.14:88;
   server 192.168.0.15:80;
}
- 5、least_conn (根据连接数)
 //使用least_conn;
upstream backserver {
   least_conn;
   server 192.168.0.14:88;
   server 192.168.0.15:80;
}
2.10 nginx控制浏览器缓存(expires / expire @)

//直接在location里面配置
location ~ \.(png|jpg|gif|css|js)${
	root html/images;
	expires 30s;
	#expire @22h30m   指定缓存过期的时间为22:30
	#expire off 	不开启缓存(但浏览器本身有默认)
	#expire max		永不过期
}

/**
	时间单位
2s 2秒
2m 2分钟
2h 2小时
2d 2天
**/
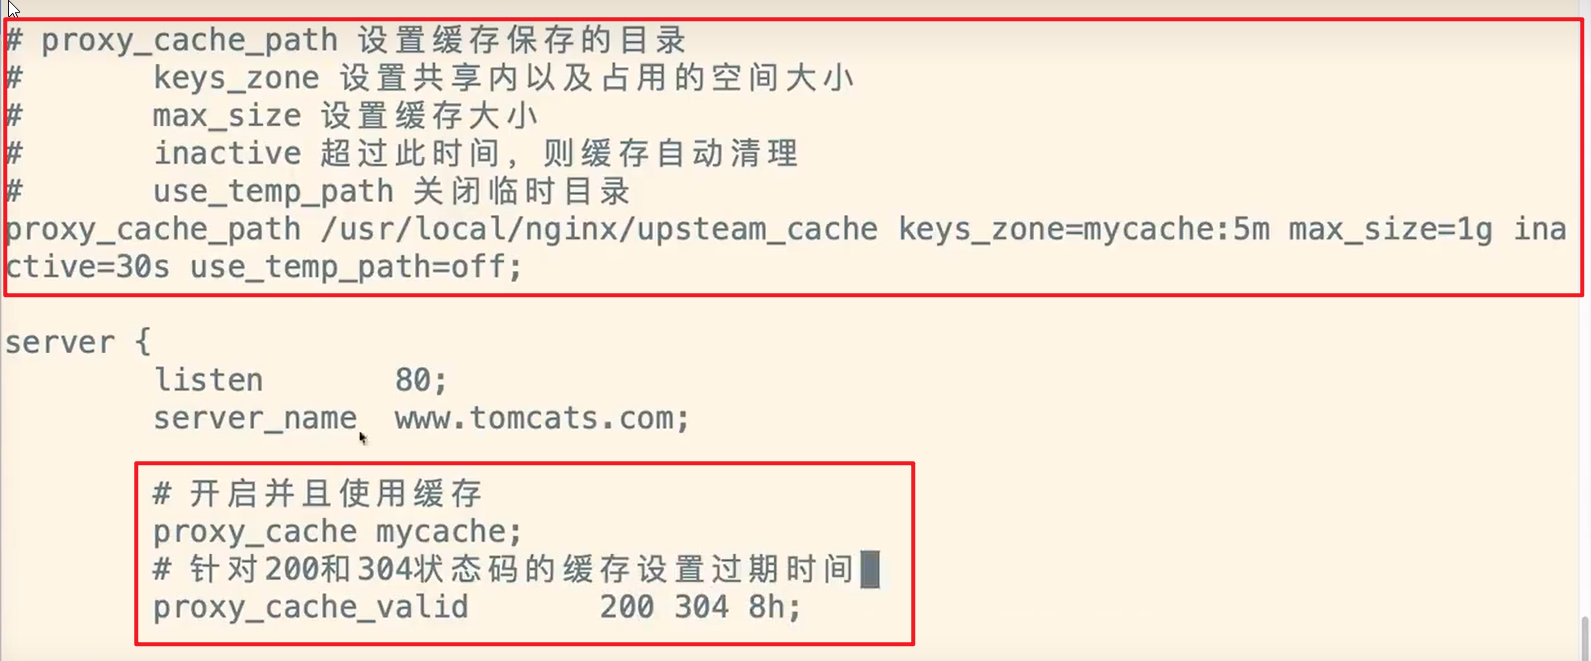
2.11nginx配置自身缓存(proxy_cache_path)
2.12 nginx配置SSL证书提供https访问
1、拿ssl证书文件,直接上网百度
2、然后在nginx.conf添加配置
http {
    include       mime.types;
    default_type  application/octet-stream;
    sendfile        on;
    keepalive_timeout  65;
  server {
  #监听443端口
    listen 443;
    #你的域名
    server_name huiblog.top;
    ssl on;
    #ssl证书的pem文件路径
    ssl_certificate  /root/card/huiblog.top.pem;
    #ssl证书的key文件路径
    ssl_certificate_key /root/card/huiblog.top.key;
    location / {
     proxy_pass  http://公网地址:项目端口号;
    }
}
server {
    listen 80;
    server_name huiblog.top;
    #将请求转成https
    rewrite ^(.*)$ https://$host$1 permanent;
}
}
3、nginx常用的参数说明(重要)
3.1 proxy_set_header: 用于设置传递给后端服务器的请求头信息
//Host
proxy_set_header Host $host;
这一行将请求中的 Host 头部设置为客户端请求的主机名。
//

例如,如果客户端请求 http://example.com/foo,则 Host 头部将被设置为 example.com
$host变量会自动解析并使用请求中的 Host 头部的值.即example.com

//X-Real-IP
proxy_set_header X-Real-IP $remote_addr;
设置将 X-Real-IP 头部设置为客户端的真实 IP 地址。(这个变量也会自动解析)
//

//X-Forwarded-For
proxy_set_header X-Forwarded-For $proxy_add_x_forwarded_for;
这一行设置 X-Forwarded-For 头部,它包括了所有代理服务器的 IP 地址,使后端服务器能够获取到客户端的链路信息。
//

// X-Forwarded-Proto
proxy_set_header X-Forwarded-Proto $scheme;
设置 X-Forwarded-Proto 头部,它告知后端服务器客户端使用的协议(HTTP或HTTPS)
//
3.2 proxy_pass 将当前请求传递给后端服务器,并指定后端服务器的URL
proxy_pass http://backend_server;
这个就是请求代理到 http://backend_server

(tips:  这里的 backend_server 可以是域名、IP地址,也可以指定端口,例如 http://localhost:8080。)
3.3 try_files
tip:try_files 指令已经涵盖了文件和目录的检查,因此不需要再用 if 条件语句来单独处理不存在的文件

/ **
基础用法(注意不要$uri前或后的路径,即不要写成/dist/$uri之类的)
** /
location /images/ {
    root /opt/html/;
    try_files $uri   $uri/  /images/default.gif;

    说明比如 请求 127.0.0.1/images/test.gif 会依次查找 1.文件/opt/html/images/test.gif
    2.文件夹 /opt/html/images/test.gif/下的index文件  3. 请求127.0.0.1/images/default.gif
}

/ **
进阶用法 (@)
** /
location / {
    try_files /system/maintenance.html
    $uri $uri/index.html $uri.html
    @mongrel;
}

location @mongrel {
    proxy_pass http://mongrel;    //请求转发到http://mongrel这个地址进行处理
}
以上中若未找到给定顺序的文件,则将会交给location @mongrel处理(相当于匹配到了@mongrel来匹配)
4、基本命令
//nginx.conf文件位于:conf/nginx.conf
编辑配置文件:vim nginx.conf

首先先去到nginx的可执行文件,位于:sbin/nginx

//测试配置文件的正确性
nginx -t

// 平滑重启服务
nginx -s reload

//设置读取的是哪个配置文件
nginx -c 配置文件路径

//平滑停止(等待没有连接)
nginx -s quit

//查看nginx的进程详情(看master、worker进程)
ps -ef|grep nginx
5、nginx进阶
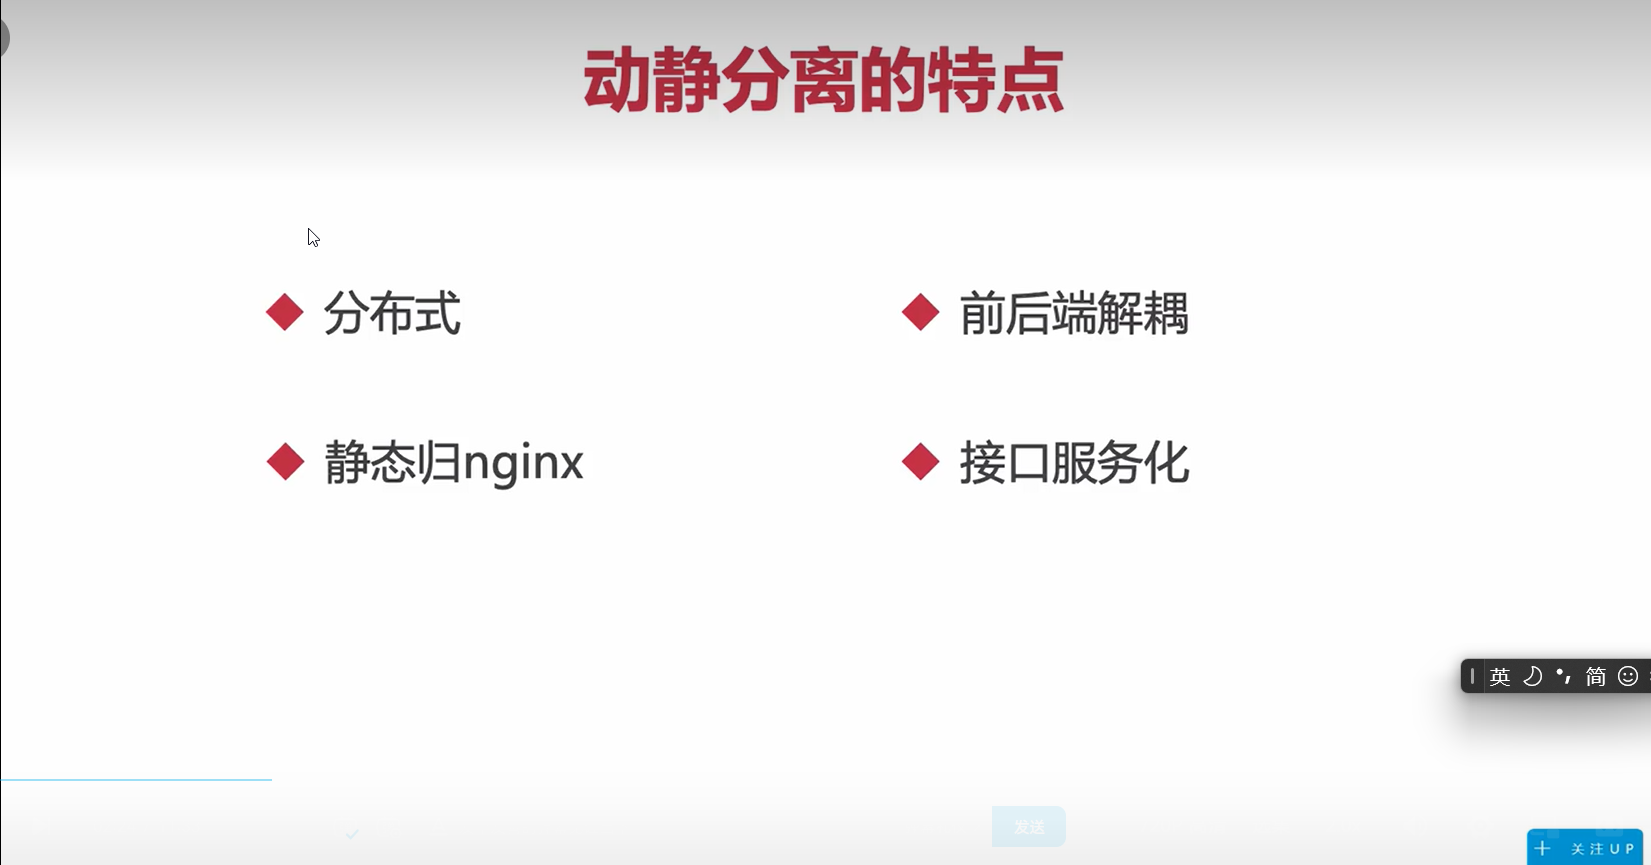
5.1 nginx实现的动静分离
把动态数据的接口和静态资源分开,减少服务器的压力,提交静态资源访问的速度
前后端相应分开部署
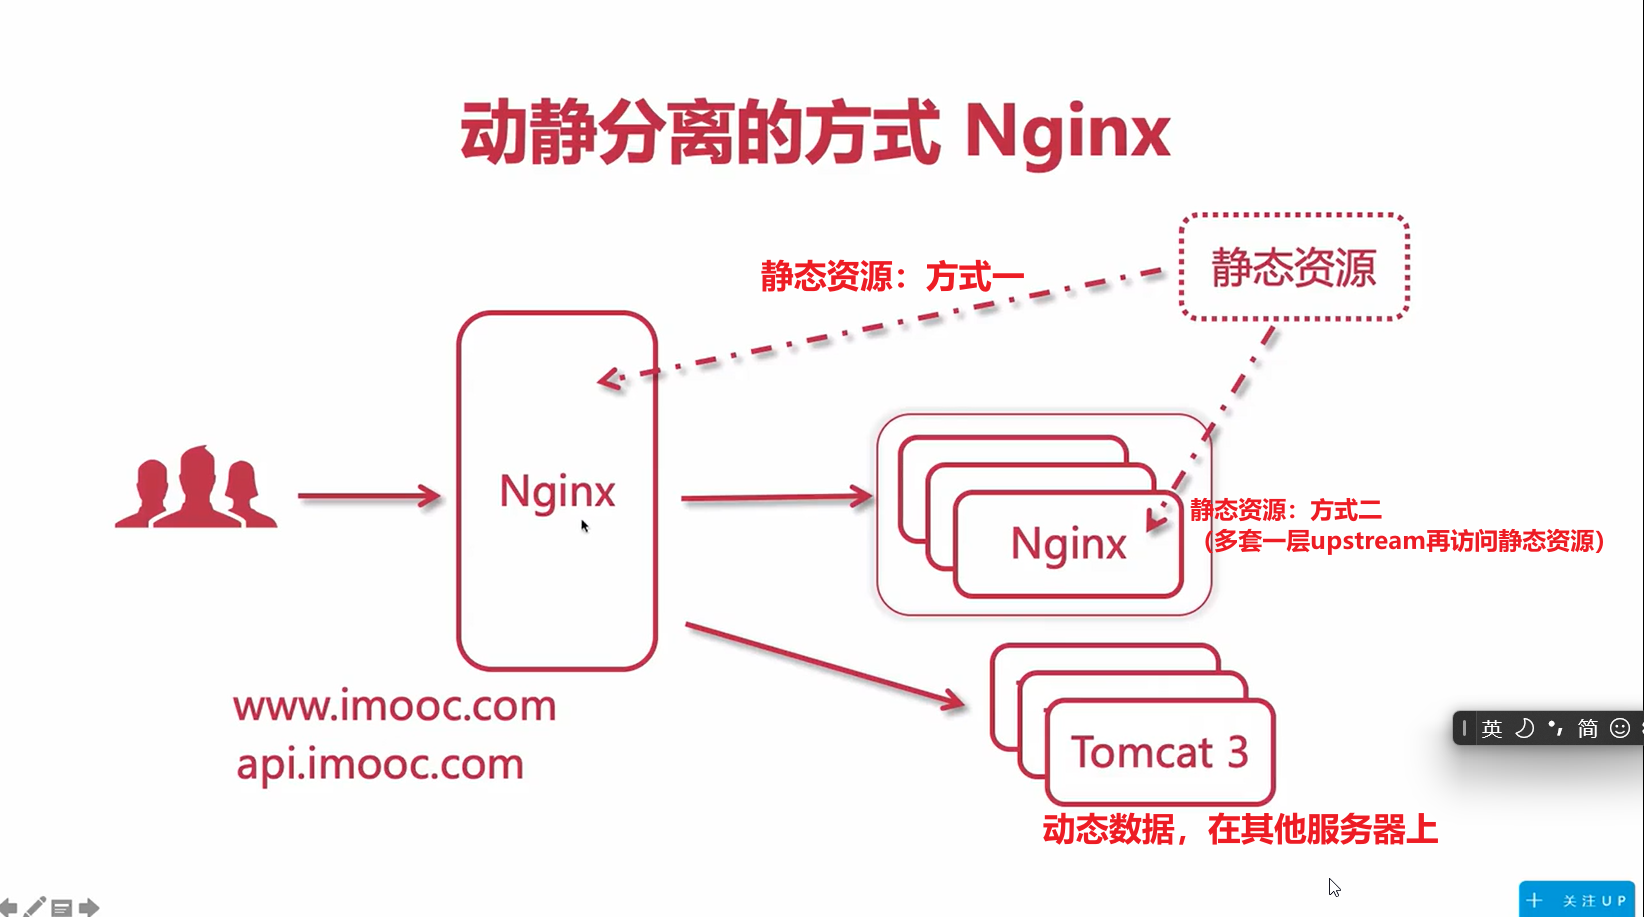
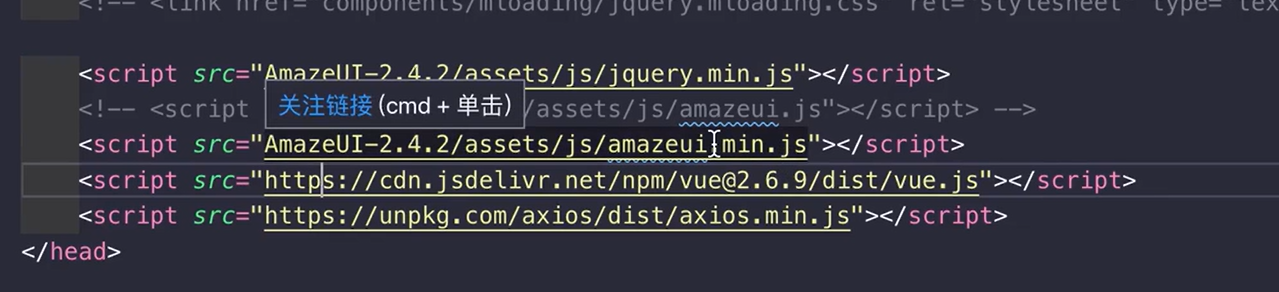
常用的动静分离的方式:
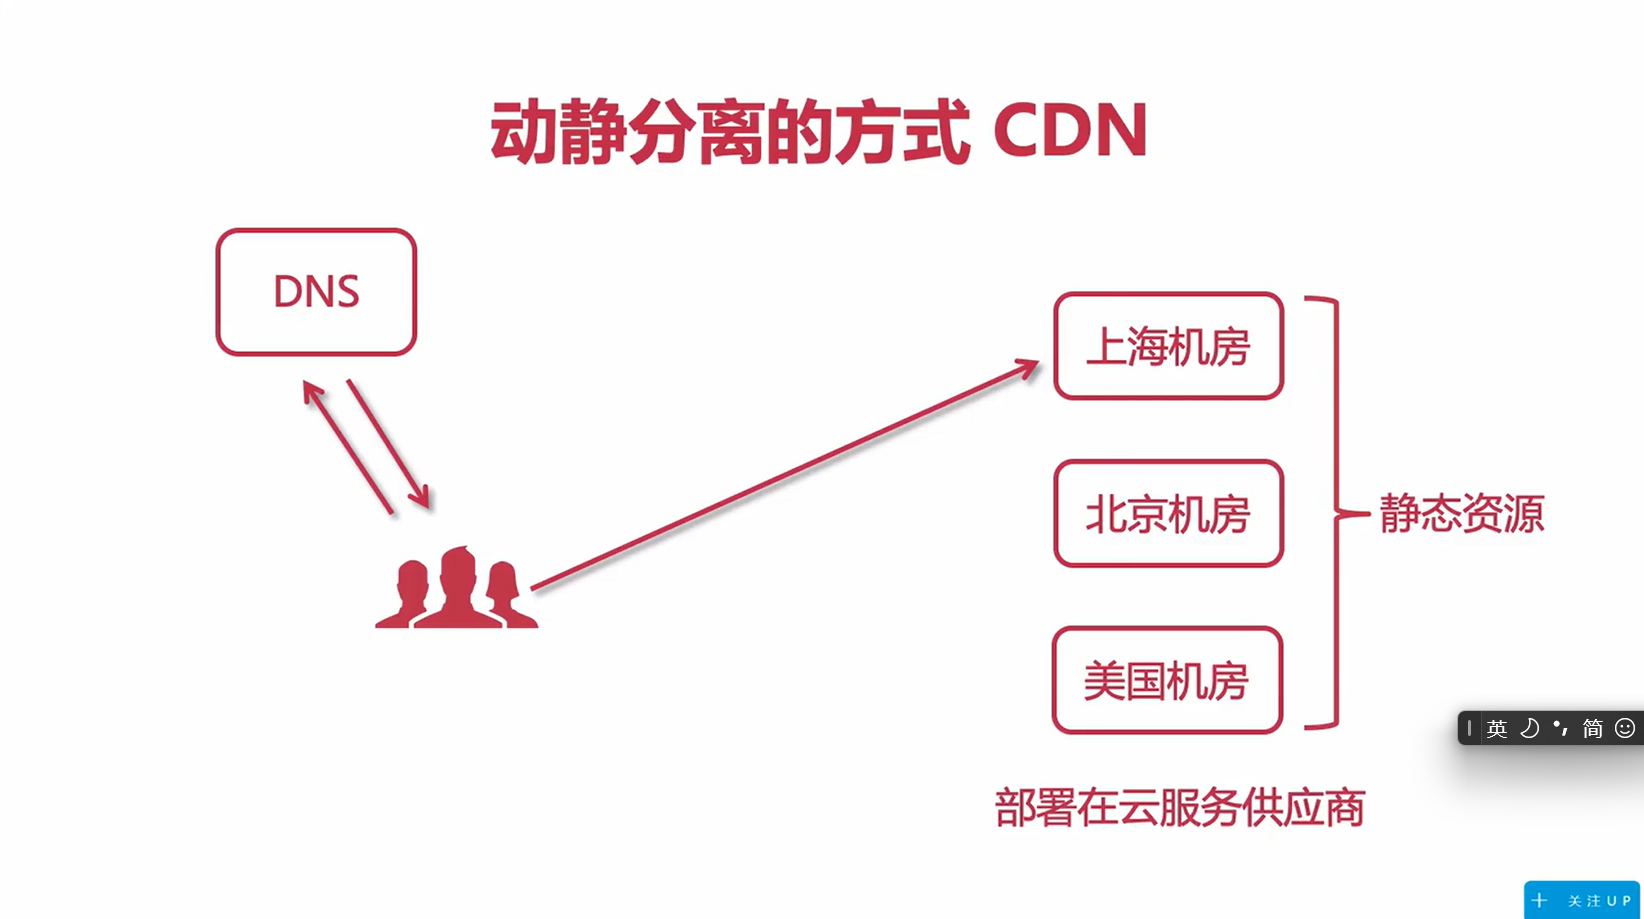
例如:
6、nginx在實際開發中的使用例子
旧的项目中反代个二级目录到新项目,实现可以在旧项目里面使用新项目的接口
//这就是一个完整的nginx配置
server {
    listen 80;
    server_name yourdomain.com;

    # 老项目的根目录位置
    root /var/www/old-project;

    location / {
        try_files $uri $uri/ /index.php?$query_string;
    }

    # 新项目的反向代理配置
    location /newproject/ {
        proxy_set_header Host $host;
        proxy_set_header X-Real-IP $remote_addr;
        proxy_set_header X-Forwarded-For $proxy_add_x_forwarded_for;
        proxy_set_header X-Forwarded-Proto $scheme;

        # 如果新项目是运行在不同的服务器上,替换 http://localhost:8080
        proxy_pass http://localhost:8080/;

        # 处理新项目的路径前缀
        rewrite ^/newproject/(.*)$ /$1 break;
    }

    # PHP 处理(假设你的老项目是 PHP 项目)
    location ~ \.php$ {
        include snippets/fastcgi-php.conf;
        fastcgi_pass unix:/var/run/php/php7.4-fpm.sock;
    }

    # 其他必要的 Nginx 配置
}


 1万+
1万+

 被折叠的 条评论
为什么被折叠?
被折叠的 条评论
为什么被折叠?
 到【灌水乐园】发言


