


在OpenCV中,threshold函数是一个非常基础且强大的工具,用于将图像转换为二值图像(即图像的每个像素点非黑即白)。这个函数在图像预处理、特征提取、边缘检测等任务中非常有用。下面,我将详细解释如何在C++中使用OpenCV的threshold函数。
在计算机视觉和图像处理中,阈值分割(Thresholding)是一种常用的图像处理技术,用于将图像转换成二值图像(黑白图像)。这种方法可以简化图像分析过程,使得后续的特征提取更加容易。OpenCV 提供了一个名为 threshold() 的函数来实现这一功能。
函数原型
在OpenCV的C++接口中,threshold函数的原型如下:
double cv::threshold(InputArray src, OutputArray dst,
                double thresh, double maxval, int type)

参数说明
src: 输入图像,必须是单通道(灰度图)。
dst: 输出图像,与输入图像具有相同的尺寸和类型。
thresh: 阈值。
maxval: 当像素值超过(或小于,取决于type)阈值时应该被赋予的值。
type: 阈值类型,决定了阈值操作的方式。OpenCV提供了几种不同的阈值类型,常用的有以下几种:
    THRESH_BINARY
    THRESH_BINARY_INV
    THRESH_TRUNC
    THRESH_TOZERO
    THRESH_TOZERO_INV
    THRESH_OTSU 和 THRESH_TRIANGLE(这两个通常与其他类型结合使用,用于自动计算最佳阈值)
下面我将详细解释如何使用 C++ 和 OpenCV 的 threshold() 函数来对图像进行阈值分割。
1. 导入必要的头文件
首先需要导入 OpenCV 的头文件:
#include <opencv2/opencv.hpp>
#include <iostream>

using namespace cv;
using namespace std;

2. 加载图像
我们需要读取一张图像,并将其转换为灰度图像以便进行阈值分割:
Mat src = imread("path/to/your/image.jpg", IMREAD_GRAYSCALE); // 载入灰度图像
if (src.empty()) {
    cout << "Could not open or find the image" << endl;
    return -1;
}

3. 设置阈值分割参数
在进行阈值分割之前,需要定义阈值分割的参数:

thresh:阈值,通常根据图像的亮度分布来选择。
maxval:如果像素值超过了阈值,则被赋予的最大值。
type:指定阈值分割的类型。

OpenCV 支持以下几种阈值分割类型:
    THRESH_BINARY:如果像素值大于阈值,则设置为最大值,否则设置为0。
    THRESH_BINARY_INV:如果像素值大于阈值,则设置为0,否则设置为最大值。
    THRESH_TRUNC:如果像素值大于阈值,则设置为阈值,否则保持不变。
    THRESH_TOZERO:如果像素值小于阈值,则设置为0,否则保持不变。
    THRESH_TOZERO_INV:如果像素值大于阈值,则设置为0,否则保持不变。
    THRESH_OTSU:使用 Otsu's 方法从图像直方图中找到最优阈值。
    THRESH_TRIANGLE:使用 Triangle 方法从图像直方图中找到最优阈值。
假设我们选择使用全局阈值分割:
int thresh = 127; // 全局阈值
int maxval = 255; // 最大值
int type = THRESH_BINARY; // 二值化类型

如果要使用 Otsu's 方法自动计算最优阈值:
int type = THRESH_BINARY + THRESH_OTSU; // 结合 Otsu's 方法

4. 应用阈值分割
接下来,我们使用 threshold() 函数来分割图像:
Mat dst;
threshold(src, dst, thresh, maxval, type);

注意,当使用 THRESH_OTSU 或 THRESH_TRIANGLE 时,阈值 thresh 应该设为0,因为函数会自动计算阈值:
threshold(src, dst, 0, maxval, type);

5. 显示结果
现在我们可以显示原始图像和分割后的图像:
namedWindow("Original Image", WINDOW_AUTOSIZE);
imshow("Original Image", src);

namedWindow("Thresholded Image", WINDOW_AUTOSIZE);
imshow("Thresholded Image", dst);

6. 等待按键并清理
最后,等待用户按键后关闭窗口并清理内存:
waitKey(0); // 等待按键
destroyAllWindows(); // 关闭所有窗口
完整代码1
#include <opencv2/opencv.hpp>
#include <iostream>
using namespace cv;
using namespace std;
int main(int argc, char** argv)
{
Mat src = imread("48.jpg", IMREAD_GRAYSCALE);
if (src.empty())
{
cout << "Could not open or find the image" << endl;
return -1;
}
int thresh = 127; // 全局阈值
int maxval = 255; // 最大值
int type = THRESH_BINARY; // 二值化类型
Mat dst;
threshold(src, dst, thresh, maxval, type);
namedWindow("Original Image", WINDOW_NORMAL);
imshow("Original Image", src);
namedWindow("Thresholded Image", WINDOW_NORMAL);
imshow("Thresholded Image", dst);
waitKey(0); // 等待按键
destroyAllWindows(); // 关闭所有窗口
return 0;
}
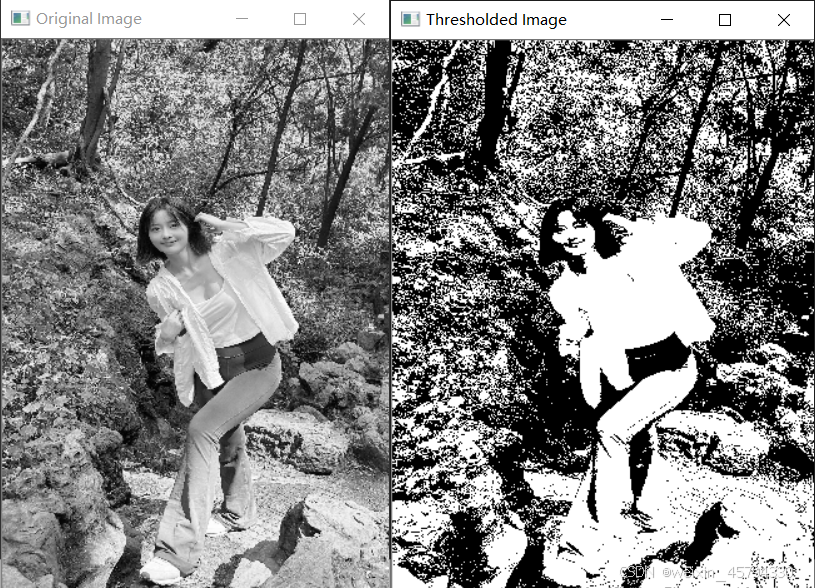
这个示例展示了如何使用 OpenCV 的 threshold() 函数来执行基本的阈值分割操作。你可以根据实际需要调整阈值和类型来达到预期的效果。运行结果1

使用示例2
下面是一个简单的示例,展示了如何使用threshold函数将灰度图像转换为二值图像:
#include <opencv2/opencv.hpp>
#include <iostream>
int main() {
// 加载图像
cv::Mat src = cv::imread("path_to_your_image.jpg", cv::IMREAD_GRAYSCALE);
if (src.empty()) {
std::cerr << "Error loading image!" << std::endl;
return -1;
}
// 创建输出图像
cv::Mat dst;
// 应用阈值操作
double thresh_value = 127.0; // 示例阈值
double max_value = 255.0; // 超过阈值时的最大值
int threshold_type = cv::THRESH_BINARY; // 阈值类型
cv::threshold(src, dst, thresh_value, max_value, threshold_type);
// 显示结果
cv::imshow("Source Image", src);
cv::imshow("Thresholded Image", dst);
cv::waitKey(0);
return 0;
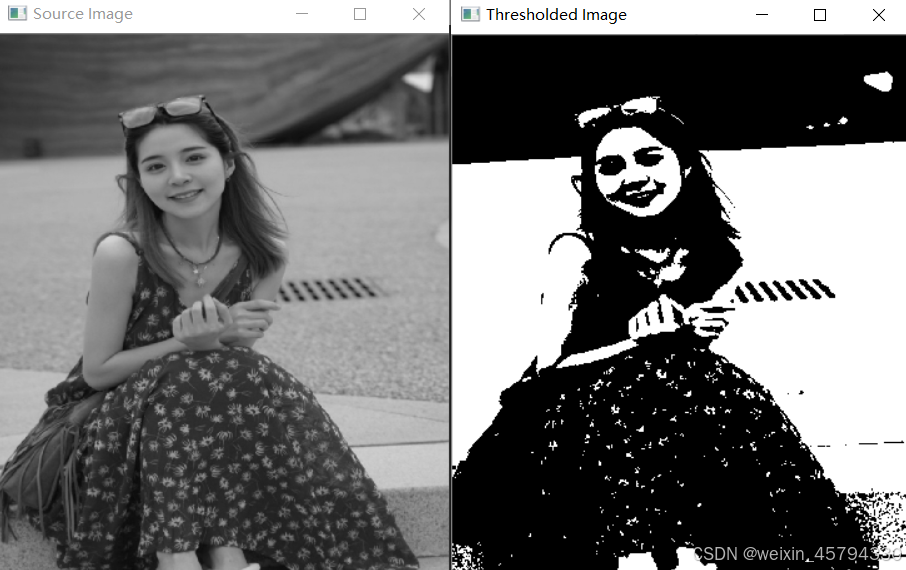
}运行结果2

注意事项
- 确保输入图像是灰度图(单通道)。
THRESH_OTSU和THRESH_TRIANGLE可以与其他阈值类型结合使用(通过位或操作),以自动计算最佳阈值。例如,THRESH_BINARY | THRESH_OTSU。- 当使用
THRESH_OTSU或THRESH_TRIANGLE时,thresh参数被忽略,因为算法会自动计算最佳阈值。然而,你仍然需要提供一个thresh值,因为函数原型要求这个参数,但你可以将其设置为0或其他任意值。 - 阈值的选择对结果有很大影响,因此在实际应用中可能需要通过试验来确定最佳阈值。
使用示例3
//#include "pch.h"
#include "opencv2/imgcodecs.hpp"
#include "opencv2/highgui.hpp"
#include <opencv2/imgproc/imgproc.hpp>
#include <iostream>
#include <string>
using namespace cv; //所有opencv类都在命名空间cv下
using namespace std;
//#pragma comment(lib, "opencv_world450d.lib")
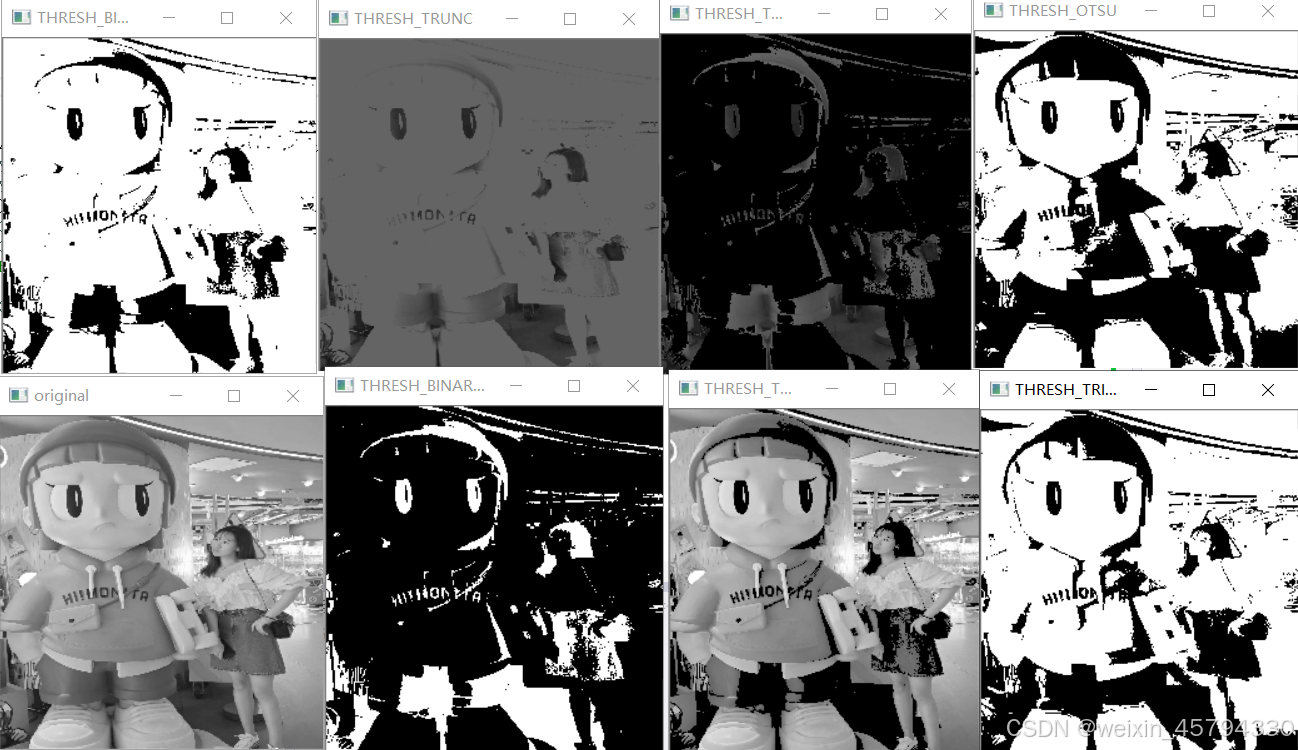
void f1(char *image)
{
cv::Mat gray = imread(image, IMREAD_GRAYSCALE);
namedWindow("original", WINDOW_NORMAL);
cv::imshow("original", gray);
// 全局二值化
int th = 100;
cv::Mat threshold1, threshold2, threshold3, threshold4, threshold5, threshold6, threshold7, threshold8;
cv::threshold(gray, threshold1, th, 255, THRESH_BINARY);
cv::threshold(gray, threshold2, th, 255, THRESH_BINARY_INV);
cv::threshold(gray, threshold3, th, 255, THRESH_TRUNC);
cv::threshold(gray, threshold4, th, 255, THRESH_TOZERO);
cv::threshold(gray, threshold5, th, 255, THRESH_TOZERO_INV);
//cv::threshold(gray, threshold6, th, 255, THRESH_MASK);
cv::threshold(gray, threshold7, th, 255, THRESH_OTSU);
cv::threshold(gray, threshold8, th, 255, THRESH_TRIANGLE);
namedWindow("THRESH_BINARY", WINDOW_NORMAL);
cv::imshow("THRESH_BINARY", threshold1);
namedWindow("THRESH_BINARY_INV", WINDOW_NORMAL);
cv::imshow("THRESH_BINARY_INV", threshold2);
namedWindow("THRESH_TRUNC", WINDOW_NORMAL);
cv::imshow("THRESH_TRUNC", threshold3);
namedWindow("THRESH_TOZERO", WINDOW_NORMAL);
cv::imshow("THRESH_TOZERO", threshold4);
namedWindow("THRESH_TOZERO_INV", WINDOW_NORMAL);
cv::imshow("THRESH_TOZERO_INV", threshold5);
//cv::imshow("THRESH_MASK", threshold6);
namedWindow("THRESH_OTSU", WINDOW_NORMAL);
cv::imshow("THRESH_OTSU", threshold7);
namedWindow("THRESH_TRIANGLE", WINDOW_NORMAL);
cv::imshow("THRESH_TRIANGLE", threshold8);
}
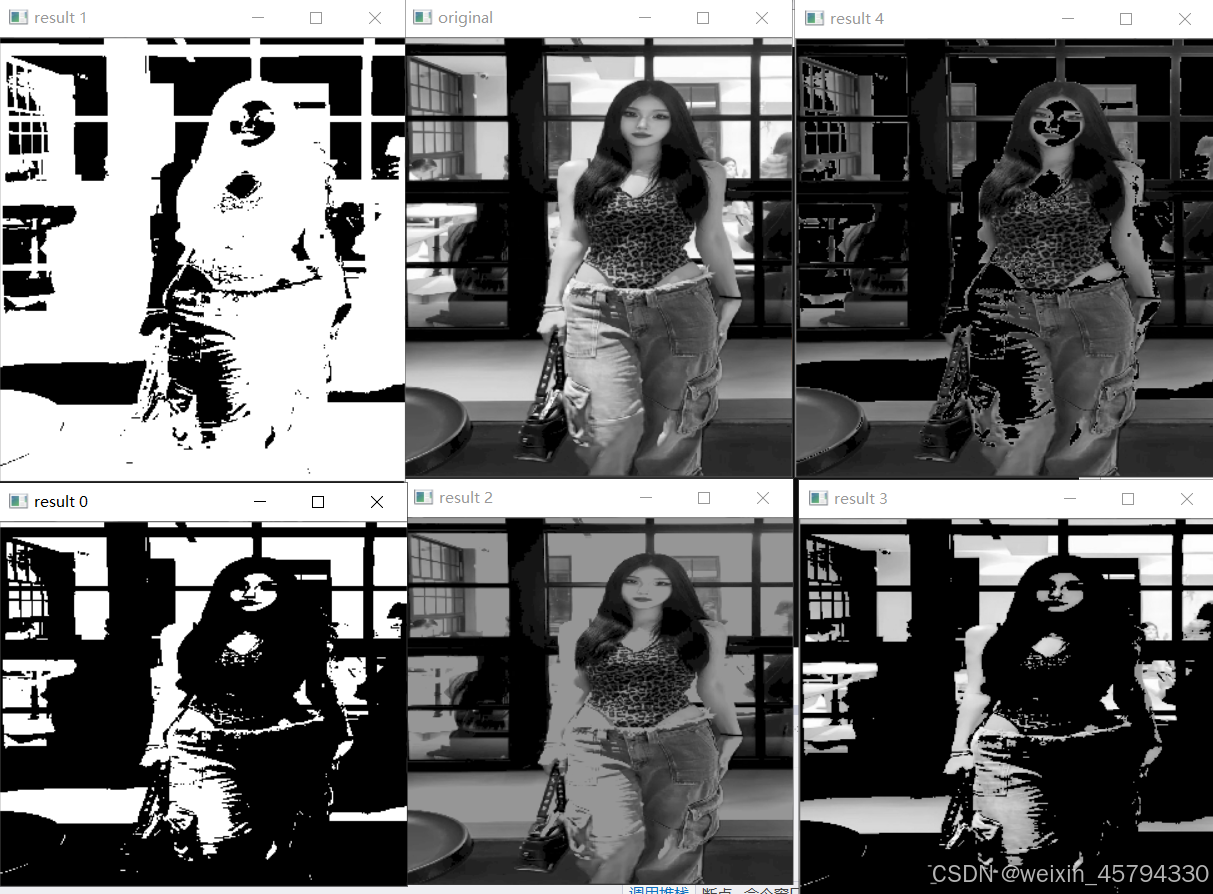
void f2(char *image)
{
cv::Mat gray = imread(image, IMREAD_GRAYSCALE);
namedWindow("original", WINDOW_NORMAL);
cv::imshow("original", gray);
string windowstring = "result 0";
string imagestring = "result 0.jpg";
cv::Mat result;
enum thresholdtype { THRESH_BINARY, THRESH_BINARY_INV, THRESH_TRUNC, THRESH_TOZERO, THRESH_TOZERO_INV };
for (int thresh = 0; thresh < 5; thresh++)
{
// 0: 二进制阈值,1: 反二进制阈值,2: 截断阈值,3: 0阈值,4: 反0阈值
threshold(gray, result, 150, 255, thresholdtype(thresh));//改变参数实现不同的threshold
namedWindow(windowstring, WINDOW_NORMAL);
cv::namedWindow(windowstring);
cv::imshow(windowstring, result);//显示输出结果
// cv::imwrite(imagestring, result);
windowstring[7]++;
imagestring[7]++;
}
}
int main(void)
{
f1((char*)"11.png");
f2((char*)"12.png");
waitKey(0); //等待按键响应后退出,0改为5000就是5秒后自动退出。
return 0;
}
运行结果3


 被折叠的 条评论
为什么被折叠?
被折叠的 条评论
为什么被折叠?
 到【灌水乐园】发言


