


【elasticsearch】2.环境集群部署
Windows单节点部署
Windows单节点部署比较简单,直接官网下载压缩包解压运行即可,这里不再做说明
Windows集群部署
配置文件elasticsearch.yml重要参数
- cluster.name:集群名称
- node.name:节点名称
- node.master:是否是master节点,true/false
- node.data:是否是数据节点,true/false
- network.host:主机地址
- http.port:http端口
- transport.tcp.port:tcp通信端口
注意:同一个集群中,cluster.name是唯一的
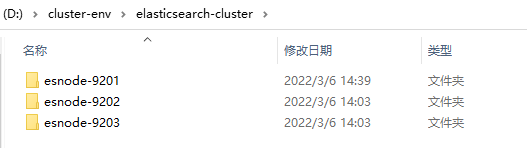
1.创建elasticsearch-cluster文件夹,在内部复制三个elasticsearch服务
2.分别修改每个节点的config/elasticsearch.yml配置文件
# 节点1的配置信息
# 集群名称,唯一,节点之间要保持一致
cluster.name: my-elasticsearch
# 节点名称,集群内唯一
node.name: esnode-9201
# 是master节点
node.master: true
# 是数据节点
node.data: true

# 主机ip地址
network.host: localhost
# http端口
http.port: 9201
# tcp通信端口
transport.tcp.port: 9301

# 跨域配置
http.cors.enabled: true
http.cors.allow-origin: "*"
注意:集群中每个节点的名称和端口不能重复
# 节点2的配置信息
# 集群名称,唯一,节点之间要保持一致
cluster.name: my-elasticsearch
# 节点名称,集群内唯一
node.name: esnode-9202
# 是master节点
node.master: true
# 是数据节点
node.data: true

# 主机ip地址
network.host: localhost
# http端口
http.port: 9202# tcp通信端口
transport.tcp.port: 9302
# 配置节点之间的通信端口
discovery.seed_hosts: ["localhost:9301"]
discovery.zen.fd.ping_timeout: 1m
discovery.zen.fd.ping_retries: 5

# 跨域配置
http.cors.enabled: true
http.cors.allow-origin: "*"
# 节点3的配置信息
# 集群名称,唯一,节点之间要保持一致
cluster.name: my-elasticsearch
# 节点名称,集群内唯一
node.name: esnode-9203
# 是master节点
node.master: true
# 是数据节点
node.data: true

# 主机ip地址
network.host: localhost
# http端口
http.port: 9203
# tcp通信端口
transport.tcp.port: 9303

# 配置节点之间的通信端口
discovery.seed_hosts: ["localhost:9301","localhost:9302"]
discovery.zen.fd.ping_timeout: 1m
discovery.zen.fd.ping_retries: 5

# 跨域配置
http.cors.enabled: true
http.cors.allow-origin: "*"
3.分别启动三个节点服务。
进入bin目录,双击运行elasticsearch.bat,启动服务
4.查询集群状态
GET:http://localhost:9201/_cluster/health
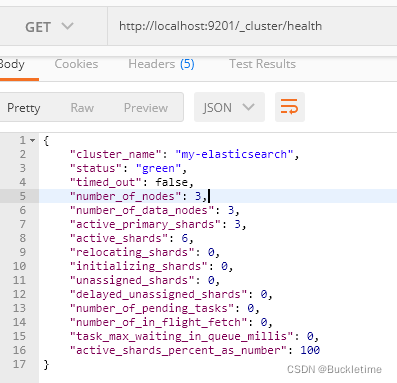
status为"green",节点数量和数据节点数量均为3,集群部署成功。
Linux单节点部署
官网下载压缩包,以elasticsearch-8.0.1-linux-x86_64.tar.gz为例
1. 软件解压缩
tar -zxvf elasticsearch-8.0.1-linux-x86_64.tar.gz -C /opt/module/
2. 创建用户
因为安全问题,elasticsearch不允许root用户直接运行,所以要创建新用户
# 创建es用户
useradd es
# 为es用户设置密码
passwd es
# 修改elasticsearch文件夹所有者权限
chown -R es:es /opt/module/elasticsearch-8.0.1
3. 修改配置文件
修改/opt/module/elasticsearch-8.0.1/config/elasticsearch.yml文件
cluster.name: elasticsearch
node.name: node-1
network.host: 0.0.0.0
http.port: 9200
cluster.initial_master_nodes: ["node-1"]
修改系统配置文件 /etc/security/limits.conf,在文件末尾增加下面内容
# 每个进程可以打开的文件数的限制
es soft nofile 65536
es hard nofile 65536
修改/etc/security/limits.d/20-nproc.conf
# 每个进程可以打开的文件数的限制
es soft nofile 65536
es hard nofile 65536
# 操作系统级别对每个用户创建的进程数的限制 *表示Linux所有用户名称
* hard nproc 4096
修改/etc/sysctl.conf
# 一个进程可以拥有的VMA(虚拟内存区域)的数量,默认值65536
vm.max_map_count=655360
重新加载
sysctl -p
4. 启动ES
# 切换es用户
su es
# 进入elasticsearch的bin目录
cd /opt/module/elasticsearch-8.0.1/bin
# 运行es
./elasticsearch
异常情况
1. 启动正常,但是访问不到es服务
日志信息
received plaintext http traffic on an https channel, closing connection
Netty4HttpChannel{localAddress=/[0:0:0:0:0:0:0:1]:9200, remoteAddress=/[0:0:0:0:0:0:0:1]:54048}
问题原因: 是因为开启了 ssl 认证。
解决方法: 在config/elasticsearch.yml 文件中把 xpack.security.http.ssl:enabled 设置成 false 即可
xpack.security.http.ssl:
  enabled: false
  keystore.path: certs/http.p12
2. 访问9200端口时,需要账号密码
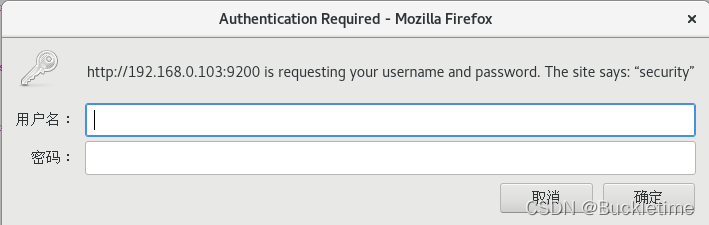
问题原因: 开启了密码验证模式
解决方法: 在config/elasticsearch.yml 文件中把 xpack.security.enabled 属性设置为 false 即可。设置成免密登录
xpack.security.enabled: false
Linux集群部署
1. 创建es-cluster文件夹,在内部复制三个elasticsearch服务
cd /opt/module/es-cluster
cp -r elasticsearch-8.0.1   esnode-1
cp -r elasticsearch-8.0.1   esnode-2
cp -r elasticsearch-8.0.1   esnode-3
2. 修改配置文件
分别修改节点服务的conf/elasticsearch.yml配置文件
# 节点1配置
# 集群名称,唯一
cluster.name: my-elasticsearch
# 节点名称,不重复
node.name: esnode-1
#是不是有资格成为主节点
node.master: true
#是否存储数据
node.data: true
#ip地址.
network.host: 0.0.0.0
#端口
http.port: 9201
#内部节点之间沟通端口
transport.tcp.port: 9301
#es7.x  之后新增的配置,节点发现
discovery.seed_hosts: ["localhost:9301","localhost:9302","localhost:9303"]
#es7.x  之后新增的配置,初始化一个新的集群时需要次配置来选举master
cluster.initial_master_nodes: ["esnode-1","esnode-2","esnode-3"]
#数据和存储路径
path.data: /opt/module/es-cluster/data
path.logs: /opt/module/es-cluster/logs
# 节点2配置
# 集群名称,唯一
cluster.name: my-elasticsearch
# 节点名称,不重复
node.name: esnode-2
#是不是有资格成为主节点
node.master: true
#是否存储数据
node.data: true
#ip地址.
network.host: 0.0.0.0
#端口
http.port: 9202
#内部节点之间沟通端口
transport.tcp.port: 9302
#es7.x  之后新增的配置,节点发现
discovery.seed_hosts: ["localhost:9301","localhost:9302","localhost:9303"]
#es7.x  之后新增的配置,初始化一个新的集群时需要次配置来选举master
cluster.initial_master_nodes: ["esnode-1","esnode-2","esnode-3"]
#数据和存储路径
path.data: /opt/module/es-cluster/data
path.logs: /opt/module/es-cluster/logs
# 节点3配置
# 集群名称,唯一
cluster.name: my-elasticsearch
# 节点名称,不重复
node.name: esnode-3
#是不是有资格成为主节点
node.master: true
#是否存储数据
node.data: true
#ip地址.
network.host: 0.0.0.0
#端口
http.port: 9203
#内部节点之间沟通端口
transport.tcp.port: 9303
#es7.x  之后新增的配置,节点发现
discovery.seed_hosts: ["localhost:9301","localhost:9302","localhost:9303"]
#es7.x  之后新增的配置,初始化一个新的集群时需要次配置来选举master
cluster.initial_master_nodes: ["esnode-1","esnode-2","esnode-3"]
#数据和存储路径
path.data: /opt/module/es-cluster/data
path.logs: /opt/module/es-cluster/logs
其他系统配置文件和单节点部署一样,可参考上述Linux单节点部署的其他系统文件配置。
3. 创建用户
因为安全问题,elasticsearch不允许root用户直接运行,所以要创建新用户
# 创建es用户
useradd es
# 为es用户设置密码
passwd es
# 修改elasticsearch文件夹所有者权限
chown -R es:es /opt/module/es-cluster
4. 启动集群服务
cd /opt/module/es-cluster/esnode-1/bin/
./elasticsearch
cd /opt/module/es-cluster/esnode-2/bin/
./elasticsearch
cd /opt/module/es-cluster/esnode-3/bin/
./elasticsearch
5. 查看集群节点
GET:http://192.168.0.103:9201/_cat/nodes


 被折叠的 条评论
为什么被折叠?
被折叠的 条评论
为什么被折叠?
 到【灌水乐园】发言


