


java基础之代码碎片
1 类定义
package com.wyh.day0325;

public class Student {
    /*
    *
    *   学生属性
    * */
    private String name;
    private int age ;
    private String id;
    private String class_;
    private String grade;


    // 学生信息setter and getter

    public String getName() {
        return name;
    }

    public void setName(String name) {
        this.name = name;
    }

    public int getAge() {
        return age;
    }

    public void setAge(int age) {
        this.age = age;
    }

    public String getId() {
        return id;
    }

    public void setId(String id) {
        this.id = id;
    }

    public String getClass_() {
        return class_;
    }

    public void setClass_(String class_) {
        this.class_ = class_;
    }

    public String getGrade() {
        return grade;
    }

    public void setGrade(String grade) {
        this.grade = grade;
    }


    // 构造函数
    public Student() {
    }

    public Student(String name, int age, String id, String class_, String grade) {
        this.name = name;
        this.age = age;
        this.id = id;
        this.class_ = class_;
        this.grade = grade;
    }


    /*
    * 学生方法
    * */

    public void sing() {
        System.out.println("学生会唱歌!!!");
    }

    public void learn() {
        System.out.println("学生会学习!!!");
    }

}
2 匿名对象
package com.wyh.day0325;


/*
* 创建对象的标准格式
* 类名 变量名= new 类名();
*
*
* 匿名对象就是只有右边的对象,没有左边的名字和赋值运算符
*
* 注意事项: 匿名对象只能使用唯一的一次,下次再使用不得不再创建一个新对象.
* 使用建议: 如果确定有一个对象只需要使用唯一的一次,就可以使用匿名对象.
* */
public class AnonymousDemo {

    public static void main(String[] args) {
        Student stu = new Student();
        stu.setAge(18);
        stu.setName("刘德华");
        System.out.println(stu.getName());


        new Student().setName("张三");

        System.out.println(new Student().getName());
    }


}
3 生成随机数
package com.wyh.day0325;

import java.util.Random;

public class RandomDemo {
    public static void main(String[] args) {
        /*
         * 使用Random类
         *
         * 1 导包
         * import java.util.Random;
         * 2 创建
         * Random r = new Random();
         * 3 使用
         *
         * int i = r.nextInt();
         *
         * */

        Random r = new Random();
        // 生成范围为int范围
        int i = r.nextInt();
        System.out.println("随机数为: " + i);

        // 自定义范围左闭右开[0,n)
        int j = r.nextInt(10);
        System.out.println("在特定范围生成的随机数为: " + j);


    }
}
4 ArrayList集合
package com.wyh.day0325;


import java.util.ArrayList;

/*
 * 数组的长度不可以发生改变.
 * 但是ArrayList集合的长度是可以随意变化的.
 * 对于ArrayList来说,有一个尖括号<E>代表泛型.
 * 泛型:也就是装在集合中的所有元素,全都是统一的生么类型.
 * 注意:泛型只能是引用类型,不能是基本类型.
 *
 *
 * 注意事项:
 * 对于ArrayList集合来说,直接打印的不是地址值,而是内容,
 * 如果内容是空,得到的是[]
 *
 *
 * ArrayList当中常用的方法有
 *  public boolean add(E e);向集合中添加元素,参数类型和泛型一致
 *  public E get(int index):从集合中获取元素,参数是索引值
 *  public E remove(int index): 从集合中删除一个元素,参数是索引值
 *  public int size(): 获取集合的长度
 * */
public class DemoArrayList {


    public static void main(String[] args) {
        //备注: 从JDK 1.7+开始 右侧的尖括号内部可以不写内容,但是<>本身还是要写
        ArrayList<String> list = new ArrayList<>();
        System.out.println(list);

        //向集合中添加一些数据,需要用到add方法
        list.add("张三");
        System.out.println(list);

        list.add("李四");
        System.out.println(list);

        list.add("王五");
        System.out.println(list);

        //list.add(1234); // 错误写法,泛型是什么类型,就只能存放什么类型.

        System.out.println(list.get(1));

        list.remove(2);
        System.out.println(list);

        // 遍历集合

        for (int i = 0; i < list.size(); i++) {
            System.out.println("-------");
            System.out.println(list.get(i));
        }


    }


}
package com.wyh.day0325;

import java.util.ArrayList;

/*
* 如果希望向ArrayList当中存放基本类型数据,必须使用基本类型对应的包装类.
*
* 基本类型      包装类(引用类型,包装类都位于java.lang包下)
* byte          Byte
* short         Short
* int           Integer
* long          Long
* float        Float
* double       Double
* char         Character
* boolean      Boolean
*
*
* 从 JDK1.5+ 支持自动装箱,自动拆箱
* 自动装箱: 基本类型---> 包装类型
* 自动拆箱: 包装类型-->基本类型
*
* */
public class DemoArrayListBasic {

    public static void main(String[] args) {
        ArrayList<Integer> listA = new ArrayList<>();

        listA.add(121);
        listA.add(423);
        listA.add(423);
        listA.add(423);

        System.out.println(listA);

        int num = listA.get(2);
        System.out.println(num);
    }
}
5 静态代码块
package com.wyh.day0328;
/*
* 静态代码块的格式是:
* public class 类名{
* static{
* //静态代码块的内容
* }
*
* }
*
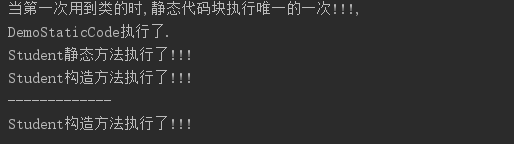
* 特点:当第一次用到类的时,静态代码块执行唯一的一次
* 静态内容总是优先于非静态,所以静态代码块比构造方法先执行.
*
*
* 静态代码块的典型用途:
* 用来一次性的对静态成员变量进行赋值
* */
public class DemoStaticCode {
static {
System.out.println("当第一次用到类的时,静态代码块执行唯一的一次!!!,\nDemoStaticCode执行了.");
}
public static void main(String[] args) {
Student one = new Student();
System.out.println("-------------");
Student two = new Student();
}
}
6 super和this关键字的三种用法
super
package com.wyh.day0328;
/*
*
* super关键字的用法有三种
* 1 在子类的成员方法中,访问父类的成员变量.
* 2 在子类的成员方法中,访问父类的成员方法.
* 3 在子类的成员方法中,访问父类的构造方法.
* */
public class Teacher extends Employee {

    int num = 20;

    public Teacher() {
        super(); //不写jvm默认赠送一个父类的无参构造
    }

    public static void main(String[] args) {
        Teacher teacher = new Teacher();

        teacher.func1();
    }

    @Override
    public void func1() {
        int num = 30;
        System.out.println(num);
        System.out.println(this.num);
        System.out.println(super.num);

        // 调用父类方法

        super.func1();
    }
}
this
package com.wyh.day0328;
/*
*
* this关键字的用法有三种
* 1 在本类的成员方法中,访问父类的成员变量.
* 2 在本类的成员方法中,访问父类的成员方法.
* 3 在本类的成员方法中,访问父类的构造方法.
*
* 在第三种用法中要注意
* A  this(...)调用也必须是构造方法的第一个语句,唯一一个.
* B super和this两种构造调用,不能同时使用.
* */
public class Teacher extends Employee {

    int num = 20;

    public Teacher() {
//        super(); //这一行不在赠送
        this(10);  // 本类的无参构造调用本类的有参构造
    }

    public Teacher(int num) {
        this.num = num;
    }

    public static void main(String[] args) {
        Teacher teacher = new Teacher();

        teacher.func1();
    }

    @Override
    public void func1() {
        int num = 30;
        System.out.println(num);
        System.out.println(this.num);
        System.out.println(super.num);

        // 调用父类方法

        super.func1();

        this.func2();
    }


    public void func2() {
        System.out.println("调用func2");
    }
}
7 字节输出流和字节输入流
package com.wyh.demo08;

import java.io.*;

public class OutPutStreamDemo {
    public static void main(String[] args) {
        //第一步:使用一个File类找到一个文件
        String rootPath = System.getProperty("user.dir");
        System.out.println(rootPath);
        String filePath = rootPath + File.separator + "123.txt";
        File file = new File(filePath); //这里只是创建了文件(或文件夹)对象,并没有创建文件
        //第二步:通过输出流子类FileOutPutStream实例化父类对象
        OutputStream out = null;
        try {
            out = new FileOutputStream(file, true);  //追加模式
        } catch (FileNotFoundException e) {
            e.printStackTrace();
        }
        //第三部:进行读写操作
        String str = "Hello World!!!\r\n";
        byte[] b = str.getBytes();
        try {
            out.write(b);
        } catch (IOException e) {
            e.printStackTrace();
        }
        //第四步:关闭输出流
        try {
            out.close();
        } catch (IOException e) {
            e.printStackTrace();
        }
    }
}
package com.wyh.demo08;

import java.io.*;

public class FileInPutStreamDemo {
    public static void main(String[] args) throws IOException {
        //第一步:使用一个File类找到一个文件
        String rootPath = System.getProperty("user.dir");
        System.out.println(rootPath);
        String filePath = rootPath + File.separator + "123.txt";
        File file = new File(filePath); //这里只是创建了文件(或文件夹)对象,并没有创建文件

        InputStream input = null;
        input = new FileInputStream(file);
        byte[] b = new byte[(int) file.length()];
        int len = input.read(b);
        int temp = 0;


        while ((temp = input.read()) != -1) {
            b[len] = (byte) temp;
            len++;
        }


        input.close();

        System.out.println("读入数组的长度:" + len);
        System.out.println("内容为:" + new String(b, 0, len));
    }
}
8 复制文件
package com.wyh.demo08;

import jdk.internal.util.xml.impl.Input;

import javax.sound.midi.Soundbank;
import java.io.*;

public class Copy {
    public static void main(String[] args) {
        if (args.length != 2) {
            System.out.println("输入的参数不正确:");
            System.out.println("例: java Copy 源文件路径 目标文件路径");
            System.exit(1);
        }

        File file1 = new File(args[0]);   //源文件对象
        File file2 = new File(args[1]);  //目标文件对象

        if (!file1.exists()) {
            System.out.println("源文件不存在!");
            System.exit(1);
        }

        InputStream input = null;     //准备好输入流对象,读取源文件
        OutputStream output = null;     //准备好输出流对象,写入目标文件

        try {
            input = new FileInputStream(file1);
        } catch (FileNotFoundException e) {
            e.printStackTrace();
        }
        try {
            output = new FileOutputStream(file2);
        } catch (FileNotFoundException e) {
            e.printStackTrace();
        }
        if (input != null && output != null) {
            int temp = 0;
            try {
                while ((temp = input.read()) != -1) {
                    output.write(temp);
                    System.out.println("复制完成!");
                }
            } catch (IOException e) {
                e.printStackTrace();
                System.out.println("复制失败!!!");
            }
            try {
                input.close();
                output.close();
            } catch (IOException e) {
                e.printStackTrace();
            }
        }
    }
}
9 键盘输入的标准格式
package com.wyh.demo09;

import java.io.BufferedReader;
import java.io.IOException;
import java.io.InputStreamReader;

public class BufferdReaderDemo {
    public static void main(String[] args) {
        BufferedReader buf = null;
        buf = new BufferedReader(new InputStreamReader(System.in));

        String str = null;
        System.out.print("请输入内容:");
        try {
            str = buf.readLine();
        } catch (IOException e) {
            e.printStackTrace();
        }
        System.out.println("输入的内容为:" + str);
    }
}
10 合并流
package com.wyh.demo09;

import jdk.internal.util.xml.impl.Input;

import java.io.*;

public class SequenceDemo {
    public static void main(String[] args) throws IOException {
        InputStream is1 = null;
        InputStream is2 = null;
        OutputStream os = null;
        SequenceInputStream sis = null;

        String rootPath = System.getProperty("user.dir");

        is1 = new FileInputStream(rootPath + File.separator + "a.txt");
        is2 = new FileInputStream(rootPath + File.separator + "b.txt");

        os = new FileOutputStream(rootPath + File.separator + "ab.txt");
        sis = new SequenceInputStream(is1, is2);  //实例化合并流

        int temp = 0;

        while ((temp = sis.read()) != -1) {
            os.write(temp);
        }

        sis.close();
        is1.close();
        is2.close();
        os.close();
    }

}
11 集合操作
package com.wyh.demo10;


import java.util.ArrayList;
import java.util.Collection;
import java.util.List;

public class demoMain {
    public static void main(String[] args) {
        List<String> allList = null;
        Collection<String> allCollection = null;

        allList = new ArrayList<>();
        allCollection = new ArrayList<>();
        //给集合添加元素
        allList.add("hello");
        allList.add(0, "World!!");

        System.out.println(allList);

        allCollection.add("WYH");
        allCollection.add("www.baidu.com");
        allList.addAll(0, allCollection);
        System.out.println(allList);
        //删除集合元素
        allList.remove("WYH");
        allList.remove(0);
        System.out.println(allList);
        //输出集合内容
        for (int i = 0; i < allList.size(); i++) {
            System.out.print(allList.get(i) + ",");
        }
        //将集合变成对象数组
        Object[] obj = allList.toArray();

        for (int i = 0; i < obj.length; i++) {
            String temp = (String) obj[i];
            System.out.println(temp + ",");
        }

        //集合其他操作
        System.out.println(allList.contains("Hello") ? "存在Hello" : "不存在Hello");

        System.out.println("Hello的位置" + allList.indexOf("hello"));
        System.out.println("集合是否为空:" + allList.isEmpty());

        //截取部分元素
        List<String> subList = allList.subList(1, 2);
        System.out.println(subList);

    }
}
12 枚举类的实现
package com.wyh.demo10;

public class Color {
    public static final Color RED = new Color("红色");
    public static final Color GREEN = new Color("绿");
    public static final Color BLUE = new Color("蓝色");
    private String name;

    private Color(String name) {
        this.setName(name);
    }

    public String getName() {
        return name;
    }

    public void setName(String name) {
        this.name = name;
    }

    public static Color getInstance(int i) {
        switch (i) {
            case 1:
                return RED;
            case 2:
                return GREEN;
            case 3:
                return BLUE;
            default:
                return null;
        }
    }
}
13 自定义注释Annotation
定义一个枚举,限制注释的输入
package com.wyh.demo11;

public enum MyName {
    WYH, LXY, LWQ
}
定义一个注释,部分属性设置默认值.
package com.wyh.demo11;

public @interface MyDefaultAnnotationNoneParam {
    public String key();

    public String value();

    public String[] strArr() default {};

    public MyName name() default MyName.WYH;
}
自定义注释使用
package com.wyh.demo11;

@MyDefaultAnnotationNoneParam(key = "name", value = "张三",name = MyName.LWQ)
public class Person {
    public String getInfo() {
        return "这是一个person类";
    }
}
14 通过反射取得Annotation
创建一个加了注释的类
package com.wyh.demo11;

public class SimpleBeanOne {
    @SuppressWarnings("unchecked")
    @Deprecated
    @Override
    public String toString() {
        return "hello wyh!!";
    }
}
通过反射获取注释
package com.wyh.demo11;

import java.lang.annotation.Annotation;
import java.lang.reflect.Method;

public class ReflectDemo01 {

    public static void main(String[] args) throws Exception {
        Class<?> c = null;
        c = Class.forName("com.wyh.demo11.SimpleBeanOne");
        Method toM = c.getMethod("toString");
        Annotation an[] = toM.getAnnotations();

        for (Annotation a : an) {
            System.out.println(a);
        }
    }
}
结果只有一个注释,这是因为只有一个注释的信息会在jvm运行时保留(可查看Retention和RetentionPolicy).

15 获取指定Annotation中的内容
创建一个自定义注释,并设置注释期限
package com.wyh.demo11;

import java.lang.annotation.Retention;
import java.lang.annotation.RetentionPolicy;

@Retention(value = RetentionPolicy.RUNTIME)  // SOURCE保留在.java文件中, CLASS 保留在.java和.class文件中 ,RUNTIME  保留到jvm运行
public @interface MyAnnotationReflect {
    public String key() default "WYH";

    public String value() default "laowang";
}
使用注释
package com.wyh.demo11;

public class SimpleBeanOne {
    @SuppressWarnings("unchecked")
    @Deprecated
    @Override
    @MyAnnotationReflect(key = "百度", value = "www.baidu.com")
    public String toString() {
        return "hello wyh!!";
    }
}
获取指定Annotation
package com.wyh.demo11;

import java.lang.annotation.Annotation;
import java.lang.reflect.Method;

public class ReflectDemo02 {
    public static void main(String[] args) throws Exception {
        Class<?> c = null;
        c = Class.forName("com.wyh.demo11.SimpleBeanOne");
        Method toM = c.getMethod("toString");
        if (toM.isAnnotationPresent(MyAnnotationReflect.class)) {
            MyAnnotationReflect mda = null;

            //取得自定义annotation
            mda = toM.getDeclaredAnnotation(MyAnnotationReflect.class);
            String key = mda.key();  //得到annotation中指定的变量内容
            String value = mda.value();
            System.out.println("key: " + key);
            System.out.println("value: " + value);
        }
    }
}

16 定义Annotation的声明位置@Target注释
package com.wyh.demo11;

import java.lang.annotation.ElementType;
import java.lang.annotation.Retention;
import java.lang.annotation.RetentionPolicy;
import java.lang.annotation.Target;

@Target(value = {ElementType.ANNOTATION_TYPE   //只能用在注释的声明上
        , ElementType.CONSTRUCTOR  //只能用在构造方法的声明上
        , ElementType.FIELD   // 只能用在字段的声明上(包括枚举常量)
        , ElementType.LOCAL_VARIABLE  // 只能用在局部变量的声明上
        , ElementType.METHOD  //只能用在方法的声明上
        ,ElementType.PACKAGE  // 只能用在包的声明上
        ,ElementType.PARAMETER // 只能用在参数的声明上
        ,ElementType.TYPE}) // 只能用在类 接口 枚举类型上
@Retention(value = RetentionPolicy.RUNTIME)  // SOURCE保留在.java文件中, CLASS 保留在.java和.class文件中 ,RUNTIME  保留到jvm运行
public @interface MyAnnotationReflect {
    public String key() default "WYH";

    public String value() default "laowang";
}
17 jdbc连接mysql数据库
package com.wyh.jdbc;

import java.sql.Connection;
import java.sql.Driver;
import java.sql.DriverManager;
import java.sql.SQLException;

public class demoMain {
    //定义mysql的数据库驱动程序
    public static final String DBDRIVER = "org.gjt.mm.mysql.Driver";
    //定义mysql数据库的连接地址
    public static final String  DBURL = "jdbc:mysql://localhost:3306/wyh_ind";
    //mysql数据库的连接用户名
    public static final String DBUSER = "root";
    //mysql数据库连接密码
    public static final String DBPASS = "mysql";
    public static void main(String[] args) {
        Connection conn = null;
        try {
            Class.forName(DBDRIVER);
        } catch (ClassNotFoundException e) {
            e.printStackTrace();
        }
        try {
            //连接mysql数据库,填写连接的用户名和密码
            conn = DriverManager.getConnection(DBURL, DBUSER, DBPASS);
        } catch (SQLException e) {
            e.printStackTrace();
        }
        System.out.println(conn);
        try {
            conn.close();
        } catch (SQLException e) {
            e.printStackTrace();
        }
    }
}
增
package com.wyh.jdbc;

import java.sql.*;

public class demoMain2 {
    //定义mysql的数据库驱动程序
    public static final String DBDRIVER = "org.gjt.mm.mysql.Driver";
    //定义mysql数据库的连接地址
    public static final String DBURL = "jdbc:mysql://localhost:3306/wyh_ind";
    //mysql数据库的连接用户名
    public static final String DBUSER = "root";
    //mysql数据库连接密码
    public static final String DBPASS = "mysql";

    public static void main(String[] args) throws Exception {
        Connection conn = null;  // 数据库连接
        Statement statement = null;  // 数据库操作
        String sql = "INSERT INTO books VALUES (11, '射雕英雄传', '1980-5-1', 12, 34, 0);";
        Class.forName(DBDRIVER); //加载驱动程序

        //连接mysql数据库,填写连接的用户名和密码
        conn = DriverManager.getConnection(DBURL, DBUSER, DBPASS);
        statement = conn.createStatement(); //实例化Statement对象
        statement.executeUpdate(sql);
        statement.close();
        conn.close();

    }
}
删
package com.wyh.jdbc;

import java.sql.*;

public class demoMain2 {
    //定义mysql的数据库驱动程序
    public static final String DBDRIVER = "org.gjt.mm.mysql.Driver";
    //定义mysql数据库的连接地址
    public static final String DBURL = "jdbc:mysql://localhost:3306/wyh_ind";
    //mysql数据库的连接用户名
    public static final String DBUSER = "root";
    //mysql数据库连接密码
    public static final String DBPASS = "mysql";

    public static void main(String[] args) throws Exception {
        Connection conn = null;  // 数据库连接
        Statement statement = null;  // 数据库操作
        int id = 11;
        String sql = "delete from books where id=" + id ;
        Class.forName(DBDRIVER); //加载驱动程序

        //连接mysql数据库,填写连接的用户名和密码
        conn = DriverManager.getConnection(DBURL, DBUSER, DBPASS);
        statement = conn.createStatement(); //实例化Statement对象
        statement.executeUpdate(sql);
        statement.close();
        conn.close();

    }
}
改
package com.wyh.jdbc;

import java.sql.*;

public class demoMain2 {
    //定义mysql的数据库驱动程序
    public static final String DBDRIVER = "org.gjt.mm.mysql.Driver";
    //定义mysql数据库的连接地址
    public static final String DBURL = "jdbc:mysql://localhost:3306/wyh_ind";
    //mysql数据库的连接用户名
    public static final String DBUSER = "root";
    //mysql数据库连接密码
    public static final String DBPASS = "mysql";

    public static void main(String[] args) throws Exception {
        Connection conn = null;  // 数据库连接
        Statement statement = null;  // 数据库操作
        int id = 1;
        String sql = "update  books set is_delete = 1 where id=" + id ;
        Class.forName(DBDRIVER); //加载驱动程序

        //连接mysql数据库,填写连接的用户名和密码
        conn = DriverManager.getConnection(DBURL, DBUSER, DBPASS);
        statement = conn.createStatement(); //实例化Statement对象
        statement.executeUpdate(sql);
        statement.close();
        conn.close();

    }
}
查
package com.wyh.jdbc;
import java.sql.*;
public class demoMain2 {
//定义mysql的数据库驱动程序
public static final String DBDRIVER = "org.gjt.mm.mysql.Driver";
//定义mysql数据库的连接地址
public static final String DBURL = "jdbc:mysql://localhost:3306/wyh_ind";
//mysql数据库的连接用户名
public static final String DBUSER = "root";
//mysql数据库连接密码
public static final String DBPASS = "mysql";
public static void main(String[] args) throws Exception {
Connection conn = null; // 数据库连接
Statement statement = null; // 数据库操作
ResultSet res = null; //保存查询结果,放到内存中,所以要控制查询量
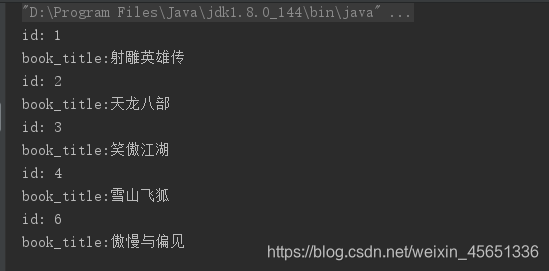
String sql = "select id, book_title from books";
Class.forName(DBDRIVER); //加载驱动程序
//连接mysql数据库,填写连接的用户名和密码
conn = DriverManager.getConnection(DBURL, DBUSER, DBPASS);
statement = conn.createStatement(); //实例化Statement对象
res = statement.executeQuery(sql);
while (res.next()) {
int id = res.getInt("id"); //取得id内容,使用列名
String booktitle = res.getString(2); // 取得booktitle内容,使用索引,建议使用索引,简单方便
System.out.println("id: " + id);
System.out.println("book_title:" + booktitle);
}
statement.close();
conn.close();
}
}
使用prepareStatement执行数据库操作,提升效率
package com.wyh.jdbc;

import java.sql.Connection;
import java.sql.DriverManager;
import java.sql.PreparedStatement;
import java.text.ParseException;
import java.text.SimpleDateFormat;

public class PreparedStatementDemo01 {
    //定义mysql的数据库驱动程序
    public static final String DBDRIVER = "org.gjt.mm.mysql.Driver";
    //定义mysql数据库的连接地址
    public static final String DBURL = "jdbc:mysql://localhost:3306/wyh_ind";
    //mysql数据库的连接用户名
    public static final String DBUSER = "root";
    //mysql数据库连接密码
    public static final String DBPASS = "mysql";

    public static void main(String[] args) throws Exception {
        Connection conn = null;
        PreparedStatement pstmt = null;
        String name = "wyh";
        String password = "mysql";
        int age = 18;
        String sex = "F";
        String birthday = "2020-01-01";
        java.util.Date temp = null;
        //通过SimpleDateFormat类将一个字符串变成java,util.Date类型
        temp = new SimpleDateFormat("yyyy-MM-dd").parse(birthday);
        //通过java.util.Date取出具体的日期,并将其变成java,sql.Date类型
        java.sql.Date bir = new java.sql.Date(temp.getTime());

        String sql = "insert into user(name,password,age,sex,birthday) values(?,?,?,?,?)";

        Class.forName(DBDRIVER); //加载驱动程序

        //连接mysql数据库,填写连接的用户名和密码
        conn = DriverManager.getConnection(DBURL, DBUSER, DBPASS);
        pstmt = conn.prepareStatement(sql);               //实例化prepareStatement
        pstmt.setString(1, name);    // 设置第一个?的内容
        pstmt.setString(2, password);    // 设置第二个?的内容
        pstmt.setInt(3, age);    // 设置第三个?的内容
        pstmt.setString(4, sex);    // 设置第四个?的内容
        pstmt.setDate(5, bir);    // 设置第五个?的内容
        pstmt.executeUpdate();  // 执行数据库更新操作,不需要sql

        pstmt.close();
        conn.close();


    }
}
CallableStatement 调用存储过程
delimiter //
drop procedure if exists myprco //
create procedure myprco(in p1 int, inout p2 int, out p3 int)
  begin
    select p1, p2, p3;
    set p1 = 10;  --修改p1
    set p2 = 20;   --修改p2
    set p3 = 30;   --修改p3
  end //

delimiter ;
set @x1 = 70;
set @x2 = 80;
call myprco(@x1,@x2,@x3);

select @x1,@x2,@x3 ;

in --> 只是将值传进来
inout -- 需要传值,并且可以把过程修改的值返回
out --> 可以不传值,过程对此值得修改可以返回
package com.wyh.jdbc;

import java.sql.*;
import java.text.ParseException;
import java.text.SimpleDateFormat;

public class PrcoDemo {
    //定义mysql的数据库驱动程序
    public static final String DBDRIVER = "org.gjt.mm.mysql.Driver";
    //定义mysql数据库的连接地址
    public static final String DBURL = "jdbc:mysql://localhost:3306/wyh_ind";
    //mysql数据库的连接用户名
    public static final String DBUSER = "root";
    //mysql数据库连接密码
    public static final String DBPASS = "mysql";

    public static void main(String[] args) throws Exception {
        Connection conn = null;
        CallableStatement cstmt = null;


        String sql = "{CALL myprco(?,?,?)}";

        Class.forName(DBDRIVER); //加载驱动程序

        //连接mysql数据库,填写连接的用户名和密码
        conn = DriverManager.getConnection(DBURL, DBUSER, DBPASS);
        cstmt = conn.prepareCall(sql);
        cstmt.setInt(1, 70);  // 第一个入参
        cstmt.setInt(2, 80);//第二个入参
        cstmt.registerOutParameter(2, Types.INTEGER); //设置返回值类型
        cstmt.registerOutParameter(3, Types.INTEGER);//设置返回值类型
        cstmt.execute();  //执行存储过程
        System.out.println("input的返回值:" + cstmt.getInt(2));
        System.out.println("out的返回值:" + cstmt.getInt(3));

        cstmt.close();
        conn.close();


    }
}


 被折叠的 条评论
为什么被折叠?
被折叠的 条评论
为什么被折叠?
 到【灌水乐园】发言


