


 本文深入讲解Yii2框架的核心组件和工作流程,包括依赖注入、事件处理、用户认证、权限管理、缓存机制、数据操作及数据提供器等功能,旨在帮助开发者全面掌握Yii2的使用技巧。
index.php(入口文件)->event_before_request->处理请求(解析路由)->创建路由对应的模块,控制器,操作对应的实例->过滤器->数据模型->视图->响应组件-> EVENT_AFTER_REQUEST ->用户浏览器
入口文件:定义全局变量,注册composer自动加载器,包含yii类文件,加载应用配置,创建一个应用实例并配置,调用run()来处理请求。
应用:yii\base\Application::id,yii\base\Application::basePath,yii\base\Application::aliases,bootstrap,catchAll,yii\base\Application::components,yii\base\Application::controllerMap,controllerNamespace,language,yii\base\Application::modules,name,yii\base\Application::params,sourceLanguage,yii\base\Application::timeZone,yii\base\Application::layoutPath,yii\base\Application::runtimePath,yii\base\Application::viewPath,yii\base\Application::vendorPath,on eventName (EVENT_BEFORE_REQUEST,EVENT_AFTER_REQUEST),yii\base\Application::defaultRoute
入口脚本调用 yii\base\Application::run() 运行应用主体:
触发 EVENT_BEFORE_REQUEST 事件。
处理请求:解析请求 路由 和相关参数; 创建路由指定的模块、控制器和动作对应的类,并运行动作。
触发 EVENT_AFTER_REQUEST 事件。
发送响应到终端用户.
应用组件:引导启动组件,核心应用组件
模块:控制器负责处理请求和生成响应;控制器由 操作 组成,它是执行终端用户请求的最基础的单元, 一个控制器可有一个或多个操作;模型是代表业务数据、规则和逻辑的对象(属性,属性标签,块赋值,验证规则,数据导出);视图(render(),renderPartial(),renderAjax(),renderContent());yii\base\Application::modules
过滤:过滤器是 控制器动作 执行之前或之后执行的对象。可以在控制器类中覆盖它的 yii\base\Controller::behaviors() 方法来声明过滤器。
小部件:主要继承yii\base\Widget,且重写init,run方法,调用XX::widget()
jsOptions: 当调用yii\web\View::registerJsFile()注册该包 每个 JavaScript文件时, 指定传递到该方法的选项。
cssOptions: 当调用yii\web\View::registerCssFile()注册该包 每个 css文件时, 指定传递到该方法的选项。
Yii框架定义许多资源包,如下资源包是最常用, 可在你的应用或扩展代码中引用它们。
yii\web\YiiAsset: 主要包含yii.js 文件,该文件完成模块JavaScript代码组织功能, 也为 data-method 和 data-confirm属性提供特别支持和其他有用的功能。
yii\web\JqueryAsset: 包含从jQuery bower 包的jquery.js文件。
yii\bootstrap\BootstrapAsset: 包含从Twitter Bootstrap 框架的CSS文件。
yii\bootstrap\BootstrapPluginAsset: 包含从Twitter Bootstrap 框架的JavaScript 文件 来支持Bootstrap JavaScript插件。
yii\jui\JuiAsset: 包含从jQuery UI库的CSS 和 JavaScript 文件。
<?php
use backend/assets/AppAsset;
AppAssets::register($this);//给该视图注册资源包
?>
<?php $this->beginPage()?>
<html>
    ...
    ...
    <?php $this->head();?>//输出我们的资源
    ....
    ....
 <body>
    <?php $this->beginBody();?>
    ...
    ...
    <?php $this->endBody();?>
 </body>
    ...
    ...
</html>
 <?php $this->endPage()?>
?>
YII2的核心就是依赖注入和事件处理。
- composer 安装
用composer创建自己的项目,a. composer init b. composer install c. require ‘…/vendor/autoload.php’
d. 修改composer.json,增加autoload项,并增加psr-4自动加载规范,并在psr-4增加 命名空间:目录 对应关系 e. composer dump-autoload f.开始编程 - 安装yii2
composer create-project --prefer-dist yiisoft/yii2-app-advanced yii-application - 初始化 ,执行init脚本
- 导入test数据,执行yii migrate
- model。
a. extend model,extends ActiveRecord
b. rules()
c. load()
d. validate()
e. tableName()
f. 链式。static::find()->where([])->select()->limit()
g. $query->createCommand()->getRawSql() - redis组件
main.php添加组件信息,redis建议使用unixSocket连接,速度快点。
'redis' => [
            'class' => 'yii\redis\Connection',
            'hostname' => 'localhost',
            'port' => 6379,
            'database' => 0,
            'password'  => 'rdsFD',
            'unixSocket' => '/tmp/redis.sock',
        ],
- log组件
'log' =>[
            # 追踪级别
            # 消息跟踪级别
            # 在开发的时候,通常希望看到每个日志消息来自哪里。这个是能够被实现的,通过配置 log 组件的 yii\log\Dispatcher::traceLevel 属性, 就像下面这样:
            'traceLevel' => YII_DEBUG ? 3 : 0,

            # 通过 yii\log\Logger 对象,日志消息被保存在一个数组里。为了这个数组的内存消耗, 当数组积累了一定数量的日志消息,日志对象每次都将刷新被记录的消息到 log targets 中。 你可以通过配置 log 组件的 yii\log\Dispatcher::flushInterval 属性来自定义数量
            'flushInterval' => 1,

            'targets' => [
                'db' =>[
                    //'levels' => ['warning'],

                    'categories' => ['appadmin'],
                    #'class' => 'yii\log\FileTarget',
                    'class' => 'yii\log\DbTarget',
                    # 当 yii\log\Logger 对象刷新日志消息到 log targets 的时候,它们并 不能立即获取导出的消息。相反,消息导出仅仅在一个日志目标累积了一定数量的过滤消息的时候才会发生。你可以通过配置 个别的 log targets 的 yii\log\Target::exportInterval 属性来 自定义这个数量,就像下面这样:
                    'exportInterval' => 1,
                    # 输出文件
                    //'logFile' => '@app/runtime/logs/appadmin.log',
                    'logTable' => '{{%system_log}}',
                    # 你可以通过配置 yii\log\Target::prefix 的属性来自定义格式,这个属性是一个PHP可调用体返回的自定义消息前缀
                    //'prefix' => function ($message) {

                    //  return $message;
                    //},
                    # 除了消息前缀以外,日志目标也可以追加一些上下文信息到每组日志消息中。 默认情况下,这些全局的PHP变量的值被包含在:$_GET, $_POST, $_FILES, $_COOKIE,$_SESSION 和 $_SERVER 中。 你可以通过配置 yii\log\Target::logVars 属性适应这个行为,这个属性是你想要通过日志目标包含的全局变量名称。 举个例子,下面的日志目标配置指明了只有 $_SERVER 变量的值将被追加到日志消息中。
                    # 你可以将 logVars 配置成一个空数组来完全禁止上下文信息包含。或者假如你想要实现你自己提供上下文信息的方式, 你可以重写 yii\log\Target::getContextMessage() 方法。
                     'logVars' => [],
                ],
                /*
                'file' =>[
                    'levels' => ['trace'],
                    'categories' => ['mylog'],
                    'class' => 'yii\log\FileTarget',
                    # 当 yii\log\Logger 对象刷新日志消息到 log targets 的时候,它们并 不能立即获取导出的消息。相反,消息导出仅仅在一个日志目标累积了一定数量的过滤消息的时候才会发生。你可以通过配置 个别的 log targets 的 yii\log\Target::exportInterval 属性来 自定义这个数量,就像下面这样:
                    'exportInterval' => 1,
                    # 输出文件
                    'logFile' => '@app/runtime/logs/my.log',
                    # 你可以通过配置 yii\log\Target::prefix 的属性来自定义格式,这个属性是一个PHP可调用体返回的自定义消息前缀
                    'prefix' => function ($message) {

                        return $message;
                    },
                    # 除了消息前缀以外,日志目标也可以追加一些上下文信息到每组日志消息中。 默认情况下,这些全局的PHP变量的值被包含在:$_GET, $_POST, $_FILES, $_COOKIE,$_SESSION 和 $_SERVER 中。 你可以通过配置 yii\log\Target::logVars 属性适应这个行为,这个属性是你想要通过日志目标包含的全局变量名称。 举个例子,下面的日志目标配置指明了只有 $_SERVER 变量的值将被追加到日志消息中。
                    # 你可以将 logVars 配置成一个空数组来完全禁止上下文信息包含。或者假如你想要实现你自己提供上下文信息的方式, 你可以重写 yii\log\Target::getContextMessage() 方法。
                     'logVars' => [],
                ],
                */
            ],
        ],

./yii migrate --migrationPath=@yii/log/migrations/   初始化log表,文件。
\Yii::info('111111111','appadmin');
- helper类 这些助手类被编写在命名空间 yii\helpers 下,并且 全是静态类 (就是说它们只包含静态属性和静态方法,而且不能实例化)
@app/components/ArrayHelper.php
<?php

namespace yii\helpers;

class ArrayHelper extends BaseArrayHelper
{
    public static function merge($a, $b)
    {
        // 你自定义的实现
    }
}

入口文件
Yii::$classMap['yii\helpers\ArrayHelper'] = '@app/components/ArrayHelper.php';

$username = ArrayHelper::getValue($comment, 'user.username', 'Unknown');
ArrayHelper::setValue($array, 'key.in', ['arr' => 'val']);
$type = ArrayHelper::remove($array, 'type');
ArrayHelper::keyExists('username', $data1, false)
ArrayHelper::getColumn($array, 'id');
$result = ArrayHelper::index($array, 'id');    重建索引,把数组中id值设置为索引
 ArrayHelper::map($array, $from, $to, $group);
 ArrayHelper::multisort($data, ['age', 'name'], [SORT_ASC, SORT_DESC]);  多维排序
 ArrayHelper::htmlEncode($data);
 ArrayHelper::htmlDecode($data);
 ArrayHelper::merge($array1, $array2);
 $data = ArrayHelper::toArray($posts, [
    'app\models\Post' => [
        'id',
        'title',
        // the key name in array result => property name
        'createTime' => 'created_at',
        // the key name in array result => anonymous function
        'length' => function ($post) {
            return strlen($post->content);
        },
    ],
]);

 创建url
 $url = \yii\helpers\Url::toRoute(['product/view', 'id' => 42,'#' => 'name']);
 $url = \yii\helpers\Url::to($url,true);
Html::tag(‘p’, Html::encode($user->name), [‘class’ => ‘username’])
这个方法的第一个参数是标签名称。第二个是要装入到开始和结束标签间的内容。第三个参数是标签属性.
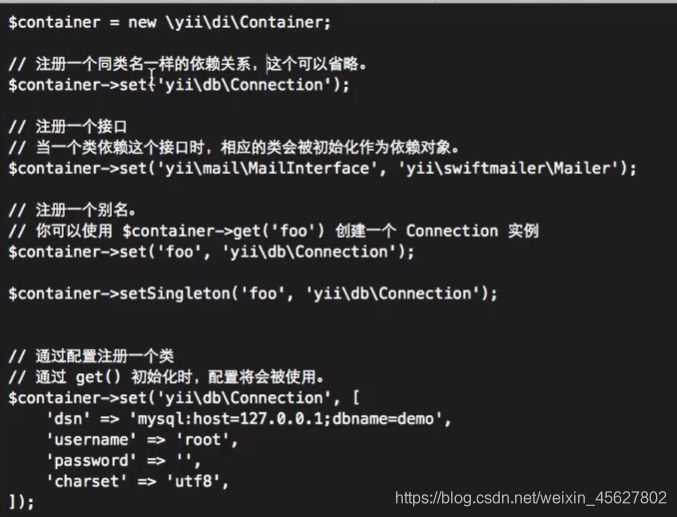
- 依赖注入。
它把传统上由程序代码直接操控的对象的调用权交给容器,通过容器来实现对象组件的装配和管理。所谓的“控制反转”概念就是对组件对象控制权的转移,从程序代码本身转移到了外部容器。
//通过构造方法实现依赖注入
class Foo
{
	public function __construct(Bar $bar){}
}

\yii\di\container->get('Foo'); //就会主动去实例化new Bar,注入Foo实例中

//回调注入
\yii\di\container->set("Foo",function(){return new Foo(new Bar)})
\yii\di\container->get('Foo'); //就会去调用回调函数new Foo(new Bar)

//单例注册
\yii\di\container->set() 与\yii\di\container->setsingleton()
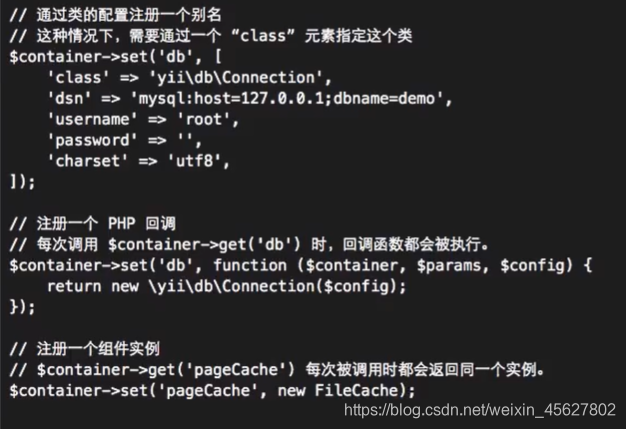
11. 服务定位器
\yii\di\ServiceLocator主要是将配置文件中components数组里的组件进行注册
如\yii\di\ServiceLocator::set(‘pageCache’,new yii\cache\FileCache),\yii\di\ServiceLocator::get(‘pageCache’),\yii\di\ServiceLocator::has(‘pageCache’)
- 用户认证
必须实现 yii\web\IdentityInterface的findIdentity($id),findIdentityByAccessToken($token, $type = null),getId,getAuthKey,validateAuthKey($authKey)等方法;login(),logout()
生成随机字符串Yii::$app->security->generateRandomString()
配置用户认证组件
'components' => [
	'user' => [
            'identityClass' => 'fecshop\models\mysqldb\AdminUser',
            'enableAutoLogin' => true,
        ],
  避免前后台session共用了
  'session' => [
           'name'=>'appadmin',
           'savePath' => sys_get_temp_dir(),
      ]
   ]

Yii::$app->user->identity;
Yii::$app->user->id;
Yii::$app->user->isGuest;
Yii::$app->user->login($identity);
Yii::$app->user->logout();
- 授权
方式一 存取控制过滤器 ACF
通过yii\filters\AccessControl类来实现的简单授权方法。
在控制器中behaviors方法中设定存取的规则。当用户请求一个动作时,ACF会检查存取规则,判断用户是否允许执行所请求的动作
public function behaciors(){
	return [
        'access' => [
            'class'=>AccessControl::className,
            'only' => ['index','view','update','delete'],
            'except' => ['update'],
            'denyCallback' => function($rule, $action){
                throw new ForbiddenHttpException("你没有权限访问这个网页");
            },
            'rules' => [
            [
				'actions' => ['login','error'],
				'allow' => true,
				'roles' => ['?','@'], //维护了一个角色数组,其中?代表游客,@代表登录的人,此外还可以是RBAC中定义的角色。
				'verbs' => ['POST'],
				'ips'=>[
				    192,168.*,      //*是通配符
				    10.12.1.182,
				],
				'matchCallback' => function ($rule, $action) {
                        return date('d-m') === '11-11';
                    },
                'denyCallback' => function($rule, $action){
                throw new ForbiddenHttpException("你没有权限访问这个网页");
            },
			]]
        ]
    ]
}
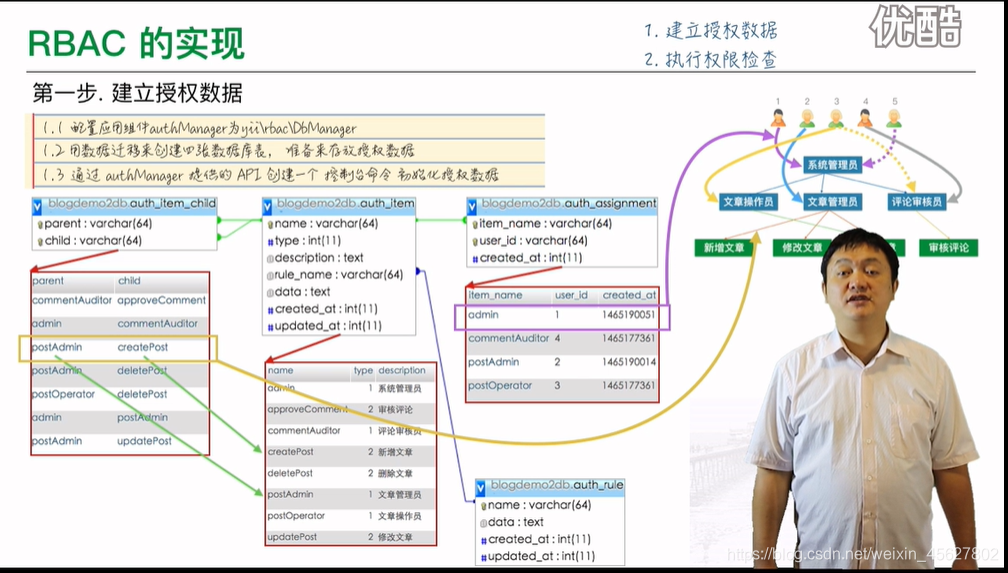
方式二 RBAC
角色是权限的集合,一个角色可以指派给一个或多个用户。
角色和权限都实现了树的层次结构,一个角色可能由其他角色或权限构成,权限也可以由其他权限构成。
系统会检查包含该权限的角色是否指派给了该用户。
配置应用组件authManager为yii\rbac\DbManager
所需数据表:auth_item_child:parent_item_name,child_item_name
auth_item:item_name,type,rule_name
auth_assignment:item_name,user_id
auth_rule:rule_name,data
可以通过数据迁移安装数据表: yii migrate --migrationPath=@yii/rbac/migrations
只能在console平台使用
$auth = Yii::$app->authManager;
添加权限
$createPermission=$auth->createPermission("createPost");
$createPermission->description="Create Post";
$auth->add($createPermission)
添加角色
$author=$auth->createRole("author");
$auth->add($author);
$auth->addChild($author,$createPermission);
将角色指派给用户
$auth->assign($author,1)
执行权限检查
public function actionCreate()
{
	if(!Yii::$app->user->can('createPost')){
		throw new ForbiddenHttpException("你没有权限访问这个网页");
	}
}
添加rule规格
首先需要创建一个类,继承yii\rbac\Rule,实现execute($user,$item,$params=array())
class AuthorRule extends \yii\rbac\Rule
{
    public $name='isAuthor';
	public function execute($user,$item,$params){
		return $user->id===$params['userid'];
	}
}
将规则添加到权限,保存的时候是先把对象序列化成字符串。读取资源流后用stream_get_contents转化成字符串再反序列化成对象
$auth=Yii::$app->authManager;
$rule=new AuthorRule();
$auth->add($rule)
<?php
namespace frontend\service;
	/**
	 * 用户业务逻辑接口
	 */
    interface IUserService{


    	public function getAllUsers();


    	public function getUserById($id);


    }

<?php
namespace frontend\service;
use frontend\models\User;
use yii\base\Object;
	/**
	 *用户业务逻辑实现
	 *实现用户业务逻辑接口
	 *
	 */
   class IUserServiceimpl extends Object implements IUserService{


		 public function __construct()
		    {

		        parent::__construct();
		    }

   		public function getAllUsers(){

   			//$list = User::find()->asArray()->all();
   			//$user = new User();
   			$list = User::getInstance()->getAllUsers();

   			return $list ? $list : [];

   		}
   		public function getUserById($id){

   				return User::findOne($id);

   		}


   }

<?php
 /**
   * $event->name,$event->sender,$event->data
   * 事件的使用主要是使用了\yii\base\component::on方法,调用回调
   * 处理器是全局函数 \yii\base\component::on(XX::EVENT_INFO,'function_name')
   * 处理器是对象方法 \yii\base\component::on(XX::EVENT_INFO,[$object,'methodName'])
   * 处理器是静态类方法 \yii\base\component::on(XX::EVENT_INFO,['app\components\Bar','methodName'])
   * 处理器是匿名函数 \yii\base\component::on(XX::EVENT_INFO,function($event){})
   * 事件的触发 \yii\base\component::trigger(XX::EVENT_INFO)
   * 事件的移除(跟on的调用一样) \yii\base\component::off()
   * 类级别事件(如追踪ActiveRecord插入) \yii\base\Event::on(ActiveRecord::className(),ActiveRecord::EVENT_AFTER_INSERT,调用(跟\yii\base\component::on的调用用法一样)),触发\yii\base\Event::trigger(ActiveRecord::EVENT_AFTER_INSERT)
 **/
namespace frontend\models;

use yii\base\Model;
use yii\db\ActiveRecord;
use Yii;
use frontend\models\Order;
use yii\web\IdentifyInterface;

    class User extends ActiveRecord
     {

        // 第一步:定义自己的事件
        const EVENT_BEFORE_MARK_QUERY = 'beforeMarkDelete';
        const EVENT_AFTER_MARK_QUERY = 'afterMarkDelete';

         // 第一步:在初始化阶段绑定事件和Event Handler
        public function init()
        {
            parent::init();
            $this->trigger(self::EVENT_INIT);
            // 完成绑定
            $this->on(self::EVENT_BEFORE_MARK_QUERY, [$this, 'onBeforeMarkQuery']);
            $this->on(self::EVENT_AFTER_MARK_QUERY,[$this,'onAfterMarkQuery']);

        }
        // 第二步:定义Event Handler
        public function onBeforeMarkQuery () {

             echo "我在查询之前进行了拦截"."<br>";
             //exit;
        }
        // 第二步:定义Event Handler
        public function onAfterMarkQuery () {

            echo "查询完了,想返回数据,别想,数据就在上面,去拿吧";
            exit;
        }
         /**
         * 获取所有用户信息
         */
        public  function getAllUsers(){
            // 触发事件
            $this->trigger(self::EVENT_BEFORE_MARK_QUERY);
            $list = static::find()->asArray()->all();
            echo "<pre>";
            print_r($list);
            $this->trigger(self::EVENT_AFTER_MARK_QUERY);

        }
        /**
         * 实例化User对象
         * @return User
         */
        public static function getInstance(){

                return new self;
        }
        /**
         * 返回表名
         */
        public static function tabName(){

             return 'user';
        }
        /**
         * 返回当前的数据库连接信息
         */
        public static function getDBInfo(){

            return parent::getDb();

        }

    }
<?php
/**
  * 行为
  * yii\base\Behavior也是继承yii\base\Object,必须重写yii\base\Behavior::events,才会触发调用对应的事件
  * 使用使用前,必须先附加到组件\yii\base\component::attachBehavior("myBehavior2",new MyBehavior)
  * \yii\base\component::attachBehavior("myBehavior2",MyBehavior::className)
  * \yii\base\component::attachBehavior("myBehavior2",[
			'class' =>MyBehavior::className(),
			'prop1' => 'value1',
			'prop2' => 'value2'
		])
  * 移除行为(用法与attachBehavior一样)	\yii\base\component::dettachBehavior()
**/
namespace app\components;

use yii\db\ActiveRecord;
use yii\base\Behavior;

class MyBehavior extends Behavior
{
	public $prop1;
	private $_prop2;

	public function getProp2()
	{
		return $this->_prop2;
	}

	public function setProp2($value)
	{
		return $this->_prop2 = $value;
	}

	public function foo(){}

	public function events()
	{
		// [事件名=>事件方法]
		return [
			ActiveRecord::EVENT_BEFORE_VALIDATE=>'beforeValidate'
		]
	}

    public function beforeValidate($event){}
}

namespace app\model;

use app\components\MyBehavior;
use yii\db\ActiveRecord;

class User extends ActiveRecord
{
	public function behaviors(){
	return [
		// 匿名行为,只有行为类名
		MyBehavior::className(),

		//命名行为,只有行为类名
		"myBehavior2" => MyBehavior::className(),

		//匿名行为,配置数组
		[
			'class' =>MyBehavior::className(),
			'prop1' => 'value1',
			'prop2' => 'value2'
		],

		//命名行为,配置数组
		"myBehavior4" =>[
			'class' =>MyBehavior::className(),
			'prop1' => 'value1',
			'prop2' => 'value2'
		]
	]
	}
}
<?php
defined('YII_DEBUG') or define('YII_DEBUG', true);
defined('YII_ENV') or define('YII_ENV', 'dev');

require(__DIR__ . '/../../vendor/autoload.php');
require(__DIR__ . '/../../vendor/yiisoft/yii2/Yii.php');
require(__DIR__ . '/../../common/config/bootstrap.php');
require(__DIR__ . '/../config/bootstrap.php');

$config = yii\helpers\ArrayHelper::merge(
    require(__DIR__ . '/../../common/config/main.php'),
    require(__DIR__ . '/../../common/config/main-local.php'),
    require(__DIR__ . '/../config/main.php'),
    require(__DIR__ . '/../config/main-local.php')
);
// 注册一个接口
Yii::$container->set('frontend\\service\\IUserService', 'frontend\\service\\IUserServiceimpl');
// 注册一个别名
Yii::$container->set('userservice','frontend\\service\\IUserService');
//定义路径别名
Yii::setAlias('@getuser' , 'index.php?r=face/getusers ');
//加载配置文件
$application = new yii\web\Application($config);
$application->run();

<?php

namespace frontend\controllers;
use Yii;
use frontend\service\IUserService;
use yii\web\Controller;
use yii\di\Container;
use yii\helpers\ArrayHelper;
use frontend\models\UserForm;


	 class FaceController extends Controller{


	 		private  $userService;

	 		public function __construct($id, $module,$config = []){


	 				//DI容器获取实例化的对象
	 				//$this->userService = \Yii::$container->get('userservice');
	 				//Service Locator通过 Yii::createObject() 来获取实例, 而这个 Yii::createObject()
	 				//是调用了DI容器的 yii\di\Container::get() 来向 Yii::$container 索要实例的。
	 				// 因此,Service Locator最终是通过DI容器来创建、获取实例的。
	 				$this->userService = \Yii::createObject('userservice');
	 				parent::__construct($id, $module,$config);

	 		}

			/**
		     * @inheritdoc
		     */
		    public function actions()
		    {
		        return [
		            'error' => [
		                'class' => 'yii\web\ErrorAction',
		            ],
		            'captcha' => [
		                'class' => 'yii\captcha\CaptchaAction',
		                'fixedVerifyCode' => YII_ENV_TEST ? 'testme' : null,
		            ],
		        ];
		    }
		    /**
		     * 获取所有用户
		     *
		     */
	 	     public function actionGetusers(){

	 				$list = $this->userService->getAllUsers();
	 				echo "<pre>";
	 				print_r($list);
	 				exit;

	 		}
	 		public function actionGetuserbyid(){

	 			$user = $this->userService->getUserById('2');
	 			$user = ArrayHelper::toArray($user);
	 			echo "<pre>";
	 			print_r($user);
	 			exit;

	 		}

}
-
数据库版本控制 migrations
a. yii migrate\create 名称
b. 打开对应文件,输入相应的sql语句
c. yii migrate migrate指定文件路径 -
自定义组件
<?php
namespace app\component;
use Yii;
use yii\base\Component;
use yii\base\InvalidConfigException;

class MyComponent extends Component
{

  public $terry;

  public function welcome()
  {
    echo $this->terry."Hello..Welcome to MyComponent";
  }

}

Yii::$app->mycomponent->welcome();

$module = Yii::$app->controller->module;
$component = $module->mycomponent;
- view渲染
public function renderPhpFile($_file_, $_params_ = [])
  {
      ob_start();
      ob_implicit_flush(false);
      extract($_params_, EXTR_OVERWRITE);
      require($_file_);
      return ob_get_clean();
  }
ob_end_flush();
- 缓存,缓存
yii缓存一共分为四种,分别为数据缓存,片段缓存,页面缓存,http缓存。
缓存方式,文件存储缓存(yii\caching\FileCache),apc扩展缓存(yii\caching\ApcCache),数据库缓存(yii\caching\DbCache)
数据缓存,应用组件Yii::$app->cache
$cache = Yii::$app->cache;
// 创建一个对 test.txt文件修改时间的缓存依赖
$dependency = new \yii\caching\FileDependency(['fileName' => 'test.txt']);
$cache->set($key, $data, null, $dependency);
要从缓存中删除一个缓存值 , 调用 delete() ; 要清空所有缓存 , 调用 flush() 。 调用 flush() 时要非常小心 , 因为它会把其它应用的缓存也清空。

$db = Yii::$app->db;
$result = $db->cache(function ($db) {
    // SQL查询的结果将从缓存中提供
    // 如果启用查询缓存并且在缓存中找到查询结果
    return $db->createCommand('SELECT * FROM yii_user WHERE id=1')->queryOne();
}, $duration = null, $dependency = null);

//片段缓存,视图中的beginCache和endCache
<?php if ($this->beginCache('key',[
    'duration' => 3600,//设置缓存过期时间为3600秒,
    'dependency' => $dependency,//设置缓存依赖,当user表中的update_time字段值发生变化,缓存失效,重新进行缓存
    'enabled' => Yii::$app->request->isGet,//当为get请求开启缓存,非get请求则关闭缓存
])):?>
    <span>html片段</span>
<?php
    $this->endCache();
    endif;
?>

//页面缓存,控制器中的behaviors的pageCache
public function behaviors(){
		return ['pageCache'=>[
				'class' => 'yii\filters\PageCache',
				//只有在执行index操作时启用HTTP缓存
				'only' => ['index'],
				'variations' =>[
					Yii::$app->request->get("page")
				],
				//缓存过期时间为60秒
				'duration' => 60,
				//当user表中的数据总数发生变化时页面缓存失效,重新进行缓存
				'dependency' => [
					'class' => 'yii\caching\DbDependency',
					'sql' => 'SELECT COUNT(*) FROM user',
					]
			]
			]}
http缓存,利用客户端来缓存,设置http头信息,控制器中的behaviors的httpCache
public function behaviors(){
		return ['httpCache'=>[
				'class' => 'yii\filters\HttpCache',
				//只有在执行index操作时启用HTTP缓存
				'only' => ['index'],
				'lastModified'=>function($action,$params){
					return 'update_unixtime';
				},
				'etagSeed'=>function($action,$params){
					return 'update_unixtime';
				},
				'cacheControlHeader'=>'public,max-age=600'
			]
			]}
要是有人利用不存在的key频繁攻击我们的应用,这就是漏洞。有一个比较巧妙的作法是,可以将这个不存在的key预先设定一个值。比如,”key” , “&&”。***在返回这个&&值的时候,我们的应用就可以认为这是不存在的key,那我们的应用就可以决定是否继续等待继续访问,还是放弃掉这次操作。***如果继续等待访问,过一个时间轮询点后,再次请求这个key,如果取到的值不再是&&,则可以认为这时候key有值了,从而避免了透传到数据库,从而把大量的类似请求挡在了缓存之中。
缓存失效
引起这个问题的主要原因还是高并发的时候,平时我们设定一个缓存的过期时间时,可能有一些会设置1分钟啊,5分钟这些,并发很高时可能会出在某一个时间同时生成了很多的缓存,并且过期时间都一样,这个时候就可能引发一当过期时间到后,这些缓存同时失效,请求全部转发到DB,DB可能会压力过重。
那如何解决这些问题呢?
其中的一个简单方案就时讲缓存失效时间分散开,比如我们可以在原有的失效时间基础上增加一个随机值,比如1-5分钟随机,这样每一个缓存的过期时间的重复率就会降低,就很难引发集体失效的事件。
通过js 接收了用户的ip,我们需要通过ip得到用户的国家,可以通过一个库包来实现,下面是详细:
cd geoip/
wget http://geolite.maxmind.com/download/geoip/database/GeoLiteCountry/GeoIP.dat.gz
gzip -d GeoIP.dat.gz
ls
GeoLiteCity.dat

centos 下安装 Let’s Encrypt 永久免费 SSL 证书

git clone https://github.com/letsencrypt/letsencrypt
cd letsencrypt
chmod +x letsencrypt-auto

./letsencrypt-auto certonly  --email 2358269014@qq.com -d fecshop.appfront.fancyecommerce.com -d fecshop.appfront.es.fancyecommerce.com
$d = debug_backtrace();
    foreach($d as $e){
      $function = $e['function'];
      $class = $e['class'];
      $file = $e['file'];
      $line = $e['line'];
      echo $file.'('.$line.'),'.
      $class.'::'.$function.'()<br/>';
    }
class ob{
  # 类成员变量
  public  $age =10;

  # 属性方法
  public function getAge(){
    return 18;
  }
    # 魔术方法
  public function __get($name){
    return 22 ;
  }
 }
urlManager动态添加规则
URL规则可以动态添加到URL管理器。如果模块需要管理自己的URL规则时很有必要。 如果需要使路由处理过程中动态添加的规则可用, 你应该在应用程序启动引导时添加。 对模块来说,需要实现 yii\base\BootstrapInterface 接口的 bootstrap() 方法, 类似下面这样动态添加规则:
注意你需要同时在 yii\web\Application::bootstrap() 中指定这些模块,这样模块才可以参与到 启动引导过程中
url重写可以通过重写request组件的getRewriteUri。
public function bootstrap($app)
{
    $app->getUrlManager()->addRules([
        // 规则在这里定义
    ], false);
}
在 yii\web\UrlManager::$rules 配置中设置新定义的规则类:
'rules' => [
    // ...其它规则...
    [
        'class' => 'app\components\CarUrlRule',
        // ...配置其它参数...
    ],
]
request 组件提供了许多方式来检测当前请求的URL。
假设被请求的URL是 http://example.com/admin/index.php/product?id=100, 你可以像下面描述的那样获取URL的各个部分:
yii\web\Request::url:返回 /admin/index.php/product?id=100, 此URL不包括host info部分。
yii\web\Request::absoluteUrl:返回 http://example.com/admin/index.php/product?id=100, 包含host infode的整个URL。
yii\web\Request::hostInfo:返回 http://example.com, 只有host info部分。
yii\web\Request::pathInfo:返回 /product, 这个是入口脚本之后,问号之前(查询字符串)的部分。
yii\web\Request::queryString:返回 id=100,问号之后的部分。
yii\web\Request::baseUrl:返回 /admin, host info之后, 入口脚本之前的部分。
yii\web\Request::scriptUrl:返回 /admin/index.php, 没有path info和查询字符串部分。
yii\web\Request::serverName:返回 example.com, URL中的host name。
yii\web\Request::serverPort:返回 80, 这是web服务中使用的端口。
事件:
通过 $event 参数,事件处理器就获得了以下有关事件的信息:
event name:事件名
event sender:调用 trigger() 方法的对象
custom data:附加事件处理器时传入的数据
       use backend\component\MyComponent;
	   use yii\base\Event;
       //附加处理器到事件bar
       Yii::$app->on('bar', function ($event) {
			echo get_class($event->sender);  // 显示 "app\components\Foo"
		});
		Yii::$app->on('bar', function ($event) {
			echo $event->data;  // 显示 "datas"
		},'datas');
        //触发事件,调用处理器,代入$event参数
		Yii::$app->trigger('bar', new Event(['sender' => new MyComponent]));
		DIE();
事件操作
绑定事件
yii框架中提供的绑定事件方法和jQuery中绑定事件的格式很相似: $obj->on(event, event_handler)。
其中,event是事件的名称,可以随意指定,需要注意的是,绑定事件的时候用的什么event名称,那么在解除事件或者触发事件的时候,也必须使用该名称才能出发该事件。
触发事件
在类中的方法内部使用$this->trigger(event),注意这个类必须继承yii\base\Component类。
取消事件
使用$obj->off(event, event_handler)来取消事件。
数据提供器(都实现了\yii\data\DataProviderInterface)
- Active data provider
new \yii\data\ActiveDataProvider([
	'query' => (new \yii\db\Query())->from()->select()->groupBy()->orderBy->limit()->all(),
	'pagination' =>['pageSize'=>20],
	'sort' => ['defaultOrder' => ['name'=>SORT_ASC]]
])->getModels()
- Array data provider
new \yii\data\ArrayDataProvider([
	'allModels' => (new \yii\db\Query())->from()->all(),
	'sort' => [
		'attributes' => []
	],
	'pagination' =>['pageSize'=>20]
])->getModels()
- Sql data provider
new \yii\data\SqlDataProvider([
	'sql'=>'select * from XX where status=:status',
	'params' => [':status'=>1],
	'totalCount' => $count,
	'sort' => [],
	'pagination'=>['pageSize'=>20]
])
Yii2.0数据操作有三种方式,一种是使用createCommand()函数,一种是Query,另一种是使用Model模型操作数据。
1. 用Yii::$app->db->createCommand()实现curd
$command=Yii::$app->db->createCommand("select * from table where id=:id");
$command=$command->bindValue(":id",1);
$command->queryOne(); //queryAll(),queryColumn(),queryScalar()

$command=Yii::$app->db->createCommand()->insert('table',['insertColumn1'=>'value1','insertColumn2'=>'value2'])->execute();

$command=Yii::$app->db->createCommand()->delete('table','where clause')->execute();

$command=Yii::$app->db->createCommand()->update('table',["updateColumn"=>'value'],'where clause')->execute();

Yii::$app->db->createCommand($sql)->queryAll();

$transaction=Yii::$app->db->beginTransaction();
$transaction->commit();
$transaction->rollback();

2. 用\yii\db\Query
$result=(new \yii\db\Query())
			->select()
			->from()
			->join()
			->where()
			->addParams()
			->groupBy()
			->having()
			->orderBy()
			->limit()
			->offset()
			->all();

3. 用模型\yii\db\ActiveRecord
Model::find();
Model::save();
Model::find()->delete();
Model::updateAll(['status' => 1], ['status'=> '2','uid'=>'1']);


 713
713

 被折叠的 条评论
为什么被折叠?
被折叠的 条评论
为什么被折叠?
 到【灌水乐园】发言


