


目录
第一章 spring概述
spring框架就像是一个容器,有两大特性,IOC与AOP,IOC管理着所有的对象创建与销毁,使开发人员专注于业务的开发,脱离于对象之间的繁杂依赖关系,AOP动态增强,再不改动代码的情况下实现原有业务上功能的增强,通过动态代理实现业务增强,并植入到增强的业务当中。
第二章 IOC之XML方式管理bean
2.1导入依赖
创建一个普通的maven项目
pom.xml
<dependency>
    <groupId>org.springframework</groupId>
    <artifactId>spring-context</artifactId>
    <version>5.3.2</version>
</dependency>
配置文件 applicationContext.xml(名称可以任意取)
这个配置文件规定了spring的配置方式,context是上下文,如果需要配置aop或者事务,则引入对应的命名规范,如果编写代码,没有对应的提示,请检查是否引入对应的命名规范。
<?xml version="1.0" encoding="UTF-8"?>
<beans xmlns="http://www.springframework.org/schema/beans"
       xmlns:xsi="http://www.w3.org/2001/XMLSchema-instance"
       xmlns:context="http://www.springframework.org/schema/context"
       xsi:schemaLocation="http://www.springframework.org/schema/beans
       http://www.springframework.org/schema/beans/spring-beans.xsd
       http://www.springframework.org/schema/context
        http://www.springframework.org/schema/context/spring-context.xsd">

 <beans>
创建实体对象(也就是bean对象,spring把所有的类统称为bean)
User.java
package com.lyf.iocdemo.entity;


/**
 * @Author: lyf
 * @CreateTime: 2022-10-11
 * @description:
 */
public class User {
    //姓名
    private String name;

    //性别
    private Character gender;

    //年龄
    private Integer age;
    //金钱
    private Double money;

    //删除
    private Boolean flag;

    public User(){

    }

    public void setName(String name){
        this.name = name;
    }


    public void setGender(Character gender){
        this.gender =gender;
    }


    public void setAge(Integer age) {
        this.age = age;
    }


    public void setMoney(Double money) {
        this.money = money;
    }

    public void setFlag(Boolean flag) {
        this.flag = flag;
    }

    @Override
    public String toString() {
        return "User{" +
                "name='" + name + '\'' +
                ", gender=" + gender +
                ", age=" + age +
                ", money=" + money +
                ", flag=" + flag +
                '}';
    }
}
配置Bean对象
第一种方式
通过class对象 值是bean对象所在的包路径 。
<?xml version="1.0" encoding="UTF-8"?>
<beans xmlns="http://www.springframework.org/schema/beans"
       xmlns:xsi="http://www.w3.org/2001/XMLSchema-instance"
       xmlns:context="http://www.springframework.org/schema/context"
       xsi:schemaLocation="http://www.springframework.org/schema/beans
       http://www.springframework.org/schema/beans/spring-beans.xsd
       http://www.springframework.org/schema/context
        http://www.springframework.org/schema/context/spring-context.xsd">
    <bean class="com.lyf.iocdemo.entity.User"/>
	</beans>
第二种 多了一个id属性,这个id属性在整个容器中是唯一的。
<bean id="user" class="com.lyf.iocdemo.entity.User"/>
第三种 是一个name属性,这个name属性在整个容器中不是唯一的,可以有多个 中间用空格分开。
    <bean name="user" class="com.lyf.iocdemo.entity.User"/>
        <bean name="user user1 user2" class="com.lyf.iocdemo.entity.User"/>
2.2 创建容器
容器是用于获取bean对象的,spring通过读取配置文件的内容来创建对象。
添加单元测试到pom中
 <dependency>
            <groupId>junit</groupId>
            <artifactId>junit</artifactId>
            <version>4.12</version>
            <scope>test</scope>
        </dependency>
第一种创建容器方式 new一个ClassPathXmlApplicationContext对象,通过配置文件所在的类路径加载创建
    @Test
    public void createIOCTest(){
       ApplicationContext applicationContext = new ClassPathXmlApplicationContext("applicationContext.xml");
    }
第二种创建容器方式 通过配置文件所在绝对路径的方式创建容器
    @Test
      public void createIOCTest(){
            ApplicationContext applicationContext = new FileSystemXmlApplicationContext("D:\\eclipse-workspace\\ioc-demo-01\\src\\main\\resources\\applicationContext.xml");
        }
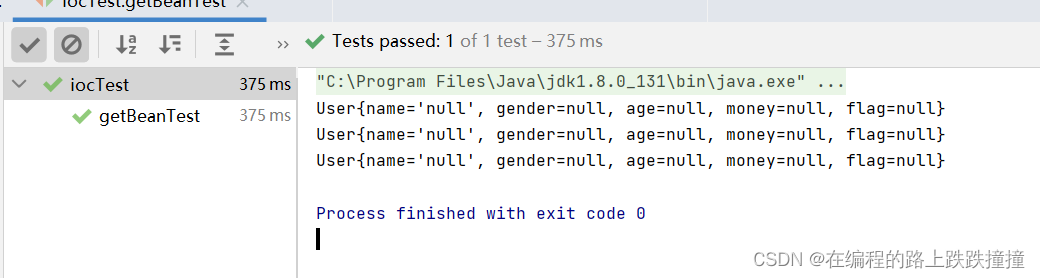
2.3 获取Bean对象
在测试包文件夹下创建一个IOC测试类,编写测试方法
获取bean实例的方式

     @Test
    //获取bean的三种方式
    public void getBeanTest(){

       ApplicationContext applicationContext = new ClassPathXmlApplicationContext("applicationContext.xml");
       //第一种获取方式:通过类名获取
        User bean1 = (User) applicationContext.getBean(User.class);
        //第二种:通过bean定义时的id或者name属性获取
        User bean2 = (User)applicationContext.getBean("user");
        //第三种,上两种的结合
        User bean3 = applicationContext.getBean("user", User.class);
        System.out.println(bean1);
        System.out.println(bean2);
        System.out.println(bean3);
    }
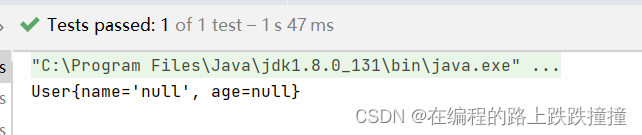
获取bean实例对象结果
2.4 bean对象设置别名
别名有一个单独的标签,name属性的值是bean对象,alias是别名的值,一个别名可以给另一个别名起新别名
  <alias name="user" alias="user2"/>

  <bean id="user"  class="com.lyf.iocdemo.entity.User"/>
<!--    bean的别名-->
  <alias name="user" alias="user2"/>//第一个别名
  <alias alias="user"  name="user2"/>//第二个别名
2.5 bean的依赖注入
2.5.1 基于setter方法注入
基于setter方法注入:spring容器会通过对象的setter方法完成注入,(也就是说把配置文件中的值通过对象的setter方法赋值)所以基于setter方法注入不能没有setter方法,这里重写了Object类的toString方法,可以让打印对象直接打印值输出,而不是内存地址。
package com.lyf.iocdemo.entity;

public class User {
    //姓名
    private String name;

    //性别
    private Character gender;

    //年龄
    private Integer age;
    //金钱
    private Double money;

    //删除
    private Boolean flag;

    public void setName(String name){
        this.name = name;
    }

    public String getName(){
        return name;
    }

    public void setGender(Character gender){
        this.gender =gender;
    }
    public Character getGender(){
        return gender;
    }

    public void setAge(Integer age) {
        this.age = age;
    }

    public Integer getAge() {
        return age;
    }

    public void setMoney(Double money) {
        this.money = money;
    }

    public void setFlag(Boolean flag) {
        this.flag = flag;
    }

    @Override
    public String toString() {
        return "User{" +
                "name='" + name + '\'' +
                ", gender=" + gender +
                ", age=" + age +
                ", money=" + money +
                ", flag=" + flag +
                '}';
    }
}
配置文件setter方法注入
 <bean id="user" class="com.lyf.iocdemo.entity.User">
        <property name="name" value="张三"/>
        <property name="age" value="10"/>
        <property name="gender" value="男"/>
        <property name="money" value="100"/>
        <property name="flag" value="1"/>
    </bean>
测试案例
    @Test
    public void setterTest2(){
          ApplicationContext applicationContext = new FileSystemXmlApplicationContext("D:\\eclipse-workspace\\ioc-demo-01\\src\\main\\resources\\applicationContext.xml");
          User user = applicationContext.getBean(User.class);
          System.out.println("user = " + user);
      }
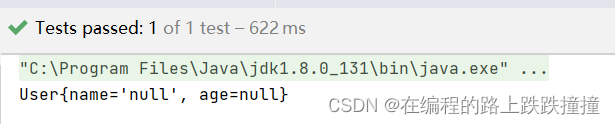
运行结果

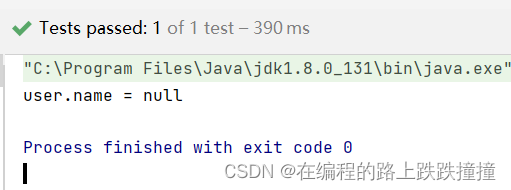
2.5.1.1 注入空值
   <bean id="user" class="com.lyf.iocdemo.entity.User">
        <property name="name" value="#{null}"/>
    </bean>
测试案例
 @Test
    public  void nullTest(){
        //第一中获取bean的方式
        ApplicationContext applicationContext = new ClassPathXmlApplicationContext("applicationContext.xml");
        User user = applicationContext.getBean(User.class);
        System.out.println("user.name = " + user.getName());
运行结果
2.5.1.2 注入对象
创建一个Department类与Employee类,在雇员类中注入部门属性,这个部门 属性需要有getter方法
Department类
public class Department {
    private String name;

    public Department(){}
    public Department(String name){
        this.name = name;
    }
    public void setName(String name) {
        this.name = name;
    }

    @Override
    public String toString() {
        return "Department{" +
                "name='" + name + '\'' +
                '}';
    }
}
Employye类
public class Employee {
    private String name;
    private String age;
    private Department dep;

    public Employee(){}
    public Employee(String name,String age,Department dep){
        this.name = name;
        this.age =age;
        this.dep =dep;
    }
    public void setName(String name) {
        this.name = name;
    }

    public void setDep(Department dep) {
        this.dep = dep;
    }

    public void setAge(String age) {
        this.age = age;
    }

    public Department getDep() {
        return dep;
    }

    @Override
    public String  toString() {
        return "Department{" +
                "name='" + name + '\'' +
                ", age='" + age + '\'' +
                ", dep=" + dep +
                '}';
    }
}
xml配置文件 ref =“def” 属于引用dep这个别名的bean
 <bean id="department" class="com.lyf.iocdemo.entity.Department">
        <property name="name" value="财务部"/>
    </bean>
    <alias name="department" alias="dep"/>

    <bean id="emp" class="com.lyf.iocdemo.entity.Employee">
        <property name="name" value="王二"/>
        <property name="age" value="10"/>
        <property name="dep" ref="dep"/>
    </bean>
运行结果

2.5.1.3 注入集合
集合中注入的值为基本数据类型
public class CollectionBean {
    //数组类型
    private String[] strings;

    //集合类型
    private List list;
    private Map map;
    private Set<String> set;


    public void setList(List list) {
        this.list = list;
    }

    public void setMap(Map map) {
        this.map = map;
    }

    public void setSet(Set<String> set) {
        this.set = set;
    }

    public void setStrings(String[] strings) {
        this.strings = strings;
    }

    @Override
    public String toString() {
        return "CollectionBean{" +
                "strings=" + Arrays.toString(strings) +
                ", list=" + list +
                ", map=" + map +
                ", set=" + set +
                '}';
    }
xml配置文件 集合中是基本数据类型的话,直接注入值就行,根据集合类型选择对应的标签。
    <bean id="collection" class="com.lyf.iocdemo.entity.CollectionBean">
<!--        数组类型-->
        <property name="strings">
            <array>
                <value>王</value>
                <value>李</value>
                <value>赵</value>
                <value>梁</value>
            </array>
        </property>

         <property name="list">
             <list>
                 <value>lao</value>
                 <value>peng</value>
                 <value>yu</value>
                 <value>qin</value>
             </list>
         </property>
        <property name="set">
            <set>
                <value>very</value>
                <value>much</value>
                <value>love</value>
            </set>
        </property>
        <property name="map">
            <map>
                <entry key="p" value="peng"/>
                <entry key="y" value="yu"/>
                <entry key="q" value="qin"/>
            </map>
        </property>
    </bean>
运行结果
集合中注入的值为对象类型

package com.lyf.iocdemo.entity;

import java.util.Arrays;
import java.util.List;
import java.util.Map;
import java.util.Set;

/**
 * @Author: lyf
 * @CreateTime: 2022-10-11
 * @description:
 */
public class CollectionObjectBean {

    private Employee[] employees;

    private List<Employee> employeeList;

    private Set<Employee> employeeSet;

    private Map<String,Employee> employeeMap;

    public void setEmployeeList(List<Employee> employeeList) {
        this.employeeList = employeeList;
    }

    public void setEmployeeSet(Set<Employee> employeeSet) {
        this.employeeSet = employeeSet;
    }

    public void setEmployeeMap(Map<String, Employee> employeeMap) {
        this.employeeMap = employeeMap;
    }

    public void setEmployees(Employee[] employees) {
        this.employees = employees;
    }

    @Override
    public String toString() {
        return "CollectionObjectBean{" +
                "employees=" + Arrays.toString(employees) +
                ", employeeList=" + employeeList +
                ", employeeSet=" + employeeSet +
                ", employeeMap=" + employeeMap +
                '}';
    }
}
xml 配置 注入的对象直接使用 <ref 标签引用即可。
<!--注入对象集合属性-->
    <bean name="objectBean" class="com.lyf.iocdemo.entity.CollectionObjectBean">
        <property name="employees">
            <array>
                <ref bean="emp"/>
                <ref bean="emp1"/>
                <ref bean="em2"/>
            </array>
        </property>
        <property name="employeeList">
            <list>
                <ref bean="emp"/>
                <ref bean="emp1"/>
                <ref bean="em2"/>
            </list>
        </property>
        <property name="employeeSet">
            <set>
                <ref bean="emp"/>
                <ref bean="emp1"/>
                <ref bean="em2"/>
            </set>
        </property>
        <property name="employeeMap">
            <map>
                <entry key="1" value-ref="emp"/>
                <entry key="2" value-ref="emp1"/>
                <entry key="3" value-ref="em2"/>
            </map>
        </property>
    </bean>
运行结果

2.5.1.4 注入级联属性
级联属性表示,一个类中有一个属性是另一个类。
package com.lyf.iocdemo.entity;


public class Flower {

    /**
     * 花的名称
     */
    private String name;

    /**
     * 花的颜色
     */
    private Color color;

    public void setName(String name) {
        this.name = name;
    }

    public void setColor(Color color) {
        this.color = color;
    }

    @Override
    public String toString() {
        return "Flower{" +
                "name='" + name + '\'' +
                ", color=" + color +
                '}';
    }
}
package com.lyf.iocdemo.entity;


public class Color {

    /**
     * 颜色名称
     */
    private String red;

    /**
     * 绿色
     */
    private String greed;

    /**
     * 黑色
     */
    private String black;

    public void setRed(String red) {
        this.red = red;
    }

    public void setGreed(String greed) {
        this.greed = greed;
    }

    @Override
    public String toString() {
        return "Color{" +
                "red='" + red + '\'' +
                ", greed='" + greed + '\'' +
                ", black='" + black + '\'' +
                '}';
    }

    public void setBlack(String black) {
        this.black = black;
    }
}
    <bean id="flower" class="com.lyf.iocdemo.entity.Flower">
        <property name="name" value="flower"></property>
        <property name="color">
            <bean class="com.lyf.iocdemo.entity.Color">
                <property name="black" value="黑色"/>
                <property name="greed" value="绿色"/>
                <property name="red" value="红色"/>
            </bean>
        </property>
    </bean>
运行结果

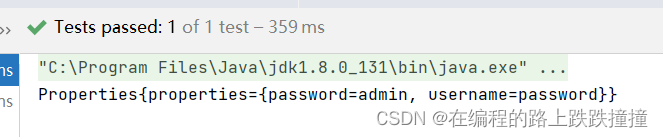
2.5.1.5 注入属性
package com.lyf.iocdemo.entity;

import java.util.Properties;

/**
 * @Author: lyf
 * @CreateTime: 2022-10-11
 * @description:
 */
public class PropertiesBean {
    private Properties properties;

    public void setProperties(Properties properties) {
        this.properties = properties;
    }

    @Override
    public String toString() {
        return "Properties{" +
                "properties=" + properties +
                '}';
    }
}
<!--    注入属性信息-->
    <bean name="properties" class="com.lyf.iocdemo.entity.PropertiesBean">
        <property name="properties">
            <props>
                <prop key="username">password</prop>
                <prop key="password">admin</prop>
            </props>
        </property>
    </bean>
运行结果
注入外部属性
创建properties.properties文件 ,写入一下值
user.username=username
user.password=password`
<!--    加载外部文件-->
    <context:property-placeholder location="classpath:properties.properties" local-override="true"/>
    <bean id="propertiesBean" class="com.lyf.iocdemo.entity.PropertiesBean">
        <property name="properties">
            <props>
                <prop key="username">${user.username}</prop>
                <prop key="password">${user.password}</prop>
            </props>
        </property>
    </bean>```

`提示:这里简述项目相关背景:`

Description:

Failed to configure a DataSource: 'url' attribute is not specified and no embedded datasource could be configured.

Reason: Failed to determine a suitable driver class

---

# 问题描述
`提示:这里描述项目中遇到的问题:`

例如:数据传输过程中数据不时出现丢失的情况,偶尔会丢失一部分数据
APP 中接收数据代码:

```c
@Override
	public void run() {
		bytes = mmInStream.read(buffer);
		mHandler.obtainMessage(READ_DATA, bytes, -1, buffer).sendToTarget();
	}
2.5.2基于有参构造方法注入
2.5.2.1 名称构造注入
修改User类,把属性值全部通过构造函数赋值。spring容器会调用有参构造方法把配置文件中的值赋值给bean。
package com.lyf.iocdemo.entity;

public class User {
    //姓名
    private String name;

    //性别
    private Character gender;

    //年龄
    private Integer age;
    //金钱
    private Double money;

    //删除
    private Boolean flag;

    public User(){
    }
    public User(String name,Character gender,Integer age,Double money,Boolean flag){
        this.name = name;
        this.gender = gender;
        this.age = age;
        this.money =money;
        this.flag =flag;
    }

    @Override
    public String toString() {
        return "User{" +
                "name='" + name + '\'' +
                ", gender=" + gender +
                ", age=" + age +
                ", money=" + money +
                ", flag=" + flag +
                '}';
    }
}
constructor-arg单词表示构造-参数,这里可以在新建一个配置文件或者保证bean的id或者name属性不重名冲突,不然会注入失败。这里我重新建了一个配置文件,如果一对标签内没有标签或者没有值,就可以使用单标签。
<?xml version="1.0" encoding="UTF-8"?>
<beans xmlns="http://www.springframework.org/schema/beans"
       xmlns:xsi="http://www.w3.org/2001/XMLSchema-instance"
       xsi:schemaLocation="http://www.springframework.org/schema/beans
       http://www.springframework.org/schema/beans/spring-beans.xsd
        ">

    <!--    基于有参构造注入-->
<!--基于名称-->
    <bean id="user1" class="com.lyf.iocdemo.entity.User">
        <constructor-arg name="name" value="peng"/>
        <constructor-arg name="gender" value="女"/>
        <constructor-arg name="age" value="22"/>
        <constructor-arg name="money" value="200"/>
        <constructor-arg name="flag" value="true"/>
    </bean>
   </beans>
测试代码
   @Test
    public void constrNameTest(){
        ApplicationContext context = new ClassPathXmlApplicationContext("context.xml");

        Object user1 = (User)context.getBean("user1");
        System.out.println(user1);
    }
运行结果

2.5.2.2 下标构造注入
User类不变,index下标 表示构造函数中参数个数的下标位置,下标中的值对应着参数的位置,value属性的值都要用引号,spring会根据参数类型赋值。
<!--基于下标-->
    <bean name="user2" class="com.lyf.iocdemo.entity.User">
        <constructor-arg index="0" value="liang"/>
        <constructor-arg index="1" value="女"/>
        <constructor-arg index="2" value="18"/>
        <constructor-arg index="3" value="1000"/>
        <constructor-arg index="4" value="1"/>
    </bean>
2.5.2.3 类型构造注入
type的值必须是包装类数据类型。不能是基本数据类型,比如 int double类型等。
<!--基于数据类型-->
    <bean name="user3" class="com.lyf.iocdemo.entity.User">
        <constructor-arg type="java.lang.String" value="yu"/>
        <constructor-arg type="java.lang.Character" value="男"/>
        <constructor-arg type="java.lang.Integer" value="12"/>
        <constructor-arg type="java.lang.Double" value="232"/>
        <constructor-arg type="java.lang.Boolean" value="true"/>
    </bean>
2.5.2.4注入空值
修改User类,加入一个name属性的有参构造。使用有参构造注入,参数类型必须赋值。比如, 一个有参构造函数有4个参数,但却赋值一个是不行的,必须全部赋值,如果只想单独赋值给一个属性,则创建对应的有参构造函数。
public User(String name){
        this.name = name;
    }
<!--    注入空值-->
    <bean name="user" class="com.lyf.iocdemo.entity.User">
        <constructor-arg name="name" value="#{null}"/>
    </bean>
2.5.2.5 注入对象
由于是有参构造,Employee 类不需要使用使用Department 的getter方法获取department值。spring直接传引用地址进行赋值。
package com.lyf.iocdemo.entity;

public class Employee {
    private String name;
    private String age;
    private Department dep;

    public Employee(){}
    public Employee(String name,String age,Department dep){
        this.name = name;
        this.age =age;
        this.dep =dep;
    }

    @Override
    public String  toString() {
        return "Department{" +
                "name='" + name + '\'' +
                ", age='" + age + '\'' +
                ", dep=" + dep +
                '}';
    }
}
package com.lyf.iocdemo.entity;

public class Department {
    private String name;

    public Department(){}
    public Department(String name){
        this.name = name;
    }
    @Override
    public String toString() {
        return "Department{" +
                "name='" + name + '\'' +
                '}';
    }
}
<!--    注入对象类型-->
    <bean name="dep" class="com.lyf.iocdemo.entity.Department">
        <constructor-arg name="name" value="设计部"/>
    </bean>

    <bean id="emp1" class="com.lyf.iocdemo.entity.Employee">
        <constructor-arg name="name" value="hua"/>
        <constructor-arg index="1" value="23"/>
        <constructor-arg type="com.lyf.iocdemo.entity.Department" ref="dep"/>
    </bean>
第二种方式注入对象
与第一种方式不同的是,第二种可以选择对应的类型来赋值,比如,选择名称属性,或者数据类型属性,index下标属性等;在赋值其他bean时,可以选择ref引用,也可以在该标签下创建bean对象进行赋值。
<!--    第二种方式-->
    <bean name="emp2" class="com.lyf.iocdemo.entity.Employee">
        <constructor-arg name="name" value="pengyuqin"/>
        <constructor-arg type="java.lang.String" value="12"/>
        <constructor-arg name="dep">
            <bean id="dep1" class="com.lyf.iocdemo.entity.Department">
                <constructor-arg index="0" value="维修部"/>
            </bean>
        </constructor-arg>
    </bean>
2.5.2.6 注入集合
注入集合 值是基本数据类型
package com.lyf.iocdemo.entity;

import java.util.Arrays;
import java.util.List;
import java.util.Map;
import java.util.Set;

public class CollectionBean {
    //数组类型
    private String[] strings;

    //集合类型
    private List list;
    private Map map;
    private Set<String> set;

    public CollectionBean(String[] strings, List list, Map map, Set<String> set) {
        this.strings = strings;
        this.list = list;
        this.map = map;
        this.set = set;
    }

    @Override
    public String toString() {
        return "CollectionBean{" +
                "strings=" + Arrays.toString(strings) +
                ", list=" + list +
                ", map=" + map +
                ", set=" + set +
                '}';
    }
}
有参构造的属性可以任意选择,index下标,name属性,type类型都可以。
<!--    注入集合-->
    <bean name="collectionBean" class="com.lyf.iocdemo.entity.CollectionBean">
        <constructor-arg name="strings">
            <array>
                <value>王一</value>
                <value>王二</value>
                <value>王三</value>
                <value>王四</value>
            </array>
        </constructor-arg>
        <constructor-arg type="java.util.List">
            <list>
                <value>李一</value>
                <value>李二</value>
                <value>李三</value>
                <value>李四</value>
                <value>李五</value>
            </list>
        </constructor-arg>

        <constructor-arg index="3">
            <set>
                <value>赵一</value>
                <value>赵二</value>
                <value>赵三</value>
                <value>赵四</value>
                <value>赵五</value>
            </set>
        </constructor-arg>
        <constructor-arg name="map">
            <map>
                <entry key="1" value="吴一"/>
                <entry key="2" value="吴二"/>
                <entry key="3" value="吴三"/>
                <entry key="4" value="吴四"/>
                <entry key="5" value="吴五"/>
            </map>
        </constructor-arg>
    </bean>
测试代码
 @Test
    public void collectionBean(){
        CollectionBean collectionBean = (CollectionBean)new ClassPathXmlApplicationContext("context.xml").getBean("collectionBean");
        System.out.println(collectionBean);
    }
运行结果

注入集合,值是对象类型
package com.lyf.iocdemo.entity;

import java.util.Arrays;
import java.util.List;
import java.util.Map;
import java.util.Set;

public class CollectionObjectBean {

    private Employee[] employees;

    private List<Employee> employeeList;

    private Set<Employee> employeeSet;

    private Map<String,Employee> employeeMap;

    public CollectionObjectBean(Employee[] employees, List<Employee> employeeList, Set<Employee> employeeSet, Map<String, Employee> employeeMap) {
        this.employees = employees;
        this.employeeList = employeeList;
        this.employeeSet = employeeSet;
        this.employeeMap = employeeMap;
    }
    @Override
    public String toString() {
        return "CollectionObjectBean{" +
                "employees=" + Arrays.toString(employees) +
                ", employeeList=" + employeeList +
                ", employeeSet=" + employeeSet +
                ", employeeMap=" + employeeMap +
                '}';
    }
}
    <!--    注入集合 值是对象类型-->
    <bean name="collectionObject" class="com.lyf.iocdemo.entity.CollectionObjectBean">
        <constructor-arg name="employees">
            <array>
                <ref bean="emp1"/>
                <ref bean="emp1"/>
                <ref bean="emp1"/>
                <ref bean="emp1"/>

            </array>
        </constructor-arg>
        <constructor-arg type="java.util.List">
            <list>
                <ref bean="emp1"/>
                <ref bean="emp1"/>
                <ref bean="emp1"/>
                <ref bean="emp1"/>
                <ref bean="emp1"/>
            </list>
        </constructor-arg>

        <constructor-arg index="2">
            <set>
                <ref bean="emp2"/>
                <ref bean="emp1"/>
                <ref bean="emp1"/>
                <ref bean="emp1"/>
                <ref bean="emp1"/>
            </set>
        </constructor-arg>
        <constructor-arg name="employeeMap">
            <map>
                <entry key="1" value-ref="emp2"/>
                <entry key="2" value-ref="emp2"/>
                <entry key="3" value-ref="emp2"/>
                <entry key="4" value-ref="emp2"/>
                <entry key="5" value-ref="emp2"/>
            </map>
        </constructor-arg>
    </bean>
2.5.3基于p&c名称空间注入
加入p&c命名空间的规范
xmlns:p="http://www.springframework.org/schema/p"
xmlns:c="http://www.springframework.org/schema/c"
User类对象
package com.lyf.iocdemo.entity;

public class User {
    //姓名
    private String name;

    //性别
    private Character gender;

    //年龄
    private Integer age;
    //金钱
    private Double money;

    //删除
    private Boolean flag;

    public User(){

    }
    public User(String name){
        this.name = name;
    }
    public User(String name,Character gender,Integer age,Double money,Boolean flag){
        this.name = name;
        this.gender = gender;
        this.age = age;
        this.money =money;
        this.flag =flag;
    }

    public void setName(String name){
        this.name = name;
    }

    public String getName(){
        return name;
    }

    public void setGender(Character gender){
        this.gender =gender;
    }
    public Character getGender(){
        return gender;
    }

    public void setAge(Integer age) {
        this.age = age;
    }

    public Integer getAge() {
        return age;
    }

    public void setMoney(Double money) {
        this.money = money;
    }

    public void setFlag(Boolean flag) {
        this.flag = flag;
    }

    @Override
    public String toString() {
        return "User{" +
                "name='" + name + '\'' +
                ", gender=" + gender +
                ", age=" + age +
                ", money=" + money +
                ", flag=" + flag +
                '}';
    }
}
p&c名称空间注入 ,相对于简写property与constructor-arg属性,属性p&c必须是在bean的单标签当中。
注入基本数据类型
<?xml version="1.0" encoding="UTF-8"?>
<beans xmlns="http://www.springframework.org/schema/beans"
       xmlns:xsi="http://www.w3.org/2001/XMLSchema-instance"
       xmlns:p="http://www.springframework.org/schema/p"
       xmlns:c="http://www.springframework.org/schema/c"
       xsi:schemaLocation="http://www.springframework.org/schema/beans
       http://www.springframework.org/schema/beans/spring-beans.xsd">


    <!--    基于p名称空间的注入-->
    <bean id="user3" class="com.lyf.iocdemo.entity.User"
          p:name="pengyuqin"
          p:age="23"
          p:gender="女"
          p:money="112"
          p:flag="false"
    />
        <!--    基于c名称空间的注入-->

       <bean id="user4" class="com.lyf.iocdemo.entity.User"
    c:name="pengyuqin"
    c:age="23"
    c:gender="女"
    c:money="112"
    c:flag="false"
    />
    </beans>
p&c注入对象类型
需要把Department&Employee的stter方法加上
 <!--    基于p命名空间注入对象-->
    <bean  id="department" class="com.lyf.iocdemo.entity.Department"
         p:name="财务部"
    />
    <bean id="employee" class="com.lyf.iocdemo.entity.Employee"
          p:name="网二"
          p:age="18"
          p:dep-ref="department"
    />
<!--    基于c命名空间注入对象-->
    <bean  id="department1" class="com.lyf.iocdemo.entity.Department"
           c:name="财务部"
    />
    <bean id="employee1" class="com.lyf.iocdemo.entity.Employee"
          c:name="网二"
          c:age="18"
          c:dep-ref="department"
    />
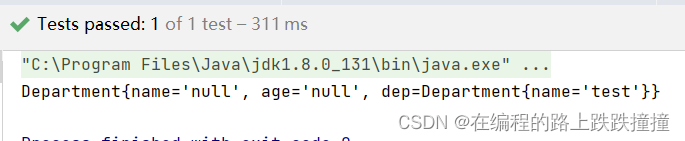
2.6 bean的自动注入
2.6.1 什么是自动注入
表示为我们只需要创建好bean对象,spring容器会帮我们进行依赖管理并注入对象,比如
我们创建好Department这个bean对象,在Employee这个bean中需要Department对象,我们可以不用赋值,spring会在ioc容器当中找到这个Department(bean)对象,并赋值到Employee的属性当中。
2.6.2 自动注入的方式
| 方式 | 说明 |
|---|---|
| no | 默认值,表示不开启自动注入 |
| byName | 通过名称进行自动注入,查找bean的id&name属性值进行注入。 |
| byType | 通过类型进行自动注入,查找的是class对象所在的类路径全名称。 |
开启自动注入
在beans标签当中加入该属性值
<beans default-lazy-init="true"></beans>
通过autowire属性开启自动注入
<?xml version="1.0" encoding="UTF-8"?>
<beans default-lazy-init="true" xmlns="http://www.springframework.org/schema/beans"
       xmlns:xsi="http://www.w3.org/2001/XMLSchema-instance"
       xsi:schemaLocation="http://www.springframework.org/schema/beans
       http://www.springframework.org/schema/beans/spring-beans.xsd">

<bean name="dep" class="com.lyf.iocdemo.entity.Department">
    <property name="name" value="test"/>
</bean>

<!--    自动注入-->
<!--    根据名称自动注入-->
    <bean id="emp" class="com.lyf.iocdemo.entity.Employee" autowire="byName"/>
<!--    根据类型自动注入-->
    <bean name="emp1" class="com.lyf.iocdemo.entity.Employee" autowire="byType"/>

</beans>
测试结果
2.7 bean的实例化
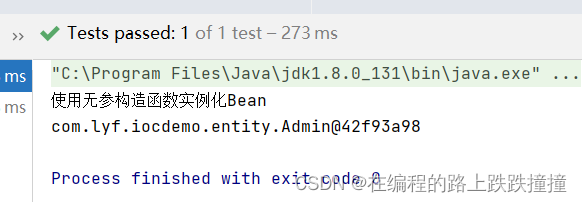
2.7.1 使用无参构造实例化
public class Admin {

    public Admin(){
        System.out.println("使用无参构造函数实例化Bean");
  }
}
<!--    使用无参构造注入-->
    <bean id="admin1" class="com.lyf.iocdemo.entity.Admin"/>
运行结果
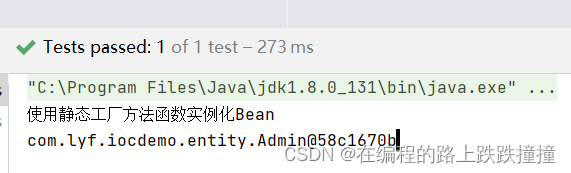
2.7.2 使用静态工厂方法实例化
public class Admin {

    public Admin(){
        System.out.println("使用静态工厂方法函数实例化Bean");
    }

    private static final Admin admin = new Admin();

    public static Admin createInstance(){
        return admin;
    }
}
factory-method的属性值是Admin中的静态方法createInstance
<!--    使用静态工厂实例对象-->
    <bean id="admin" class="com.lyf.iocdemo.entity.Admin" factory-method="createInstance"/>
运行结果
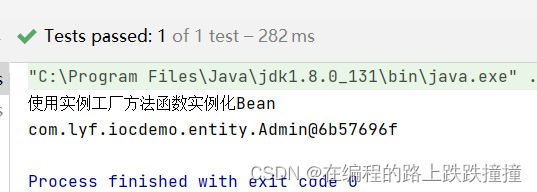
2.7.3 使用实例工厂类方法实例化
通过AdminFactory类方法实例化
public class AdminFactory {

    private static  Admin admin = new Admin();

    public static Admin createInstance(){
        return admin;
    }
}
admin2去引用adminFactory的实例方法完成bean实例化。
<bean id="adminFactory" class="com.lyf.iocdemo.entity.AdminFactory"/>

    <bean id="admin2" factory-bean="adminFactory" factory-method="createInstance"/>
运行结果
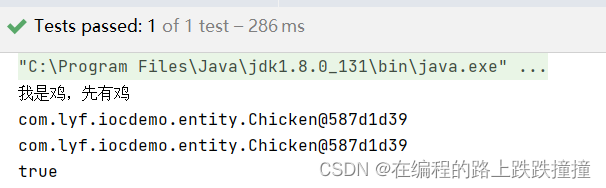
2.8 bean的前置实例化
2.8.1 什么是bean的前置实例化
前置实例化:当一个bean对象是另一个bean对象的属性时,需要用到前置bean实例化,
这种依赖关系,就需要用到bean的实例化。举例:先有鸡还是先有蛋问题,如果我们要控制这种依赖关系,我们就在bean标签当中使用depends-on属性来控制先有鸡还是先有蛋问题。
Chicken类
public class Chicken {

    public  Chicken(){
        System.out.println("我是鸡,先有鸡");
    }
}
public class Eggs {

    public  Eggs(){
        System.out.println("我是鸡蛋,先有鸡蛋");
    }
}
<!--   假设 先有鸡后有蛋,所以我们使鸡蛋的bean对象依赖于Chickenbean对象,则chicken bean在eggs先被实例化 -->
    <bean name="chicken" class="com.lyf.iocdemo.entity.Chicken"/>
    <bean id="eggs" class="com.lyf.iocdemo.entity.Eggs" depends-on="chicken"/>
2.8.2 实例化之间的关系
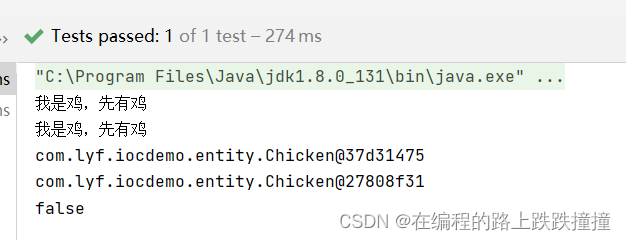
bean创建过程:
先有 Chicken——>eggs…
bean销毁过程
eggs——>Chicken…
如果有多个依赖关系,则在depends-on属性上用空格或者逗号或者分号分隔依赖关系。
<!--    鸡蛋崽崽依赖鸡粑粑与鸡妈妈-->
    <bean name="girlChicken" class="com.lyf.iocdemo.entity.Chicken"/>
    <bean name="boyChicken" class="com.lyf.iocdemo.entity.Chicken"/>

    <bean id="childEggs" class="com.lyf.iocdemo.entity.Eggs" depends-on="girlChicken,boyChicken"/>
2.9 bean的延迟加载
2.9.1 什么是延迟加载
延迟加载对bean对象,在容器创建成功之后,并不会立即实例化这个bean对象,而是等有引用对象需要该对象时,才会加载(实例化对象)该对象。延迟加载也叫按需加载。
<!--  lazy-init  开启懒加载-->
    <bean class="com.lyf.iocdemo.entity.Chicken" lazy-init="true"/>
2.10 bean的作用域
| 作用域 | 描述 |
|---|---|
| singleton | 单例模式,表示在容器中,只存在一个bean对象,无论什么样的请求都返回该bean对象给调用者 |
| prototype | 多例模式,表示在容器中,只要有请求到该bean对象,spring容器都会创建一个新的bean对象返回。 |
| request | 将bean对象的作用域限定在http请求的Request当中。 |
| session | 将bean对象的作用域限定在http请求的session当中。 |
| application | 将该bean对象的作用域限定在整个http的serveltContext当中 |
| websocket | 将该bean对象的作用域限定在整个http的websocket当中 |
开启作用域
<!--    开启作用域-->
    <bean name="chicken3 chicken4" class="com.lyf.iocdemo.entity.Chicken" scope="singleton"/>
测试代码
   @Test
    public void scope(){
        ApplicationContext context = new ClassPathXmlApplicationContext("ByNameAndByType.xml");
        Chicken chicken3 = (Chicken)context.getBean("chicken3");
        Chicken chicken4 = (Chicken)context.getBean("chicken4");
        System.out.println(chicken3);
        System.out.println(chicken4);
        System.out.println(chicken3.equals(chicken4));
    }
运行结果
多例模式
<!--    多例模式-->
    <bean  name="chicken5 chicken6" class="com.lyf.iocdemo.entity.Chicken" scope="prototype"/>
测试代码
@Test
public void scopePrototype(){
    ApplicationContext context = new ClassPathXmlApplicationContext("ByNameAndByType.xml");
    Chicken chicken5 = (Chicken)context.getBean("chicken5");
    Chicken chicken6 = (Chicken)context.getBean("chicken6");
    System.out.println(chicken5);
    System.out.println(chicken6);
    System.out.println(chicken5.equals(chicken6));
}
运行结果
2.11 bean的生命周期
2.11.1 什么是bean的生命周期
bean对象从创建到销毁的过程。
public class LifeCycle {
private String name;
public LifeCycle(){
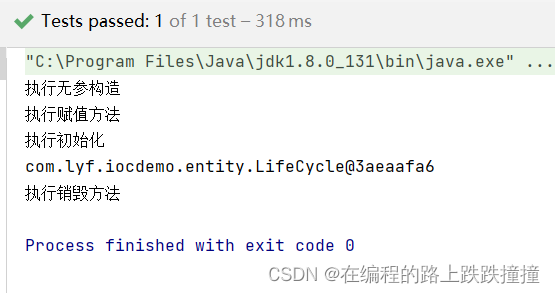
System.out.println("执行无参构造");
}
public LifeCycle(String name){
this.name = name;
System.out.println("执行有参构造");
}
public void init(){
System.out.println("执行初始化");
}
public void setName(String name) {
this.name = name;
System.out.println("执行赋值方法");
}
public void destroy(){
System.out.println("执行销毁方法");
}
}
<!--    bean的生命周期-->
    <bean id="lifeCycle" class="com.lyf.iocdemo.entity.LifeCycle"
          init-method="init" destroy-method="destroy">
<!--        <constructor-arg name="name" value="admin"/>-->
        <property name="name" value="user"/>
    </bean>
测试代码
  @Test
    public void lifeCycle(){
        LifeCycle lifeCycle = (LifeCycle) new ClassPathXmlApplicationContext("ByNameAndByType.xml").getBean("lifeCycle");
        System.out.println(lifeCycle);
        lifeCycle.destroy();
    }
测试结果
如果对象有有参构造则先执行有参构造,如果没有,则默认执行无参构造,如果有有参构造,想先执行无参构造,则声明无参构造即可。
特殊的生命周期BeanPostProcessor
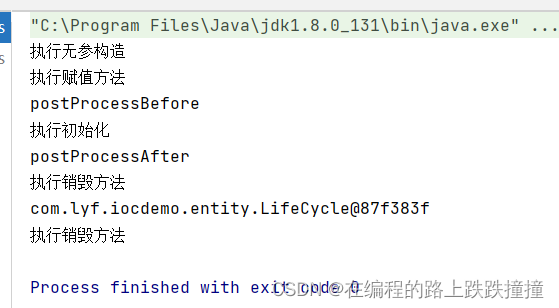
BeanPostProcessor 接口我们也叫后置处理器,作用是在Bean对象在实例化和依赖注入完毕后,在显示调用初始化方法的前后添加我们自己的逻辑。注意是Bean实例化完毕后及依赖注入完成之后才执行的。
public class MyBeanProcessor implements BeanPostProcessor {

    /**
     * 初始化之后执行方法
     * @param bean
     * @param beanName
     * @return
     * @throws BeansException
     */
    @Override
    public Object postProcessAfterInitialization(Object bean, String beanName) throws BeansException {
        LifeCycle lifeCycle  = (LifeCycle)bean;
        System.out.println("postProcessAfter");
         lifeCycle.destroy();
         return lifeCycle;
    }

    /**
     * 初始化之前执行方法
     * @param bean
     * @param beanName
     * @return
     * @throws BeansException
     */
    @Override
    public Object postProcessBeforeInitialization(Object bean, String beanName) throws BeansException {
        LifeCycle lifeCycle  = (LifeCycle)bean;
        System.out.println("postProcessBefore");
        lifeCycle.init();
        return lifeCycle;
    }
}
<!--    特殊的bean生命周期-->
    <bean name="lifeCycle1" class="com.lyf.iocdemo.entity.LifeCycle">
        <property name="name" value="roker"/>
    </bean>
    <bean class="com.lyf.iocdemo.entity.MyBeanProcessor">
    </bean>
测试代码
 @Test
    public void lifeCycle(){
        LifeCycle lifeCycle = (LifeCycle) new ClassPathXmlApplicationContext("ByNameAndByType.xml").getBean("lifeCycle1");
        System.out.println(lifeCycle);
        lifeCycle.destroy();

    }
运行结果
第三章 IOC之注解方式管理Bean
3.1 半注解方式管理bean对象
创建一个新的maven项目,导入依赖
        <dependency>
            <groupId>org.springframework</groupId>
            <artifactId>spring-context</artifactId>
            <version>5.1.10.RELEASE</version>
        </dependency>
创建一个bean对象
@Component:Component译为组件,用于标记这个类是spring容器管理的类,spring容器扫描到这个注解的时候,就会把这个类放入到容器中。spring对Component组件进行了子划分,用于区别不同的模块。表示的功能完全是一样的。
@Repository: 属于Component组件的子组件(衍生组件)用于表示在数据访问层,dao层。
@Service :属于Component组件的子组件(衍生组件)用于表示在业务层,service层。
@Controller: 属于Component组件的子组件(衍生组件)用于表示在控制层,controller层。
如果组件属性没有任何值,则表示当前的类名或方法名的首字母小写形式为该组件的名称
Student类
@Component
//@Repository
//@Service
//@Controller

public class Student {
    private String name;
    private Integer age;

    public Student() {
    }

    public Student(String name, Integer age) {
        this.name = name;
        this.age = age;
    }

    public Integer getAge() {
        return age;
    }

    public void setAge(Integer age) {
        this.age = age;
    }


    public String getName() {
        return name;
    }

    public void setName(String name) {
        this.name = name;
    }

    @Override
    public String toString() {
        return "User{" +
                "name='" + name + '\'' +
                ", age=" + age +
                '}';
    }
}
开启组件扫描
配置xml文件
<?xml version="1.0" encoding="UTF-8" ?>
<beans xmlns="http://www.springframework.org/schema/beans"
       xmlns:xsi="http://www.w3.org/2001/XMLSchema-instance"
       xmlns:context="http://www.springframework.org/schema/context"
       xsi:schemaLocation="http://www.springframework.org/schema/beans
       http://www.springframework.org/schema/beans/spring-beans.xsd
       http://www.springframework.org/schema/context
       http://www.springframework.org/schema/context/spring-context.xsd">

    <!--开启组件扫描-->
    <context:component-scan base-package="com.lyf.spring5"/>
</beans>
注解配置文件,include-filter表示把扫描的注解包含进来,exclude-filter表示排除该注解类型,扫描到该注解则不添加的容器当中。
    <!--开启组件扫描-->
    <context:component-scan base-package="com.lyf.spring5">
        <context:include-filter type="annotation" expression="org.springframework.stereotype.Component"/>
        <context:exclude-filter type="annotation" expression="org.springframework.stereotype.Indexed"/>
    </context:component-scan>
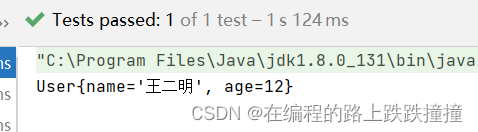
创建StudentDao类
@Repository //表示标记当前类为一个spring组件,并加入到容器当中
public class StudentDao {

    public Student getStudent(){
        Student student = new Student("王二明",12);
        return student;
    }
}
@Autowired 注入到属性当中
创建StudentService类
@Service //标记当前类为组件(Service类型组件)并加入到spring容器当中
public class StudentService {

    @Autowired //自动注入注解 表示把StudentDao这个bean注入当前属性当中,这里spring容器管理帮我们创建了studentDao对象
    private StudentDao studentDao;

    /**
     * 调用studentDao的getStudent方法 返回一个student对象
     * @return
     */
    public Student getStudent(){
        return studentDao.getStudent();
    }

}
测试代码
public class IocXmlTest {

    /**
     * 测试
     */
    @Test
    public void xmlTest(){
        Student student = new ClassPathXmlApplicationContext("context.xml")
        .getBean(StudentService.class).getStudent();
        System.out.println(student);
    }
}
测试结果
3.2 按类型进行自动注入
1.注入到setter方法当中
 @Autowired
     public void setStudentDao(StudentDao studentDao){
         this.studentDao = studentDao;
     }
2.注入到私有属性
    @Autowired //自动注入注解 表示把StudentDao这个bean注入当前属性当中,这里spring容器管理帮我们创建了studentDao对象
    private StudentDao studentDao;
3.注入当构造方法
  @Autowired
    public StudentService(StudentDao studentDao){
        this.studentDao = studentDao;
    }
3.3 按名称进行自动注入
1.注入到私有属性
@Qualifier("studentDao") 使用该注解表示使用名称进行注入,如果一个接口有多个实现类,则需要使用该注解进行指明需要使用哪个实现类,如果不指明需要实例化哪个实现类,spring容器会默认选择一个类来实例。
@Qualifier注解必须跟@Autowired 一起使用。
@Qualifier 注解的值是bean的名称,默认是类名的小写形式注入,如果需要修改,则在@Service注解当中指明bean的名称。
	@Autowired//自动注入注解 表示把StudentDao这个bean注入当前属性当中,这里spring容器管理帮我们创建了studentDao对象
    @Qualifier("studentDao")
    private StudentDao studentDao;
2.注入到set方法当中
   @Autowired
 @Qualifier("studentDao")
 public void setStudentDao(StudentDao studentDao){
      this.studentDao = studentDao;
  }
3 注入到有参构造函数当中
 @Autowired
 public StudentService(@Qualifier("studentDao") StudentDao studentDao){
     this.studentDao = studentDao;
 }
3.4 注入基本数据类型
三种基本类型注入方式
//   第一种属性注入方式
    @Value("user")
   private String  name;

    /**
     * 第二种有参构造注入方式
     * @param name
     */
    public StudentService(@Value("user1") String name){

    }

    /**
     * 第三种setter方法注入
     * @param name
     */
    public void setName(@Value("user2") String name) {
        this.name = name;
    }
3.5 注入外部属性文件
外部文件admin.properties
user.username =admin
user.password =admin
在配置文件引入外部属性文件。
  <!--引入外部文件-->
    <context:property-placeholder location="classpath:admin.properties"/>
 //第一种注入外部文件属性方式
    @Value("${user.username}")
    private String username;

    @Value("${user.password}")
    private String password;

    /**
     * 第二种有参构造函数注入方式
     * @param username
     * @param password
     */
    public StudentService(@Value("${user.username}") String username,@Value("${user.password}")String password){
        this.username =username;
        this.password = password;
    }

    /**
     * 第三种setter方法注入方式
     * @param username
     */
    public void setUsername(@Value("${user.username}") String username) {
        this.username = username;
    }

    public void setPassword(@Value("${user.password}") String password) {
        this.password = password;
    }
     @Override
    public String toString() {
        return "StudentService{" +
                ", username='" + username + '\'' +
                ", password='" + password + '\'' +
                '}';
    }
测试代码
 @Test
    public void test(){
        StudentService studentService = new ClassPathXmlApplicationContext("context.xml").getBean(StudentService.class);
        System.out.println(studentService);
    }
测试结果

3.6 bean的作用域
单例模式
@Component
@Scope("singleton")
public class Student{}
多例模式
@Component
@Scope("prototype")
public class Student{}
3.7 全注解方式管理bean对象
导入依赖
<!--        spring容器-->
        <dependency>
            <groupId>org.springframework</groupId>
            <artifactId>spring-context</artifactId>
            <version>5.1.10.RELEASE</version>
        </dependency>
<!--        单元测试-->
        <dependency>
            <groupId>junit</groupId>
            <artifactId>junit</artifactId>
            <version>4.12</version>
            <scope>test</scope>
        </dependency>
声明组件
@Component
public class Student{
private String name;
private Integer age;
}
配置文件 相对于xml形式的配置文件。
@Configuration表示当前类是一个配置文件类
@ComponentScan表示组件扫描注解,value属性表示扫描的包路径,如果有多个路径需要扫描,则{}分隔包名。
@Configuration
@ComponentScan(value = "com.lyf.spring5",includeFilters = {
        @ComponentScan.Filter(classes = Component.class)},
 excludeFilters = {@ComponentScan.Filter(classes = Controller.class)})
public class AppConfig {
}
默认使用这种模式即可
@Configuration
@ComponentScan("com.lyf.spring5")
public class AppConfig{}
测试代码
    @Test
    public void annotationTest(){
        Object student = new AnnotationConfigApplicationContext(AppConfig.class).getBean("student");
        System.out.println(student);
    }
运行结果
3.8 javaconfig 配置方式管理bean
@Configuration 注解表示该类是一个配置,被该注解标记的类都是配置类,与XML的<beans></beans>相似。
@Bean 注解表示该方法是一个bean对象,被该注解标记的方法是一个bean对象,与XML的<bean></bean>相似。
@Bean 如果没有属性值,则标记的方法为bean对象的名称默认为方法名。
通常,@Configruation&@Bean注解一起使用表示该类是一个配置类
@Configuration
public class JavaConfig {

    @Bean
    public Student student(){
        return new Student();
    }
}
JavaConfig类表示的结果跟xml表示的结果一致。
<beans>
    <bean id="emp" class="com.lyf.iocdemo.entity.Employee"></bean>
</beans>
我们需要注意的是 proxyBeanMethods 属性:
@Configuration(proxyBeanMethods = true) :代表Full模式,外部无论对配置类中的这个组件注册方法调用多少次获取的都是之前注册容器中的单实例对象
@Configuration(proxyBeanMethods = false) :代表Lite模式,外部无论对配置类中的这个组件注册方法调用多少次获取的都是创建一个新的实例对象
3.9 环境切换
创建一个数据源对象
public class DataSource {
    private String driver;
    private String url;
    private String username;
    private String password;

    public void setDriver(String driver) {
        this.driver = driver;
    }

    public void setUrl(String url) {
        this.url = url;
    }

    public void setUsername(String username) {
        this.username = username;
    }

    public void setPassword(String password) {
        this.password = password;
    }

    @Override
    public String toString() {
        return "DataSource{" +
                "driver='" + driver + '\'' +
                ", url='" + url + '\'' +
                ", username='" + username + '\'' +
                ", password='" + password + '\'' +
                '}';
    }
}
配置多数据源对象类
@Profile({"dev","default"}) 该注解表示如果spring容器指定的环境值需要这个bean对象,就会创建并使用。如果没有指定,默认创建该bean对象。
@Configuration
public class DataSourceConfig {


    @Bean("datasource")
    @Profile({"dev","default"})
    public DataSource getDataSourceDevelopment(){
        DataSource dataSource = new DataSource();
       dataSource.setDriver("com.mysql.jdbc.Driver");
       dataSource.setUrl("jdbc:mysql://localhost:3306/dev");
       dataSource.setUsername("root");
       dataSource.setPassword("root");
       return dataSource;
    }

    @Bean("datasource")
    @Profile("pro")
    public DataSource getDataSourceProduction(){
        DataSource dataSource = new DataSource();
        dataSource.setDriver("com.mysql.jdbc.Driver");
        dataSource.setUrl("jdbc:mysql://localhost:3306/pro");
        dataSource.setUsername("root");
        dataSource.setPassword("root");
        return dataSource;
    }
}
测试代码
@Test
    public void test(){
        //创建spring上下文对象(容器)
        AnnotationConfigApplicationContext context = new AnnotationConfigApplicationContext();
        //通过容器获取环境,并设置激活的配置文件
        context.getEnvironment().setActiveProfiles("dev");
        //注册配置文件到上下文当中,
        context.register(DataSourceConfig.class);
        //刷新上下文
        context.refresh();
        //获取数据库bean对象
        DataSource bean = context.getBean(DataSource.class);
        //打印数据库对象的值
        System.out.println(bean);

    }
运行结果

3.10 通过注解导入外部属性文件
外部属性文件 jdbc.properties
#开发环境数据库配置
jdbc.dev.driverClass=com.mysql.cj.jdbc.Driver
jdbc.dev.url=jdbc:mysql://localhost:3306/dev
jdbc.dev.username=root
jdbc.dev.password=root

#生产环境数据库配置
jdbc.pro.driverClass=com.mysql.jdbc.Driver
jdbc.pro.url=jdbc:mysql://localhost:3306/pro
jdbc.pro.username=root
jdbc.pro.password=456789
配置类 @PropertySource 表示导入一个外部文件,属性值是一个文件的类路径。这里注入了一个Environment 对象,该对象可以获取到外部文件的属性值
package com.lyf.spring5.jdbc;

import com.lyf.spring5.ioc.entity.DataSource;
import org.springframework.beans.factory.annotation.Autowired;
import org.springframework.beans.factory.annotation.Value;
import org.springframework.context.annotation.*;
import org.springframework.core.env.Environment;

@Configuration
@PropertySource("classpath:jdbc/jdbc.properties")
public class JdbcConfig {

    @Autowired
    private Environment env;
  // 第一种方式获取外部属性文件 。通过Environment 对象获取
  	 @Bean
    @Profile({"dev","default"})
    public DataSource DevDataSource(){
        DataSource dataSource = new DataSource();

        dataSource.setDriver(env.getProperty("jdbc.dev.driverClass"));
        dataSource.setUrl(env.getProperty("jdbc.dev.url"));
        dataSource.setUsername(env.getProperty("jdbc.dev.username"));
        dataSource.setPassword(env.getProperty("jdbc.dev.password"));
        return dataSource;
    }
	// 第二种获取方式,通过@Value注解获取
    @Value("${jdbc.pro.driver}")
    private String driver;
    @Value("${jdbc.pro.url}")
    private String url;
    @Value("${jdbc.pro.username}")
    private String username;
    @Value("${jdbc.pro.password}")
    private String password;

    @Bean
    @Profile("pro")
    public DataSource ProDataSource(){
        DataSource dataSource = new DataSource();

        dataSource.setDriver(driver);
        dataSource.setUrl(url);
        dataSource.setUsername(username);
        dataSource.setPassword(password);
        return dataSource;
    }
}
测试代码
    @Test
    public void test(){
        //创建spring上下文对象(容器)
        AnnotationConfigApplicationContext context = new AnnotationConfigApplicationContext();
        //通过容器获取环境,并设置激活的配置文件
        context.getEnvironment().setActiveProfiles("dev");
        //注册配置文件到上下文当中,
        context.register(JdbcConfig.class);
        //刷新上下文
        context.refresh();
        //获取数据库bean对象
        DataSource bean = context.getBean(DataSource.class);
        //打印数据库对象的值
        System.out.println(bean);

    }
运行结果

3. 11 导入普通对象
@Import 通过该注解获取普通对象,属性值是一个类。
@Configuration
@Import(Student.class) //导入普通对象
public class JavaConfig {
}
测试代码
    @Test
    public void test1(){
        //创建spring上下文对象(容器)
        AnnotationConfigApplicationContext context = new AnnotationConfigApplicationContext();
        Student bean = context.getBean(Student.class);
        //打印对象的值
        System.out.println(bean);

    }
测试结果
3.12 导入原生配置文件
导入原生的xml配置文件,原生的xml配置文件,通过注解方式读取该xml配置文件的内容。
<!--    注解方式读取该bean对象的参数-->
    <bean class="com.lyf.spring5.ioc.entity.Student">
        <property name="name" value="王二明"/>
        <property name="age" value="18"/>
    </bean>
配置类
@ImportResource该注解表示读取xml原生配置文件,属性值为xml文件所在的类路径。
@Configuration
@ImportResource(locations = "classpath:context.xml")
public class JavaConfig {

}
测试代码
 @Test
    public void test1(){
        //创建spring上下文对象(容器)
        AnnotationConfigApplicationContext context = new AnnotationConfigApplicationContext(JavaConfig.class);
       // context.register(JavaConfig.class);
        Student student = context.getBean("com.lyf.spring5.ioc.entity.Student",Student.class);
        //打印对象的值
        System.out.println(student);

    }
运行结果


 被折叠的 条评论
为什么被折叠?
被折叠的 条评论
为什么被折叠?
 到【灌水乐园】发言


