


 本文详细介绍了Vue2的关键特性,包括脚手架的使用、组件与mixin的混入、自定义插件与全局事件总线、VueRouter的配置、VueX的状态管理以及动画效果的实现。此外,还讲解了如何设置代理服务器解决跨域问题,插槽的分类与应用场景,以及路由传参的各种方式。
学习目标:巩固学习Vue2
脚手架、组件、mixin混入、插件plugins、路由router
例如:
- 一周复习巩固 Vue2入门知识
学习内容:
1.css关键字 scoped 组件样式加了只为当前组件服务,因为所有的组件样式会汇总使用,容易重名,解决此问题;如果在app管理组件中,使用基本代表很多组件都会使用, 如果加了这个关键字其他组件就不能使用,建议app组件就不要加
<style scoped>
.demo{
  background-color: orange;
}
</style>
2.plugin.js插件,vue的一个增强工具,在这里面可以写全局过滤器,自定义命令,全局混入mixin等等;
export default {
    install(Vue) {
        Vue.mixin({
            data() {
                return {pluginTest:'插件测试'}
            }
        })
    }
}
3.mixin混入,提取全局组件的公共部分,写在mxin里面提高代码的复用性
export const mixin= {
    data() {
        return {
            itemName: '陈先生'
        }
    },
    beforeMount() {
        console.log(this)
    }
}
4.全局事件总线(任意组件之间通信)
适用于
任意组件通信,通过绑定事件的形式,把回调函数留在自己身上,获取参数;
①在new Vue实例对象中的becreate钩子函数获取vuecomponent实例对象Vue.prototype.$bus=this
②A组件与其他组件之间的通信,调用this.$bus.$on(event,(data)=>{console.log("测试")}),回调函数留着自己身上,其他组件就可以与A组件任意通信
③记得把事件解绑beforeDestroy() { this.$bus.$off("hello"); }
//1.安装全局总线
new Vue({
render: h => h(App),
beforeCreate() {
  Vue.prototype.$bus=this
}
}).$mount('#app')

//2.绑定事件
mounted() {
  this.$bus.$on('hello',(data)=>{
    console.log("测试",data)
  })
},
//3.销毁事件
beforeDestroy() {
  this.$bus.$off("hello");
}
5.配置代理服务器,vue-cli提供的,解决跨域问题
因为浏览器发送请求的端口一般和后端不一样,导致访问服务器但是没有返回结果,此时脚手架提供的代理服务器
devServer就能解决这个问题,服务器之间的通信是通过http协议,不存在跨域问题,代理服务器接收到请求后转发给真正的服务器,前端和服务器的通信方式ajax技术
笔记:当项目public目录(静态资源)下如果有与服务器的接口名相同的时候,会优先选择静态资源,所以为了控制请求走服务器接口而不是走静态资源,给访问接口加上接口前缀,识别带前缀就走服务器,但是要加个配置
pathRewrite重写路径名,转发前去掉前缀
请求地址:http://localhost:8080/api/student
//开启代理服务器
module.exports = {
  devServer: {
      proxy: {
          //代理服务器1
          '/api': {
              target: 'http://localhost:5000',
              pathRewrite: {'/api': ""},//重写路径-->如果带前缀就替换为空串''
              ws: true,//websocate--通信方式
              changeOrigin: true//是否隐藏真实ip
          },
          //代理服务器2
          '/foo': {
              target: '<other_url>'
          }
      }
  }
}
6.动画效果
废话不多说上代码
<template>标签属性name,区分不同标签使用样式,默认都使用v-enter-active和v-leave-active
<template>
  <div>
    <button @click="isShow=!isShow">显示/隐藏</button>
    <transition name="hello" appear>
      <h1 id="test" v-show="isShow">世界自由</h1>
    </transition>
  </div>
</template>

<script>
export default {
  data() {
    return {
      name: 'Test',
      isShow: true
    }
  }
}
</script>
<style scoped>

#test {
  background-color: orange;
}

.hello-enter-active {
  animation: test 1s linear;
}

/*匀速-反转*/
.hello-leave-active {
  animation: test 1s linear reverse;
}

/*默认v-开头*/
.v-enter-active {
  animation: test 1s linear;
}

/*匀速-反转*/
.v-leave-active {
  animation: test 1s linear reverse;
}

/*关键帧-过渡动画*/
@keyframes test {
  from {
    transform: translateX(-100px);
  }
  to {
    transform: translateX(0px);
  }
}
</style>
7、过渡效果
待定
8、插槽
分类
插槽分为匿名插槽、具名插槽、作用域插槽。
子组件中匿名插槽只能有一个;可以有多个具名插槽;作用域插槽中可以有匿名插槽和具名插槽。
场景
当项目中一个组件可以多次复用时,我们可以把这个组件封装成单独的.vue文件,从而可以在不同的页面中引入该组件,从而实现组件的复用,我们称这个.vue文件为子组件,需要用到这个子组件的页面我们称为父组件。当子组件中可以决定自己的大概结构,但是有些内容的展示与否,或者展示的形式子组件不能决定,需要由父组件来决定之后传给子组件时,需要使用到作用域插槽(匿名插槽和具名插槽辅助作用域插槽),父组件决定内容,子组件决定位置。
父组件APP
<slotTest>
      <h1>我是默认插槽与子组件通信传递html结构</h1>
      <h2 slot="h2">我是具名插槽</h2>
      <template v-slot:h3="atguigu">
        <h3 v-for="(iteam,index) in atguigu.arr " :key="index">
          {{ index }}--{{ iteam }}我是作用域插槽{{ atguigu.arr }}</h3>
      </template>
    </slotTest>
子组件slotTest
<template>
  <div>
    <slot>我是插槽默认值</slot>
    <slot name="h2">我是h2插槽默认值</slot>
    <slot name="h3" :arr="arr">我是h3插槽默认值</slot>
  </div>
</template>

<script>
export default {
  data() {
    return {
      name: 'slotTest',
      arr: [1, 2, 3, 4]
    }
  }
}
</script>
备注:子组件挖个坑带名,父组件指名跳;子组件给父组件传参
scope(新版本写的新法)不然会报错Unexpected mixed usage of different slot syntaxes
新版本:v-slot:h3="atguigu" 正确
老版本: slot="hit" slot-scope="atguigu">
报错:混用了不同的slot语法
9、VueX–插件
集中式的管理数据(状态)插件,由Store仓库来进行管理,多了配置项
store
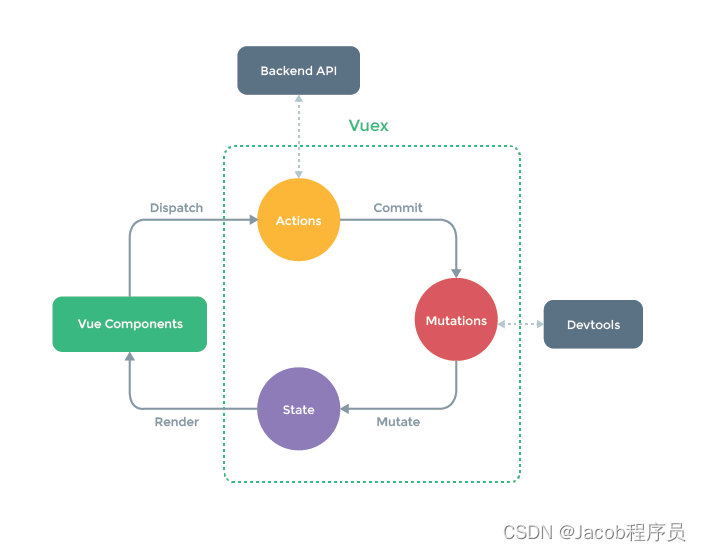
状态:
1.actions—>由dispatch触发
2.mutacations—>commit触发
3.state—>存储数据,获取数据this.$store.age
4.getter —>缓存
5.module—>模块化
废话不多说上代码
为什么在Store目录下的js文件这里使用Vue.use(vuex)?
答:如果在main.js中使用,代码运行会先运行import,此时vuecomponent身上没有store配置对象,必须先引入VueX,有了配置对象Store,才能把创建的vuex实例赋值给配置项,所以直接在创建vuex实例之前就引入配置项,不然会报错;
store.js
//该文件用于创建vuex中最核心的文件store
//导入vuex
import Vuex from 'vuex';
//应用vuex
Vue.use(Vuex);
//导入vue
import Vue from 'vue'
//准备actives --用于响应组件中的动作
const actions = {
    // this.$store.dispatch("add",this.number)调用了,就执行这里
    add(context,value){
        console.log("actions的add被调用了,参数:",context,value);
        context.commit("ADD",value);
    }
}
//准备mutations --用于操作data
const mutations = {
    ADD(state,value){
       console.log("mutations的ADD被调用了",state,value)
       state.sum+=value
    }
}
//准备state --用于存储数据
const state = {
    sum:0
}
//导出/暴露store
export default new Vuex.Store({
    actions, mutations, state
})
main.js
import Vue from 'vue'
import App from './App.vue'
import ElementUI from 'element-ui';
import 'element-ui/lib/theme-chalk/index.css';
import store from './store/index.js';
//关闭提示
Vue.config.productionTip = false
//应用ElementUI库
Vue.use(ElementUI);

new Vue({
  el: "#app",
  render: h => h(App),
  store
})
App.vue
<template>
  <div id="root">
    <h1>App组件</h1>
    <select v-model.number="number">
      <option value="6">请选择</option>
      <option value="1">1</option>
      <option value="2">2</option>
      <option value="3">3</option>
    </select>
    <button @click="add">+</button>
    <span>={{ $store.state.sum }}</span>
  </div>
</template>

<script>

export default {
  name: "App",
  data() {
    return {
      number: 1
    }
  },
  methods: {
    add() {
      // 通过dispatch
      // this.$store.dispatch("add",this.number)
      //通过comit,绕过actions
      this.$store.commit("ADD", this.number)
    }
  },
  mounted() {
    console.log("app", this);
  },
};

</script>
10、路由route–插件
单页面跳转,vue多一个路由
router配置项
在入口main.js配置路由
//引入vuerouter
import VueRouter from 'vue-router'
//引入路由器
import router from './router/index.js'
//引用插件
Vue.use(VueRouter)
1.路由规则
//该文件用于创建整个应用的路由器
import VueRouter from "vue-router"
import About from '../pages/About.vue'
import Home from '../pages/Home.vue'
import Info from '../pages/Info.vue'
// import Temp from '../pages/temp.vue'
import list from '../pages/list.vue'
import detail from '../pages/detail.vue'


//暴露-路由对象-创建一个路由器
export default new VueRouter({
    //配置路由规则
    routes: [
        {
            path: '/about',
            component: About
        },
        {
            path: '/home',
            component: Home,
            children: [
                {
                    path: 'info',
                    component: Info
                },
                {
                    path: 'list',
                    component: list,
                    children: [
                        {
                            path: 'detail',
                            component: detail

                        }
                    ]
                },
            ]
        }
    ]
})
2.二级路由
<template>
  <div>
    <h2>我是Home</h2><br>
    <router-link active-class="active" to="/home/Info" ><el-button type="success">信息按钮</el-button></router-link>
    <br>
    <br>
    <router-link active-class="active" to="/home/list"><el-button type="success">列表按钮</el-button></router-link>
    <br>
    <br>
    <router-view></router-view>
  </div>
</template>

<script>
export default {
  name: "Home",
  comments: {},
  beforeDestroy() {
    console.log("我是home组件我被销毁了");
  },
};
</script>

<style>
</style>
3.三级路由且传参给detail组件
params参数采用query方式传参?id=1&name=liming
<template>
  <ul>
    <li v-for="(iteam,index) in arr" :key="index">

      <!--      路由传参方式1:-->
      <!--      <router-link :to="{-->
      <!--      path:'/home/list/detail?id=999'}">-->

      <!--      路由传参方式2:-->
      <router-link :to="{
      path:'/home/list/detail',
      query:{
        id:iteam.title,
        name:iteam.name
      }
    }">
        {{ iteam.name }}
      </router-link>
    </li>

    <hr>
    <router-view></router-view>

  </ul>
</template>

<script>
export default {
  name: "Info",
  data() {
    return {
      arr: [
        {title: '001', name: '选项1'},
        {title: '002', name: '选项2'},
        {title: '003', name: '选项3'},
      ]
    };
  },
};
</script>

<style>
</style>
4.detail组件接收路由传参并且打印在控制台
<template>
  <div>
    title:<span>{{this.$route.query.id}}</span><br>
    name:<span>{{this.$route.query.name}}</span>
  </div>
</template>

<script>
export default {
  name: "detail",
  mounted() {
    console.log("路由参数:",this.$route.query)
  }
};
</script>

<style>
</style>
命名路由简化跳转路径
1.路由命名规则,name属性
 path: 'list',
                    component: list,
                    children: [
                        {
                            name:'xiangqin',
                            path: 'detail',
                            component: detail

                        }
2.组件路由跳转
 <router-link :to="{
        name:'xiangqin',
      // path:'/home/list/detail',
        query:{
        id:iteam.title,
        name:iteam.name
      }
    }">
        {{ iteam.name }}
      </router-link>
params参数
1.配置路由,声明占位符
  {
                    path: 'list',
                    component: list,
                    children: [
                        {
                        name: 'xiangqin',
                        // path: 'detail',
                        path: 'detail/:id/:name',//声明占位符,使用params传参
                        component: detail

                        }
                    ]
                },
2.路由跳转传参
//1.0
    <router-link :to="{
        name:'xiangqin',
      // path:'/home/list/detail',
        params:{
        id:iteam.title,
        name:iteam.name
      }
//2.0 字符串传参
 <router-link to="/home/list/detail/001/222">{{ iteam.name }}</router-link>
 //3.0-通过占位符
 <router-link :to="`/home/list/detail/${iteam.title}/${iteam.name}`"> {{ iteam.name }}</router-link>
3.接收参数
title:<span>{{ this.$route.params.id }}</span><br>
name:<span>{{ this.$route.params.name }}</span>
特别注意:使用
params:{id:iteam.title}方式传参,必须使用name属性跳转,不能使用Path
props简化传参,路由规则里面新的配置项,props
分为三种
1.字符串,直接写死
router
//路由规则
 name: 'xiangqin',
                            // path: 'detail',
                            path: 'detail/:id/:name',//声明占位符,使用params传参
                            component: detail,
                            props: {id:12,name:12}
template
<div>
	title:<span>{{ id }}</span><br>
    name:<span>{{ name }}</span>
<div/>
路由规则
export default {
  name: "detail",
  props: ['id', 'name']
  }
2.布尔值,接收所有params参数以props的形式传递参数,query参数不行!!
export default {
  name: "detail",
  props: true
  }
3.函数式,返回一个值,query方式用props接收
路由
 {
                    path: 'list',
                    component: list,
                    children: [
                        {
                            name: 'xiangqin',
                            path: 'detail',
                            component: detail,
                            props($route) {
                                console.log('props参数', $route)
                                return {
                                    id: $route.query.id,
                                    name: $route.query.name,
                                    a: 1
                                };
                            }
                        }
                    ]
                }
}
父组件采用query传参
<router-link :to="{
        name:'xiangqin',
      // path:'/home/list/detail',
        query:{
        id:iteam.title,
        name:iteam.name
      }
    }">
        {{ iteam.name }}
      </router-link>
以props配置项接收参数
<div>
    title:<span>{{ id }}</span><br>
    name:<span>{{ name }}</span>
  </div>
</template>

<script>
export default {
  name: "detail",
  props: ['id', 'name'],
  </script>
router-link replace

编程式路由导航
使用router路由器身上的API完成跳转,不使用router-linke标签
push模式
 pushShow(iteam) {
      this.$router.push({
        name: 'xiangqin',
        query: {
          id: iteam.title,
          name: iteam.name
        }
      })
    }
replace模式
  replaceShow(iteam){
      this.$router.replace({
        name: 'xiangqin',
        query: {
          id: iteam.title,
          name: iteam.name
        }
      })
    }
前进-后退-go(正负数)
  forWard() {
      this.$router.forward();
    },
    back() {
      this.$router.back();
    },
    go() {
      this.$router.go(3);//跳转到栈当前3个
    }
  }
缓存路由组件
 <!--白名单include=组件名-->
   <keep-alive include="list">
     <router-view></router-view>
   </keep-alive>
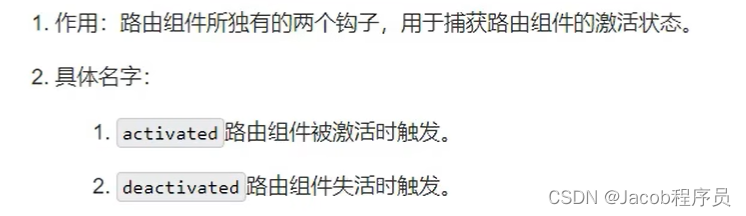
两个新的生命周期钩子
路由守卫
学习时间:
例如:
- 周一至周五晚上 7 点—晚上9点
- 周六上午 9 点-上午 11 点
- 周日下午 3 点-下午 6 点
学习产出:
提示:这里统计学习计划的总量
例如:
- 技术笔记 2 遍
- 优快云 技术博客 3 篇
- 学习的 vlog 视频 1 个


 726
726

 被折叠的 条评论
为什么被折叠?
被折叠的 条评论
为什么被折叠?
 到【灌水乐园】发言


