


 本文深入探讨了SpringBoot的运行原理,包括pom.xml的父依赖管理,SpringBoot启动器的作用,以及主启动类中的注解功能。特别强调了@SpringBootApplication注解的@ComponentScan、@SpringBootConfiguration、@EnableAutoConfiguration等关键作用,揭示了自动配置是如何通过@EnableAutoConfiguration从META-INF/spring.factories加载并生效的。最后,简要概述了SpringApplication.run的执行流程。
pom.xml文件
父依赖
主要是管理项目的资源过滤及插件!
<!-- 父依赖 -->
<parent>
		<groupId>org.springframework.boot</groupId>
		<artifactId>spring-boot-starter-parent</artifactId>
		<version>2.4.0</version>
		<relativePath/> <!-- lookup parent from repository -->
	</parent>
Ctrl +鼠标左键点入,发现还有一个父依赖
<parent>
    <groupId>org.springframework.boot</groupId>
    <artifactId>spring-boot-dependencies</artifactId>
    <version>2.4.0</version>
  </parent>
Ctrl +鼠标左键点入dependencies发现自动装配了许多jar包依赖

这里才是真正管理SpringBoot应用里面所有依赖版本的地方,SpringBoot的版本控制中心,以后我们导入依赖默认是不需要写版本;但是如果导入的包没有在依赖中管理着就需要手动配置版本了
启动器:spring-boot-starter
 <!-- web场景启动器 -->
        <dependency>
            <groupId>org.springframework.boot</groupId>
            <artifactId>spring-boot-starter-web</artifactId>
        </dependency>
        <!-- springboot单元测试 -->
        <dependency>
            <groupId>org.springframework.boot</groupId>
            <artifactId>spring-boot-starter-test</artifactId>
            <scope>test</scope>
        </dependency>
    </dependencies>
springboot-boot-starter-xxx表示的是spring-boot的场景启动器
spring-boot-starter-web:帮我们导入了web模块正常运行所依赖的组件
spring-boot-starter-test:帮我们导入了springboot中test类正常运行所依赖的组件
SpringBoot将所有的功能场景都抽取出来,做成一个个的starter (启动器),只需要在项目中引入这些starter即可,所有相关的依赖都会导入进来 , 我们要用什么功能就导入什么样的场景启动器即可 ,我们未来也可以自己自定义 springboot-boot-starter-xxx
主启动类
//@SpringBootApplication 来标注一个主程序类
//说明这是一个Spring Boot应用
@SpringBootApplication
public class SpringbootApplication {

   public static void main(String[] args) {
     //以为是启动了一个方法,没想到启动了一个服务
      SpringApplication.run(SpringbootApplication.class, args);
   }

}
分析这些注解到底干了什么?
@SpringBootApplication
作用:标注在某个类上说明这个类是SpringBoot的主配置类 , SpringBoot就应该运行这个类的main方法来启动SpringBoot应用
Ctrl + 鼠标左键进入这个注解:可以看到上面还有很多其他注解
@SpringBootConfiguration
@EnableAutoConfiguration
@ComponentScan(
    excludeFilters = {@Filter(
    type = FilterType.CUSTOM,
    classes = {TypeExcludeFilter.class}
), @Filter(
    type = FilterType.CUSTOM,
    classes = {AutoConfigurationExcludeFilter.class}
)}
)
public @interface SpringBootApplication {
@ComponentScan
这个注解在Spring中很重要 ,它对应XML配置中的元素
作用:自动扫描并加载符合条件的组件或者bean , 将这个bean定义加载到IOC容器中
@SpringBootConfiguration
作用:SpringBoot的配置类 ,标注在某个类上 , 表示这是一个SpringBoot的配置类
Ctrl + 鼠标左键点入该注解@SpringBootConfiguration
@Configuration
public @interface SpringBootConfiguration {
Ctrl + 鼠标左键点入该注解@Configuration
@Component
public @interface Configuration {
这里的 @Configuration,说明这是一个配置类 ,配置类就是对应Spring的xml 配置文件
里面的 @Component 这就说明,启动类本身也是Spring中的一个组件而已,负责启动应用
回到 SpringBootApplication 注解中继续看其他注解
@EnableAutoConfiguration
作用:开启自动配置功能
以前使用spring时我们需要自己配置东西,而现在springboot可以自动帮我们配置,该注解告诉springboot开启自动配置功能,这样自动配置才能生效
Ctrl + 鼠标左键点入该注解查看
@AutoConfigurationPackage
@Import({AutoConfigurationImportSelector.class})
public @interface EnableAutoConfiguration {
@AutoConfigurationPackage :自动配置包
@import :Spring底层注解@import , 给容器中导入一个配置类作为组件
Ctrl + 鼠标左键进入@AutoConfigurationPackage注解
@Import({Registrar.class})
public @interface AutoConfigurationPackage {
Registrar.class 作用:将主启动类的所在包及包下面所有子包里面的所有组件扫描到并交给SpringIOC容器管理
@Import({AutoConfigurationImportSelector.class})
作用:给容器导入自动配置导入选择器作为组件
AutoConfigurationImportSelector:该类为自动配置导入选择器类,那么它会导入哪些组件的选择器呢?我们点击去这个类看源码
AutoConfigurationImportSelector这个类里面有一个方法叫获取候选所有配置
// 获得候选的配置
protected List<String> getCandidateConfigurations(AnnotationMetadata metadata, AnnotationAttributes attributes) {
    //这里的getSpringFactoriesLoaderFactoryClass()方法
    //返回的就是我们最开始看的启动自动导入配置文件的注解类;EnableAutoConfiguration
    List<String> configurations = SpringFactoriesLoader.loadFactoryNames(this.getSpringFactoriesLoaderFactoryClass(), this.getBeanClassLoader());
    Assert.notEmpty(configurations, "No auto configuration classes found in META-INF/spring.factories. If you are using a custom packaging, make sure that file is correct.");
    return configurations;
}
this.getSpringFactoriesLoaderFactoryClass()调用的是下面这个方法,也就是启动自动导入配置文件的注解类;EnableAutoConfiguration
 protected Class<?> getSpringFactoriesLoaderFactoryClass() {
        return EnableAutoConfiguration.class;
    }
调用了 SpringFactoriesLoader 类的静态方法,我们进入SpringFactoriesLoader类loadFactoryNames() 方法
public static List<String> loadFactoryNames(Class<?> factoryType, @Nullable ClassLoader classLoader) {
        ClassLoader classLoaderToUse = classLoader;
        if (classLoader == null) {
            classLoaderToUse = SpringFactoriesLoader.class.getClassLoader();
        }

        String factoryTypeName = factoryType.getName();
        //这里它又调用了 loadSpringFactories 方法
        return (List)loadSpringFactories(classLoaderToUse).getOrDefault(factoryTypeName, Collections.emptyList());
    }
这里它又调用了 loadSpringFactories 方法,继续查看oadSpringFactories 方法
private static Map<String, List<String>> loadSpringFactories(ClassLoader classLoader) {
//获得classLoader , 我们返回可以看到这里得到的就是EnableAutoConfiguration标注的类本身
        Map<String, List<String>> result = (Map)cache.get(classLoader);
        if (result != null) {
            return result;
        } else {
            HashMap result = new HashMap();

            try {
            //去获取一个资源 "META-INF/spring.factories"
                Enumeration urls = classLoader.getResources("META-INF/spring.factories");

//将读取到的资源遍历,封装成为一个Properties
                while(urls.hasMoreElements()) {
                    URL url = (URL)urls.nextElement();
                    UrlResource resource = new UrlResource(url);
                    Properties properties = PropertiesLoaderUtils.loadProperties(resource);
                    Iterator var6 = properties.entrySet().iterator();

                    while(var6.hasNext()) {
                        Entry<?, ?> entry = (Entry)var6.next();
                        String factoryTypeName = ((String)entry.getKey()).trim();
                        String[] factoryImplementationNames = StringUtils.commaDelimitedListToStringArray((String)entry.getValue());
                        String[] var10 = factoryImplementationNames;
                        int var11 = factoryImplementationNames.length;

                        for(int var12 = 0; var12 < var11; ++var12) {
                            String factoryImplementationName = var10[var12];
                            ((List)result.computeIfAbsent(factoryTypeName, (key) -> {
                                return new ArrayList();
                            })).add(factoryImplementationName.trim());
                        }
                    }
                }

                result.replaceAll((factoryType, implementations) -> {
                    return (List)implementations.stream().distinct().collect(Collectors.collectingAndThen(Collectors.toList(), Collections::unmodifiableList));
                });
                cache.put(classLoader, result);
                return result;
            } catch (IOException var14) {
                throw new IllegalArgumentException("Unable to load factories from location [META-INF/spring.factories]", var14);
            }
        }
    }
我们去查看导入的依赖spring-boot-autoconfigure下面的META-INF下面的spring.factories
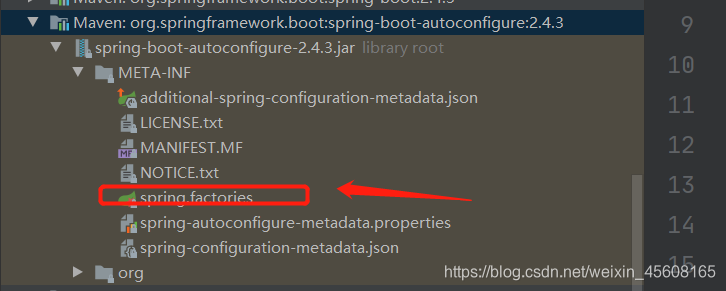
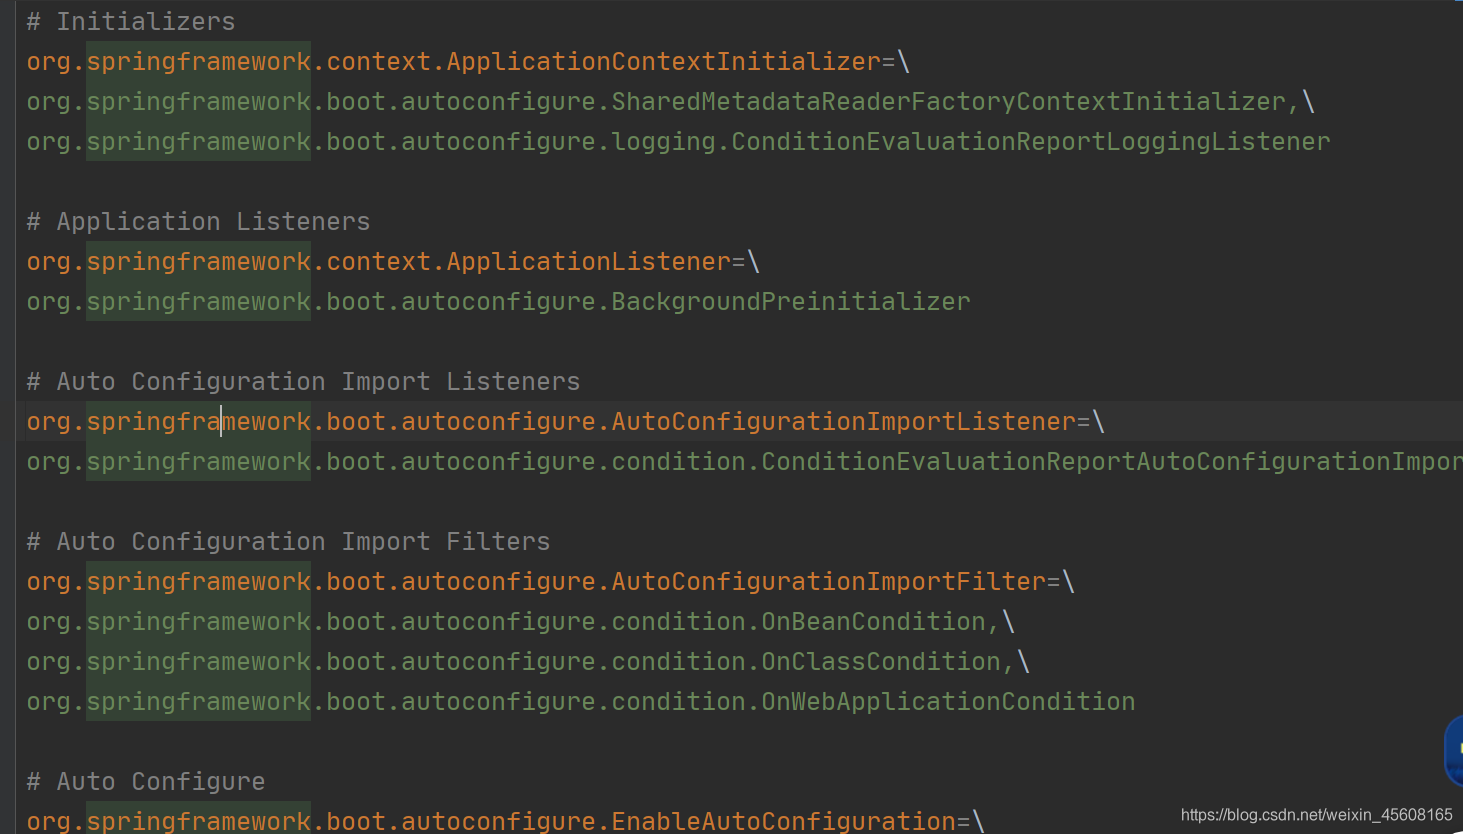
spring.factories文件中看到了很多自动配置的文件;这就是自动配置根源所在
上面的自动配置类我们打开一个看看,比如WebMvcAutoConfiguration
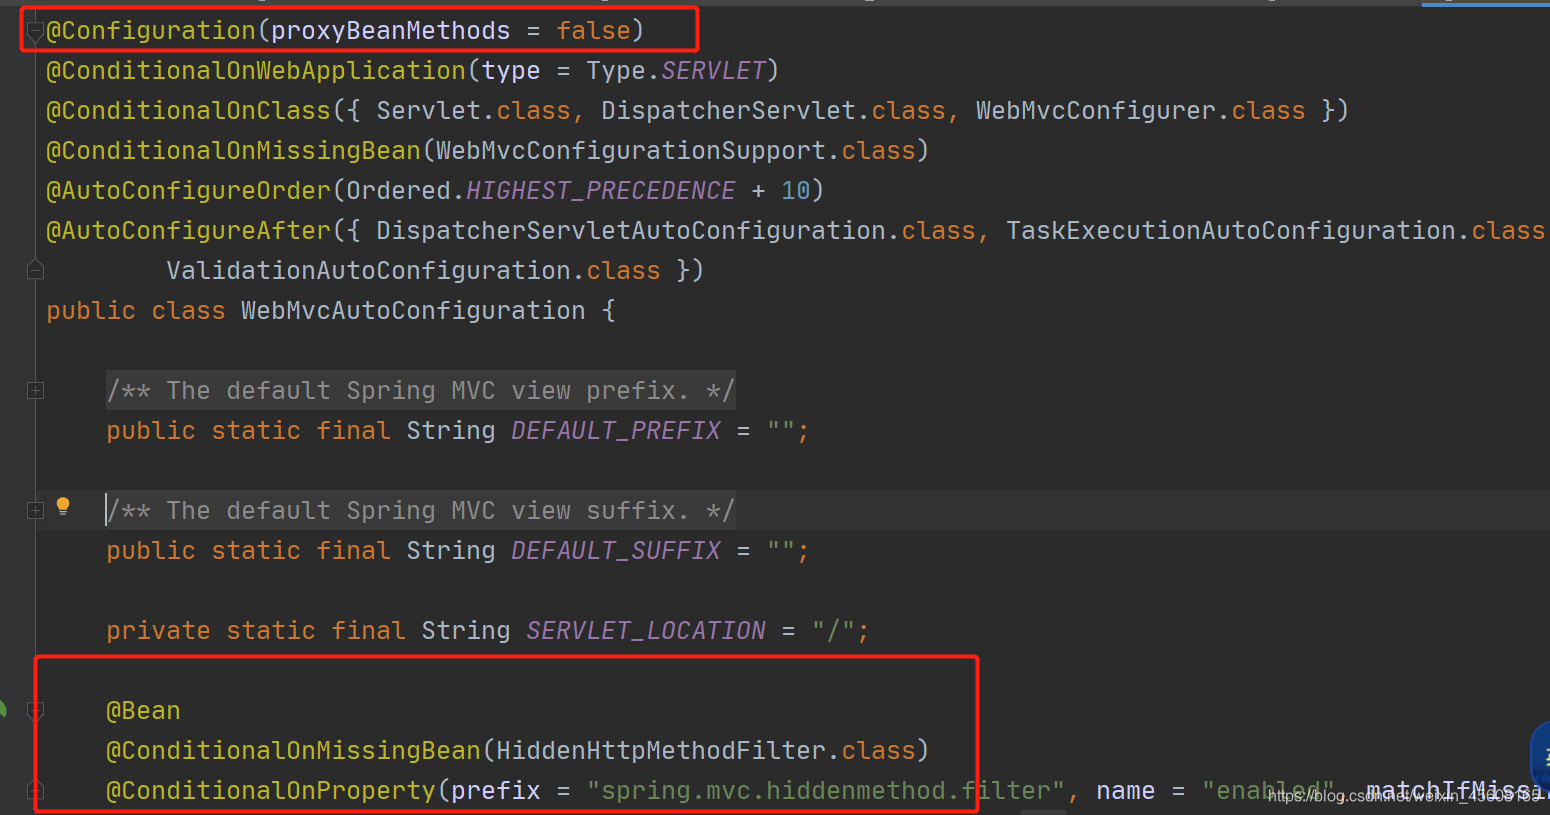
可以看到这些一个个的都是JavaConfig配置类,而且都注入了一些Bean。
所以,自动配置真正实现是从classpath中搜寻所有的META-INF/spring.factories配置文件 ,并将其中对应的 org.springframework.boot.autoconfigure. 包下的配置项,通过反射实例化为对应标注了 @Configuration的JavaConfig形式的IOC容器配置类 , 然后将这些都汇总成为一个实例并加载到IOC容器中
结论:
- SpringBoot在启动的时候从类路径下的META-INF/spring.factories中获取EnableAutoConfiguration指定的值
- 将这些值作为自动配置类导入容器 , 自动配置类就生效 , 帮我们进行自动配置工作
- 整个J2EE的整体解决方案和自动配置都在springboot-autoconfigure的jar包中
- 它会给容器中导入非常多的自动配置类 (xxxAutoConfiguration), 就是给容器中导入这个场景需要的所有组件 , 并配置好这些组件
- 有了自动配置类 , 免去了我们手动编写配置注入功能组件等的工作
思考:META-INF/spring.factories下面这么多配置文件为什么有的生效有的没有生效?
我们可以在META-INF/spring.factories下找一个不认识的进去看一下
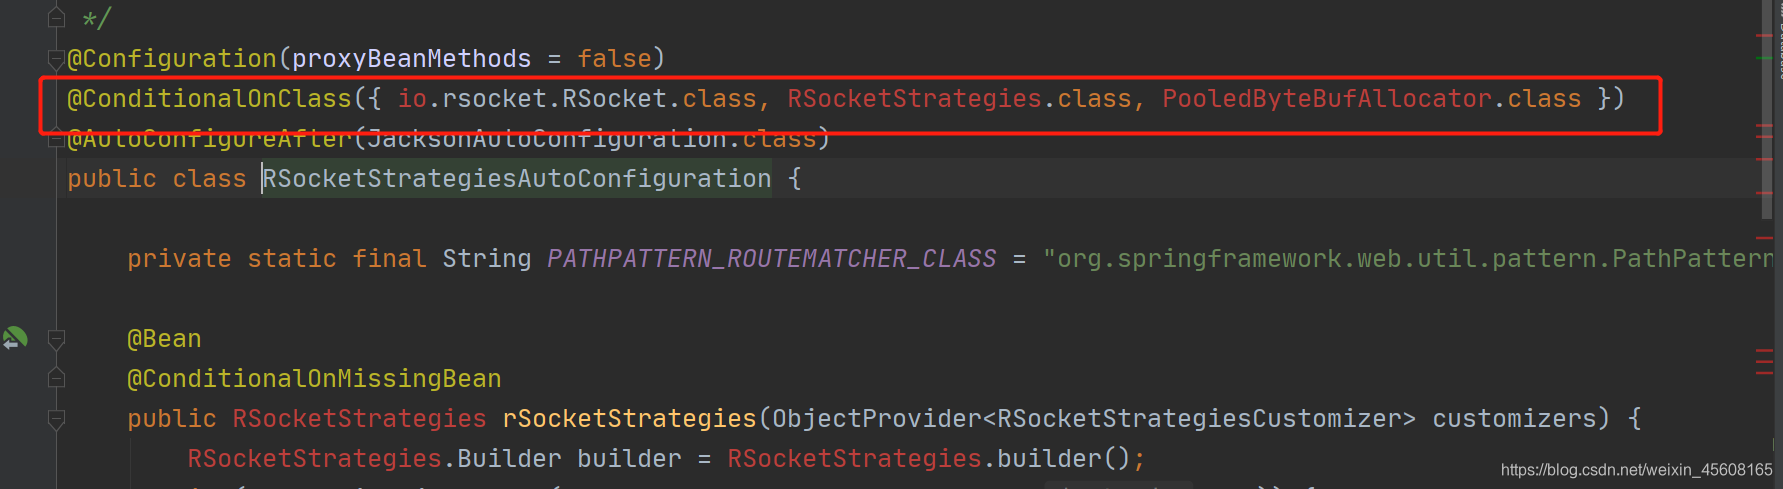
可以发现有一个注解@ConditionalOnClass候选类中的class值不满足,则不会自动装配到spring中,所以这些类没有生效,即该类不存在,则该类无效,需要导入对应的spring-boot-starter-xxx才能有作用
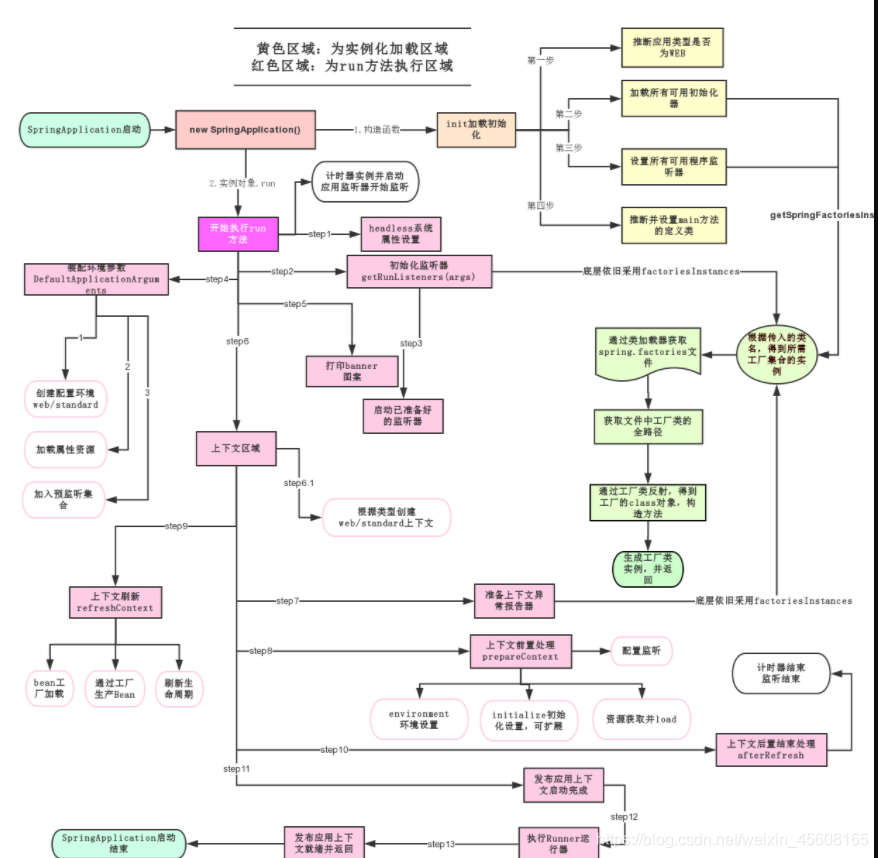
SpringApplication运行
SpringApplication.run分析
分析该方法主要分两部分,一部分是SpringApplication的实例化,二是run方法的执行
这个类主要做了四件事情:
- 推断应用的类型是普通的项目还是Web项目
- 查找并加载所有可用初始化器 , 设置到initializers属性中
- 找出所有的应用程序监听器,设置到listeners属性中
- 推断并设置main方法的定义类,找到运行的主类
查看该类的构造器:
public SpringApplication(ResourceLoader resourceLoader, Class... primarySources) {
    // ......
    //推断应用的类型是普通的项目还是Web项目
    this.webApplicationType = WebApplicationType.deduceFromClasspath();
   	 //查找并加载所有可用初始化器 , 设置到initializers属性中
	this.setInitializers(this.getSpringFactoriesInstances();
	//找出所有的应用程序监听器,设置到listeners属性中
    this.setListeners(this.getSpringFactoriesInstances(ApplicationListener.class));
    //推断并设置main方法的定义类,找到运行的主类
    this.mainApplicationClass = this.deduceMainApplicationClass();
}
run方法流程分析


 3962
3962

 被折叠的 条评论
为什么被折叠?
被折叠的 条评论
为什么被折叠?
 到【灌水乐园】发言


