


环境版本说明
- RedHat9 [Red Hat Enterprise Linux release 9.0]
- Ansible [core 2.13.3]
- Python [3.9.10]
- jinja [3.1.2]
1. 管理软件和订阅
1.1 优化多软件包安装
实现同时安装apache和php
方式1:通过编写两个事务实现
---
- name: play1
  hosts: node1
  tasks:

  - name: Install the latest version of Apache	# 安装Apache
    ansible.builtin.dnf:
      name: httpd
      state: latest
  - name: Install the latest version of PHP		# 安装PHP
    ansible.builtin.dnf:
      name: php
      state: latest
方式2:通过循环方式实现
---
- name: play1
  hosts: node1
  tasks:

  - name: Install the latest version of Apache and PHP
    ansible.builtin.dnf:
      name: "{{ item }}"	# 循环项
      state: latest
    loop:			# loop指定循环列表
      - httpd
      - php
方式3:通过列表方式实现
---
- name: play1
  hosts: node1
  tasks:

  - name: Install the latest version of Apache and PHP
    ansible.builtin.dnf:
      name:			# dnf允许使用列表方式指定安装包名
        - httpd
        - php
      state: latest
方式4:通过定义变量方式实现
---
- name: play1
  hosts: node1
  tasks:

  - name: Install the latest version of Apache and PHP
    ansible.builtin.dnf:
      name: "{{ packages }}"	# 使用列表项
      state: latest
    vars:
      packages:		# 定义变量packages,变量类型为列表
        - httpd
        - php
1.2 收集有关已安装软件包的事实
[Step1]:编辑playbook
var: ansible_facts.packages:可以输出所有事实变量
vim dnf.yml

# 文件内容如下
---
- name: play1
  hosts: node1
  tasks:

  - name: Gather the package facts
    ansible.builtin.package_facts:
      manager: auto			# 将已安装的软件包信息作为事实返回
  - name: Print the package facts
    ansible.builtin.debug:
      var: ansible_facts.packages['ModemManager']  # 输出事实变量
[Step2]:运行playbook
ansible-navigator run dnf.yml -m stdout

1.3 配置RPM软件仓库文件
可以通过ansible-doc搜索有关yum仓库的模块
ansible-doc -l | grep yum

软件仓库练习
- 创建playbook,名称定义为yum.yml,受管主机为node1
- 存储库的名称为 BaseOS,描述信息为 BaseOS
- 仓库地址为:file://mnt/cdrom/BaseOS
- 开启GPG签名,GPG密钥地址为 file://tmp/RPM-GPG-KEY-redhat-release
- 存储库状态为启用
[Step1]:编写playbook
---
- name: yum
  hosts: node1
  tasks:
  - name: BaseOS
    ansible.builtin.yum_repository:
      name: BaseOS
      description: BaseOS
      file: file://mnt/cdrom/BaseOS
      baseurl: file://tmp/RPM-GPG-KEY-redhat-release
      gpgcheck: yes
      enabled: yes
2. 管理用户和身份验证
管理Linux用户和组,配置SSH,以及修改受管主机上的sudo配置。
2.1 user模块
- 创建playbook,名为user.yml
- 在node1上创建用户tom,用户描述为Teacher
- 归属组附加组均分别为 wheel、root
- 用户密码为redhat@123
- 指定用户的UID=2000,不允许该用户登陆
[Step1]:编写playbook
vim user.yml

# 文件内容如下
---
- name: Add User
  hosts: node1
  tasks:
  - name: Add the user 'tom'
    ansible.builtin.user:
      name: tom				# 用户名
      comment: Teacher			# 描述信息
      uid: 2000			# 用户ID
      group: wheel		# 所属组
      groups: root		# 附加组
      password: redhat@123		# 用户密码
      shell: /bin/nologin		# 默认Shell终端
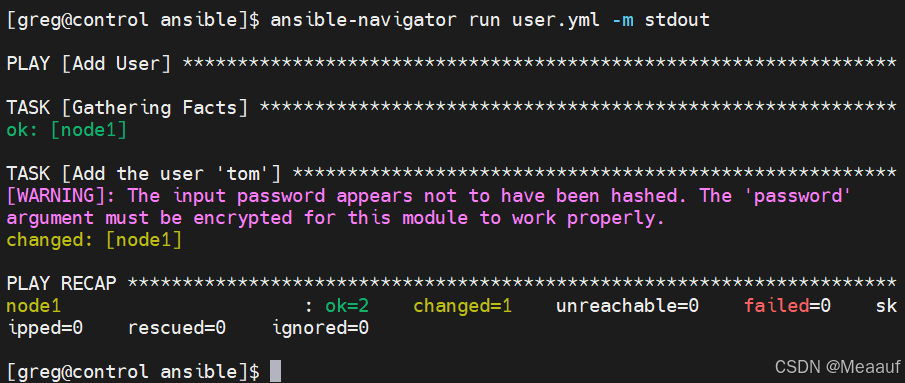
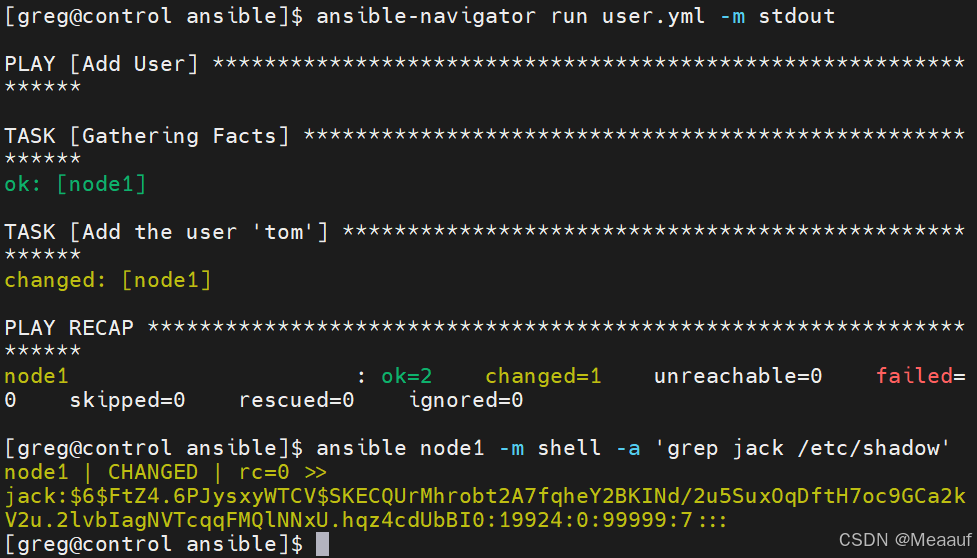
[Step2]:验证:查看node1上创建的用户信息
ansible node1 -m shell -a "id tom"
ansible node1 -m shell -a "grep tom /etc/shadow"

如果设置用户时想加密存储,可以使用password_hash
---
- name: Add User
  hosts: node1
  tasks:
  - name: Add the user 'jack'
    ansible.builtin.user:
      name: jack
      password: "{{ 'redhat@123' | password_hash('sha512') }}"
'redhat@123':为用户的密码(如果是字符串需要加引号,是变量则不需要引号)password_hash('sha512'):采用sha512的哈希格式
3. 管理启动过程和调度任务
3.1 at临时调度任务
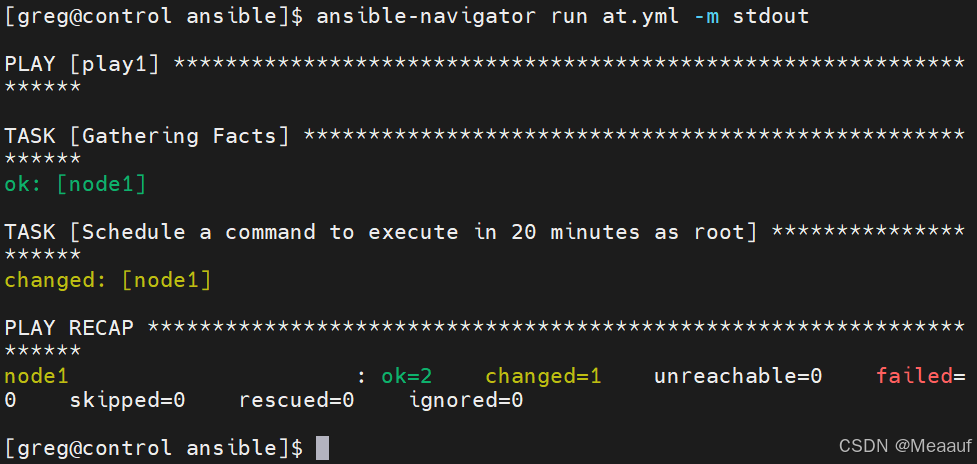
[Step1]:编写playbook
vim at.yml

# 文件内容如下
---
- name: play1
  hosts: node1
  tasks:
  - name: Schedule a command to execute in 20 minutes as root
    ansible.posix.at:
      command: ls -d / >/dev/null		# 执行的命令
      count: 20				# 间隔时间
      units: minutes		# 时间单位
[Step2]:运行playbook
ansible-navigator run at.yml -m stdout
[Step3]:验证:查看node1上存在的计划任务
ansible node1 -m shell -a 'atq'

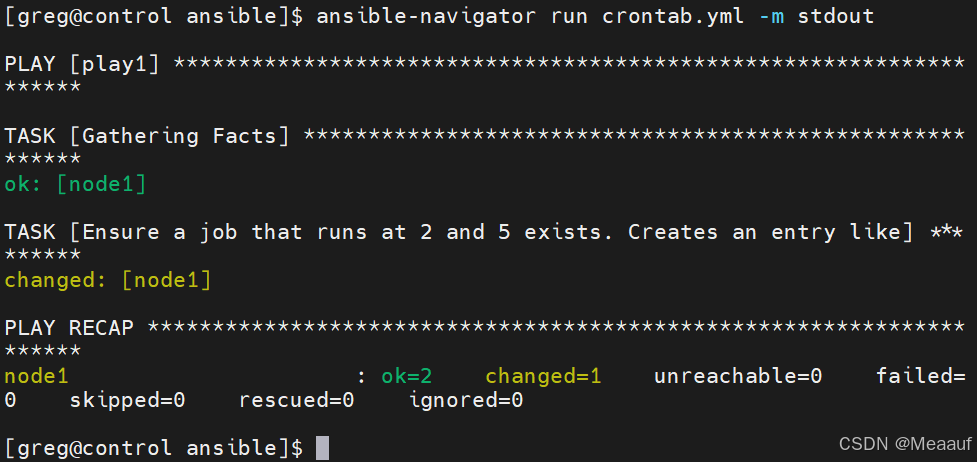
3.2 cron周期执行调度任务
[Step1]:编写playbook
vim crontab.yml

# 文件内容如下
---
- name: play1
  hosts: node1
  tasks:

  - name: Ensure a job that runs at 2 and 5 exists. Creates an entry like
    ansible.builtin.cron:
      name: "check dirs"
      minute: "0"
      hour: "5,2"
      job: "ls -alh > /dev/null"
[Step2]:运行playbook
ansible-navigator run crontab.yml -m stdout
[Step3]:验证:查看crontab计划任务
ansible node1 -m shell -a 'crontab -l'

3.3 command和shell模块
二者的区别在于command是系统的默认模块,但是不支持特殊字符,而shell支持特殊字符
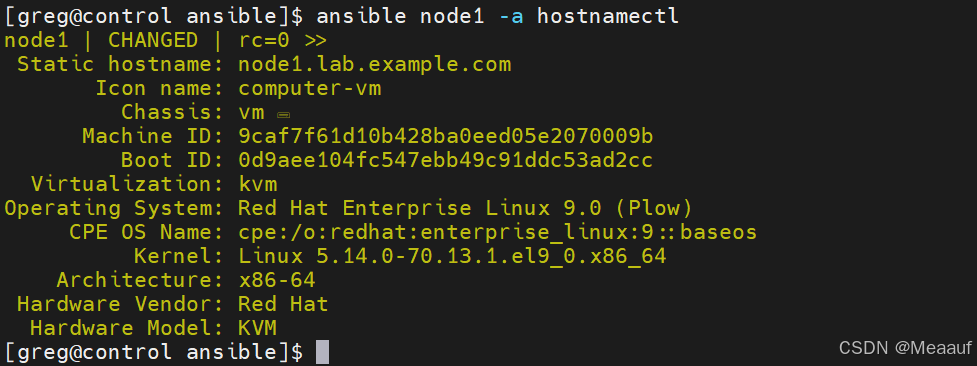
[Step1]:可以使用command实现简单命令,因为command是默认模块,所以不需要-m参数指定模块
ansible node1 -a hostnamectl
[Step2]:shell模块使用
ansible node1 -m shell -a "grep tom /etc/shadow"

4. 管理存储
4.1 parted模块
划分两个分区,分区大小均为500M。
parted模块默认没有安装,需要安装对应的集合。
[Step1]:查看是否安装parted模块
ansible-navigator collections -m stdout | grep parted

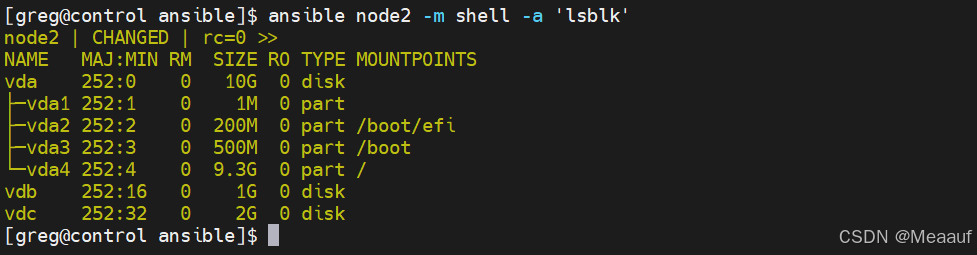
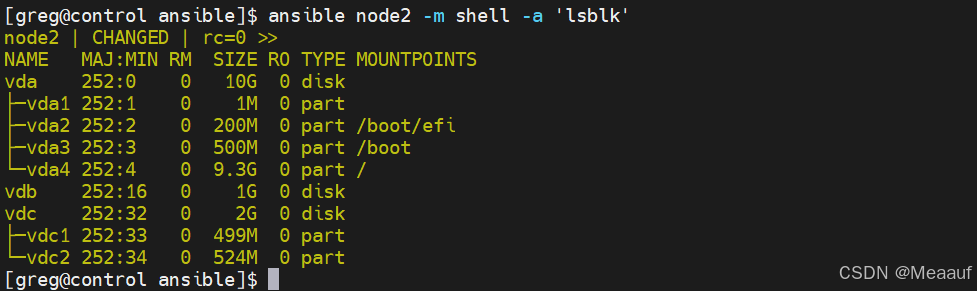
[Step2]:查询受管主机的磁盘使用情况
ansible node2 -m shell -a 'lsblk'
[Step3]:编写playbook
vim parted.yml

# 文件内容如下
---
- name: play1
  hosts: node2
  tasks:
  - name: Create a new primary partition with a size of 500MiB
    community.general.parted:
      device: /dev/vdc
      number: 1
      state: present
      part_end: 500MiB

  - name: Create a new primary partition with a size of 500MiB
    community.general.parted:
      device: /dev/vdc
      number: 2
      state: present
      part_start: 500MiB
      part_end: 1GiB
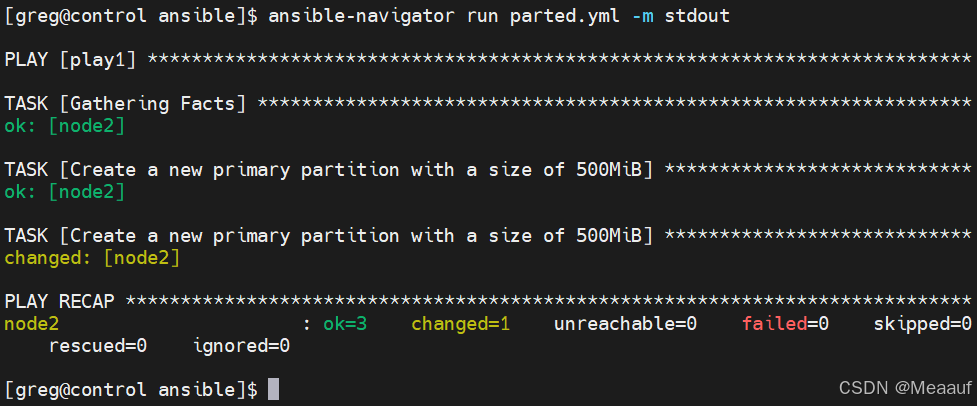
[Step4]:运行playbook
ansible-navigator run parted.yml -m stdout
[Step5]:查看磁盘情况
vim block_info.yml

# 文件内容如下
---
- name: play1
  hosts: node2
  tasks:

  - name: Read device information
    community.general.parted: device=/dev/vdc unit=MiB
    register: sdb_info

  - name: Print return information from the previous task
    ansible.builtin.debug:
      var: sdb_info
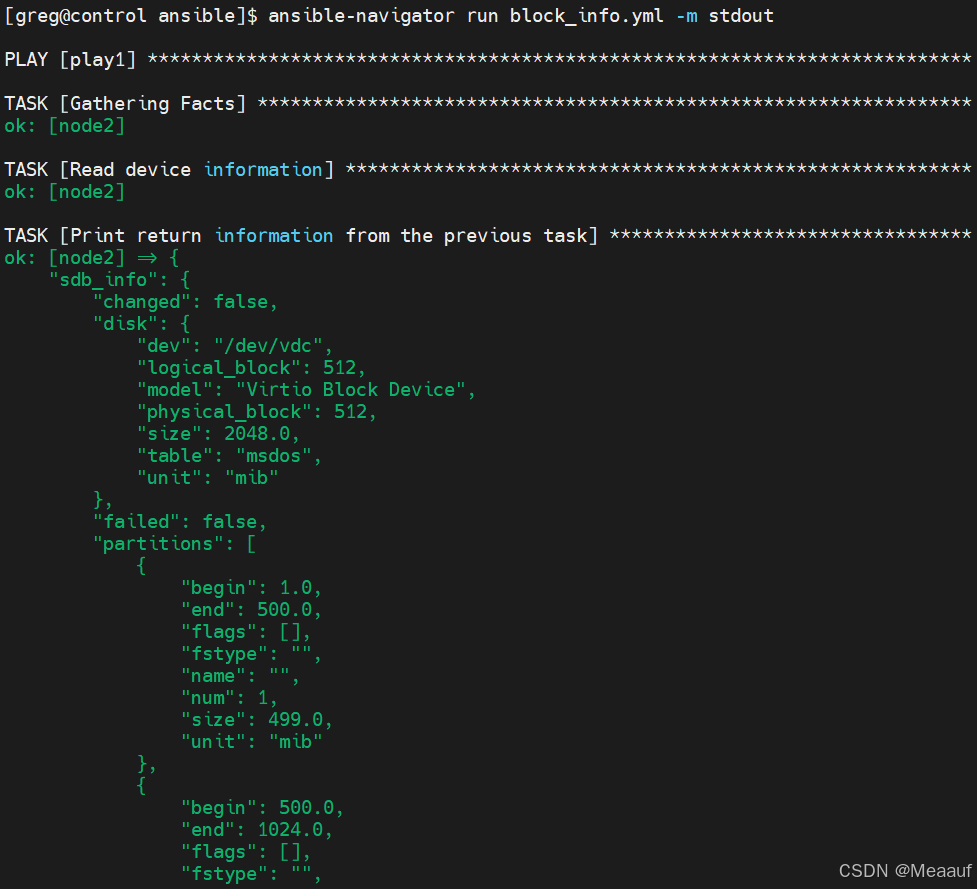
[Step6]:运行playbook
ansible-navigator run parted.yml -m stdout
[Step6]:验证:查看系统的磁盘使用情况
ansible node2 -m shell -a 'lsblk'
4.2 lvg模块
将上述划分的两个分区创建为卷组,卷组名为vg1,扩展块大小为16M。
lvg模块默认没有安装,需要安装对应的集合。在新建卷组的时候会自动创建物理卷,所以Ansible没有提供物理卷模块。
[Step1]:查看是否安装lvg模块
ansible-navigator collections -m stdout | grep community.general.lvg

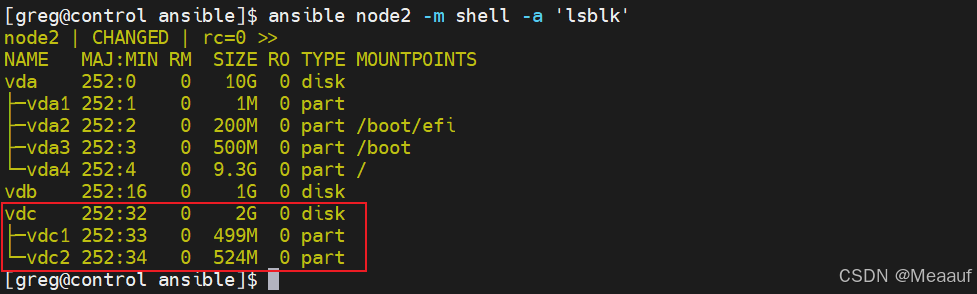
[Step2]:查询受管主机的磁盘使用情况
ansible node2 -m shell -a 'lsblk'
[Step3]:编写playbook
vim lvg.yml

# 文件内容如下
---
- name: lvg
  hosts: node2
  tasks:
  - name: Create a volume group
    community.general.lvg:
      vg: vg1
      pvs: /dev/vdc1,/dev/vdc2
      pesize: 16M
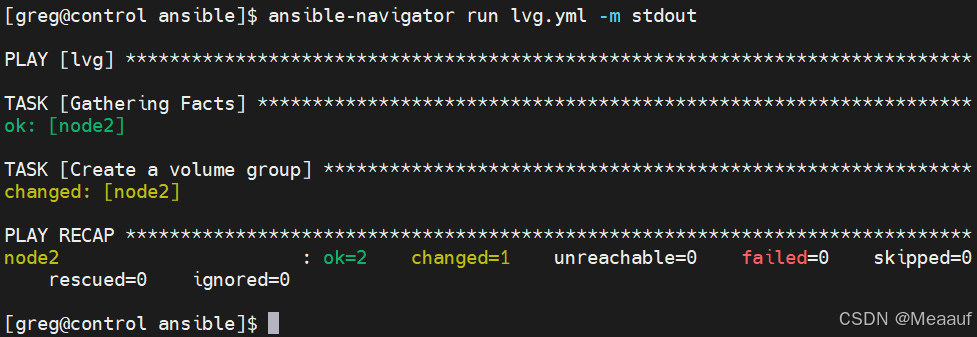
[Step4]:运行playbook
ansible-navigator run lvg.yml -m stdou
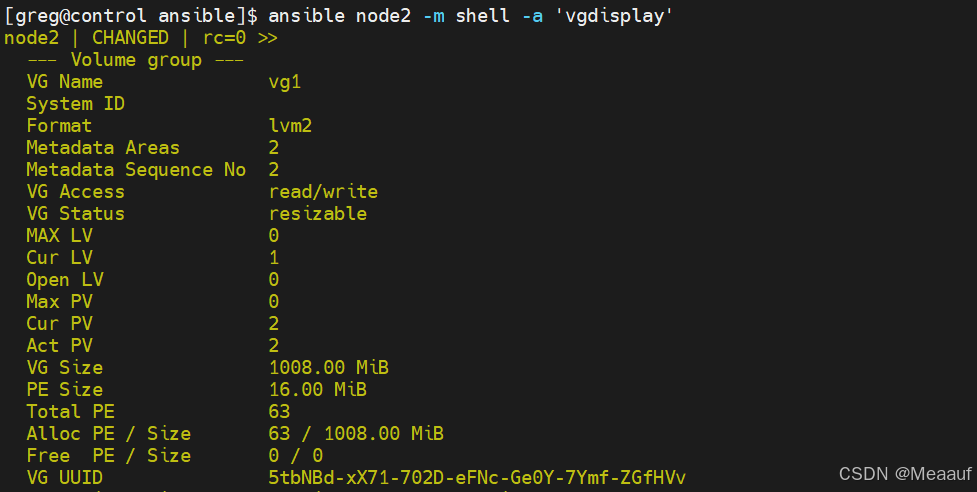
[Step5]:验证:查看逻辑卷信息
ansible node2 -m shell -a 'vgdisplay'

[Step6]:验证:查看物理卷信息
ansible node2 -m shell -a 'pvdisplay'

4.3 lvol模块
新建逻辑卷lv1,逻辑卷大小为全部空余空间。
lvol模块默认没有安装,需要安装对应的集合。
[Step1]:查看是否安装parted模块
ansible-navigator collections -m stdout | grep community.general.lvol

[Step2]:查询受管主机的卷组容量
ansible node2 -m shell -a 'vgdisplay'
[Step3]:编写playbook
vim lvol.yml

# 文件内容如下
---
- name: lvol
  hosts: node2
  tasks:
  - name: Create a logical volume of 512m
    community.general.lvol:
      vg: vg1
      lv: lv1
      size: 100%FREE
[Step4]:运行playbook
ansible-navigator run lvol.yml -m stdout
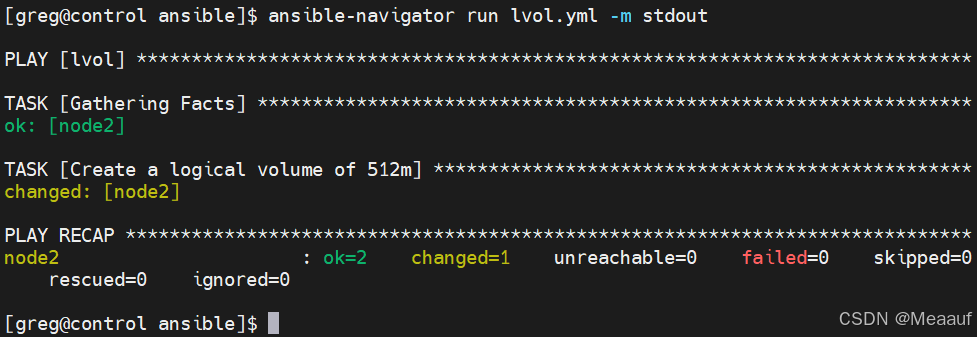
[Step5]:查看逻辑卷信息
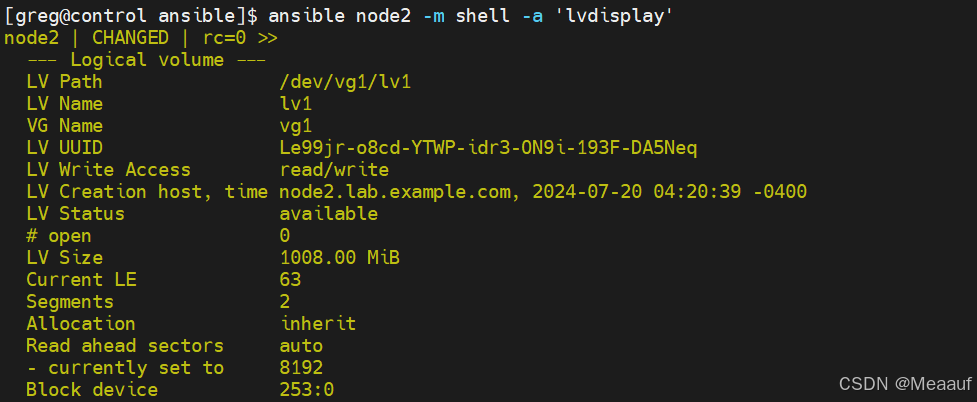
ansible node2 -m shell -a 'lvdisplay'
4.4 filesystem模块
将逻辑卷lv1格式化为xfs
lvol模块默认没有安装,需要安装对应的集合。
[Step1]:查看是否安装filesystem模块
ansible-navigator collections -m stdout | grep community.general.filesystem

[Step2]:查询受管主机的逻辑卷信息
ansible node2 -m shell -a 'lvdisplay'

[Step3]:编写playbook
vim filesystem.yml

# 文件内容如下
---
- name: filesystem
  hosts: node2
  tasks:
  - name: Create a ext2 filesystem on /dev/vg1/lv1
    community.general.filesystem:
      fstype: xfs
      dev: /dev/vg1/lv1
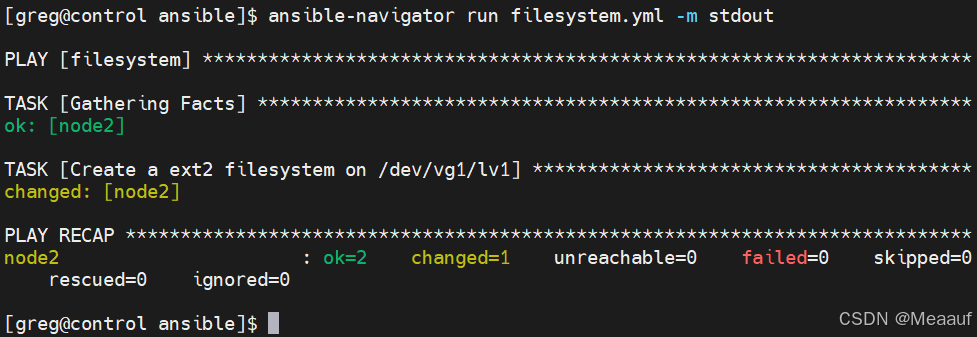
[Step4]:运行playbook
ansible-navigator run filesystem.yml -m stdout
[Step5]:查看lv1的文件系统
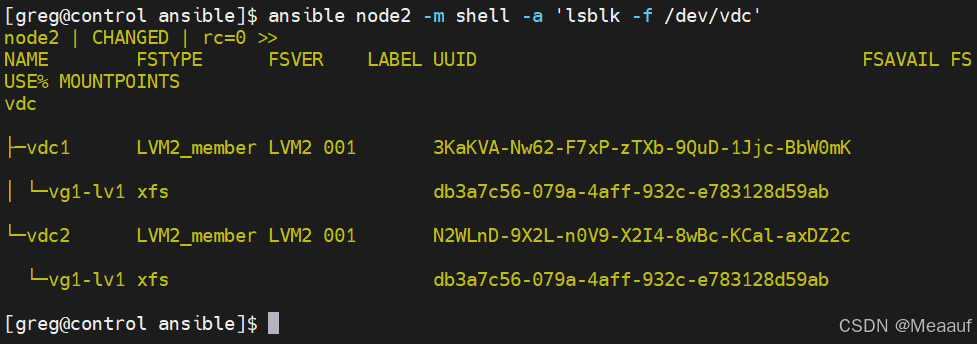
ansible node2 -m shell -a 'lsblk -f /dev/vdc'
4.5 mount模块
将逻辑卷lv1挂载到/mnt/lv1目录下
[Step1]:查看是否安装mount模块
ansible-navigator collections -m stdout | grep mount

[Step2]:编写playbook
vim mount.yml

# 文件内容如下
---
- name: mount
  hosts: node2
  tasks:
  - name: Mount
    ansible.posix.mount:
      path: /mnt/lv1
      src: /dev/vg1/lv1
      fstype: xfs
      state: mounted
      # 会写入fstab并挂载,挂载目录不存在会自动创建
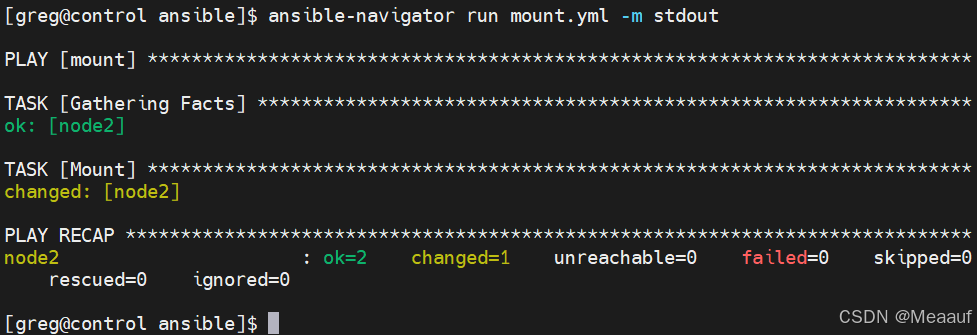
[Step4]:运行playbook
ansible-navigator run mount.yml -m stdout
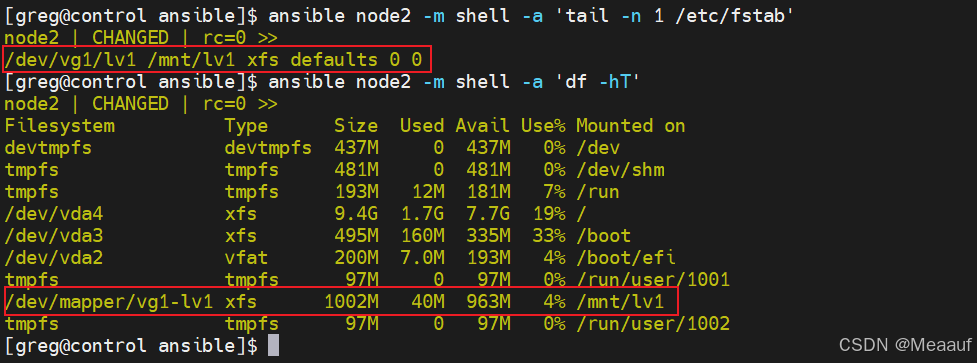
[Step5]:验证:查看node2上的挂载和fstab文件内容
ansible node2 -m shell -a 'tail -n 1 /etc/fstab'
ansible node2 -m shell -a 'df -hT'
[Step6]:实现卸载:编辑playbook
vim mount.yml

# 修改文件后内容如下
---
- name: mount
  hosts: node2
  tasks:
  - name: Mount
    ansible.posix.mount:
      path: /mnt/lv1
      src: /dev/vg1/lv1
      fstype: xfs
      state: unmounted
[Step7]:运行playbook
ansible-navigator run mount.yml -m stdout
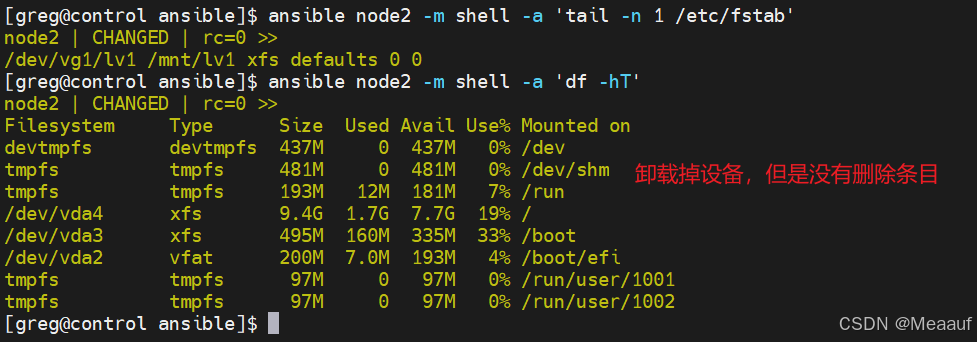
[Step8]:验证:查看node2上的挂载和fstab文件内容
ansible node2 -m shell -a 'tail -n 1 /etc/fstab'
ansible node2 -m shell -a 'df -hT'
[Step9]:重新挂载然后实现:删除卸载、删除条目和删除挂载目录
ansible node2 -m shell -a 'mount /dev/vg1/lv1 /mnt/lv1'
vim mount.yml

# 修改文件后内容如下
---
- name: mount
  hosts: node2
  tasks:
  - name: Mount
    ansible.posix.mount:
      path: /mnt/lv1
      src: /dev/vg1/lv1
      fstype: xfs
      state: absent
[Step10]:运行playbook
ansible-navigator run mount.yml -m stdout
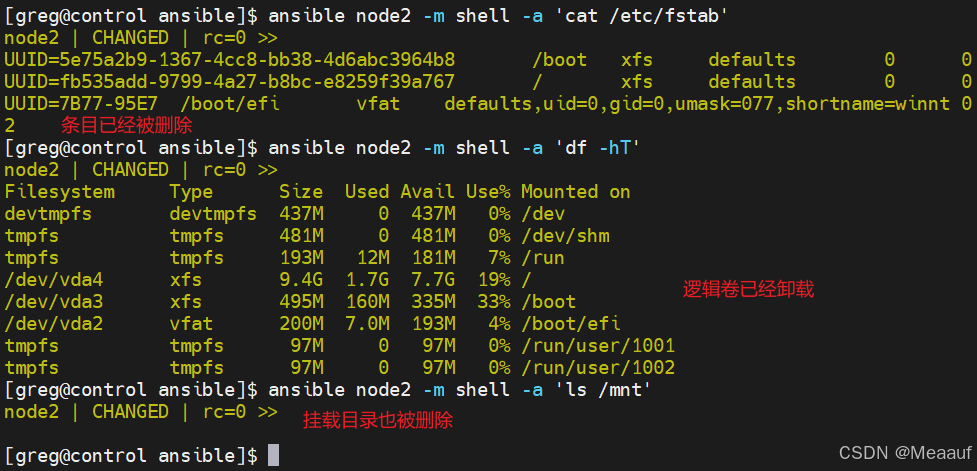
[Step11]:验证:查看node2上的挂载、fstab文件内容和挂载点目录信息
ansible node2 -m shell -a 'cat /etc/fstab'
ansible node2 -m shell -a 'df -hT'
ansible node2 -m shell -a 'ls /mnt'
5. 管理网络
network_connections模块来源于系统角色rhel-system-roles.noarch,需要提前安装好系统角色然后指定角色路径。
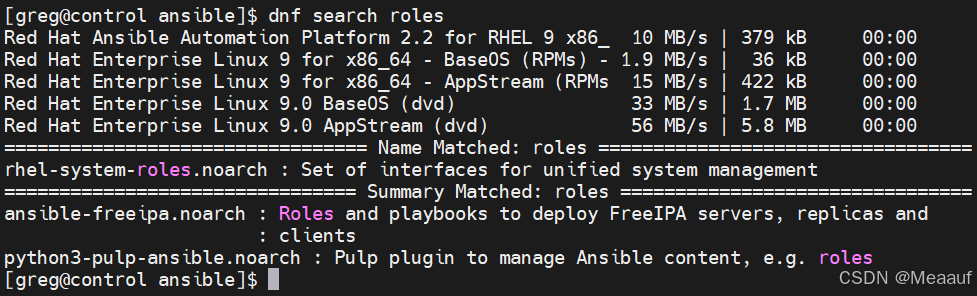
[Step1]:检索系统角色
dnf search roles
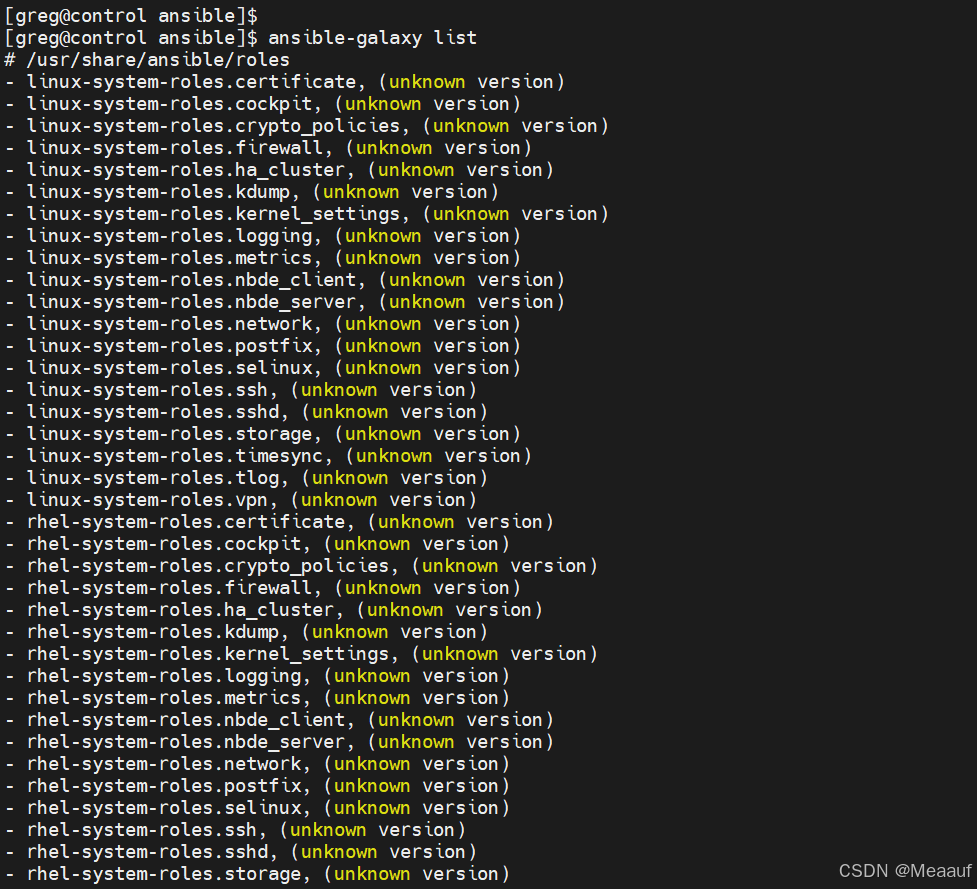
[Step2]:安装系统角色,然后列出系统角色
sudo dnf install -y rhel-system-roles.noarch
ansible-galaxy list
[Step3]:配置角色路径
vim ansible.cfg

# 在[default]下定义角色路径
roles_path=/usr/share/ansible/roles
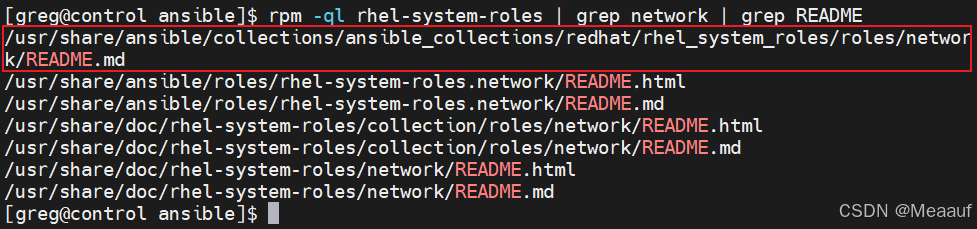
[Step4]:查询角色帮助文档
rpm -ql rhel-system-roles | grep network | grep README
[Step5]:查询模板文件
rpm -ql rhel-system-roles | grep network | grep example
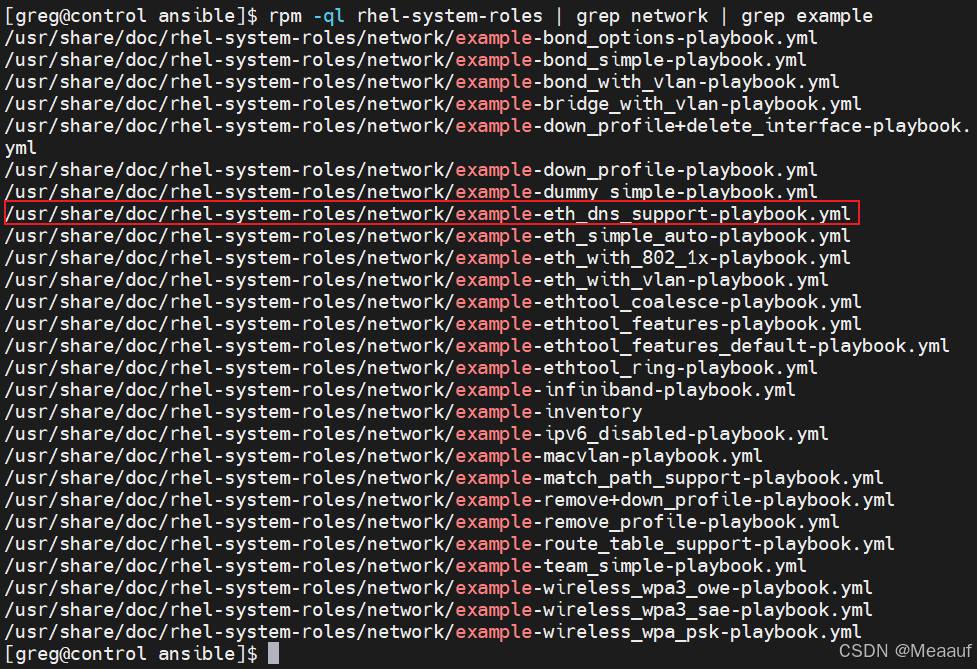
[Step5]:复制模板文件
cp /usr/share/doc/rhel-system-roles/network/example-eth_dns_support-playbook.yml network.yml
[Step6]:编写playbook
vim network.yml

# 文件内容如下
---
- hosts: all
  vars:
    network_connections:
      - name: eth0			# 操作的链接名
        type: ethernet		# 网卡链接的类型
        ip:
          dhcp4: no			# 关闭IPv4 DHCP
          gateway4: 192.168.10.254		# 设置网关
          dns:
            - 8.8.8.8		# 设置DNS1
            - 192.168.10.1	# 设置DNS2
          dns_search:
            - example.com	# DNS域
            - subdomain.example.com

          auto6: no			# 关闭IPv6 DHCP
          gateway6: 2001:db8::1		# 设置IPv6网关

          address:
            - 192.168.10.1/24	# 设置IPv4地址
            - 2001:db8::80/7	# 设置IPv6地址
        state: up			# 启用网卡
  roles:
    - rhel-system-roles.network
[Step7]:运行playbook
ansible-playbook network.yml -m stdout
6. 普通用户管理受管主机
6.1 超级用户的远程管理方式
[Step1]:编辑Ansible配置文件
vim ansible.cfg

# 在[defaults]下添加以下键值对
[defaults]
remote_user=root		# 指定远程用户
host_key_checking=False	# 第一次ssh远程登录时会提示检查主机密钥,False:避免Ansible用于连接主机的底层工具检查主机密钥
[Step1]:在清单文件中添加远程用户密码
vim inventory

# 写入下列内容
[all:vars]		# 为所有主机指定变量
ansible_user=root		# 指定远程用户,这里可以省略
ansible_password=xxxx		# 指定远程用户密码
6.2 普通用户远程管理方式
[Step1]:编辑Ansible配置文件
vim ansible.cfg

# 在[defaults]和[privilege_escalation]下添加以下键值对
[defaults]
remote_user=xxx		# 指定远程用户为普通用户
host_key_checking=False

[privilege_escalation]
become=True		# 允许提权
become_method=sudo	# 提权的方式,默认值可以不用设置
become_user=root	# 提权的用户为root,默认值可以不用设置
become_ask_pass=false	# 关闭提示输入提权密码,默认值可以不设置


 871
871

 被折叠的 条评论
为什么被折叠?
被折叠的 条评论
为什么被折叠?
 到【灌水乐园】发言


