


 本文介绍了如何使用Swagger-UI在Spring Boot项目中生成在线接口文档,通过添加依赖、配置和注解,实现接口的自动解析与展示。这种方式能够简化开发流程,提高前后端对接效率,同时也便于接口的调试。
早先在实际开发工作中我们可能都遇到过困惑,如果在整理好所有接口文档后再进行开发,那么肯定是要耽搁很多开发时间,浪费掉不必要的时间,如果不用接口文档,前后端对接又会出很多问题,那么如果等后端开发完成后再完成开发文档呢又会增加很多工作量,那么在这里我们介绍一款非常好用的在线文档生成框架,也可以称作是工具-----swagger-ui
关于简介就不多说,可以询问度娘,在这里我们主要说她的用法(基于springboot),对于任何工具和三方框架我们的使用大都可按照使用三部曲进行,那么直接上代码吧
- 添加依赖
<!-- swagger-ui 用于前后端对接的生成在线文档用 -->
		<dependency>
        <groupId>io.springfox</groupId>
        <artifactId>springfox-swagger2</artifactId>
        <version>2.8.0</version>
		</dependency>
		<dependency>
        <groupId>io.springfox</groupId>
        <artifactId>springfox-swagger-ui</artifactId>
        <version>2.8.0</version>
        </dependency>
添加以上关于swagger的依赖,当然,版本大家自己控制,我这里是我项目中用到的
- 增加配置
springboot我们一般采用java类来使用@Configuration表示一个配置类,在这里要另外注意的是要在这个配置类上加上@EnableSwagger2注解,表示启用swagger
package com.wwy.config;

import java.util.ArrayList;
import java.util.List;
import javax.servlet.http.HttpServletResponse;
import org.springframework.beans.factory.annotation.Value;
import org.springframework.context.annotation.Bean;
import org.springframework.context.annotation.Configuration;
import org.springframework.web.bind.annotation.RequestMethod;
import io.swagger.annotations.ApiOperation;
import springfox.documentation.builders.ApiInfoBuilder;
import springfox.documentation.builders.PathSelectors;
import springfox.documentation.builders.RequestHandlerSelectors;
import springfox.documentation.builders.ResponseMessageBuilder;
import springfox.documentation.service.ApiInfo;
import springfox.documentation.service.ResponseMessage;
import springfox.documentation.spi.DocumentationType;
import springfox.documentation.spring.web.plugins.Docket;
import springfox.documentation.swagger2.annotations.EnableSwagger2;
import springfox.documentation.service.ApiKey;
import springfox.documentation.service.AuthorizationScope;
import springfox.documentation.service.SecurityReference;
import springfox.documentation.spi.service.contexts.SecurityContext;

/**
 1. swagger-ui的配置类,
 2. @author wwy
 3. @date 2019年12月3日
 4. @version v0.0.1
 5.  */
@EnableSwagger2
@Configuration
public class SwaggerConfig{
	//根据yml中的配置获取服务名
	@Value("${spring.application.name}")
	private String name;
	/**
	 * Docket对象的bean标签
	 * @return
	 */
	@Bean
	public Docket docket() {
		List<ResponseMessage> responseMessages = new ArrayList<ResponseMessage>();
		//200
		responseMessages.add(new ResponseMessageBuilder().code(HttpServletResponse.SC_OK).message("操作成功").build());
		//404
		responseMessages.add(new ResponseMessageBuilder().code(HttpServletResponse.SC_NOT_FOUND).message("资源不存在").build());
		//500
		responseMessages.add(new ResponseMessageBuilder().code(HttpServletResponse.SC_INTERNAL_SERVER_ERROR).message("服务器异常").build());
		return new Docket(DocumentationType.SWAGGER_2)
				.apiInfo(apiInfo())
				.useDefaultResponseMessages(false)
				.globalResponseMessage(RequestMethod.GET, responseMessages)
				.globalResponseMessage(RequestMethod.POST, responseMessages)
				.globalResponseMessage(RequestMethod.DELETE, responseMessages)
				.select()
				.apis(RequestHandlerSelectors.withMethodAnnotation(ApiOperation.class))
				.build()
				.securitySchemes(securitySchemes())
				.securityContexts(securityContexts());

	}
	/**
	 * 接口信息
	 * @return
	 */
	private ApiInfo apiInfo() {
		return new ApiInfoBuilder().title("分销API文档-"+name).version("1.0.0").description("项目描述").build();
	}
	/**
	 * token验证
	 * @return
	 */
	private List<ApiKey> securitySchemes() {
		List<ApiKey> list = new ArrayList<ApiKey>();
		list.add(new ApiKey("Authorization", "token", "header"));
		return list;
	}
	private List<SecurityContext> securityContexts() {
		List<SecurityContext> list = new ArrayList<SecurityContext>();
		list.add(SecurityContext.builder()
				.securityReferences(defaultAuth())
				.forPaths(PathSelectors.regex("^(?!auth).*$"))
				.build());
		return list;
	}
	List<SecurityReference> defaultAuth() {
		AuthorizationScope authorizationScope = new AuthorizationScope("global", "accessEverything");
		AuthorizationScope[] authorizationScopes = new AuthorizationScope[1];
		authorizationScopes[0] = authorizationScope;
		List<SecurityReference> list = new ArrayList<SecurityReference>();
		list.add(new SecurityReference("Authorization", authorizationScopes));
		return list;
	}
}
以上是我自己项目使用的配置类,因为是微服务项目,做了单点登录,上面有token验证,如果不需要做验证的话也可以去除相应的代码
- 添加注解
添加注解主要分为controller和dto上,各自使用不同的注解,以便于swagger解析
例如(controller):
package com.wwy.sso.controller;

import javax.servlet.http.HttpServletRequest;
import javax.servlet.http.HttpServletResponse;
import org.springframework.beans.factory.annotation.Autowired;
import org.springframework.web.bind.annotation.PostMapping;
import org.springframework.web.bind.annotation.RequestMapping;
import org.springframework.web.bind.annotation.RestController;
import com.wwy.entry.APIEntry;
import com.wwy.entry.User;
import com.wwy.sso.service.SsoService;
import io.swagger.annotations.Api;
import io.swagger.annotations.ApiImplicitParam;
import io.swagger.annotations.ApiImplicitParams;
import io.swagger.annotations.ApiOperation;

/**
 *
 * @author wwy
 * @date 2019年11月29日
 * @version v0.0.1
 *
 */

@Api(tags="单点登录")
@RestController
@RequestMapping("sso")
public class SsoController {

	@Autowired
	private SsoService ssoService;

	/**
	 * 用户注册的方法
	 * @return
	 */
	@ApiOperation("注册")
	@PostMapping("register")
	public APIEntry register(User user,HttpServletRequest request,HttpServletResponse response) {
		return ssoService.register(user);

	}
	/**
	 * 用户登录的方法
	 * @return
	 */
	@ApiOperation("登录")
	@ApiImplicitParams({@ApiImplicitParam(name="tel",value="电话"),@ApiImplicitParam(name="passWord",value="密码")})
	@PostMapping("login")
	public APIEntry login(String tel,String passWord,HttpServletRequest request,HttpServletResponse response) {

		return ssoService.login(tel,passWord,request,response);
	}
}
大家可以看看以上示例,我们在controller类上添加注解
@Api(tags="单点登录"),其中tags的值就是我们自己对当前controller的描述,后面看到swagger界面就一目了然了
在方法上添加注解@ApiOperation("注册"),有了这两个注解swagger就可以顺利的解析这个controller,那么也有人看到我有在方法上添加@ApiImplicitParams({@ApiImplicitParam(name="tel",value="电话"),@ApiImplicitParam(name="passWord",value="密码")})
这个注解可以说是可有可无的,这个注解主要是对方法的参数做说明的,如果是多个参数就用@ApiImplicitParams注解,其中的参数是一个@ApiImplicitParam数组,没一个@ApiImplicitParam描述一个相应的参数
例2(dto):
package com.wwy.entry;

import javax.validation.constraints.NotNull;
import io.swagger.annotations.ApiModel;
import io.swagger.annotations.ApiModelProperty;
import lombok.Data;
import lombok.ToString;
/**
 *
 * @author wwy
 * @date 2019年11月29日
 * @version v0.0.1
 *分销商信息实体类
 */
//使用mybatisplus指定表明
//@TableName("user")
@Data
@ToString
@ApiModel("用户信息")
public class User {
	/**
	 * 分销商id
	 */
//使用mybatisplus指定主键
//@TableId(value="user_id",type = IdType.AUTO)
@ApiModelProperty("主键")
private Long userId;
/**
 * 分销商姓名
 */
@ApiModelProperty("用户真实姓名")
private String userName;
/**
 * 用户昵称
 */
@ApiModelProperty("用户昵称")
private String nickName;
/**
 * 密码
 */
@ApiModelProperty("密码")
private String passWord;
/**
 * 头像
 */
@ApiModelProperty("头像")
private String portrait;
/**
 * 电话1
 */
@ApiModelProperty("电话")
private String tel;
/**
 * 电话2
 */
@ApiModelProperty("电话2")
private String tel2;
/**
 * 分销商地址
 */
@ApiModelProperty("地址")
private String addr;
/**
 * 分销商微信号
 */
@ApiModelProperty("微信")
private String weixin;
/**
 * 分销商邮箱
 */
@ApiModelProperty("邮箱")
private String emil;
/**
 * 创建时间
 */
@ApiModelProperty("创建时间")
private String createTime;
/**
 * 分销商是否通过审核
 * 审核1.未审核0
 */
@ApiModelProperty("是否审核")
private Integer examine=0;
/**
 * 分销商是否删除
 * 删除1.未删除0
 */
@ApiModelProperty("是否删除")
private Integer delete=0;
/**
 * 分销商是否被禁用
 * 禁用1,未禁用0
 */
@ApiModelProperty("是否禁用")
private Integer prohibit=0;
/**
 * 角色标识
 * 1商家2分销商
 */
@ApiModelProperty("角色标识")
@NotNull
private Integer role;

}
在实体类的类上添加@ApiModel("用户信息")注解,在属性上添加@ApiModelProperty("角色标识")注解,这里的注解主要是方便我们测试的时候每一个字段或参数都有相关的说明,大家一试便知,不必过多解释!
- 使用
说了这么多代码中的方法,下面说说上面的工作究竟能给我们带来什么便利吧!我们需要做的很简单,就是在原本项目访问路径的后面添加swagger-ui.html,例如我的项目根路径是http://localhost:8002/user,那么我们就访问http://localhost:8002/user/swagger-ui.html;至于访问的效果是怎么样的,上个图吧
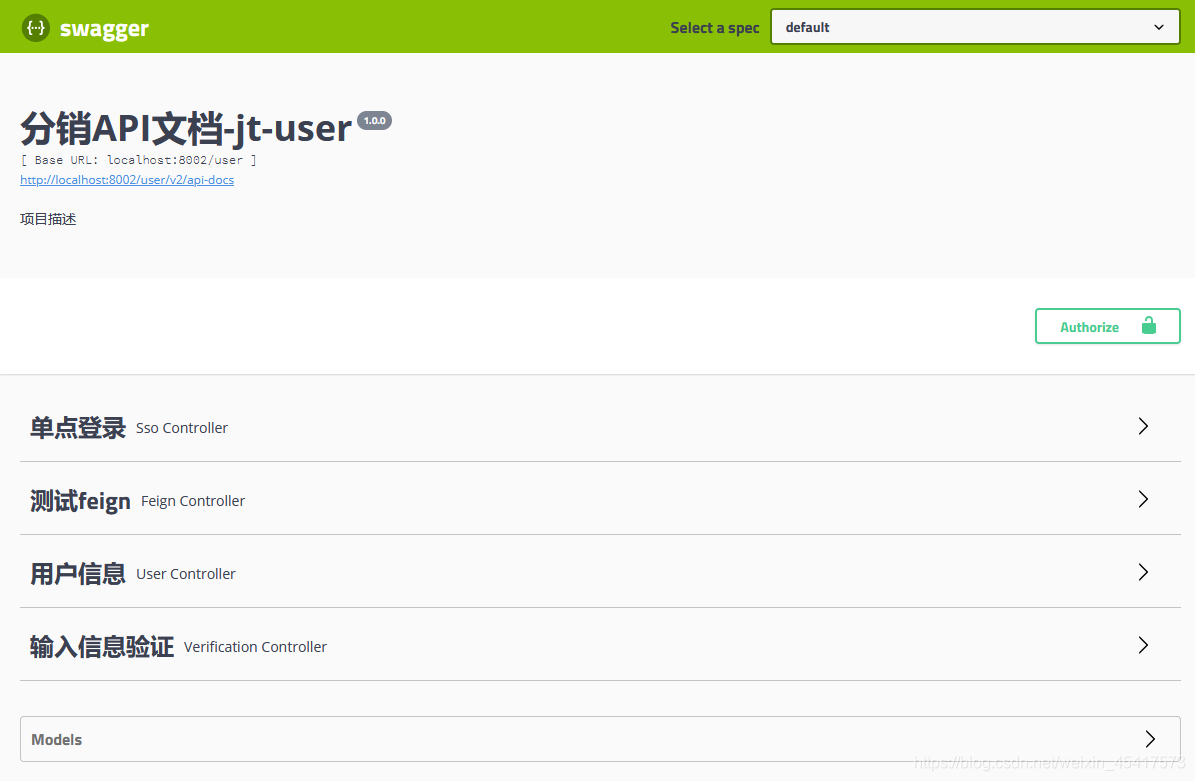 我们写好的每一个接口都在列表中,如果有做单点登录,就在测试接口前先点击
 输入你自己准备好的token,如果没有做验证就可以直接开始测试接口了,用法非常简单,这里简单上几个图
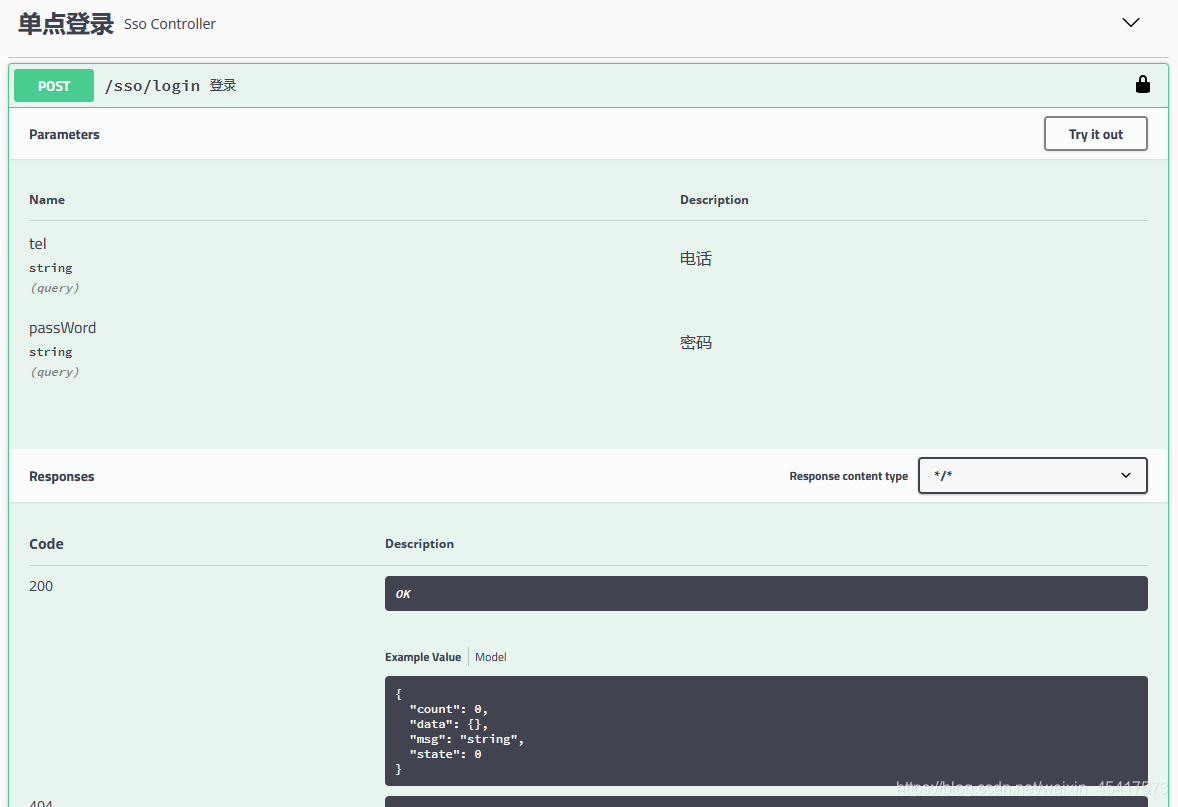 点击try it out
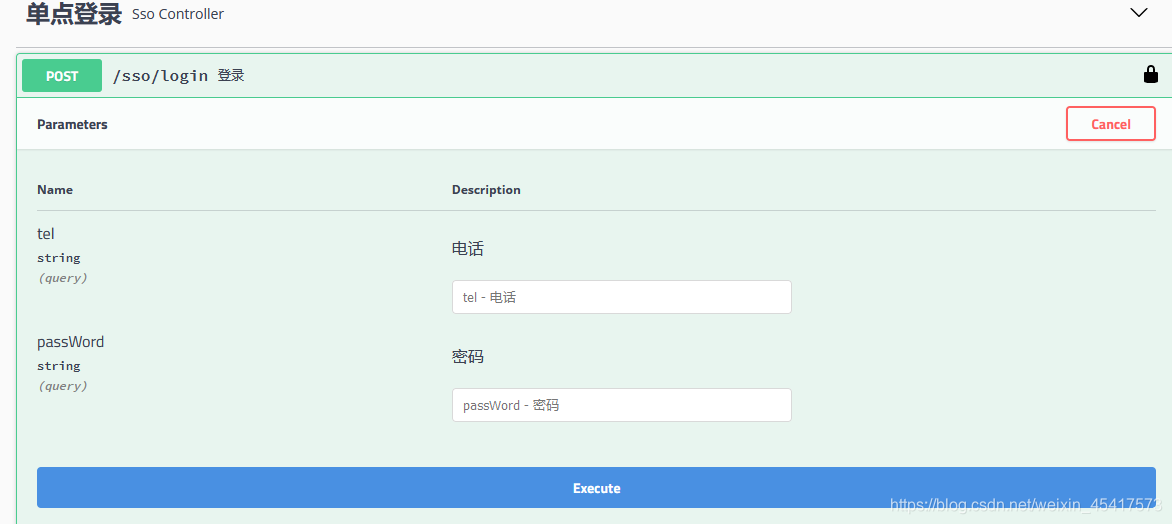 输入参数点击execute就可以测试了,在下面会显示相关测试结果!这里既方便了前后端对接,也方便了我们自己调试接口,get不必去麻烦的拼接参数,post也不用去用各种测试工具了!欢迎指正!!


 被折叠的 条评论
为什么被折叠?
被折叠的 条评论
为什么被折叠?
 到【灌水乐园】发言


