


 本文介绍了Python中实现定时任务的四种方法:time模块、threading.Timer、sched模块以及APScheduler框架。重点讲述了APScheduler的配置和job操作,包括添加、移除、暂停、恢复、修改job,以及调度器事件和trigger规则(date、cron、interval)的设定。
一、time模块(阻塞)
# 此方法有一个弊端,若在sleep期间过去了第30s,则不会提示
from datetime import datetime
import time
def timer():
    while True:
        a = datetime.now().strftime("%S")
        if a == '30':     # 每分钟的第30s执行
            print('铃铃铃')
            print(datetime.now().strftime("%Y-%m-%d %H:%M:%S"))
        else:
        	time.sleep(1)  # 否则停止一秒
timer()
二、threading的Timer(非阻塞)
from datetime import datetime
from threading import Timer
# 打印时间函数
def printTime(inc):
    print(datetime.now().strftime("%Y-%m-%d %H:%M:%S"))
    t = Timer(inc, printTime, (inc,))
    t.start()
# 5s
printTime(5)
# Timer 函数第一个参数是时间间隔(单位是秒),第二个参数是要调用的函数名,第三个参数是调用函数的参数(tuple)
三、sched模块
# sched 模块是 Python 内置的模块,它是一个调度(延时处理机制),每次想要定时执行某任务都必须写入一个调度
import sched
import time
from datetime import datetime
# 初始化sched模块的 scheduler 类
# 第一个参数是一个可以返回时间戳的函数,第二个参数可以在定时未到达之前阻塞。
# 类似于while True,可以循环,结束时调用自身
schedule = sched.scheduler(time.time, time.sleep)
# 被周期性调度触发的函数
def printTime(inc):
    print(datetime.now().strftime("%Y-%m-%d %H:%M:%S"))
    schedule.enter(inc, 0, printTime, (inc,))
# 默认参数60s
def main(inc=60):
    # enter四个参数分别为:间隔事件、优先级(用于同时间到达的两个事件同时执行时定序)、被调用触发的函数,
    # 给该触发函数的参数(tuple形式)
    schedule.enter(0, 0, printTime, (inc,))
    schedule.run()
# 10s 输出一次
main(10)
# sched 模块不是循环的,一次调度被执行后就 Over 了,如果想再执行,请再次 enter
四、APScheduler框架
APScheduler 四个组件分别为:
触发器(trigger)
	date: 特定的时间点触发
    interval: 固定时间间隔触发
    cron: 在特定时间周期性地触发
作业存储(job store)
执行器(executor)
调度器(scheduler)
# 使用 APScheduler 需要安装
# pip install apscheduler
# corn  为到此时间时
from apscheduler.schedulers.blocking import BlockingScheduler
from datetime import datetime
def job():
    print(datetime.now().strftime('%Y-%m-%d %H:%M:%S'))
scheduler = BlockingScheduler()
# job为执行函数,'corn'为到 此时间时
# day_of_week='1-5'为周一到周五,hour=13为13点,minute=5为5分
scheduler.add_job(job,'cron',day_of_week='1-5',hour=6,minute=30)
scheduler.start()

# interval  为每隔多少时间
from apscheduler.schedulers.blocking import BlockingScheduler
from datetime import datetime
def job():
    print(datetime.now().strftime("%Y-%m-%d %H:%M:%S"))
# 定义BlockingScheduler
sched = BlockingScheduler()
sched.add_job(job, 'interval', seconds=5)  # 每隔5秒
sched.start()
配置调度器
APScheduler提供了许多不同的方式来配置调度器,你可以使用一个配置字典或者作为参数关键字的方式传入。你也可以先创建调度器,再配置和添加作业,这样你可以在不同的环境中得到更大的灵活性。
下面来看一个简单的 BlockingScheduler 例子
from apscheduler.schedulers.blocking import BlockingScheduler
from datetime import datetime

def job():
    print(datetime.now().strftime("%Y-%m-%d %H:%M:%S"))
# 定义BlockingScheduler
sched = BlockingScheduler()
sched.add_job(job, 'interval', seconds=5)
sched.start()
上述代码创建了一个 BlockingScheduler,并使用默认内存存储和默认执行器。(默认选项分别是 MemoryJobStore 和 ThreadPoolExecutor,其中线程池的最大线程数为10)。配置完成后使用 start() 方法来启动。
如果想要显式设置 job store(使用mongo存储)和 executor 可以这样写:
from datetime import datetime
from pymongo import MongoClient
from apscheduler.schedulers.blocking import BlockingScheduler
from apscheduler.jobstores.memory import MemoryJobStore
from apscheduler.jobstores.mongodb import MongoDBJobStore
from apscheduler.executors.pool import ThreadPoolExecutor, ProcessPoolExecutor
# MongoDB 参数
host = '127.0.0.1'
port = 27017
client = MongoClient(host, port)
# 输出时间
def job():
    print(datetime.now().strftime("%Y-%m-%d %H:%M:%S"))
# 存储方式
jobstores = {
    'mongo': MongoDBJobStore(collection='job', database='test', client=client),
    'default': MemoryJobStore()
}
executors = {
    'default': ThreadPoolExecutor(10),
    'processpool': ProcessPoolExecutor(3)
}
job_defaults = {
    'coalesce': False,
    'max_instances': 3
}
scheduler = BlockingScheduler(jobstores=jobstores, executors=executors, job_defaults=job_defaults)
scheduler.add_job(job, 'interval', seconds=5, jobstore='mongo')
scheduler.start()
在运行程序5秒后,第一次输出时间。
在 MongoDB 中可以看到 job 的状态

对 job 的操作
添加 job
添加job有两种方式:
- add_job()
- scheduled_job()
第二种方法只适用于应用运行期间不会改变的 job,而第一种方法返回一个apscheduler.job.Job 的实例,可以用来改变或者移除 job。
from apscheduler.schedulers.blocking import BlockingScheduler
sched = BlockingScheduler()
# 装饰器
@sched.scheduled_job('interval', id='my_job_id', seconds=5)
def job_function():
    print("Hello World")
# 开始
sched.start()
@sched.scheduled_job() 是 Python 的装饰器。
移除 job
移除 job 也有两种方法:
1. remove_job()
2. job.remove()

remove_job 使用 jobID 移除
job.remove() 使用 add_job() 返回的实例
job = scheduler.add_job(myfunc, 'interval', minutes=2)
job.remove()
# id
scheduler.add_job(myfunc, 'interval', minutes=2, id='my_job_id')
scheduler.remove_job('my_job_id')
暂停和恢复 job
暂停一个 job:
1.  apscheduler.job.Job.pause()

2.  apscheduler.schedulers.base.BaseScheduler.pause_job()
恢复一个 job:
1. apscheduler.job.Job.resume()

2. apscheduler.schedulers.base.BaseScheduler.resume_job()
希望你还记得 apscheduler.job.Job 是 add_job() 返回的实例
获取 job 列表
获得可调度 job 列表,可以使用get_jobs() 来完成,它会返回所有的 job 实例。
也可以使用print_jobs() 来输出所有格式化的 job 列表。
修改 job
除了 jobID 之外 job 的所有属性都可以修改,使用 apscheduler.job.Job.modify() 或者 modify_job() 修改一个 job 的属性
1. job.modify(max_instances=6, name='Alternate name')

2. modify_job('my_job_id', trigger='cron', minute='*/5')
关闭 job
默认情况下调度器会等待所有的 job 完成后,关闭所有的调度器和作业存储。将 wait 选项设置为 False 可以立即关闭。
1. scheduler.shutdown()

2. scheduler.shutdown(wait=False)
scheduler 事件
scheduler 可以添加事件监听器,并在特殊的时间触发。
def my_listener(event):
    if event.exception:
        print('The job crashed :(')
    else:
        print('The job worked :)')
# 添加监听器
scheduler.add_listener(my_listener, EVENT_JOB_EXECUTED | EVENT_JOB_ERROR)
trigger 规则
date
最基本的一种调度,作业只会执行一次。它的参数如下:
- run_date (datetime|str) – the date/time to run the job at
- timezone (datetime.tzinfo|str) – time zone for run_date if it doesn’t have one already
from datetime import date
from apscheduler.schedulers.blocking import BlockingScheduler
sched = BlockingScheduler()
def my_job(text):
    print(text)
# The job will be executed on November 6th, 2009
sched.add_job(my_job, 'date', run_date=date(2009, 11, 6), args=['text'])
sched.add_job(my_job, 'date', run_date=datetime(2009, 11, 6, 16, 30, 5), args=['text'])
sched.add_job(my_job, 'date', run_date='2009-11-06 16:30:05', args=['text'])
# The 'date' trigger and datetime.now() as run_date are implicit
sched.add_job(my_job, args=['text'])
sched.start()
cron
year (int|str) – 4-digit year
month (int|str) – month (1-12)
day (int|str) – day of the (1-31)
week (int|str) – ISO week (1-53)
day_of_week (int|str) – number or name of weekday (0-6 or mon,tue,wed,thu,fri,sat,sun)
hour (int|str) – hour (0-23)
minute (int|str) – minute (0-59)
second (int|str) – second (0-59)
start_date (datetime|str) – earliest possible date/time to trigger on (inclusive)
end_date (datetime|str) – latest possible date/time to trigger on (inclusive)
timezone (datetime.tzinfo|str) – time zone to use for the date/time calculations (defaults to scheduler timezone)
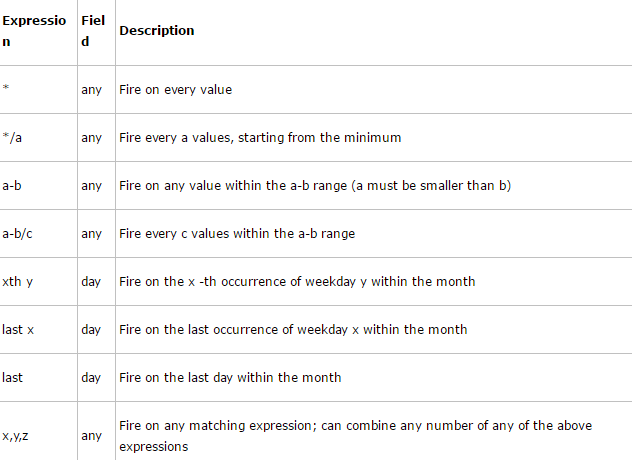
表达式:
from apscheduler.schedulers.blocking import BlockingScheduler

def job_function():
    print("Hello World")
# BlockingScheduler
sched = BlockingScheduler()
# Schedules job_function to be run on the third Friday
# of June, July, August, November and December at 00:00, 01:00, 02:00 and 03:00
sched.add_job(job_function, 'cron', month='6-8,11-12', day='3rd fri', hour='0-3')
# Runs from Monday to Friday at 5:30 (am) until 2014-05-30 00:00:00
sched.add_job(job_function, 'cron', day_of_week='mon-fri', hour=5, minute=30, end_date='2014-05-30')
sched.start()
interval
参数:
weeks (int) – number of weeks to wait
days (int) – number of days to wait
hours (int) – number of hours to wait
minutes (int) – number of minutes to wait
seconds (int) – number of seconds to wait
start_date (datetime|str) – starting point for the interval calculation
end_date (datetime|str) – latest possible date/time to trigger on
timezone (datetime.tzinfo|str) – time zone to use for the date/time calculations
from datetime import datetime
from apscheduler.schedulers.blocking import BlockingScheduler

def job_function():
    print("Hello World")
# BlockingScheduler
sched = BlockingScheduler()
# Schedule job_function to be called every two hours
sched.add_job(job_function, 'interval', hours=2)
# The same as before, but starts on 2010-10-10 at 9:30 and stops on 2014-06-15 at 11:00
sched.add_job(job_function, 'interval', hours=2, start_date='2010-10-10 09:30:00', end_date='2014-06-15 11:00:00')
sched.start()


 35万+
35万+

 被折叠的 条评论
为什么被折叠?
被折叠的 条评论
为什么被折叠?
 到【灌水乐园】发言


