


应用场景:实现简单的即时消息聊天室.
(Linux + centos + php + nginx + mysql + redis)环境
一、扩展安装
pecl install swoole
安装完成后可以通过以下命令检测Swoole是否安装成功
php -m

二、webSocket服务端代码
我们需要通过Laravel Command来实现,因为Swoole只能运行在PHP CLI模式下
1.生成Command类
php artisan make:command SwooleServer
2.编写webSocket Server逻辑
<?php

namespace App\Console\Commands;


use Illuminate\Console\Command;
use Illuminate\Support\Facades\Redis;
use Illuminate\Support\Facades\Request;

class SwooleServer extends Command
{
    /**
     * The name and signature of the console command.
     *
     * @var string
     */
    protected $signature = 'swoole:server';

    /**
     * The console command description.
     *
     * @var string
     */
    protected $description = 'swoole send msg';

    /**
     * Create a new command instance.
     *
     * @return void
     */
    public function __construct()
    {
        parent::__construct();
    }

    /**
     * Execute the console command.
     *
     * @return int
     */
    public function handle()
    {

        //创建server
        $server = new \Swoole\WebSocket\Server("0.0.0.0",9501);

        //监听连接进入事件
        $server->on('Connect', function ($server, $fd) {
            $userid = Request::input('userid');
            echo "Client: Connect456-$userid.\n";
//            echo "fd: $fd";
        });

        //连接成功回调
        $server->on('open', function (\Swoole\WebSocket\Server $server, $request) {
            $this->info($request->fd . '链接成功');
            $userid = Request::input('userid');
            echo "Client: Connect-$userid.\n";
        });

        //收到消息回调
        $server->on('message', function (\Swoole\WebSocket\Server $server, $frame) {
//            $content = $frame->data;
            $this->info($frame->data . 'msg');
            $msg = json_decode($frame->data,true);

            $fd = $frame->fd;
            if(isset($msg['type'])){
                $type = $msg['type'];
                if($type == 1){
                    //绑定用户信息和fd信息
                    $from_userid = $msg['from_userid'];
                    $cacheKey = "socket_uid_".$from_userid;
                    $time = 86400;
                    $data = [
                        'userid' => $from_userid,
                        'fd' => $fd
                    ];
                    Redis::setex($cacheKey,$time,serialize($data));
                    $to_userinfo = Redis::get($cacheKey);
                    if($to_userinfo){
                        session(['socket_uid_session' => $cacheKey]);

                        $server->push($fd,$from_userid.'连接成功,可以开始聊天啦');
//                        $server->push($fd,$fd.'连接成功,可以开始聊天啦');

                    }else{
                        $server->push($fd,$fd.'连接失败');
                    }


                }else if($type == 2){
                    //发送消息
                    $content = $msg['data'];
                    $from_userid = $msg['from_userid'];
                    $this->info($from_userid . 'msg');
                    $to_userids = $msg['to_userids'];//1,2,3
                    $to_userids_arr = explode(',',$to_userids);
                    foreach ($to_userids_arr as $k => $v){
                        $cacheKey = "socket_uid_".$v;
                        $to_userinfo = Redis::get($cacheKey);
//                      $server->push($frame->fd,$cacheKey);
                        $this->info($to_userinfo . '$to_userinfo');
                        $to_userinfo = unserialize($to_userinfo);
                        if(!$to_userinfo){
                            $this->info($content.'对方不在线');
                            $server->push($frame->fd,$to_userinfo['userid'].'对方不在线');
                        }else{
                            $this->info($content.'对方在线');
                            $to_fd = $to_userinfo['fd'];
//                        $content = $content.'-from_userid-'.$from_userid.'-to_userid-'.$to_userid.'-fd-';

                            $uid = (int)$v;
                            $this->info($uid.'yonghuid');

                            //推送信息给指定用户
                            $server->push($to_fd,$content);
                            //推送给所有链接
                            //foreach ($server->connections as $fd){
                            //    $content = $content.$fd;
                            //    $server->push($fd,$content);
                            //}
                        }
                    }


                }else if($type == 3){
                    //发送心跳包
                    $this->info('心跳包12');
//                    $server->push($fd,$content);
                }

            }else{
                //连接失败
                $server->push($frame->fd,'连接失败,退出重进');
            }

        });

        //关闭链接回调
        $server->on('close', function ($ser, $fd) {
            //接触用户userid和fd的关系
            $cacheKey = session('socket_uid_session');
            Redis::del($cacheKey);
            $this->info($cacheKey);
            $this->info($fd . '断开链接');

        });

        $server->start();
    }
}
3、在网站根目录运行以下命令
php artisan swoole:server
启动服务端
三、客户端实现
<div style="width:600px;margin:0 auto;border:1px solid #ccc;">
    <div id="content" style="overflow-y:auto;height:300px;"></div>
    <hr />
    <div style="height:40px;background:white;">
        发送人userid:<input type="text" class="form-control" id="from_userid"  placeholder="发送人id" value="{{$userid}}">
        接收人userid:<input type="text" class="form-control" id="to_userids"  placeholder="接收人id"></br>
        发送内容:<input type="text" class="form-control" id="message"  placeholder="请输入内容">
        <button type="button" class="btn btn-primary" onclick="sendMessage()">点击发送1</button>
    </div>
</div>

<script type="text/javascript">
    var arr = {};

    if(window.WebSocket){
        //创建连接
        // 端口和ip地址对应不要写错
        // var webSocket = new WebSocket("ws://0.0.0.0:9501");
        //https请求
        // var wss = "wss://zsy.hzyxhfp.com/wss:9501";
        //http请求
        var wss = "ws://192.168.124.143:9501";
        var webSocket = new WebSocket(wss);


        // 握手成功
        webSocket.onopen = function (event) {
            // console.log(3);
            console.log('webSocket 链接成功');
            // console.log(webSocket.readyState);
            if (webSocket.readyState === 1) {
                var from_userid = document.getElementById('from_userid').value;
                var arr = {};
                arr['from_userid'] = from_userid;
                arr['type'] = 1;//1:第一次连接,绑定用户信息
                var arrJson =  JSON.stringify(arr);
                webSocket.send(arrJson);
                // console.log("connected readyState");
            }

        };

        //收到服务端消息回调
        webSocket.onmessage = function (event) {
            console.log(webSocket,'onmessage');
            var content = document.getElementById('content');
            content.innerHTML = content.innerHTML.concat('<p style="margin-left:20px;height:20px;line-height:20px;">'+event.data+'</p>');
        }

        //监听断开连接
        webSocket.onclose = function(event) {
            console.log(webSocket,'onclose');
            var content = document.getElementById('content');
            content.innerHTML = content.innerHTML.concat('<p style="margin-left:20px;height:20px;line-height:20px;">您已断开连接</p>');
            //重新连接
        }


        //发送消息
        var sendMessage = function(){
            var data = document.getElementById('message').value;
            arr['data'] = data;
            arr['from_userid'] = document.getElementById('from_userid').value;
            arr['to_userids'] = document.getElementById('to_userids').value;
            arr['type'] = 2;//2:发送信息

            var myJSON =  JSON.stringify(arr);
            console.log(webSocket);
            if (webSocket.readyState === 1) {
                //当前用户在线
                webSocket.send(myJSON);
                // webSocket.send(data);
                var content = document.getElementById('content');
                content.innerHTML = content.innerHTML.concat('<p style="margin-left:20px;height:20px;line-height:20px;color: blue;">'+data+'</p>');
            }else{
                //当前用户不在线
                console.log('连接失败,请刷新重进');

            }

            // webSocket.send(myJSON);
            // // webSocket.send(data);
            // var content = document.getElementById('content');
            // content.innerHTML = content.innerHTML.concat('<p style="margin-left:20px;height:20px;line-height:20px;">'+data+'</p>');

        }


        //每隔5秒发送一个心跳包
        setInterval(function(){
            console.log('setInterval')
            var arr = {};
            arr['type'] = 3;
            var myJSON =  JSON.stringify(arr);
            webSocket.send(myJSON)
        },5000);


    }else{
        console.log("您的浏览器不支持WebSocket");
    }


</script>
四、配置nginx转发swoole,否则websocket连接不上(此为http请求,如果是HTTPS请求,配置需重新配置)
server {
    listen 80;
    server_name www.tbk.com;
    charset utf-8;
    index index.html index.htm index.php;
    root /www/shop/public;

    proxy_connect_timeout 600s;
    proxy_send_timeout 600s;
    proxy_read_timeout 600s;
    send_timeout 300s;

    fastcgi_connect_timeout 600;
    fastcgi_send_timeout 600;
    fastcgi_read_timeout 600;
    uwsgi_read_timeout 600;

   #limit_conn perip 2;
   #limit_conn perserver 4;

   #proxy_read_timeout 6;
   #keepalive_timeout 1s;

   #location  /api/banners/ {
   #	limit_conn perserver 4;
   #}


    location / {
    	#swoole
	 		proxy_pass http://127.0.0.1:9510;
       	 	proxy_redirect off;
        	proxy_set_header Host $host;
        	proxy_set_header X-Real-IP $remote_addr;
        	proxy_set_header X-Forwarded-For $proxy_add_x_forwarded_for;
        	proxy_http_version 1.1;
        	proxy_set_header Upgrade $http_upgrade;
        	proxy_set_header Connection "upgrade";
        #swoole

  			try_files $uri $uri/ /index.php$is_args$args;
    }


    location = /favicon.ico { access_log off; log_not_found off; }
    location = /robots.txt  { access_log off; log_not_found off; }

    error_log    /usr/local/webserver/nginx/logs/tbk_nginx_error.log    error;
    error_page 404 /index.php;
    location ~ /\. {
        deny all;
    }

    location ~ .*\.(woff|js|css|png|jpg|gif|swf|ico|pdf|mov|fla|zip|rar)$ {
        try_files $uri =404;
    }

    location ~ .*\.(woff|jpg|jpeg|png|gif|ico|css|js)$ {
        expires 1h;
        add_header Cache-Control public;
        add_header Pragma public;
        add_header Vary Accept-Encoding;
    }

    location ~ \.php(.*)$ {
   	fastcgi_pass   127.0.0.1:9000;
            fastcgi_index  index.php;
            fastcgi_split_path_info  ^((?U).+\.php)(/?.+)$;
            fastcgi_param  SCRIPT_FILENAME  $document_root$fastcgi_script_name;
            fastcgi_param  PATH_INFO  $fastcgi_path_info;
            fastcgi_param  PATH_TRANSLATED  $document_root$fastcgi_path_info;
            include        fastcgi_params;
    }
    location ~ /\.(?!well-known).* {
        deny all;
    }


    # security headers
    add_header X-Frame-Options "SAMEORIGIN" ;
    add_header X-XSS-Protection "1; mode=block" ;
    add_header X-Content-Type-Options "nosniff" ;
    add_header Referrer-Policy "no-referrer-when-downgrade" ;
    add_header Content-Security-Policy "default-src * data: 'unsafe-eval' 'unsafe-inline'" ;
    add_header Strict-Transport-Security "max-age=31536000; includeSubDomains; preload" ;
    # gzip
    gzip on;
    gzip_vary on;
    gzip_proxied any;
    gzip_comp_level 6;
    gzip_types text/plain text/css text/xml application/json application/javascript application/xml+rss application/atom+xml image/svg+xml;
}
在原本配置上,介绍swoole这一段配置
如果不出意外,那么到此时websocket应该就连接成功了
但是因为我的后端逻辑中使用了redis,所以还得配置redis
五、安装配置redis(默认已安装,没安装的百度安装一下)
.env文件配置
CACHE_DRIVER=redis
REDIS_CLIENT=predis
QUEUE_CONNECTION=redis

REDIS_HOST=127.0.0.1
REDIS_PASSWORD=null
REDIS_PORT=6379
启动redis
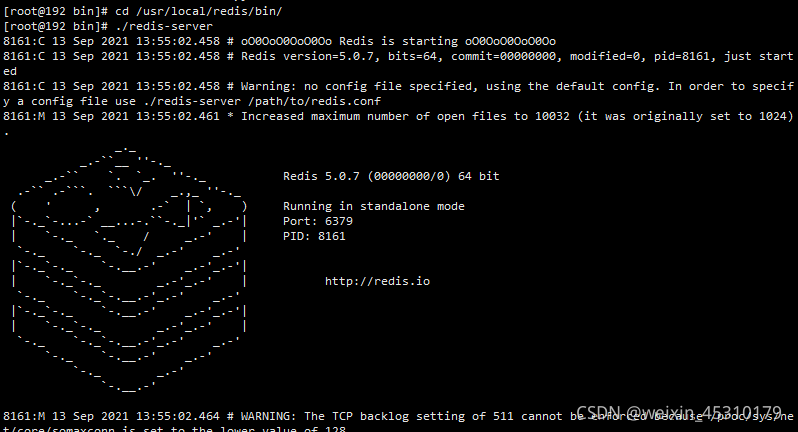
此时发送消息
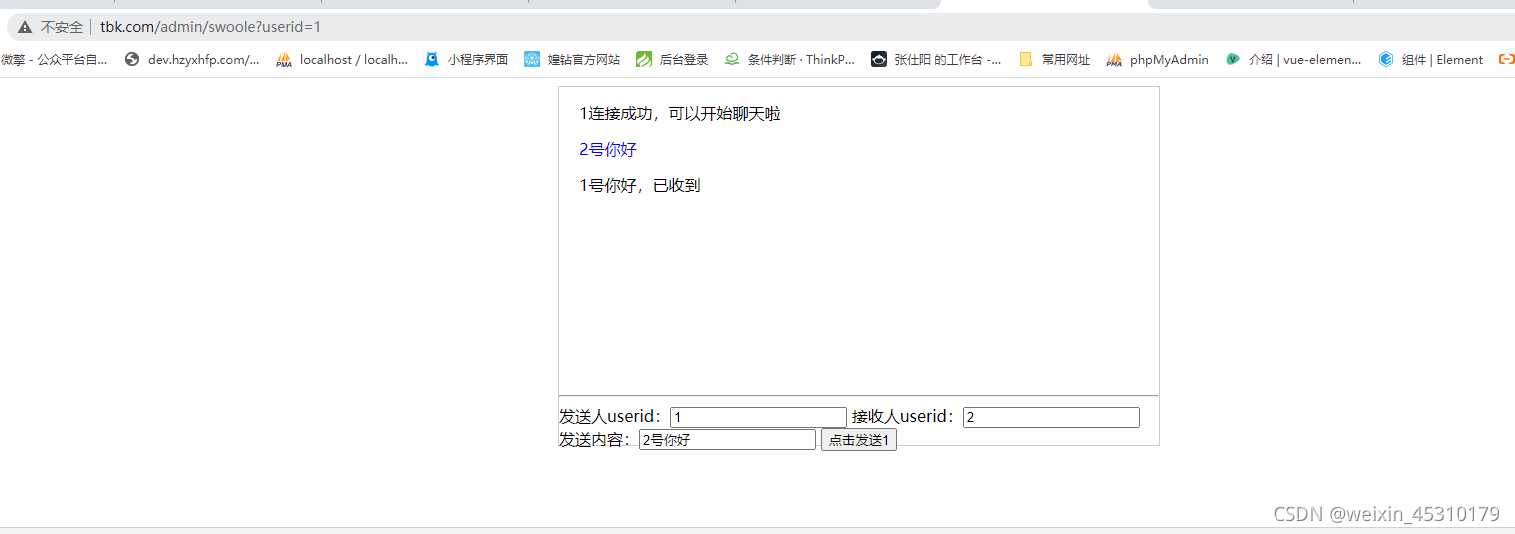
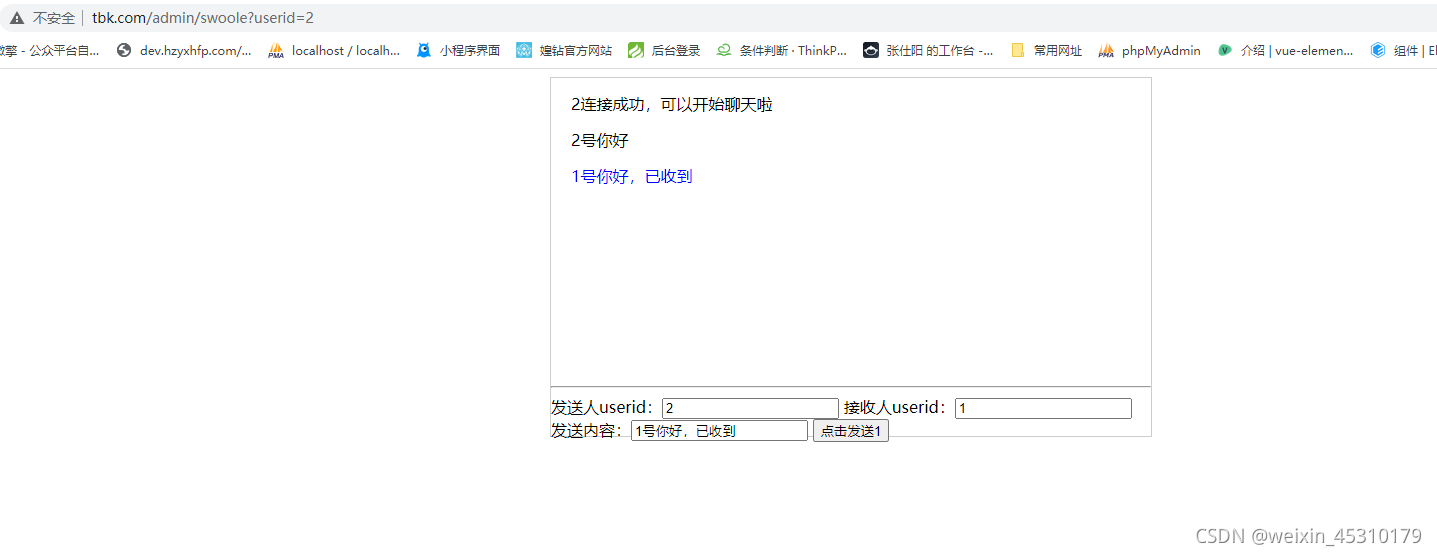
至此实现了简易聊天室的功能
6、刚才我们是通过手动在根目录运行 php artisan swoole:server启动服务器,但不可能一直使用终端运行该命令,所以为了让 swoole:server进程永久地在后台运行,应该使用一个进程监视器,如 Supervisor,以确保其不会停止运行。
如何安装使用请查看
Laravel + CentOS7配置Supervisor守护进程
1、安装Supervisor
yum install supervisor
如果提示没有可用软件包

先执行命令
yum -y install epel-release
然后在执行上面的命令
yum install supervisor
安装完成
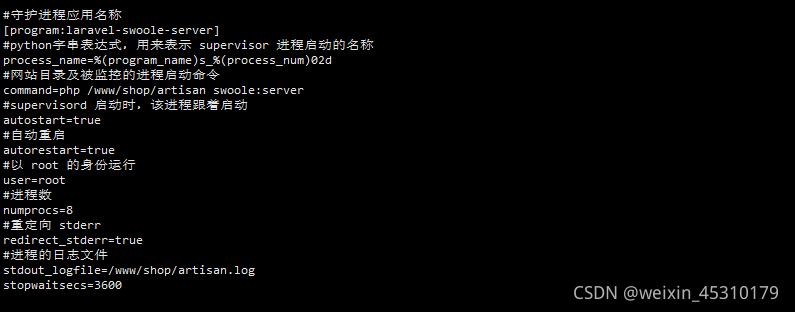
2、安装完成后,修改 /etc/supervisord.conf 文件,在文件末尾 [include] 上方添加代码:
#守护进程应用名称
[program:laravel-swoole-server]
#python字串表达式,用来表示 supervisor 进程启动的名称
process_name=%(program_name)s_%(process_num)02d
#网站目录及被监控的进程启动命令
command=php /www/shop/artisan swoole:server
#supervisord 启动时,该进程跟着启动
autostart=true
#自动重启
autorestart=true
#以 root 的身份运行
user=root
#进程数
numprocs=8
#重定向 stderr
redirect_stderr=true
#进程的日志文件
stdout_logfile=/www/shop/artisan.log
stopwaitsecs=3600
主要要修改command后面的网站的目录位置
应该确保 stopwaitsecs 的值大于运行时间最长的任务所消耗的秒数。否则,Supervisor 可能会在任务完成前终止任务
3、配置文件修改后,执行 sudo supervisorctl reread
4、如果报错:

error: <class ‘socket.error’>, [Errno 2] No such file or directory: file: /usr/lib64/python2.7/socket.py
则先执行
supervisord
再依次执行
sudo supervisorctl reread
sudo supervisorctl update
sudo supervisorctl start laravel-swoole-server:*
完成后可以查看进程是否正常运行:
ps -ef | grep artisan
5、如果要同时守护多个进程
最简单的场景就是在配置文件当中定义多个program:
[program: A]
[program: B]
[program: C]
这样,我们可以使用supervisorctl [start|stop] [program_name]的方式来方便的启动、重启指定的进程
如果在 Laravel 中修改了代码,需要重启 Supervisor 才能生效


 被折叠的 条评论
为什么被折叠?
被折叠的 条评论
为什么被折叠?
 到【灌水乐园】发言


