


 本文详细介绍了ActiveMQ的安装、基础用法,包括生产者、消费者的创建,以及不同签收模式的探讨。接着,文章深入讲解了SpringBoot如何与ActiveMQ整合,提供了配置类和工具类的代码示例,并展示了生产者和消费者的实现。此外,还提到了手动签收模式的一个常见问题及解决方案。
昨天仔细研究了activeMQ消息队列,也遇到了些坑,昨天晚上也写了篇文章记录坑的内容,其实上篇文章(SpringBoot整合activeMQ消息队列手动签收(Session.CLIENT_ACKNOWLEDGE)为什么失效啊?)已经详细的介绍了activeMQ的SpringBoot的整合之类的,但是不太全面,今天我就从activeMQ最基本生产者和消费者到SpringBoot整合activeMQ来个详细的介绍,老规矩,废话少说,直接扔干货。
1、activeMQ安装
我安装的是Linux版本的activeMQ,先下载其压缩包,然后上传至服务器解压,然后在bin目录下启动,启动命令:./activemq start。这样就成功启动起来了。
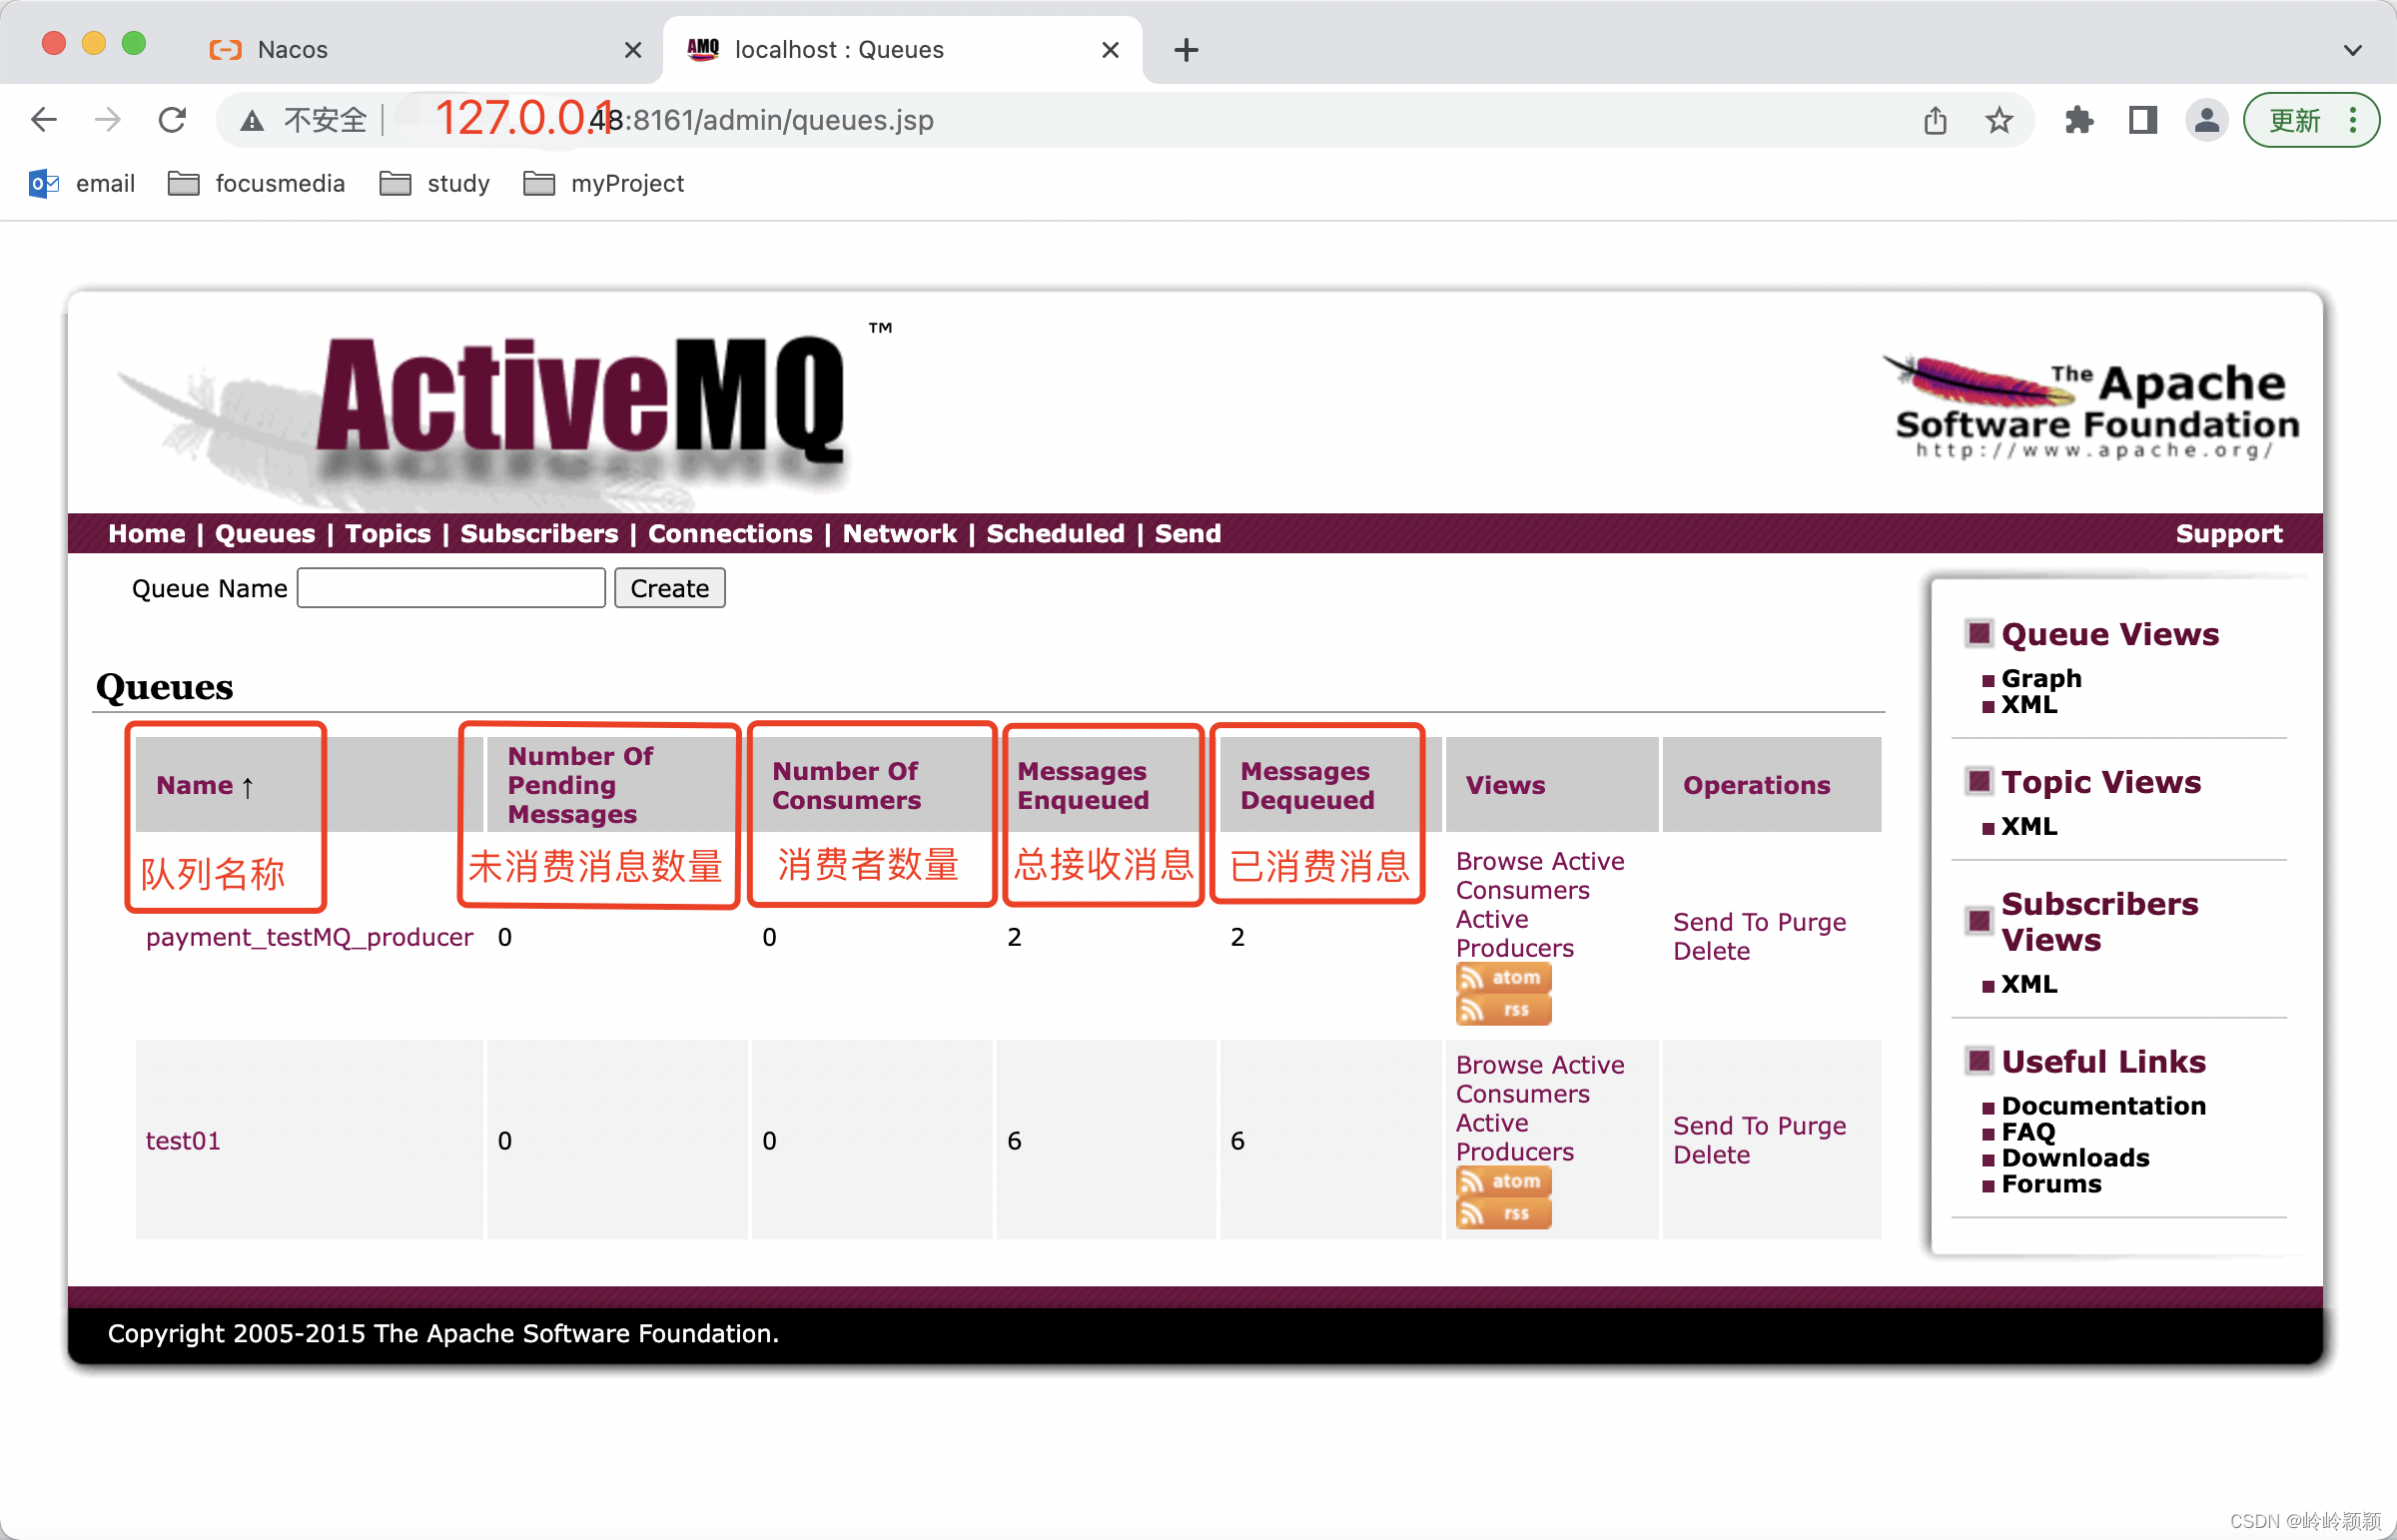
可以在浏览器中访问URL地址:127.0.0.1:8161/admin
默认账户密码:username:admin; password:admin。
这里我介绍的安装比较简单,大家如果安装失败的话,那么网上可以多找找其它资源,这里我就不过多叙述安装的方法和注意事项等等。
2、基本activeMQ用法
2.1、引入activeMQ依赖
	<dependency>
            <groupId>org.springframework.boot</groupId>
            <artifactId>spring-boot-starter-activemq</artifactId>
            <exclusions>
                <exclusion>
                    <groupId>org.slf4j</groupId>
                    <artifactId>slf4j-log4j12</artifactId>
                </exclusion>
            </exclusions>
        </dependency>

        <dependency>
            <groupId>org.apache.activemq</groupId>
            <artifactId>activemq-pool</artifactId>
            <version>5.15.2</version>
            <exclusions>
                <exclusion>
                    <groupId>org.slf4j</groupId>
                    <artifactId>slf4j-log4j12</artifactId>
                </exclusion>
            </exclusions>
	</dependency>
2.2、编写生产者
代码如下所示:
package com.ygl.payment.service;

import javax.jms.Connection;
import javax.jms.JMSException;
import javax.jms.MessageProducer;
import javax.jms.Queue;
import javax.jms.Session;

import org.apache.activemq.ActiveMQConnectionFactory;
import org.apache.activemq.command.ActiveMQTextMessage;

/**
 * 测试activeMQ 生产者
 * @ClassName: TestMainMQProducer
 * @Author: ygl
 * @Date: 2022/3/30 14:38
 * @Version: 1.0
 *
 */
public class TestMainMQProducer {

    public static void main(String[] args) {

        ActiveMQConnectionFactory activeMQConnectionFactory = new ActiveMQConnectionFactory("tcp://127.0.0.1:61616");
        try {
            Connection connection = activeMQConnectionFactory.createConnection();
            connection.start();
            //第一个值表示是否使用事务,如果选择true,第二个值相当于选择0
            Session session = connection.createSession(true, Session.SESSION_TRANSACTED);
            //Session session = connection.createSession(false, Session.AUTO_ACKNOWLEDGE);
            Queue queue = session.createQueue("test01");
            MessageProducer producer = session.createProducer(queue);
            ActiveMQTextMessage activeMQTextMessage = new ActiveMQTextMessage();
            for (int i = 0; i < 6; i++) {
                if (i == 3) {
                    //int i1 = i / 0;
                }
                activeMQTextMessage.setText("hello activeMQ!——>" + i);
                producer.send(activeMQTextMessage);
            }
            //开启事务时一定要commit
            session.commit();
            connection.close();
        } catch (JMSException e) {
            e.printStackTrace();
        }
    }
}
上面的生产者中,我提交消息采用的是开启事务( connection.createSession(true, Session.SESSION_TRANSACTED); )的方式来提交,在发送消息最后一定一定要记得写session.commit() 方法,因为你虽然使用的发送方法send(),但是这是个事务,只有在commit()的时候才是真正的将消息提交至消息队列,如果期间发生异常,那么这一批次的的消息全部会回滚,无法提交至消息队列中。这就是开启事务的作用。
生产者者启动后,activeMQ消息队列插入消息如下所示:
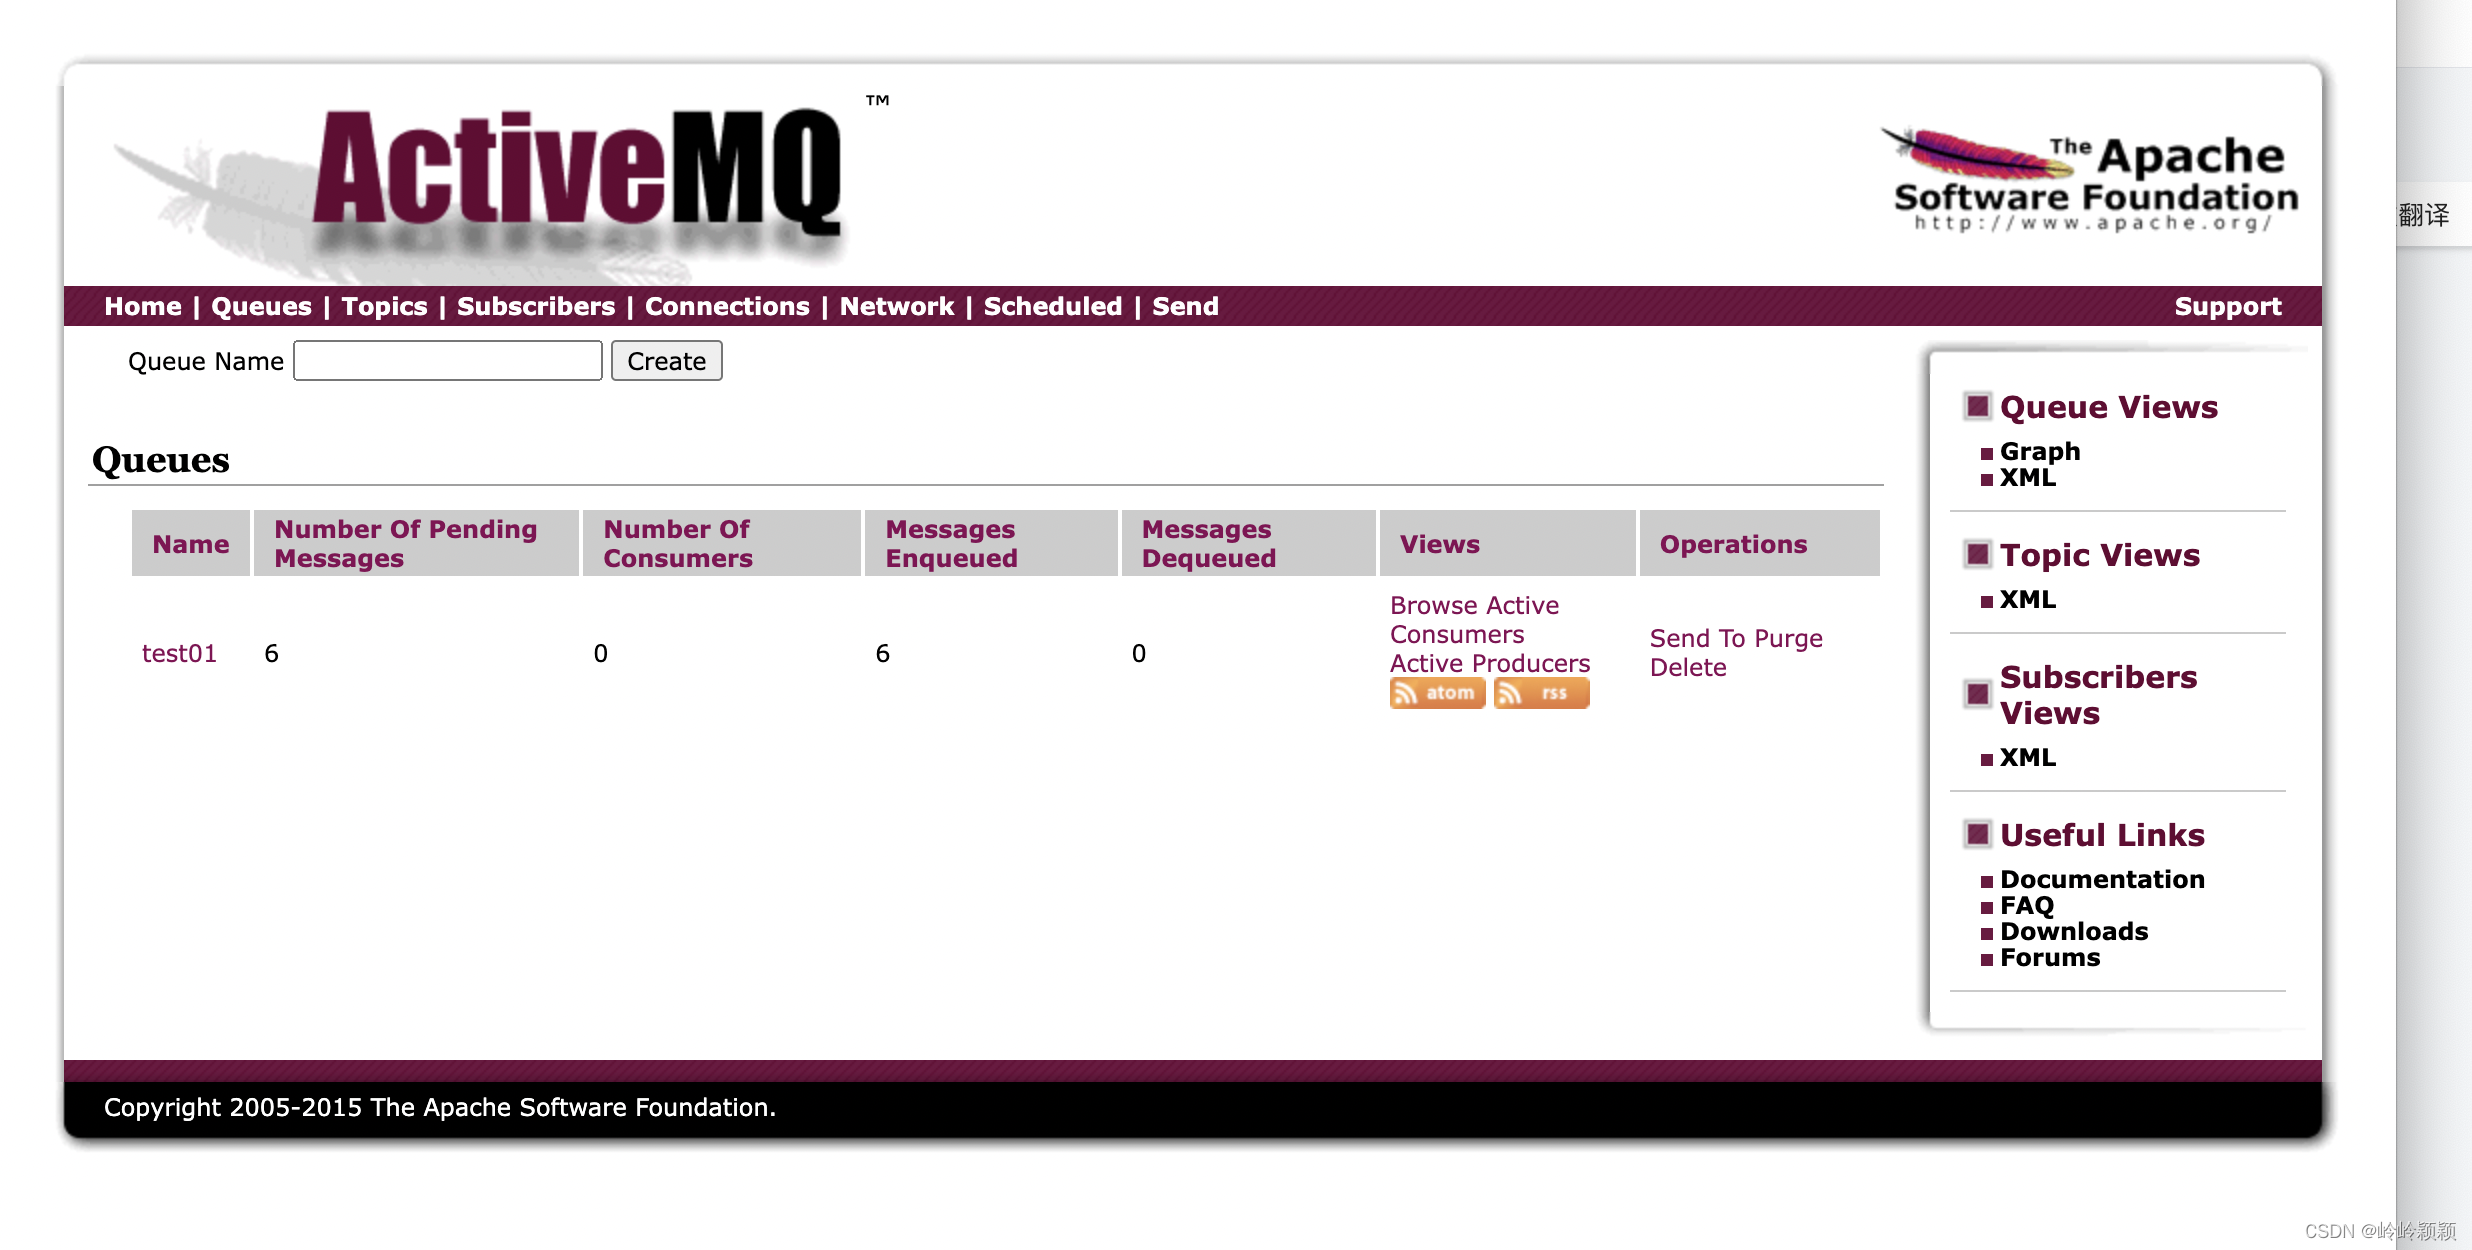 上面可以看到已经发送了6条消息,待消费消息6条,消费者0个,已经消费消息0条。
2.3、编写消费者
在消费者中,主要有三种事务签收模式,这里我逐个给大家来在代码中介绍。
2.3.1、自动签收模式
代码如下所示:
package com.ygl.payment.service;

import javax.jms.Connection;
import javax.jms.JMSException;
import javax.jms.Message;
import javax.jms.MessageConsumer;
import javax.jms.MessageListener;
import javax.jms.Queue;
import javax.jms.Session;
import javax.jms.TextMessage;

import org.apache.activemq.ActiveMQConnectionFactory;

/**
 * 测试MQ消费者
 * @ClassName: TestMainMQConsumer
 * @Author: ygl
 * @Date: 2022/3/30 14:54
 * @Version: 1.0
 *
 */
public class TestMainMQConsumer2 {

    public static void main(String[] args) {

        ActiveMQConnectionFactory activeMQConnectionFactory = new ActiveMQConnectionFactory("tcp://127.0.0.1:61616");
        Connection connection = null;
        try {
            connection = activeMQConnectionFactory.createConnection();
            connection.start();
            //关闭事务,启用自动签收消息模式
            Session session = connection.createSession(false, Session.AUTO_ACKNOWLEDGE);
            //开启事务,启用事务签收消息模式
            //Session session = connection.createSession(true, Session.SESSION_TRANSACTED);
            //关闭事务,启用手动签收模式
            //Session session = connection.createSession(false, Session.CLIENT_ACKNOWLEDGE);
            Queue queue = session.createQueue("test01");
            MessageConsumer consumer = session.createConsumer(queue);
            consumer.setMessageListener(new MessageListener() {
                @Override
                public void onMessage(Message message) {

                    if (message instanceof TextMessage) {
                        String text = null;

                        try {
                            text = ((TextMessage) message).getText();
                            System.out.println(text);
                        } catch (JMSException e) {
                            e.printStackTrace();
                        }
                    }
                }
            });

        } catch (JMSException e) {
            e.printStackTrace();
        }
    }
}
自动签收模式下,就只在消费者在接收消息时就返回给消息队列说该消息已经消费,无论你你拿到该消息后在后续的执行其他方法过程中产生线程终端还是异常也好,对消息队列来说都没影响,消息队列中该消息记录是已经消费。
2.3.2、事务签收模式
代码如下所示:
package com.ygl.payment.service;

import javax.jms.Connection;
import javax.jms.JMSException;
import javax.jms.Message;
import javax.jms.MessageConsumer;
import javax.jms.MessageListener;
import javax.jms.Queue;
import javax.jms.Session;
import javax.jms.TextMessage;

import org.apache.activemq.ActiveMQConnectionFactory;

/**
 * 测试MQ消费者
 * @ClassName: TestMainMQConsumer
 * @Author: ygl
 * @Date: 2022/3/30 14:54
 * @Version: 1.0
 *
 */
public class TestMainMQConsumer2 {

    public static void main(String[] args) {

        ActiveMQConnectionFactory activeMQConnectionFactory = new ActiveMQConnectionFactory("tcp://124.222.158"
                + ".248:61616");
        Connection connection = null;
        try {
            connection = activeMQConnectionFactory.createConnection();
            connection.start();
            //关闭事务,启用自动签收消息模式
            //Session session = connection.createSession(false, Session.AUTO_ACKNOWLEDGE);
            //开启事务,启用事务签收消息模式
            Session session = connection.createSession(true, Session.SESSION_TRANSACTED);
            //关闭事务,启用手动签收模式
            //Session session = connection.createSession(false, Session.CLIENT_ACKNOWLEDGE);
            Queue queue = session.createQueue("test01");
            MessageConsumer consumer = session.createConsumer(queue);
            consumer.setMessageListener(new MessageListener() {
                @Override
                public void onMessage(Message message) {

                    if (message instanceof TextMessage) {
                        String text = null;

                        try {
                            text = ((TextMessage) message).getText();
                            System.out.println(text);
                        } catch (JMSException e) {
                            e.printStackTrace();
                        }
                    }
                }
            });

        } catch (JMSException e) {
            e.printStackTrace();
        }
    }
}
事务签收模式下,当消费者拿到消息,但是在执行后续方法是产生异常或者其他以及执行了rollback()方法,那么该事务将会回滚,消息队列中仍然有该消息,但是消息队列会重试,如果执行了6次,仍然未成功,那么该消息就将进入死信队列。
2.3.3、手动签收模式
代码如下所示:
package com.ygl.payment.service;

import javax.jms.Connection;
import javax.jms.JMSException;
import javax.jms.Message;
import javax.jms.MessageConsumer;
import javax.jms.MessageListener;
import javax.jms.Queue;
import javax.jms.Session;
import javax.jms.TextMessage;

import org.apache.activemq.ActiveMQConnectionFactory;

/**
 * 测试MQ消费者
 * @ClassName: TestMainMQConsumer
 * @Author: ygl
 * @Date: 2022/3/30 14:54
 * @Version: 1.0
 *
 */
public class TestMainMQConsumer2 {

    public static void main(String[] args) {

        ActiveMQConnectionFactory activeMQConnectionFactory = new ActiveMQConnectionFactory("tcp://127.0.0.1:61616");
        Connection connection = null;
        try {
            connection = activeMQConnectionFactory.createConnection();
            connection.start();
            //关闭事务,启用自动签收消息模式
            //Session session = connection.createSession(false, Session.AUTO_ACKNOWLEDGE);
            //开启事务,启用事务签收消息模式
            //Session session = connection.createSession(true, Session.SESSION_TRANSACTED);
            //关闭事务,启用手动签收模式
            Session session = connection.createSession(false, Session.CLIENT_ACKNOWLEDGE);
            Queue queue = session.createQueue("test01");
            MessageConsumer consumer = session.createConsumer(queue);
            consumer.setMessageListener(new MessageListener() {
                @Override
                public void onMessage(Message message) {

                    if (message instanceof TextMessage) {
                        String text = null;

                        try {
                            text = ((TextMessage) message).getText();
                            System.out.println(text);
                            message.acknowledge();
                        } catch (JMSException e) {
                            e.printStackTrace();
                        }
                    }
                }
            });
        } catch (JMSException e) {
            e.printStackTrace();
        }
    }
}
手动签收模式想下,当消费者接收到消息之后,必须手动执行方法message.acknowledge(); 当执行该方法之后,相当于告知消息队列,该消息我已经消费了;否则该消息将一直停留在未消费的状态,那么其他消费者在启动后仍然可以消费。
以上就是消费者的三种签收模式,请大家详细的看看,这个还是比较重要的,接下来的SpringBoot整合activeMQ中,我将一笔带过,不再详细的介绍,将主要讲解如何整合。
3、SpringBoot整合activeMQ
3.1、activeMQ配置类和工具类
配置类config如下所示:
/**
 * ActiveMQ 配置类
 * @ClassName: ActiveMQConfig
 * @Author: ygl
 * @Date: 2022/3/30 16:14
 * @Version: 1.0
 */
@Configuration
public class ActiveMQConfig {

    @Value("${spring.activemq.broker-url:disabled}")
    String brokerURL;

    @Value("${activemq.listener.enable:disabled}")
    String listenerEnable;

    @Bean
    public ActiveMQUtil getActiveMQUtil() throws JMSException {

        if (brokerURL.equals("disabled")) {
            return null;
        }
        ActiveMQUtil activeMQUtil = new ActiveMQUtil();
        activeMQUtil.init(brokerURL);
        return activeMQUtil;
    }

    //定义一个消息监听器连接工厂,这里定义的是点对点模式的监听器连接工厂
    @Bean(name = "jmsQueueListener")
    public DefaultJmsListenerContainerFactory jmsQueueListenerContainerFactory(
            ActiveMQConnectionFactory activeMQConnectionFactory) {

        DefaultJmsListenerContainerFactory factory = new DefaultJmsListenerContainerFactory();
        if (!listenerEnable.equals("true")) {
            return null;
        }

        factory.setConnectionFactory(activeMQConnectionFactory);
        //设置并发数
        factory.setConcurrency("5");

        //重连间隔时间
        factory.setRecoveryInterval(5000L);
        //设置为点对点(p2p)模式
        factory.setPubSubDomain(false);
        //作为生产者如果需要支持事务,则需要配置SessionTransacted为true
        factory.setSessionTransacted(false);
        //消息的应答方式,需要手动确认,此时SessionTransacted必须被设置为false,且为Session.CLIENT_ACKNOWLEDGE模式
        //Session.AUTO_ACKNOWLEDGE  消息自动签收
        //Session.CLIENT_ACKNOWLEDGE  客户端调用acknowledge方法手动签收  注意在SpringBoot里面手动确认是失效的,要设置为 4
        //Session.DUPS_OK_ACKNOWLEDGE 不必必须签收,消息可能会重复发送
        //factory.setSessionAcknowledgeMode(4);
        factory.setSessionAcknowledgeMode(Session.CLIENT_ACKNOWLEDGE);
        return factory;
    }

    @Bean(name = "topicListenerContainerFactory")
    public JmsListenerContainerFactory topicListenerContainerFactory(ConnectionFactory connectionFactory) {

        DefaultJmsListenerContainerFactory factory = new DefaultJmsListenerContainerFactory();
        if (!listenerEnable.equals("true")) {
            return null;
        }
        factory.setConnectionFactory(connectionFactory);
        factory.setPubSubDomain(true);
        return factory;
    }


    @Bean
    public ActiveMQConnectionFactory activeMQConnectionFactory() {
        /*if((url==null||url.equals(""))&&!brokerURL.equals("disabled")){
            url=brokerURL;
        }*/
        ActiveMQConnectionFactory activeMQConnectionFactory =
                new ActiveMQConnectionFactory(brokerURL);
        return activeMQConnectionFactory;
    }
}
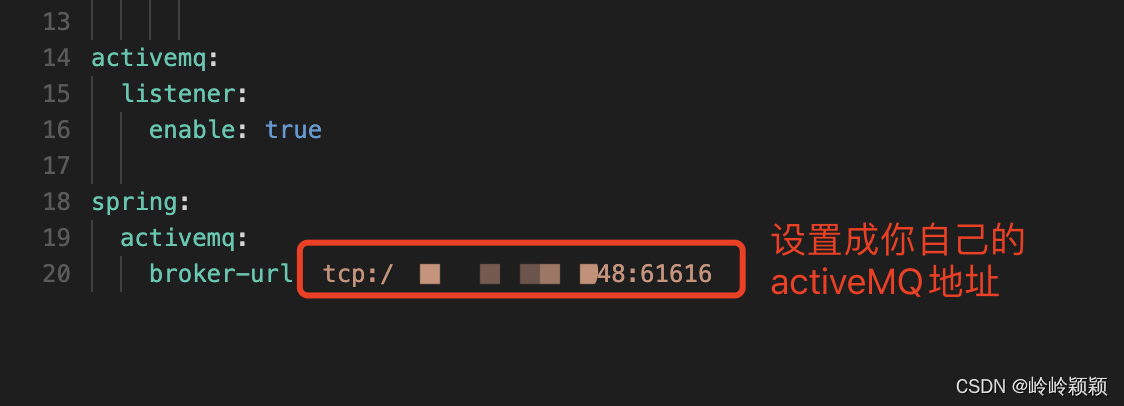
spring.activemq.broker-url和activemq.listener.enable在yml配置中如下图所示:
activeMQUtil工具类如下所示:
public class ActiveMQUtil {

    PooledConnectionFactory pooledConnectionFactory = null;

    public ConnectionFactory init(String brokerUrl) {

        ActiveMQConnectionFactory factory = new ActiveMQConnectionFactory(brokerUrl);
        //加入连接池
        pooledConnectionFactory = new PooledConnectionFactory(factory);
        //出现异常时重新连接
        pooledConnectionFactory.setReconnectOnException(true);
        //
        pooledConnectionFactory.setMaxConnections(5);
        pooledConnectionFactory.setExpiryTimeout(10000);
        return pooledConnectionFactory;
    }

    public ConnectionFactory getConnectionFactory() {
        return pooledConnectionFactory;
    }
}
3.2、SpringBoot整合activeMQ生产端
代码如下所示:
package com.ygl.payment.service.impl;

import javax.jms.Connection;
import javax.jms.ConnectionFactory;
import javax.jms.JMSException;
import javax.jms.MessageProducer;
import javax.jms.Queue;
import javax.jms.Session;
import javax.jms.Topic;

import org.apache.activemq.command.ActiveMQMapMessage;
import org.springframework.beans.factory.annotation.Autowired;
import org.springframework.stereotype.Service;

import com.ygl.payment.client.dto.TestActiveMQDTO;
import com.ygl.payment.service.ActiveMQService;
import com.ygl.payment.service.util.ActiveMQUtil;

/**
 * activeMQ service实现类
 * @ClassName: ActiveMQService
 * @Author: ygl
 * @Date: 2022/3/30 16:09
 * @Version: 1.0
 *
 */
@Service
public class ActiveMQServiceImpl implements ActiveMQService {


    @Autowired
    ActiveMQUtil activeMQUtil;


    /**
     * 测试点对点模式 p2p
     * @author: ygl
     * @date: 2022/3/30 22:34
     * @param testActiveMQDTO
     * @return java.lang.String
     */
    @Override
    public String testMQProducer(TestActiveMQDTO testActiveMQDTO) throws JMSException {

        ConnectionFactory connectionFactory = activeMQUtil.getConnectionFactory();
        Connection connection = null;
        connection = connectionFactory.createConnection();
        connection.start();
        /**
         * 第一个参数:是否开启事务;第二个参数:签收的几种方式
         */
        Session session = connection.createSession(true, Session.SESSION_TRANSACTED);
        Queue queue = session.createQueue("payment_testMQ_producer");
        MessageProducer producer = session.createProducer(queue);

        /*
        for (int i = 0; i < 6; i++) {

              if (i == 4) {
                              int i1 = i / 0;
                         }

        ActiveMQMapMessage activeMQMapMessage = new ActiveMQMapMessage();
        activeMQMapMessage.setString(i + "——>name", testActiveMQDTO.getName());
        activeMQMapMessage.setString(i + "——>age", String.valueOf(testActiveMQDTO.getAge()));
        producer.send(activeMQMapMessage);
            }
         */

        ActiveMQMapMessage activeMQMapMessage = new ActiveMQMapMessage();
        activeMQMapMessage.setString("name", testActiveMQDTO.getName());
        activeMQMapMessage.setString("age", String.valueOf(testActiveMQDTO.getAge()));
        producer.send(activeMQMapMessage);


        session.commit();
        producer.close();
        session.close();
        connection.close();

        return "send success";
    }

    /**
     * 测试发布者订阅模式 pub-sub
     * @author: ygl
     * @date: 2022/3/30 22:37
     * @param testActiveMQDTO
     * @return java.lang.String
     */
    @Override
    public String testMQTopicProducer(TestActiveMQDTO testActiveMQDTO) throws JMSException {

        ConnectionFactory connectionFactory = activeMQUtil.getConnectionFactory();
        Connection connection = null;

        connection = connectionFactory.createConnection();
        connection.start();
        Session session = connection.createSession(true, Session.SESSION_TRANSACTED);
        Topic topic = session.createTopic("test-topic01");
        MessageProducer producer = session.createProducer(topic);
        ActiveMQMapMessage activeMQMapMessage = new ActiveMQMapMessage();
        activeMQMapMessage.setString("name", testActiveMQDTO.getName());
        activeMQMapMessage.setString("age", String.valueOf(testActiveMQDTO.getAge()));
        producer.send(activeMQMapMessage);
        session.commit();
        producer.close();
        session.close();
        connection.close();
        return "send success";
    }
}
该生产者是开启事务来提交,大家也可以不开启事务提交,直接设置为false即可。
3.3、SpringBoot整合activeMQ消费端
代码如下所示:
/**
 * 消息队列 监听
 * @ClassName: MQListener
 * @Author: ygl
 * @Date: 2022/3/30 21:44
 * @Version: 1.0
 *
 */
@Component
public class MQListener {

	//监听p2p消息队列
	@JmsListener(destination = "payment_testMQ_producer", containerFactory = "jmsQueueListener")
	public void testMQConsumerThree(MapMessage mapMessage, Session session) {

	        String name = null;
	        String age = null;
	        try {
	            name = mapMessage.getString("name");
	            age = mapMessage.getString("age");
	            TestActiveMQDTO testActiveMQDTO = new TestActiveMQDTO();
	            testActiveMQDTO.setName(name);
	            testActiveMQDTO.setAge(Integer.parseInt(age));
	            System.out.println("我是Three——>姓名:" + name + ";年龄:" + age);
	            //session.rollback();
	            mapMessage.acknowledge();
	        } catch (JMSException e) {
	            e.printStackTrace();
	        }
	    }

	 //监听pub(topic)模式
	@JmsListener(destination = "test-topic01", containerFactory = "topicListenerContainerFactory")
    public void testMQTopicConsumerOne(MapMessage mapMessage) throws JMSException {

        String name = mapMessage.getString("name");
        String age = mapMessage.getString("age");

        TestActiveMQDTO testActiveMQDTO = new TestActiveMQDTO();
        testActiveMQDTO.setName(name);
        testActiveMQDTO.setAge(Integer.parseInt(age));
        System.out.println("topic——>我是One——>姓名:" + name + ";年龄:" + age);

    }
}
如果想更改签收模式,大家可以在config配置类中直接进行更改即可,如图所示:
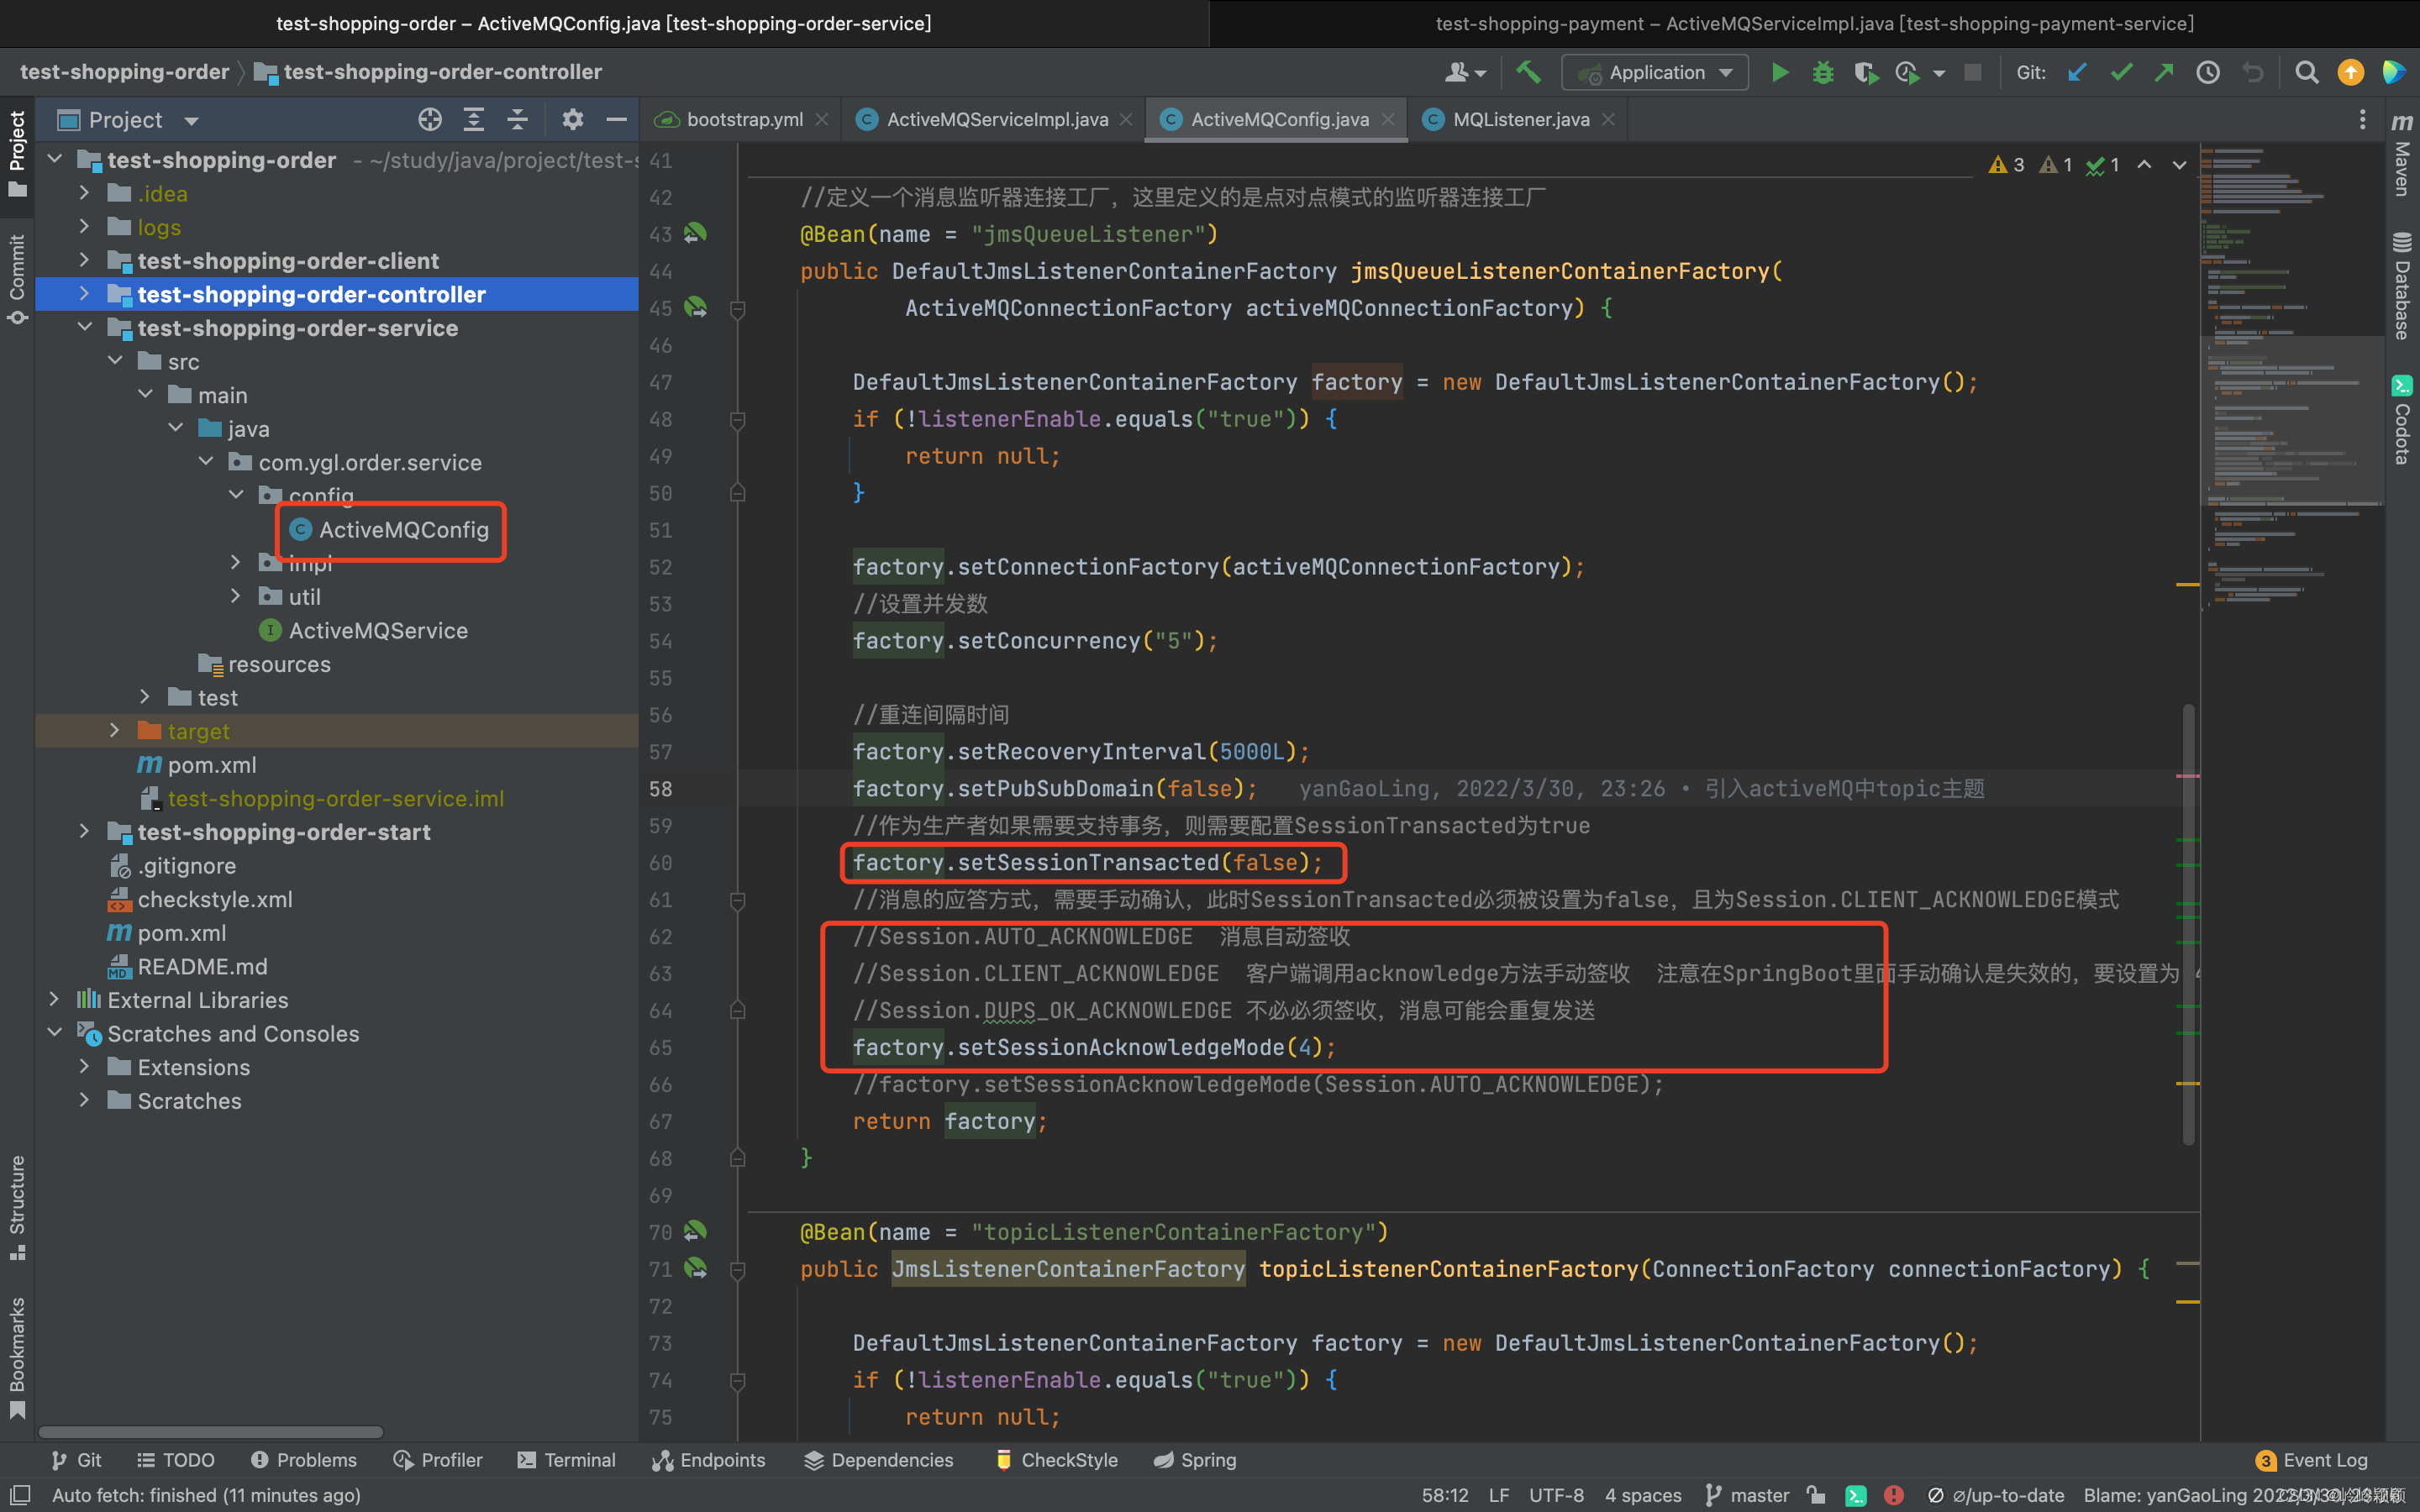
注意:在手动签收模式下有个大坑,手动签收模式就是不生效,如果你遇到这个问题,请移步至我的上篇文章(SpringBoot整合activeMQ消息队列手动签收(Session.CLIENT_ACKNOWLEDGE)为什么失效啊?)这里会给你详细解决的。
好了,今天的分享就到这吧,activeMQ也告一段落,如果上面的内容有哪些不对的和你们有疑问的,请在评论区中指出和提出。谢谢
记得随手点赞评论转发哦。


 1464
1464

 被折叠的 条评论
为什么被折叠?
被折叠的 条评论
为什么被折叠?
 到【灌水乐园】发言


