大家好,好久不见。我国著名数学家华罗庚先生曾说:“聪明在于勤奋,天才在于积累”。衷心希望大家坚守初心,实现中华民族伟大复兴的中国梦!
一、开发背景
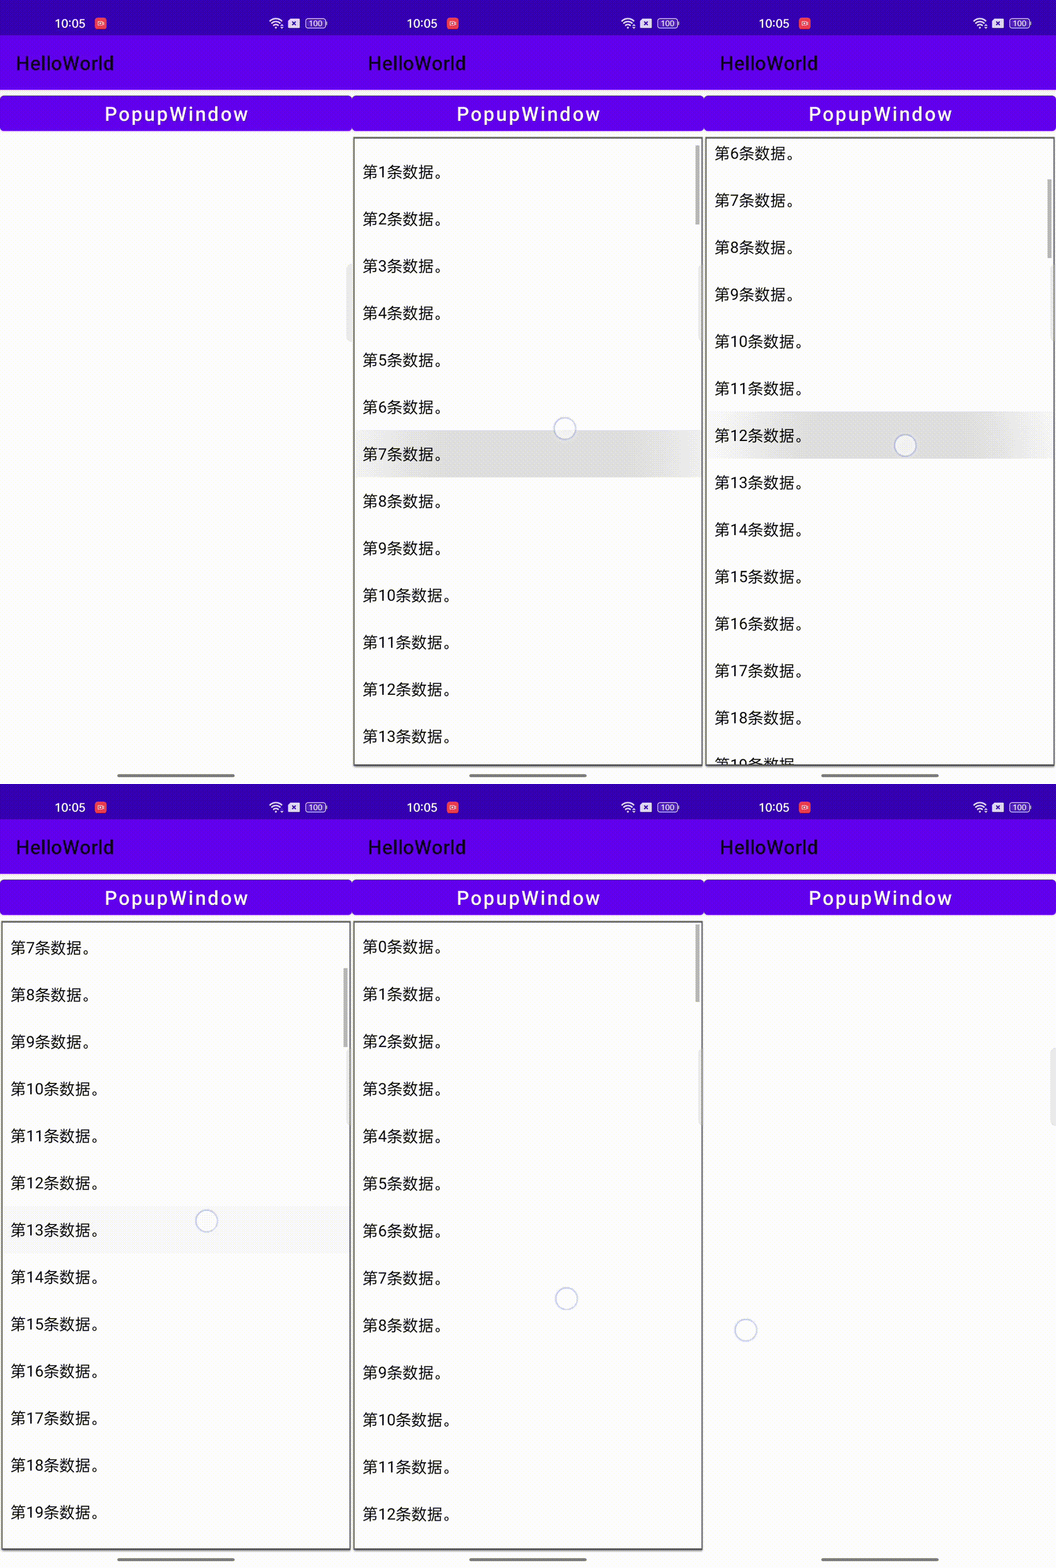
上一篇文章向大家介绍了 SeekBar 如何设置进度条的颜色。本篇文章向大家介绍如何使用 PopupWindow + ListView 实现弹出滑动列表的显示效果。如果您正在为此感到迷茫,那么衷心希望能够帮助到此刻迷茫的您。代码实现的效果如下图所示:

二、PopupWindow 和 ListView 的简单介绍
PopupWindow 是悬浮框,用来显示信息。和 AlertDialog 不同的是:PopupWindow 在屏幕中的位置可以是任意的。
ListView 是列表视图,只负责展示数据。它的适配器用来提供数据。
三、弹出滑动列表的实现思路
我们把含有 ListView 的布局嵌入到 PopupWindow 中,为 Button 设置监听事件,实现点击 Button 就弹出 PopupWindow 的交互效果。
我们需要有自定义的 adapter 给 ListView 提供数据。还要在 MainActivity 中创建 PopupWindow 的对象,并且同时把含有 ListView 的布局嵌入到悬浮框里。梳理了大致的实现思路之后,我们来看具体的代码实现。
四、弹出滑动列表的实现代码
布局先行,让我们先来看 MainActivity 的布局代码,布局代码如下所示:
<?xml version="1.0" encoding="utf-8"?>
<androidx.constraintlayout.widget.ConstraintLayout xmlns:android="http://schemas.android.com/apk/res/android"
    xmlns:app="http://schemas.android.com/apk/res-auto"
    xmlns:tools="http://schemas.android.com/tools"
    android:layout_width="match_parent"
    android:layout_height="match_parent"
    tools:context=".demo05.MainActivity">

    <Button
        android:id="@+id/btn_1"
        android:layout_width="match_parent"
        android:layout_height="wrap_content"
        android:text="PopupWindow"
        android:textAllCaps="false"
        android:textSize="20sp"
        app:layout_constraintTop_toTopOf="parent" />

</androidx.constraintlayout.widget.ConstraintLayout>
整个布局代码只有一个 Button 控件。我们等会儿要为它设置监听事件,让来它来触发条件,弹出 PopupWindow 。
接下来,让我们来看 MainActivity 的 java 代码。如下所示:
package cn.com.helloworld.demo05;

import androidx.appcompat.app.AppCompatActivity;
import androidx.constraintlayout.solver.LinearSystem;

import android.content.ClipData;
import android.graphics.drawable.PaintDrawable;
import android.os.Bundle;
import android.view.LayoutInflater;
import android.view.View;
import android.view.ViewGroup;
import android.widget.ArrayAdapter;
import android.widget.Button;
import android.widget.ListView;
import android.widget.PopupWindow;

import java.util.ArrayList;
import java.util.List;

import cn.com.helloworld.R;

public class MainActivity extends AppCompatActivity {
    Button btn_1;

    @Override
    protected void onCreate(Bundle savedInstanceState) {
        super.onCreate(savedInstanceState);
        setContentView(R.layout.activity_main6);
        btn_1 = findViewById(R.id.btn_1);
        btn_1.setOnClickListener(new View.OnClickListener() {
            @Override
            public void onClick(View v) {
                showPopupWindow();
            }
        });
    }

    public void showPopupWindow() {
        PopupWindow popupWindow = new PopupWindow(MainActivity.this);
        popupWindow.setWidth(ViewGroup.LayoutParams.MATCH_PARENT);
        popupWindow.setHeight(ViewGroup.LayoutParams.WRAP_CONTENT);
        View contentView = LayoutInflater.from(MainActivity.this).inflate(R.layout.popupwindow, null);
        ArrayList<String> data = new ArrayList<>();
        for (int i = 0; i < 100; i++) {
            data.add("第" + i + "条数据。");
        }
        ListView lv = contentView.findViewById(R.id.lv_1);
        ArrayAdapter<String> adapter = new ArrayAdapter<>(MainActivity.this, android.R.layout.simple_spinner_dropdown_item, data);
        lv.setAdapter(adapter);
        popupWindow.setContentView(contentView);
        popupWindow.setFocusable(true);
        popupWindow.showAsDropDown(btn_1);
    }
}
分析代码:从第30行到第35行的代码,为 btn_1 设置事件监听器。实现点击 btn_1 就调用自定义函数 showPopupWindow () ,从而弹出 PopupWindow 。
从第39行到52行的代码是自定义函数 showPopupWindow () 的函数体。从第39行到第41行的代码,是创建 PopupWindow 的必不可少的代码,因为创建 PopupWindow 的同时必须为其声明 width 、height 的属性值。第42行的代码用来动态加载布局,把名为 popupwindow 的 XML 布局文件转换成 View 对象。第43行到第46行的代码用来给 ListView 创建数据。因为我在这里为了降低案例的难度,所以只使用了 ListView 的 ArrayAdapter 数组适配器,ArrayAdapter 的构造方法需要三个参数:Context 上下文、int 类型的 resource 布局资源文件 id 和 数组名。第49行代码用来给 ListView 绑定适配器,因为初学者特别容易忘记在创建 Adapter 的对象后还需要给 ListView 绑定 Adapter ,所以需要特别注意这一步。
第50行代码用来给 PopupWindow 填充我们刚刚动态加载的布局文件,因为 PopupWindow 里没有默认的布局,所以这一步也很重要、需要熟记。第51行的代码用来让 PopupWindow 获取 focus ,我们在屏幕弹出悬浮框之后,点击 PopupWindow 之外的屏幕区域,屏幕上的 PopupWindow 就会消失。第52行的代码也非常重要,调用 PopupWindow 的 showAsDropDown () 方法,用来弹出 PopupWindow 并且显示在屏幕上。给 PopupWindow 设置的布局文件 popupwindow 的代码如下所示:
<?xml version="1.0" encoding="utf-8"?>
<LinearLayout xmlns:android="http://schemas.android.com/apk/res/android"
    android:layout_width="match_parent"
    android:layout_height="match_parent"
    android:background="#FFFFFF"
    android:gravity="center"
    android:orientation="vertical">

    <ListView
        android:id="@+id/lv_1"
        android:layout_width="match_parent"
        android:layout_height="match_parent"
        android:divider="@null" />

</LinearLayout>


 本文介绍了如何在Android应用中结合PopupWindow和ListView实现弹出滑动列表的效果。首先,阐述了PopupWindow作为浮动窗口和ListView作为列表视图的基本概念。接着,详细说明了实现弹出滑动列表的思路,包括将ListView布局嵌入PopupWindow,为Button设置监听事件以弹出PopupWindow。最后,提供了具体的布局和Java代码示例,详细解析了实现过程中的关键步骤,如设置事件监听器、创建PopupWindow、绑定Adapter以及显示PopupWindow的方法。


 307
307

 被折叠的 条评论
为什么被折叠?


