


 本文详细介绍如何在SpringBoot项目中整合Redis实现注解式缓存,包括依赖配置、yml配置、注解使用及JSON序列化器创建,同时讲解缓存过期时间配置。
SpringBoot整合redis及其注解式开发
1.SpringBoot整合redis注解式简单开发
步骤如下:
①导入pom依赖
  <!--redis依赖配置-->
        <dependency>
            <groupId>org.springframework.boot</groupId>
            <artifactId>spring-boot-starter-data-redis</artifactId>
        </dependency>
②添加yml配置,在spring下添加
spring:
  redis:
    host:192.168.190.0  # Redis服务器地址
    database: 0 # Redis数据库索引(默认为0)
    port: 6379 # Redis服务器连接端口
    password: 1234 # Redis服务器连接密码(默认为空)
    jedis:
      pool:
        max-active: 8 # 连接池最大连接数(使用负值表示没有限制)
        max-wait: -1ms # 连接池最大阻塞等待时间(使用负值表示没有限制)
        max-idle: 8 # 连接池中的最大空闲连接
        min-idle: 0 # 连接池中的最小空闲连接
    timeout: 3000ms # 连接超时时间(毫秒)

  cache: #缓存类型为redis
    type: redis
    redis:
      cache-null-values: false  #是否存储空值
      time-to-live: 600000ms #设置过期时间
③直接在数据处理层service接口的实现类中加入注解就可以实现缓存啦
直接上代码
package com.bobi.dz.robot.service.impl;


import com.bobi.dz.mbg.mapper.AgvdevdaoMapper;
import com.bobi.dz.mbg.model.Agvdevdao;
import com.bobi.dz.robot.service.AGVDevDaoService;
import com.github.pagehelper.PageHelper;
import org.springframework.beans.factory.annotation.Autowired;
import org.springframework.cache.annotation.CacheEvict;
import org.springframework.cache.annotation.Cacheable;
import org.springframework.stereotype.Service;

import java.util.List;


@Service
public class AGVDevDaoServiceImpl implements AGVDevDaoService {
    @Autowired
    private AgvdevdaoMapper agvDevDaoMapper;


    @CacheEvict(value = "AGVDevDao",allEntries = true)
    @Override
    public int deleteByPrimaryKey(String agvId) {
        return agvDevDaoMapper.deleteByPrimaryKey(agvId);
    }


    @CacheEvict(value="AGVDevDao",key = "'selectAll'")
    @Override
    public int insert(Agvdevdao record) {
        return agvDevDaoMapper.insertSelective(record);
    }

    @CacheEvict(value = "AGVDevDao",allEntries = true)
    @Override
    public int updateByPrimaryKey(Agvdevdao record) {
        return agvDevDaoMapper.updateByPrimaryKeySelective(record);
    }

    @Cacheable(value="AGVDevDao",key = "'selectAll'")
    @Override
    public List<Agvdevdao> selectAll(Integer pageNum,Integer pageSize) {
        PageHelper.startPage(pageNum, pageSize);
        List<Agvdevdao> list = agvDevDaoMapper.selectAll();
        return list;
    }

    @Cacheable(value="AGVDevDao",key = "'selectByPrimaryKey'+#agvId")
    @Override
    public Agvdevdao selectByPrimaryKey(String agvId) {
        System.out.println("查询机器人信息。。。。。");
        return agvDevDaoMapper.selectByPrimaryKey(agvId);
    }
}
代码解释图
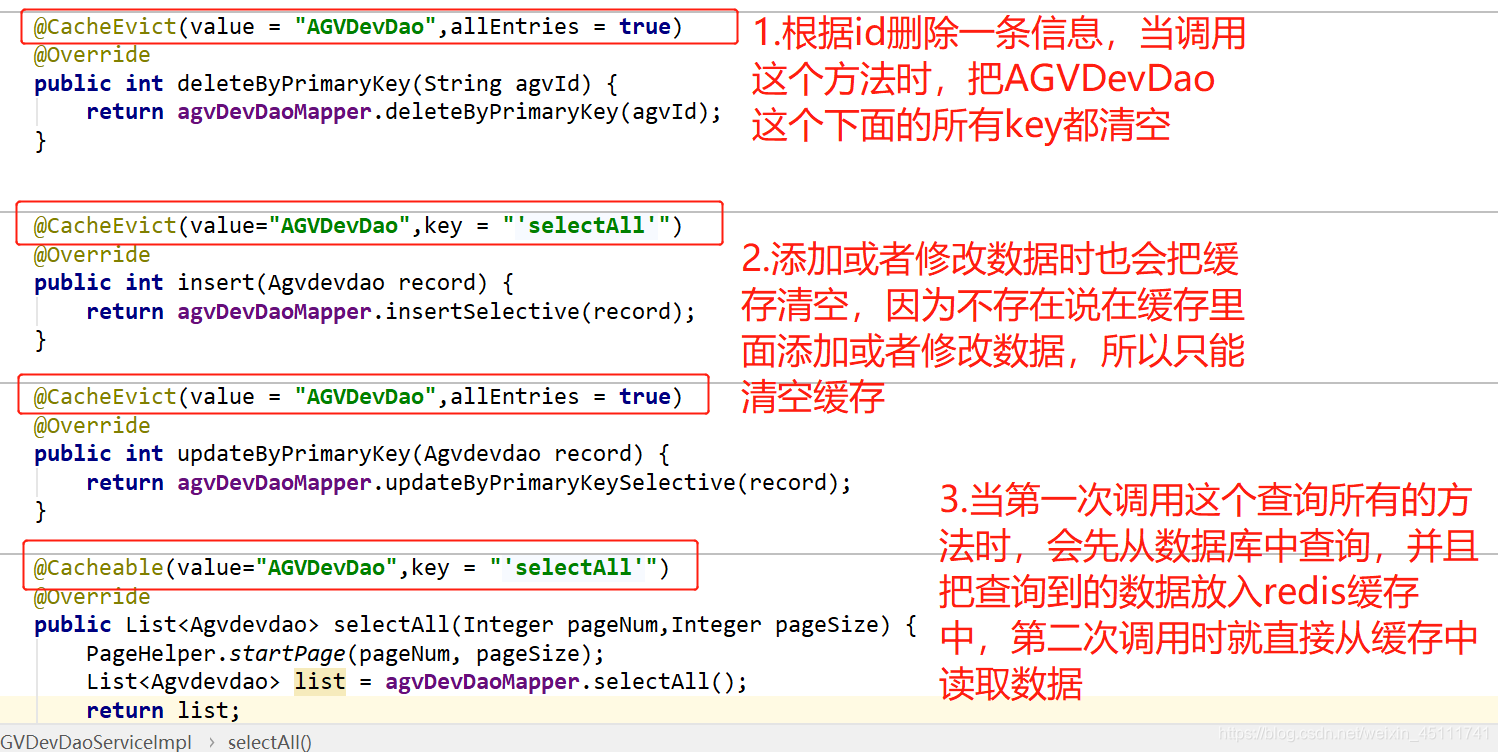
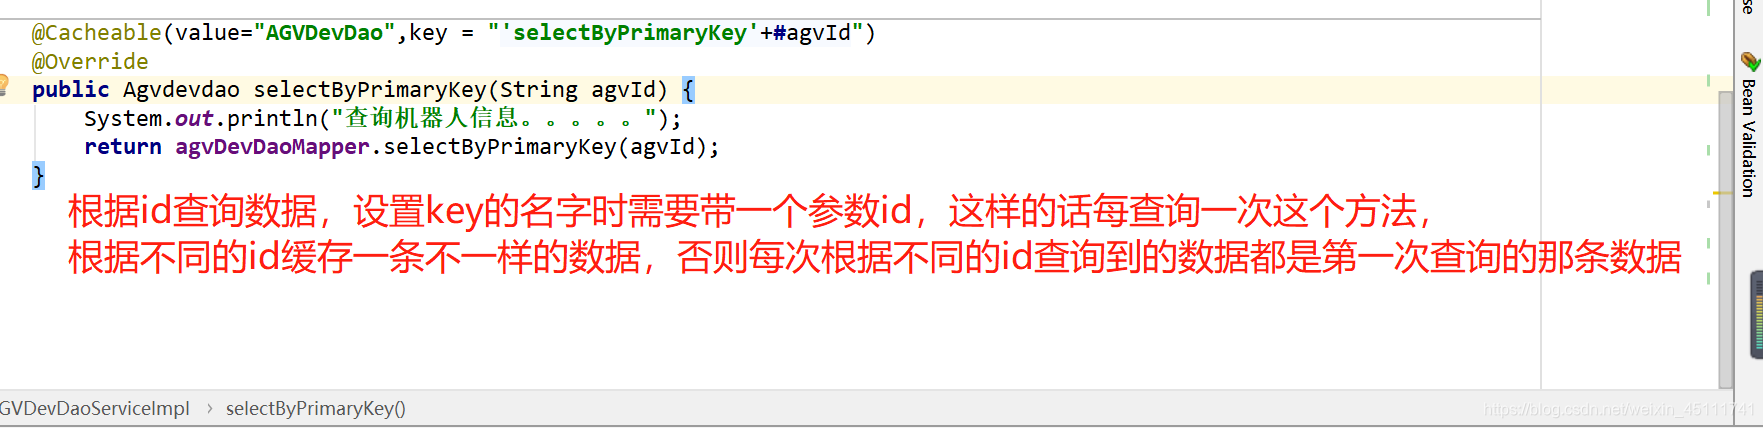
如果需要有多个参数的话,可以直接在key的名字后面拼接参数,用一个符号隔开就行

以上就是一个简单的使用redis缓存的流程啦
因为redis是以序列化的形式来缓存的,所以如果需要实现缓存,比较重要的一步就是返回的结果的对象需要实现序列化接口。
但是这是IO式的序列化,看不着实际的内容,像乱码一样
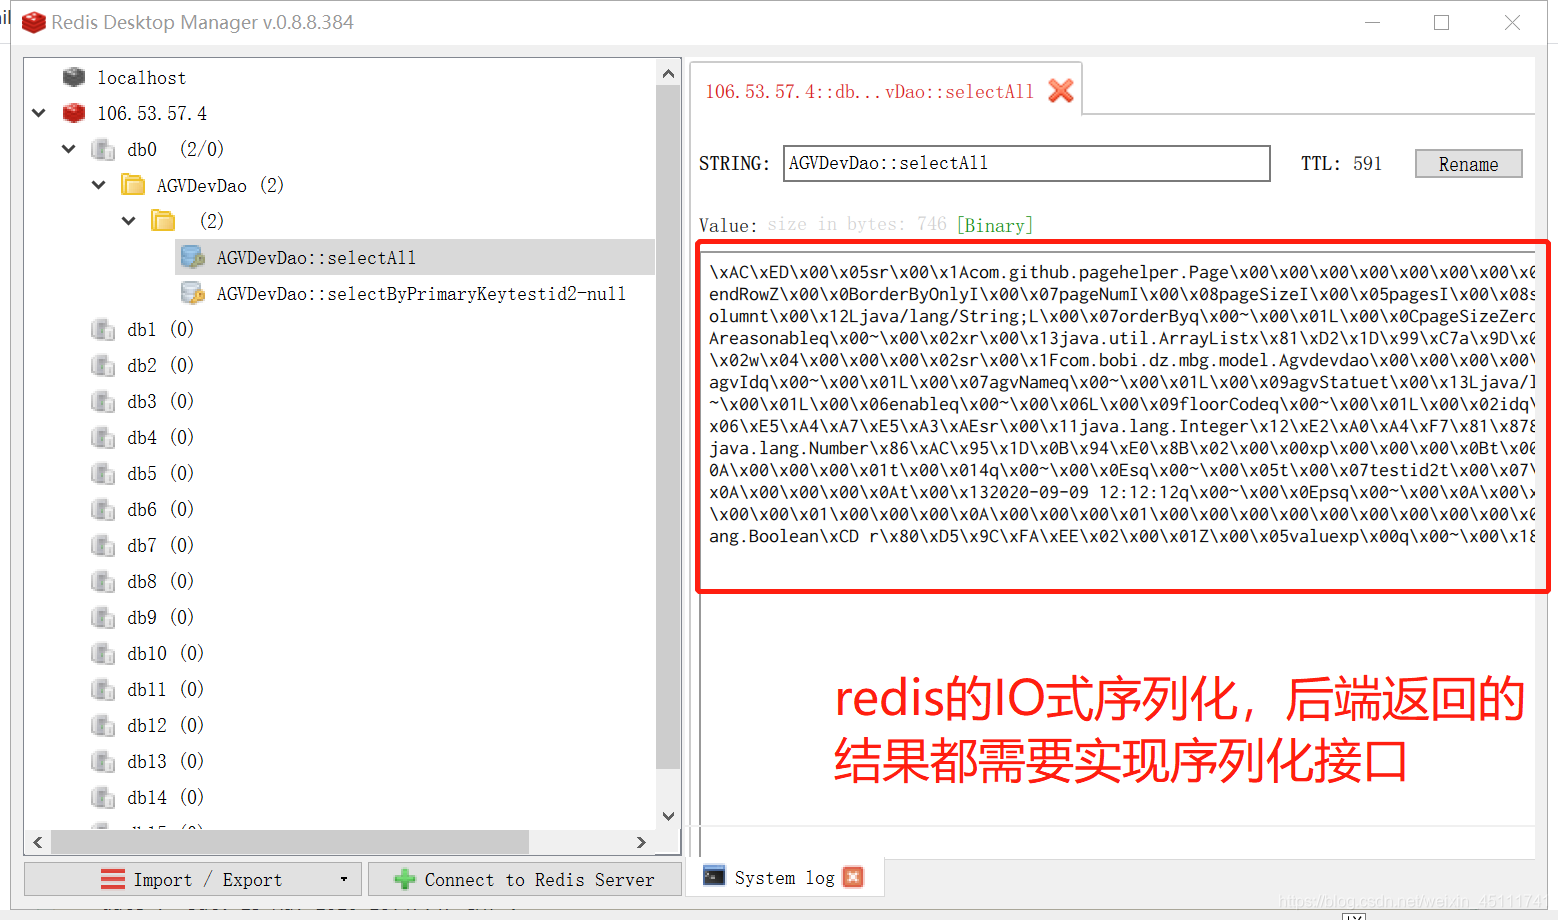
下面我们需要创建JSON序列化器
2.创建redis配置类RedisConfig
package com.bobi.dz.robot.service.config;
import com.fasterxml.jackson.annotation.JsonAutoDetect;
import com.fasterxml.jackson.annotation.PropertyAccessor;
import com.fasterxml.jackson.databind.ObjectMapper;
import org.springframework.cache.CacheManager;
import org.springframework.cache.annotation.CachingConfigurerSupport;
import org.springframework.cache.annotation.EnableCaching;
import org.springframework.cache.interceptor.KeyGenerator;
import org.springframework.context.annotation.Bean;
import org.springframework.context.annotation.Configuration;
import org.springframework.data.redis.cache.RedisCacheConfiguration;
import org.springframework.data.redis.cache.RedisCacheManager;
import org.springframework.data.redis.cache.RedisCacheWriter;
import org.springframework.data.redis.connection.RedisConnectionFactory;
import org.springframework.data.redis.core.RedisTemplate;
import org.springframework.data.redis.core.StringRedisTemplate;
import org.springframework.data.redis.serializer.Jackson2JsonRedisSerializer;
import org.springframework.data.redis.serializer.RedisSerializationContext;
import org.springframework.data.redis.serializer.RedisSerializer;
import org.springframework.data.redis.serializer.StringRedisSerializer;
import java.lang.reflect.Method;
import java.time.Duration;
import java.util.HashMap;
import java.util.HashSet;
import java.util.Map;
import java.util.Set;
/**
* Redis配置类
* Created by macro on 2020/3/2.
*/
@EnableCaching
@Configuration
//继承CachingConfigurerSupport,为了自定义生成KEY的策略。可以不继承。
public class RedisConfig extends CachingConfigurerSupport {
@Bean
public RedisTemplate<String, Object> redisTemplate(RedisConnectionFactory redisConnectionFactory) {
RedisSerializer<Object> serializer = redisSerializer();
RedisTemplate<String, Object> redisTemplate = new RedisTemplate<>();
redisTemplate.setConnectionFactory(redisConnectionFactory);
redisTemplate.setKeySerializer(new StringRedisSerializer());
redisTemplate.setValueSerializer(serializer);
redisTemplate.setHashKeySerializer(new StringRedisSerializer());
redisTemplate.setHashValueSerializer(serializer);
redisTemplate.afterPropertiesSet();
return redisTemplate;
}
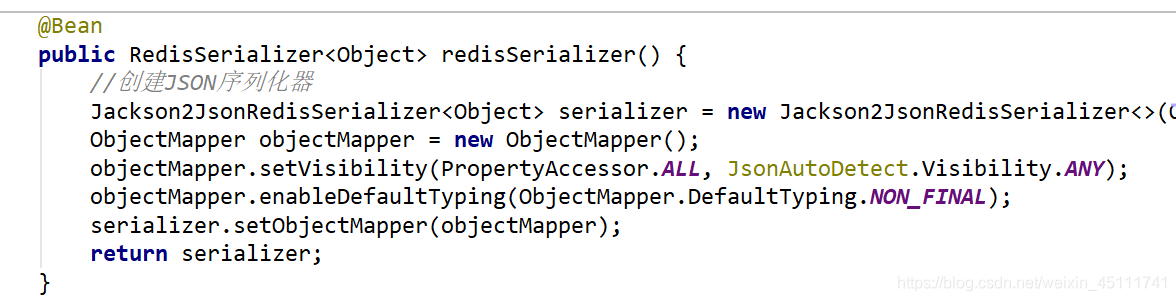
@Bean
public RedisSerializer<Object> redisSerializer() {
//创建JSON序列化器
Jackson2JsonRedisSerializer<Object> serializer = new Jackson2JsonRedisSerializer<>(Object.class);
ObjectMapper objectMapper = new ObjectMapper();
objectMapper.setVisibility(PropertyAccessor.ALL, JsonAutoDetect.Visibility.ANY);
objectMapper.enableDefaultTyping(ObjectMapper.DefaultTyping.NON_FINAL);
serializer.setObjectMapper(objectMapper);
return serializer;
}
@Bean
public RedisCacheManager redisCacheManager(RedisConnectionFactory redisConnectionFactory) {
RedisCacheWriter redisCacheWriter = RedisCacheWriter.nonLockingRedisCacheWriter(redisConnectionFactory);
//设置Redis缓存有效期为1天
RedisCacheConfiguration redisCacheConfiguration = RedisCacheConfiguration.defaultCacheConfig()
.serializeValuesWith(RedisSerializationContext.SerializationPair.fromSerializer(redisSerializer())).entryTtl(Duration.ofDays(1));
return new RedisCacheManager(redisCacheWriter, redisCacheConfiguration);
}
//
// @Bean
// public CacheManager cacheManager(RedisConnectionFactory redisConnectionFactory) {
// //通过Spring提供的RedisCacheConfiguration类,构造一个自己的redis配置类,从该配置类中可以设置一些初始化的缓存命名空间
// // 及对应的默认过期时间等属性,再利用RedisCacheManager中的builder.build()的方式生成cacheManager:
// RedisCacheConfiguration config = RedisCacheConfiguration.defaultCacheConfig(); // 生成一个默认配置,通过config对象即可对缓存进行自定义配置
// config = config.entryTtl(Duration.ofMinutes(1)) // 设置缓存的默认过期时间,也是使用Duration设置
// .disableCachingNullValues(); // 不缓存空值
//
// // 设置一个初始化的缓存空间set集合
// Set<String> cacheNames = new HashSet<>();
// cacheNames.add("my-redis-cache1");
// cacheNames.add("my-redis-cache2");
//
// // 对每个缓存空间应用不同的配置
// Map<String, RedisCacheConfiguration> configMap = new HashMap<>();
// configMap.put("my-redis-cache1", config);
// configMap.put("my-redis-cache2", config.entryTtl(Duration.ofSeconds(120)));
//
// RedisCacheManager cacheManager = RedisCacheManager.builder(redisConnectionFactory) // 使用自定义的缓存配置初始化一个cacheManager
// .initialCacheNames(cacheNames) // 注意这两句的调用顺序,一定要先调用该方法设置初始化的缓存名,再初始化相关的配置
// .withInitialCacheConfigurations(configMap)
// .build();
// return cacheManager;
// }
}
只要创建RedisConfig配置类,在配置类中创建json序列化器,那么就会覆盖掉IO式序列化,并且对象可以不需要实现序列化接口了(之前不实现序列化接口的话会报错)
缓存过期时间配置
当我们有多个缓存空间时,我们想给每个缓存设置不同的过期时间的话,需要在RedisConfig中
对每个缓存空间应用不同的配置
    @Bean
    public CacheManager cacheManager(RedisConnectionFactory redisConnectionFactory) {
        //通过Spring提供的RedisCacheConfiguration类,构造一个自己的redis配置类,从该配置类中可以设置一些初始化的缓存命名空间
        // 及对应的默认过期时间等属性,再利用RedisCacheManager中的builder.build()的方式生成cacheManager:
        RedisCacheConfiguration config = RedisCacheConfiguration.defaultCacheConfig();  // 生成一个默认配置,通过config对象即可对缓存进行自定义配置
        config = config.entryTtl(Duration.ofMinutes(1))     // 设置缓存的默认过期时间,也是使用Duration设置
                .disableCachingNullValues();     // 不缓存空值

        // 设置一个初始化的缓存空间set集合
        Set<String> cacheNames = new HashSet<>();
        cacheNames.add("my-redis-cache1");
        cacheNames.add("my-redis-cache2");

        // 对每个缓存空间应用不同的配置
        Map<String, RedisCacheConfiguration> configMap = new HashMap<>();
        configMap.put("my-redis-cache1", config);
        configMap.put("my-redis-cache2", config.entryTtl(Duration.ofSeconds(120)));

        RedisCacheManager cacheManager = RedisCacheManager.builder(redisConnectionFactory)     // 使用自定义的缓存配置初始化一个cacheManager
                .initialCacheNames(cacheNames)  // 注意这两句的调用顺序,一定要先调用该方法设置初始化的缓存名,再初始化相关的配置
                .withInitialCacheConfigurations(configMap)
                .build();
        return cacheManager;
    }


 被折叠的 条评论
为什么被折叠?
被折叠的 条评论
为什么被折叠?
 到【灌水乐园】发言


