


 本文详细介绍了Redis集群中的数据分区策略,包括客户端分区、代理分区和查询路由,以及它们的优缺点。重点讨论了RedisCluster的哈希槽分区,通过创建和操作RedisCluster演示了数据分配和槽位移动。此外,还提到了一致性哈希和hashtag在数据分布中的作用,以及Predixy作为代理如何支持Redis Sentinel和Cluster。最后,文章展示了如何手动调整槽位以优化集群数据分布。
Redis集群第二篇之数据分区
上篇我们提到,redis单机会存在三个问题
- 单点故障
- 容量有限
- 压力过大
通过哨兵(Sentinel),我们可以解决其中两个问题(单点故障和压力过大),但是容量有限的问题怎么解决呢?
首先我们可以通过业务逻辑将数据拆分给不同的redis(商品类、购物车类等),如果根据业务逻辑拆分以后还是很大呢?
那么就需要数据分区:
不同的分区实现方案
- 客户端分区就是在客户端就已经决定数据会被存储到哪个redis节点或者从哪个redis节点读取。大多数客户端已经实现了客户端分区。
- 代理分区 意味着客户端将请求发送给代理,然后代理决定去哪个节点写数据或者读数据。代理根据分区规则决定请求哪些Redis实例,然后根据Redis的响应结果返回给客户端。redis和memcached的一种代理实现就是Twemproxy
- 查询路由 的意思是客户端随机地请求任意一个redis实例,然后由Redis将请求转发给正确的Redis节点。Redis Cluster实现了一种混合形式的查询路由,但并不是直接将请求从一个redis节点转发到另一个redis节点,而是在客户端的帮助下直接redirected到正确的redis节点。
客户端分区:
modula:通过hash算法+取模,取模的数量取决于redis实例的数量。

缺点:取模的值是固定的,如果新增了redis实例,模数值会变化,去对应的redis取值会取不到。
random:通过随机的方式给redis。

缺点:因为是随机放到redis里的,也存在取值取不到的问题,但也有使用场景(消息队列):放list类型的值,通过lpush放,另外一个客户端lpop取值
kemata:一致性哈希(哈希环),应用于数据的分布式存储,在增删节点之间,能够尽可能少的迁移数据,保证多数数据的一致性,
更倾向于将redis作为缓存使用而不是数据库。

如上图,在这个哈希环中有0~2^32个虚拟的点,redisA通过计算后在A点,redisB通过计算后在B点,
当data数据进来的时候,通过同样的计算方式映射到了D点,那么就将它存在离它最近的redis A服务器中。
但是当新增一个redis服务器,经过映射后正好在A点和D点之间呢?就会造成C点到D点之间的数据再查询时
查不到,因为它们在redis A服务器中,但是查询时是去redis C服务器中查了。

优点:新增节点可以分担其他节点的压力,不会造成所有数据全部洗牌。
缺点:新增节点会造成一小部分数据无法命中(如图中C点到D点之间的数据),造成击穿,访问压到数据库上。
解决方法:取值时如取不到,则去离它最近的第二个节点上取值。
基于客户端分区的弊端:客户端过多时造成redis服务器压力过大,所以需要在客户端和服务端之间加代理层,由代理层去做(modula、random或者ketama)
代理分区:
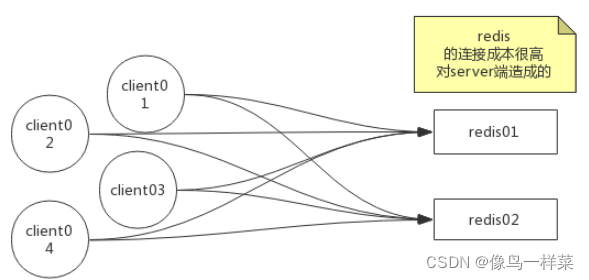
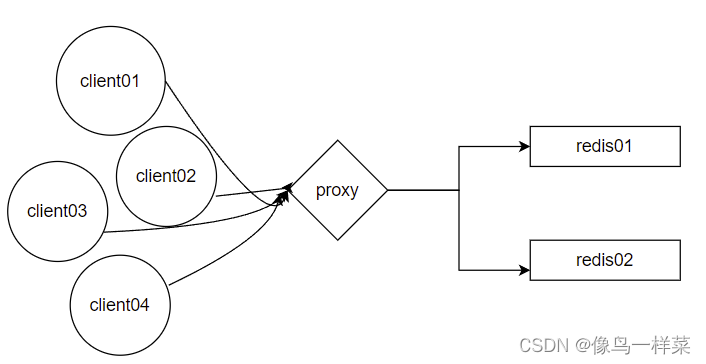
github上有众多开源的redis代理,如twemproxy、predixy、codis、redis-cerberus
对比:
| 特性 | predixy | twemproxy | codis | redis-cerberus |
|---|---|---|---|---|
| 高可用 | Redis Sentinel或Redis Cluster | 一致性哈希 | Redis Sentinel | Redis Cluster |
| 可扩展 | Key哈希分布或Redis Cluster | Key哈希分布 | Key哈希分布 | Redis Cluster |
| 开发语言 | C++ | C | GO | C++ |
| 多线程 | 是 | 否 | 是 | 是 |
| 事务 | Redis Sentinel模式单Redis组下支持 | 不支持 | 不支持 | 不支持 |
| BLPOP/BRPOP/BLPOPRPUSH | 支持 | 不支持 | 不支持 | 支持 |
| Pub/Sub | 支持 | 不支持 | 不支持 | 支持 |
| Script | 支持load | 不支持 | 不支持 | 不支持 |
| Scan | 支持 | 不支持 | 不支持 | 不支持 |
| Select DB | 支持 | 不支持 | 支持 | Redis Cluster只有一个DB |
| Auth | 支持定义多个密码,给予不同读写及管理权限和Key访问空间 | 不支持 | 同redis | 不支持 |
| 读从节点 | 支持,可定义丰富规则读指定的从节点 | 不支持 | 支持,简单规则 | 支持,简单规则 |
| 多机房支持 | 支持,可定义丰富规则调度流量 | 不支持 | 有限支持 | 有限支持 |
| 统计信息 | 丰富 | 丰富 | 丰富 | 简单 |
三种模式:modula、random、kemata
这三种模式都有一个弊端:新增或删除节点会影响数据,不能做数据库用
查询路由:
通过预分区来解决以上弊端,引入了哈希槽的概念:

redis cluster有16384个哈希槽,每个key通过CRC16校验后对16384取模来决定放置哪个槽.集群的每个节点负责一部分hash槽。
当新增一个节点时,只需要将其他槽位分一部分到新的节点上去,就可以完成集群的扩展,由于从一个节点将哈希槽移动到另一个节点并不会停止服务,所以无论添加删除或者改变某个节点的哈希槽的数量都不会造成集群不可用的状态。

Redis-Cluster采用无中心结构(无主模型),每个节点保存数据和整个集群状态,每个节点都和其他所有节点连接。
其结构特点:
- 所有的redis节点彼此互联(PING-PONG机制),内部使用二进制协议优化传输速度和带宽。
- 节点的fail是通过集群中超过半数的节点检测失效时才生效。
- 客户端与redis节点直连,不需要中间proxy层.客户端不需要连接集群所有节点,连接集群中任何一个可用节点即可。
- redis-cluster把所有的物理节点映射到[0-16383]slot上(不一定是平均分配),cluster 负责维护node<->slot<->value。
- Redis集群预分好16384个槽位,当需要在 Redis 集群中放置一个 key-value 时,根据 CRC16(key) mod 16384的值,决定将一个key放到哪个槽位中。
但是数据一旦分治,聚合操作就难以实现,开启事务处理不在同一个节点上的key也难以实现。
如何解决这个问题,我们要人为的将数据分到同一个节点上,这时候需要引入hash tag概念。
hash tag:主要作用是将某一固定特征数据存储到一台实例上,避免逐个查询集群中实例。
实现方式为在key中加个{},例如{1}key1。使用hash tag后客户端在计算key的crc16时,只计算{}中数据。如果没使用hash tag,客户端会对整个key进行crc16计算。
predixy:
-
新建predixy目录,在github上下载编译好的文件,并解压
[root@djh redis]# mkdir predixy/
[root@djh redis]# cd predixy/
[root@djh redis]# wget https://github.com/joyieldInc/predixy/releases/download/1.0.5/predixy-1.0.5-bin-amd64-linux.tar.gz
[root@djh predixy]# tar xf predixy-1.0.5-bin-amd64-linux.tar.gz
如果下载速度过慢可以替换为此加速地址:https://github.91chi.fun//https://github.com//joyieldInc/predixy/releases/download/1.0.5/predixy-1.0.5-bin-amd64-linux.tar.gz
-
解压后进入
[root@djh predixy]# cd predixy-1.0.5 [root@djh predixy-1.0.5]# ll 总用量 36 drwxrwxr-x 2 501 501 4096 10月 20 2018 bin drwxrwxr-x 2 501 501 4096 10月 20 2018 conf drwxrwxr-x 3 501 501 4096 10月 20 2018 doc -rw-rw-r-- 1 501 501 1537 10月 20 2018 LICENSE -rw-rw-r-- 1 501 501 5680 10月 20 2018 README_CN.md -rw-rw-r-- 1 501 501 4200 10月 20 2018 README.md drwxrwxr-x 2 501 501 4096 10月 20 2018 test [root@djh predixy-1.0.5]# cd conf/ [root@djh conf]# ll 总用量 36 -rw-rw-r-- 1 501 501 2395 10月 20 2018 auth.conf -rw-rw-r-- 1 501 501 1041 10月 20 2018 cluster.conf #redis cluster的配置 -rw-rw-r-- 1 501 501 3426 10月 20 2018 command.conf -rw-rw-r-- 1 501 501 781 10月 20 2018 dc.conf -rw-rw-r-- 1 501 501 2121 10月 20 2018 latency.conf -rw-rw-r-- 1 501 501 2547 10月 20 2018 predixy.conf #自己的配置 -rw-rw-r-- 1 501 501 1421 10月 20 2018 sentinel.conf #哨兵的配置 -rw-rw-r-- 1 501 501 2016 10月 20 2018 standalone.conf -rw-rw-r-- 1 501 501 98 10月 20 2018 try.conf -
开始搭建基于哨兵的集群:
[root@djh conf]# vi predixy.conf
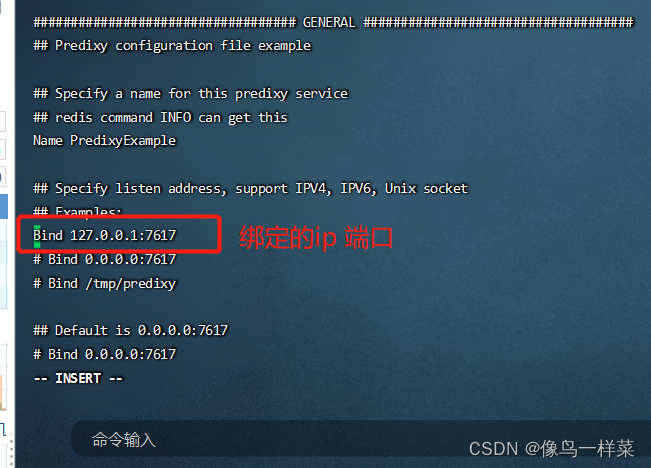

完成后保存退出。
- 修改sentinel.conf

完成后保存退出。
-
修改好以后开始准备启动哨兵,修改哨兵配置文件
[root@djh conf]# cd
[root@djh ~]# cd test/
#上一篇博客中讲解时创建的文件
[root@djh test]# ll
总用量 264
-rw-r--r-- 1 root root   606 4月  11 01:21 26379.conf
-rw-r--r-- 1 root root   606 4月  11 01:21 26380.conf
-rw-r--r-- 1 root root   606 4月  11 01:21 26381.conf
-rw-r--r-- 1 root root 83474 4月  10 17:45 6379.conf
-rw-r--r-- 1 root root 83556 4月  11 01:21 6380.conf
-rw-r--r-- 1 root root 83531 4月  11 01:21 6381.conf
[root@djh test]# vi 26379.conf   #第一个哨兵的配置文件

-
修改26380.conf
port 26380   #第二个哨兵的配置文件
sentinel monitor shard001 127.0.0.1 36379 2
sentinel monitor shard002 127.0.0.1 46379 2
修改26381.conf
port 26381 #第三个哨兵的配置文件 sentinel monitor shard001 127.0.0.1 36379 2 sentinel monitor shard002 127.0.0.1 46379 2 -
开启三个客户端,启动三个哨兵
#客户端1 [root@djh test]# redis-server 26379.conf --sentinel #客户端2 [root@djh test]# redis-server 26380.conf --sentinel #客户端3 [root@djh test]# redis-server 26381.conf --sentinel -
另起一个客户端启动shard001第一套主从复制集群的master
[root@djh test]# mkdir 36379 [root@djh test]# mkdir 36380 [root@djh test]# mkdir 46379 [root@djh test]# mkdir 46380 [root@djh test]# ll 总用量 280 -rw-r--r-- 1 root root 443 4月 16 22:03 26379.conf -rw-r--r-- 1 root root 443 4月 16 22:03 26380.conf -rw-r--r-- 1 root root 443 4月 16 22:04 26381.conf drwxr-xr-x 2 root root 4096 4月 16 22:07 36379 drwxr-xr-x 2 root root 4096 4月 16 22:07 36380 drwxr-xr-x 2 root root 4096 4月 16 22:07 46379 drwxr-xr-x 2 root root 4096 4月 16 22:07 46380 -rw-r--r-- 1 root root 83474 4月 10 17:45 6379.conf -rw-r--r-- 1 root root 83556 4月 11 01:21 6380.conf -rw-r--r-- 1 root root 83531 4月 11 01:21 6381.conf [root@djh test]# cd 36379/ [root@djh 36379]# redis-server --port 36379 -
再启动shard001的slave
[root@djh ~]# cd test/ [root@djh test]# cd 36380/ [root@djh 36380]# redis-server --port 36380 --replicaof 127.0.0.1 36379 #启动时追随127.0.0.1 36379 -
启动shard002第二套主从复制集群的master
[root@djh ~]# cd test/ [root@djh test]# cd 46379/ [root@djh 46379]# redis-server --port 46379 -
再启动shard002的slave
[root@djh 46380]# redis-server --port 46380 --replicaof 127.0.0.1 46379 -
此时两套主从复制集群启动完成
-
新启一个客户端准备启动predixy
[root@djh redis]# cd predixy/
[root@djh predixy]# cd predixy-1.0.5
[root@djh predixy-1.0.5]# cd bin/
[root@djh bin]# ./predixy ../conf/predixy.conf   #根据predixy的配置文件启动
2022-04-16 22:32:19.769785 N Proxy.cpp:112 predixy listen in 127.0.0.1:7617
2022-04-16 22:32:19.769915 N Proxy.cpp:143 predixy running with Name:PredixyExample Workers:1
2022-04-16 22:32:19.770101 N Handler.cpp:454 h 0 create connection pool for server 127.0.0.1:26381
2022-04-16 22:32:19.770130 N ConnectConnectionPool.cpp:42 h 0 create server connection 127.0.0.1:26381 5
2022-04-16 22:32:19.770250 N Handler.cpp:454 h 0 create connection pool for server 127.0.0.1:26380
2022-04-16 22:32:19.770273 N ConnectConnectionPool.cpp:42 h 0 create server connection 127.0.0.1:26380 6
2022-04-16 22:32:19.770333 N Handler.cpp:454 h 0 create connection pool for server 127.0.0.1:26379
2022-04-16 22:32:19.770346 N ConnectConnectionPool.cpp:42 h 0 create server connection 127.0.0.1:26379 7
2022-04-16 22:32:19.770784 N StandaloneServerPool.cpp:422 sentinel server pool group shard001 create master server 127.0.0.1:36379
2022-04-16 22:32:19.770917 N StandaloneServerPool.cpp:472 sentinel server pool group shard001 create slave server 127.0.0.1:36380
2022-04-16 22:32:19.770932 N StandaloneServerPool.cpp:422 sentinel server pool group shard002 create master server 127.0.0.1:46379
2022-04-16 22:32:19.770945 N StandaloneServerPool.cpp:472 sentinel server pool group shard002 create slave server 127.0.0.1:46380
启动后可以看到,已经可以发现两套主从(shard001、shard002),也可以看到predixy的端口号为7617,客户端只需要连接predixy即可。
-
测试一下:启动一个客户端,连接predixy
[root@djh ~]# redis-cli -p 7617 127.0.0.1:7617> set k1 hello OK 127.0.0.1:7617> get k1 "hello" 127.0.0.1:7617> set k2 world OK 127.0.0.1:7617> get k2 "world" 127.0.0.1:7617> -
我们直接连接redis实例看一下数据分配到哪里去了
[root@djh ~]# redis-cli -p 36379 127.0.0.1:36379> keys * 1) "k1" 127.0.0.1:36379> [root@djh ~]# redis-cli -p 46379 127.0.0.1:36379> keys * 1) "k2" 127.0.0.1:36379> #可以看到数据已经分配到了不同的集群中 -
也可以通过hash tag将key强制放到同一个节点中
[root@djh ~]# redis-cli -p 7617 127.0.0.1:7617> set {oo}k3 nihao OK 127.0.0.1:7617> set {oo}k4 wohao OK -
我们去查看一下
[root@djh ~]# redis-cli -p 46379
127.0.0.1:46379> keys *
1) "{oo}k3"
2) "{oo}k4"
3) "k2"
127.0.0.1:46379>
但是此时predixy是不支持事务的,predixy的事务在Redis Sentinel模式单Redis组下支持,上述是多组(多套主从)
可以在predixy.conf文件中删掉group shard002,这时数据只会在group shard001中写入,也就支持事务了
当master挂掉以后,slave会投票选出master接替
以上集群结构如下图:

predixy既支持Redis Sentinel也支持Redis Cluster
- 后端为Redis Sentinel监控的一组Redis,功能完全等同于原始Redis
- 后端为Redis Sentinel监控的多组Redis,则有部分功能受限
- 后端为Redis Cluster,功能完全等同于Redis Cluster
redis cluster:
-
在redis的安装目录下看cluster的脚本
[root@djh /]# cd /usr/djh/redis/redis-6.0.6/utils/create-cluster/ [root@djh create-cluster]# ll 总用量 8 -rwxrwxr-x 1 root root 2694 7月 21 2020 create-cluster -rw-rw-r-- 1 root root 1436 7月 21 2020 README [root@djh create-cluster]# vi create-cluster #配置文件内容 # Settings BIN_PATH="../../src/" CLUSTER_HOST=127.0.0.1 PORT=30000 TIMEOUT=2000 NODES=6 #节点数 REPLICAS=1 #副本数。副本数为1,节点数是6,也就是3主3从,每个主有一个slave PROTECTED_MODE=yes ADDITIONAL_OPTIONS="" -
启动这6个实例,端口分别为30001~30006
[root@djh create-cluster]# ./create-cluster start Starting 30001 Starting 30002 Starting 30003 Starting 30004 Starting 30005 Starting 30006 -
每个节点开始分槽位
[root@djh create-cluster]# ./create-cluster create >>> Performing hash slots allocation on 6 nodes... Master[0] -> Slots 0 - 5460 #master0分到0-5460槽位 Master[1] -> Slots 5461 - 10922 #master1分到5461-10922槽位 Master[2] -> Slots 10923 - 16383 #master2分到10923-16383槽位 Adding replica 127.0.0.1:30005 to 127.0.0.1:30001 #slave 30005追随30001 Adding replica 127.0.0.1:30006 to 127.0.0.1:30002 #slave 30006追随30002 Adding replica 127.0.0.1:30004 to 127.0.0.1:30003 #slave 30004追随30003 >>> Trying to optimize slaves allocation for anti-affinity [WARNING] Some slaves are in the same host as their master M: 191fa2471c7775a2e4deb73a94be7a15aca8f94d 127.0.0.1:30001 #主的ID号以及地址 slots:[0-5460] (5461 slots) master #槽位的范围以及数量 M: f702f1abd28a697133668ef2e3a26c07846365e8 127.0.0.1:30002 slots:[5461-10922] (5462 slots) master M: 200ff9819aeac0a0213fff37d2b75f847222e840 127.0.0.1:30003 slots:[10923-16383] (5461 slots) master S: 49e4456e74509e5bcddc900edf7ad482b9e79d3f 127.0.0.1:30004 #从的ID号以及地址 replicates 191fa2471c7775a2e4deb73a94be7a15aca8f94d #所追随的主的ID号 S: 5b207c87d61693c6e40291febc9b8b4a2268369e 127.0.0.1:30005 replicates f702f1abd28a697133668ef2e3a26c07846365e8 S: 111768f4abd4430a0e5169249ad285bdddd1d4fe 127.0.0.1:30006 replicates 200ff9819aeac0a0213fff37d2b75f847222e840 Can I set the above configuration? (type 'yes' to accept): yes >>> Nodes configuration updated >>> Assign a different config epoch to each node >>> Sending CLUSTER MEET messages to join the cluster Waiting for the cluster to join >>> Performing Cluster Check (using node 127.0.0.1:30001) M: 191fa2471c7775a2e4deb73a94be7a15aca8f94d 127.0.0.1:30001 slots:[0-5460] (5461 slots) master 1 additional replica(s) S: 111768f4abd4430a0e5169249ad285bdddd1d4fe 127.0.0.1:30006 slots: (0 slots) slave replicates 200ff9819aeac0a0213fff37d2b75f847222e840 M: 200ff9819aeac0a0213fff37d2b75f847222e840 127.0.0.1:30003 slots:[10923-16383] (5461 slots) master 1 additional replica(s) S: 49e4456e74509e5bcddc900edf7ad482b9e79d3f 127.0.0.1:30004 slots: (0 slots) slave replicates 191fa2471c7775a2e4deb73a94be7a15aca8f94d M: f702f1abd28a697133668ef2e3a26c07846365e8 127.0.0.1:30002 slots:[5461-10922] (5462 slots) master 1 additional replica(s) S: 5b207c87d61693c6e40291febc9b8b4a2268369e 127.0.0.1:30005 slots: (0 slots) slave replicates f702f1abd28a697133668ef2e3a26c07846365e8 [OK] All nodes agree about slots configuration. >>> Check for open slots... >>> Check slots coverage... [OK] All 16384 slots covered. -
连接30001节点(可以连接任意节点)
[root@djh create-cluster]# redis-cli -p 30001 #如果直接普通模式连接,则在set值时,节点经过计算,需要将k1放到 127.0.0.1:30001> set k1 hello #30003节点上,则会通过报错的形式提示 (error) MOVED 12706 127.0.0.1:30003 127.0.0.1:30001> exit [root@djh create-cluster]# redis-cli -c -p 30001 #连接时,加-c 参数,代表集群模式连接, 127.0.0.1:30001> set k1 hello #此时再set k1,则会跳转到30003节点后创建k1 -> Redirected to slot [12706] located at 127.0.0.1:30003 OK 127.0.0.1:30003> get k1 "hello" 127.0.0.1:30003> set k2 world #再创建k2,又跳转到30001节点 -> Redirected to slot [449] located at 127.0.0.1:30001 OK 127.0.0.1:30001> get k1 #在30001节点获取k1,又跳转到30003节点, -> Redirected to slot [12706] located at 127.0.0.1:30003 #根据你要获取的值跳转到相应的节点,这就是查询路由 "hello" 127.0.0.1:30003> -
尝试一下操作事务
127.0.0.1:30003> WATCH k2 #监控一下k2 -> Redirected to slot [449] located at 127.0.0.1:30001 OK 127.0.0.1:30001> MULTI #开启事务 OK 127.0.0.1:30001> set k1 zhangsan #设置k1 -> Redirected to slot [12706] located at 127.0.0.1:30003 #跳转到30003 OK 127.0.0.1:30003> set k2 lisi #设置k2 -> Redirected to slot [449] located at 127.0.0.1:30001 #跳转到30001 OK 127.0.0.1:30001> EXEC #执行事务 (error) ERR EXEC without MULTI #报错:原因是在30001上开启的事务,但是操作整个事务 127.0.0.1:30001> #的操作垮了两个节点,30003上并没有开启事务。 -
要想解决上面的问题,我们可以将key通过hash tag放到同一节点
127.0.0.1:30001> set {oo}k1 hello #在创建k1时,加上标志位oo,经过计算,在30001节点上, OK 127.0.0.1:30001> set {oo}k2 world #在下面所有操作中,只要是对标志为oo的,都不会离开30001节点 OK 127.0.0.1:30001> set {oo}k3 nihao OK 127.0.0.1:30001> WATCH {oo}k1 OK 127.0.0.1:30001> MULTI OK 127.0.0.1:30001> get {oo}k1 QUEUED 127.0.0.1:30001> set {oo}k2 zhangsan QUEUED 127.0.0.1:30001> get {oo}k2 QUEUED 127.0.0.1:30001> exec #成功执行事务 1) "hello" 2) OK 3) "zhangsan" 127.0.0.1:30001> -
我们停掉服务,并且清空
[root@djh create-cluster]# ./create-cluster stop [root@djh create-cluster]# ./create-cluster clean -
我们也可以在启动的时候手动指定槽位分配
[root@djh create-cluster]# redis-cli --cluster create 127.0.0.1:30001 127.0.0.1:30002 127.0.0.1:30003 127.0.0.1:30004 127.0.0.1:30005 127.0.0.1:30006 --cluster-replicas 1 #创建6个节点,其中副本数(slave)是1 >>> Performing hash slots allocation on 6 nodes... Master[0] -> Slots 0 - 5460 Master[1] -> Slots 5461 - 10922 Master[2] -> Slots 10923 - 16383 Adding replica 127.0.0.1:30005 to 127.0.0.1:30001 Adding replica 127.0.0.1:30006 to 127.0.0.1:30002 Adding replica 127.0.0.1:30004 to 127.0.0.1:30003 >>> Trying to optimize slaves allocation for anti-affinity [WARNING] Some slaves are in the same host as their master M: ccf917c5a67749347f793b0466ff313ee210361b 127.0.0.1:30001 slots:[0-5460] (5461 slots) master M: 134c5cb5fffc29dfa7d0ddca42c6293c7481564a 127.0.0.1:30002 slots:[5461-10922] (5462 slots) master M: b93d14e1160462ba44f0811f5507f6929573d477 127.0.0.1:30003 slots:[10923-16383] (5461 slots) master S: d3ca0aa1a1b4feafbcaaea263ed5216c0ed7c4e9 127.0.0.1:30004 replicates ccf917c5a67749347f793b0466ff313ee210361b S: ea2f3aab08c0936a70cdf3b2a3ffd608e62529b2 127.0.0.1:30005 replicates 134c5cb5fffc29dfa7d0ddca42c6293c7481564a S: a4914594e1e525d6f5ee3cc7c87f9ad67592f344 127.0.0.1:30006 replicates b93d14e1160462ba44f0811f5507f6929573d477 Can I set the above configuration? (type 'yes' to accept): yes >>> Nodes configuration updated >>> Assign a different config epoch to each node >>> Sending CLUSTER MEET messages to join the cluster Waiting for the cluster to join . >>> Performing Cluster Check (using node 127.0.0.1:30001) M: ccf917c5a67749347f793b0466ff313ee210361b 127.0.0.1:30001 slots:[0-5460] (5461 slots) master 1 additional replica(s) S: d3ca0aa1a1b4feafbcaaea263ed5216c0ed7c4e9 127.0.0.1:30004 slots: (0 slots) slave replicates ccf917c5a67749347f793b0466ff313ee210361b M: b93d14e1160462ba44f0811f5507f6929573d477 127.0.0.1:30003 slots:[10923-16383] (5461 slots) master 1 additional replica(s) M: 134c5cb5fffc29dfa7d0ddca42c6293c7481564a 127.0.0.1:30002 slots:[5461-10922] (5462 slots) master 1 additional replica(s) S: a4914594e1e525d6f5ee3cc7c87f9ad67592f344 127.0.0.1:30006 slots: (0 slots) slave replicates b93d14e1160462ba44f0811f5507f6929573d477 S: ea2f3aab08c0936a70cdf3b2a3ffd608e62529b2 127.0.0.1:30005 slots: (0 slots) slave replicates 134c5cb5fffc29dfa7d0ddca42c6293c7481564a [OK] All nodes agree about slots configuration. >>> Check for open slots... >>> Check slots coverage... [OK] All 16384 slots covered. -
对于集群的其他操作,我们可以查看帮助
[root@djh create-cluster]# redis-cli --cluster help Cluster Manager Commands: create host1:port1 ... hostN:portN --cluster-replicas <arg> check host:port --cluster-search-multiple-owners info host:port fix host:port --cluster-search-multiple-owners --cluster-fix-with-unreachable-masters reshard host:port --cluster-from <arg> --cluster-to <arg> --cluster-slots <arg> --cluster-yes --cluster-timeout <arg> --cluster-pipeline <arg> --cluster-replace rebalance host:port --cluster-weight <node1=w1...nodeN=wN> --cluster-use-empty-masters --cluster-timeout <arg> --cluster-simulate --cluster-pipeline <arg> --cluster-threshold <arg> --cluster-replace add-node new_host:new_port existing_host:existing_port --cluster-slave --cluster-master-id <arg> del-node host:port node_id call host:port command arg arg .. arg set-timeout host:port milliseconds import host:port --cluster-from <arg> --cluster-copy --cluster-replace backup host:port backup_directory help For check, fix, reshard, del-node, set-timeout you can specify the host and port of any working node in the cluster. -
比如移动槽位
[root@djh create-cluster]# redis-cli --cluster reshard 127.0.0.1:30001 >>> Performing Cluster Check (using node 127.0.0.1:30001) M: ccf917c5a67749347f793b0466ff313ee210361b 127.0.0.1:30001 slots:[0-5460] (5461 slots) master 1 additional replica(s) S: d3ca0aa1a1b4feafbcaaea263ed5216c0ed7c4e9 127.0.0.1:30004 slots: (0 slots) slave replicates ccf917c5a67749347f793b0466ff313ee210361b M: b93d14e1160462ba44f0811f5507f6929573d477 127.0.0.1:30003 slots:[10923-16383] (5461 slots) master 1 additional replica(s) M: 134c5cb5fffc29dfa7d0ddca42c6293c7481564a 127.0.0.1:30002 slots:[5461-10922] (5462 slots) master 1 additional replica(s) S: a4914594e1e525d6f5ee3cc7c87f9ad67592f344 127.0.0.1:30006 slots: (0 slots) slave replicates b93d14e1160462ba44f0811f5507f6929573d477 S: ea2f3aab08c0936a70cdf3b2a3ffd608e62529b2 127.0.0.1:30005 slots: (0 slots) slave replicates 134c5cb5fffc29dfa7d0ddca42c6293c7481564a [OK] All nodes agree about slots configuration. >>> Check for open slots... >>> Check slots coverage... [OK] All 16384 slots covered. How many slots do you want to move (from 1 to 16384)? 2000 #你要移动多少个槽位 What is the receiving node ID? b93d14e1160462ba44f0811f5507f6929573d477 #移动给30003节点,填上它的ID号 Please enter all the source node IDs. Type 'all' to use all the nodes as source nodes for the hash slots. Type 'done' once you entered all the source nodes IDs. #输入all,则所有节点用作哈希槽的源节点。 Source node #1: ccf917c5a67749347f793b0466ff313ee210361b #也可以输入ID号,从30001的节点拿槽位 Source node #2: done #能从多个节点取,如果完成输入done -
可以查看一下节点的信息,之前是均匀分布的,但是现在可以看到30001已经分了2000个槽位给到了30003
[root@djh create-cluster]# redis-cli --cluster info 127.0.0.1:30001
127.0.0.1:30001 (ccf917c5...) -> 0 keys | 3461 slots | 1 slaves.
127.0.0.1:30003 (b93d14e1...) -> 0 keys | 7461 slots | 1 slaves.
127.0.0.1:30002 (134c5cb5...) -> 0 keys | 5462 slots | 1 slaves.
[OK] 0 keys in 3 masters.
0.00 keys per slot on average.
[root@djh create-cluster]#
可以通过check命令查看更详细的信息
[root@djh create-cluster]# redis-cli --cluster check 127.0.0.1:30001
127.0.0.1:30001 (ccf917c5...) -> 0 keys | 3461 slots | 1 slaves.
127.0.0.1:30003 (b93d14e1...) -> 0 keys | 7461 slots | 1 slaves.
127.0.0.1:30002 (134c5cb5...) -> 0 keys | 5462 slots | 1 slaves.
[OK] 0 keys in 3 masters.
0.00 keys per slot on average.
>>> Performing Cluster Check (using node 127.0.0.1:30001)
M: ccf917c5a67749347f793b0466ff313ee210361b 127.0.0.1:30001
   slots:[2000-5460] (3461 slots) master                   #30001节点槽位2000-5460
   1 additional replica(s)
S: d3ca0aa1a1b4feafbcaaea263ed5216c0ed7c4e9 127.0.0.1:30004
   slots: (0 slots) slave
   replicates ccf917c5a67749347f793b0466ff313ee210361b
M: b93d14e1160462ba44f0811f5507f6929573d477 127.0.0.1:30003 #30003节点槽位0-1999和10923-16383
   slots:[0-1999],[10923-16383] (7461 slots) master
   1 additional replica(s)
M: 134c5cb5fffc29dfa7d0ddca42c6293c7481564a 127.0.0.1:30002  #30002节点槽位5461-10922
   slots:[5461-10922] (5462 slots) master
   1 additional replica(s)
S: a4914594e1e525d6f5ee3cc7c87f9ad67592f344 127.0.0.1:30006
   slots: (0 slots) slave
   replicates b93d14e1160462ba44f0811f5507f6929573d477
S: ea2f3aab08c0936a70cdf3b2a3ffd608e62529b2 127.0.0.1:30005
   slots: (0 slots) slave
   replicates 134c5cb5fffc29dfa7d0ddca42c6293c7481564a
[OK] All nodes agree about slots configuration.
>>> Check for open slots...
>>> Check slots coverage...
[OK] All 16384 slots covered.
[root@djh create-cluster]#
总结:
redis单点问题:单点故障、容量有限、压力过大
单点故障、压力过大:对redis做主从复制集群,并通过Sentinel哨兵对其监控进行自动故障转移,解决单点故障和压力过大问题。
容量有限:通过对redis数据分区进行解决。


 被折叠的 条评论
为什么被折叠?
被折叠的 条评论
为什么被折叠?
 到【灌水乐园】发言


