


基于EMQ与Wemos实现用web控制LED灯
一、项目硬件
| 名称 | 数量 |
|---|---|
| Wemos D1 | 1 |
| RGB小灯 | 1 |
| 杜邦线 | 若干 |
二、项目软件
| 名称 | 版本 |
|---|---|
| Windows | 10 (自己看着办) |
| arduino IDE | 1.8.13(自己看着办) |
三、项目开始
1、硬件部分
代码下载:https://download.youkuaiyun.com/download/weixin_45062087/18200239
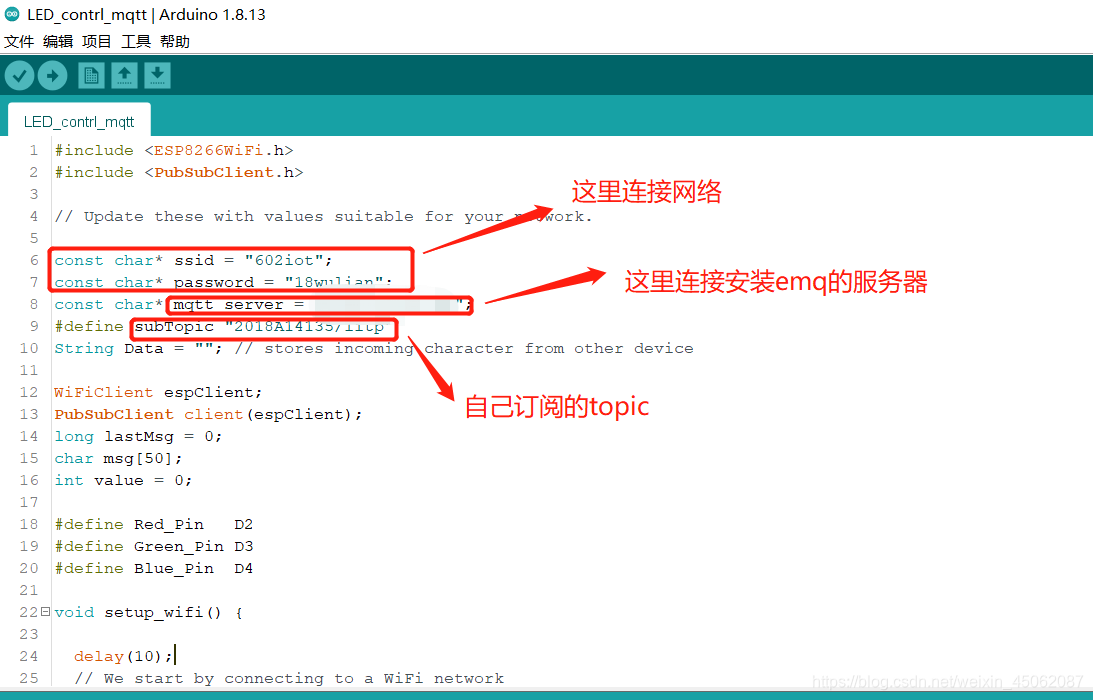
(1)arduino部分重要代码
(2)完整代码
#include <ESP8266WiFi.h>
#include <PubSubClient.h>
// Update these with values suitable for your network.
const char* ssid = "";//wifi账号
const char* password = "";//wifi密码
const char* mqtt_server = "";//安装了EMQ服务器的ip
#define subTopic "2018A14135/litp"//自己订阅的topic
String Data = ""; // stores incoming character from other device
WiFiClient espClient;
PubSubClient client(espClient);
long lastMsg = 0;
char msg[50];
int value = 0;
#define Red_Pin D2
#define Green_Pin D3
#define Blue_Pin D4
void setup_wifi() {
delay(10);
// We start by connecting to a WiFi network
Serial.println();
Serial.print("Connecting to ");
Serial.println(ssid);
WiFi.begin(ssid, password);
while (WiFi.status() != WL_CONNECTED) {
delay(500);
Serial.print(".");
}
randomSeed(micros());
Serial.println("");
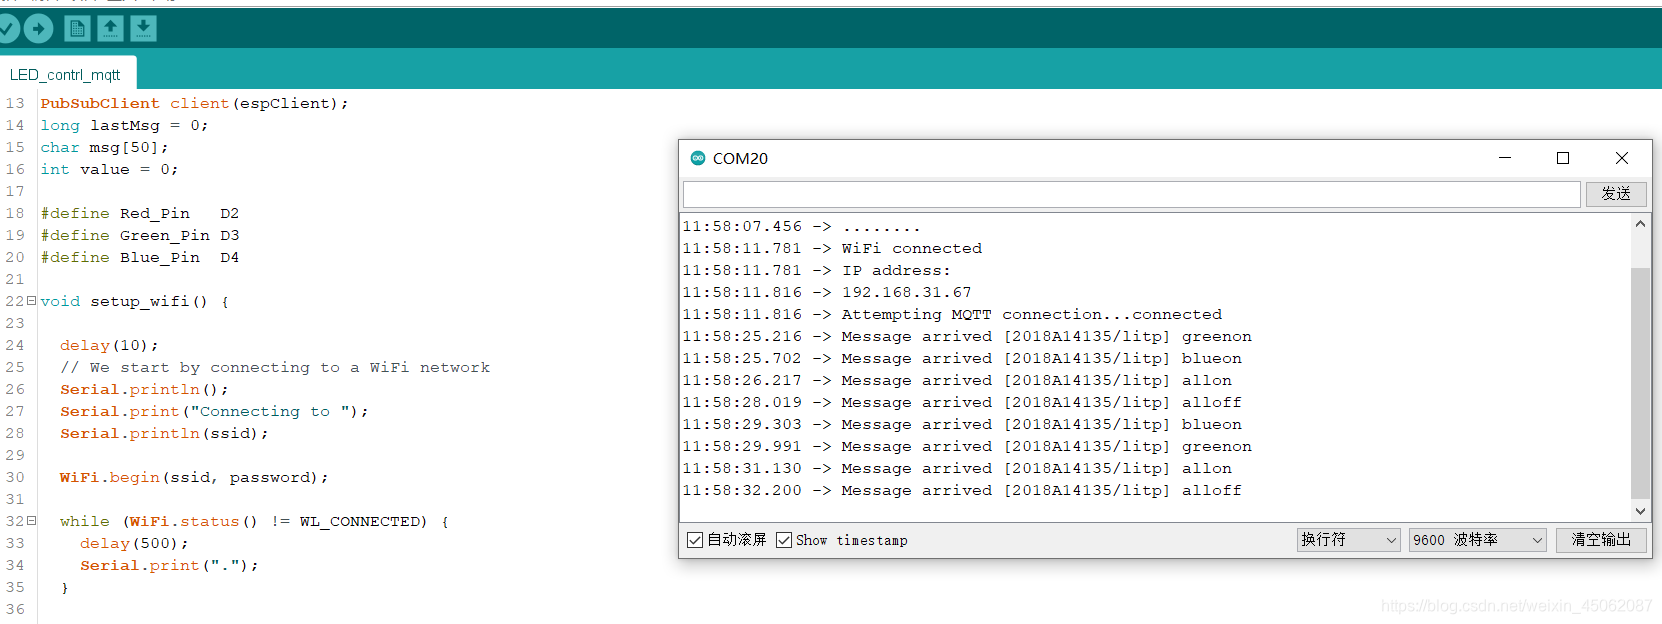
Serial.println("WiFi connected");
Serial.println("IP address: ");
Serial.println(WiFi.localIP());
}
void callback(char* topic, byte* payload, unsigned int length) {
Serial.print("Message arrived [");
Serial.print(topic);
Serial.print("] ");
String Data = ""; // stores incoming character from other device
for (int i = 0; i < length; i++) {
Data += (char)payload[i];
Serial.print((char)payload[i]);
}
Serial.println();
// Switch on the LED if an 1 was received as first character
if (Data == "redon") {
digitalWrite(Red_Pin, HIGH);
} else if (Data == "redoff") {
digitalWrite(Red_Pin, LOW);
} else if (Data == "greenon") {
digitalWrite(Green_Pin, HIGH);
} else if (Data == "greenoff") {
digitalWrite(Green_Pin, LOW);
} else if (Data == "blueon") {
digitalWrite(Blue_Pin, HIGH);
} else if (Data == "blueoff") {
digitalWrite(Blue_Pin, LOW);
} else if (Data == "allon") {
digitalWrite(Red_Pin, HIGH);
digitalWrite(Green_Pin, HIGH);
digitalWrite(Blue_Pin, HIGH);
} else if (Data == "alloff") {
digitalWrite(Red_Pin, LOW);
digitalWrite(Green_Pin, LOW);
digitalWrite(Blue_Pin, LOW);
} else if (Data == "runon") {
digitalWrite(Red_Pin, HIGH);
delay(500);
digitalWrite(Red_Pin, LOW);
digitalWrite(Green_Pin, HIGH);
delay(500);
digitalWrite(Green_Pin, LOW);
digitalWrite(Blue_Pin, HIGH);
delay(500);
digitalWrite(Blue_Pin, LOW);
}
}
void reconnect() {
// Loop until we're reconnected
while (!client.connected()) {
Serial.print("Attempting MQTT connection...");
// Create a random client ID
String clientId = "ESP8266Client-";
clientId += String(random(0xffff), HEX);
// Attempt to connect
if (client.connect(clientId.c_str())) {
Serial.println("connected");
// Once connected, publish an announcement...
client.publish("outTopic", "hello world");
// ... and resubscribe
client.subscribe(subTopic);
} else {
Serial.print("failed, rc=");
Serial.print(client.state());
Serial.println(" try again in 5 seconds");
// Wait 5 seconds before retrying
delay(5000);
}
}
}
void setup() {
pinMode(Red_Pin, OUTPUT);
pinMode(Green_Pin, OUTPUT);
pinMode(Blue_Pin, OUTPUT);
pinMode(BUILTIN_LED, OUTPUT); // Initialize the BUILTIN_LED pin as an output
Serial.begin(9600);
setup_wifi();
client.setServer(mqtt_server, 1883);
client.setCallback(callback);
}
void loop() {
if (!client.connected()) {
reconnect();
}
client.loop();
}
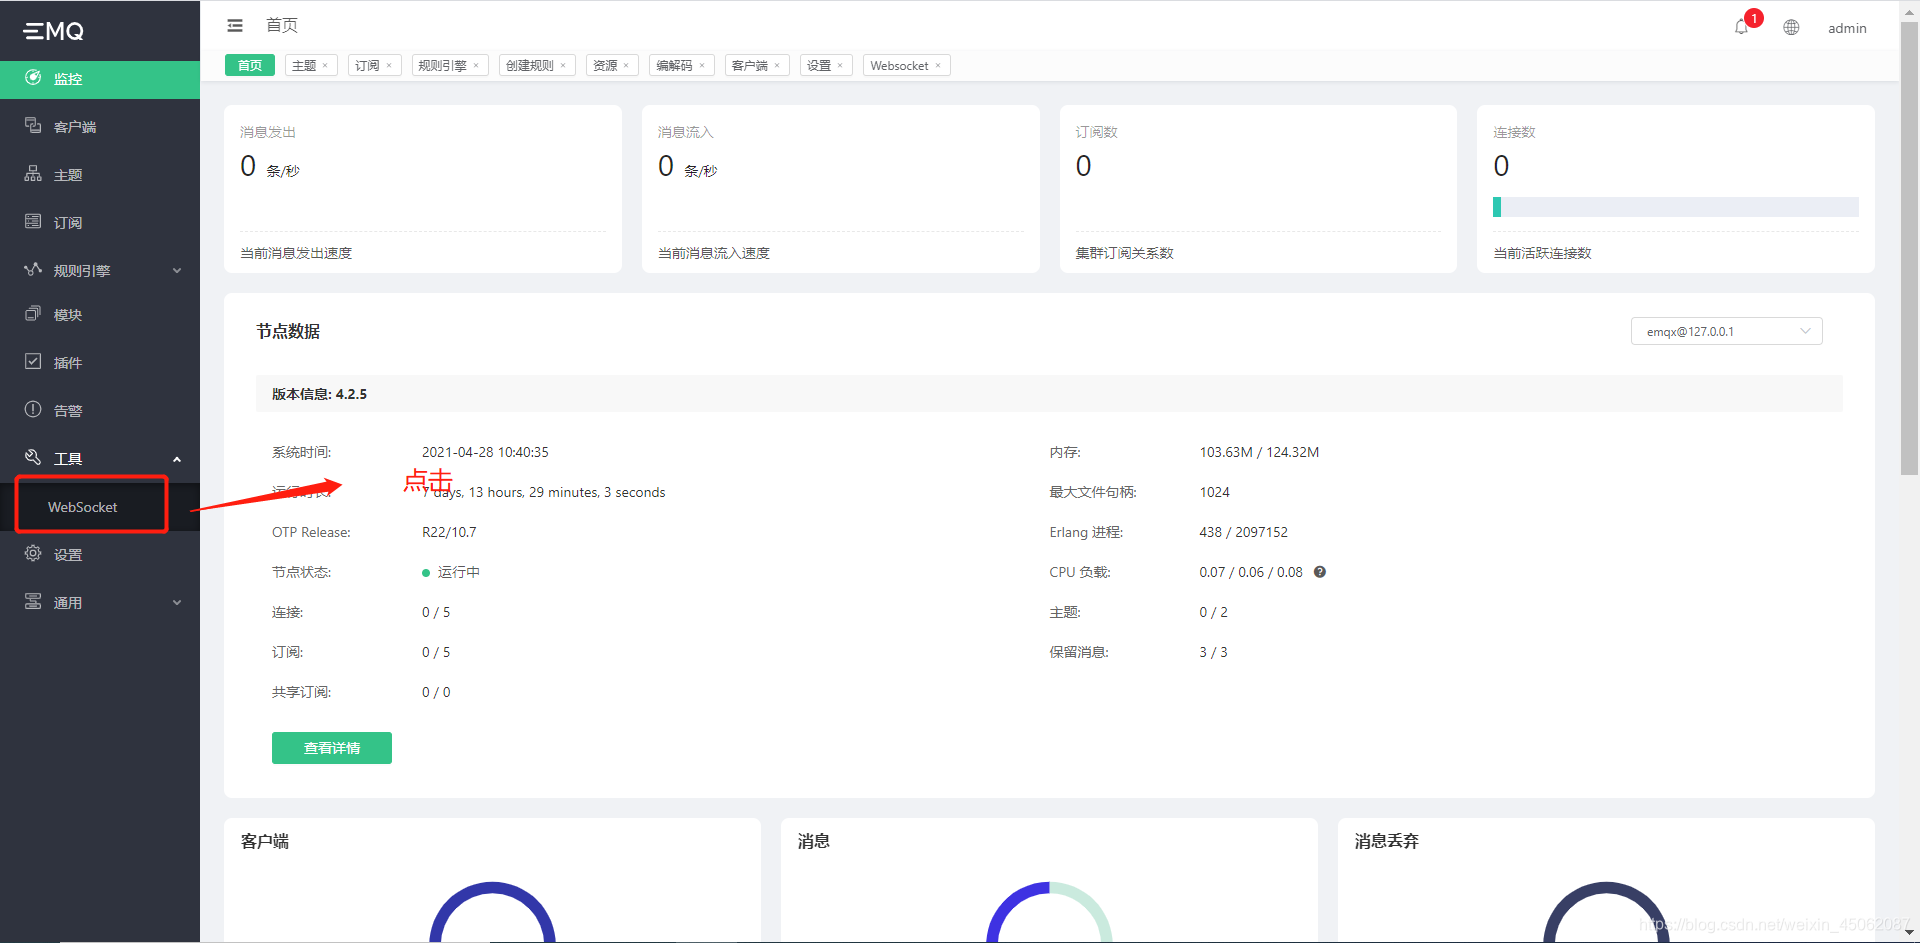
2、EMQ部分
代码下载:https://download.youkuaiyun.com/download/weixin_45062087/18199948
(1)服务器连接(参考下面文章)
安装EMQ参考:https://blog.youkuaiyun.com/weixin_45062087/article/details/115918250?spm=1001.2014.3001.5501
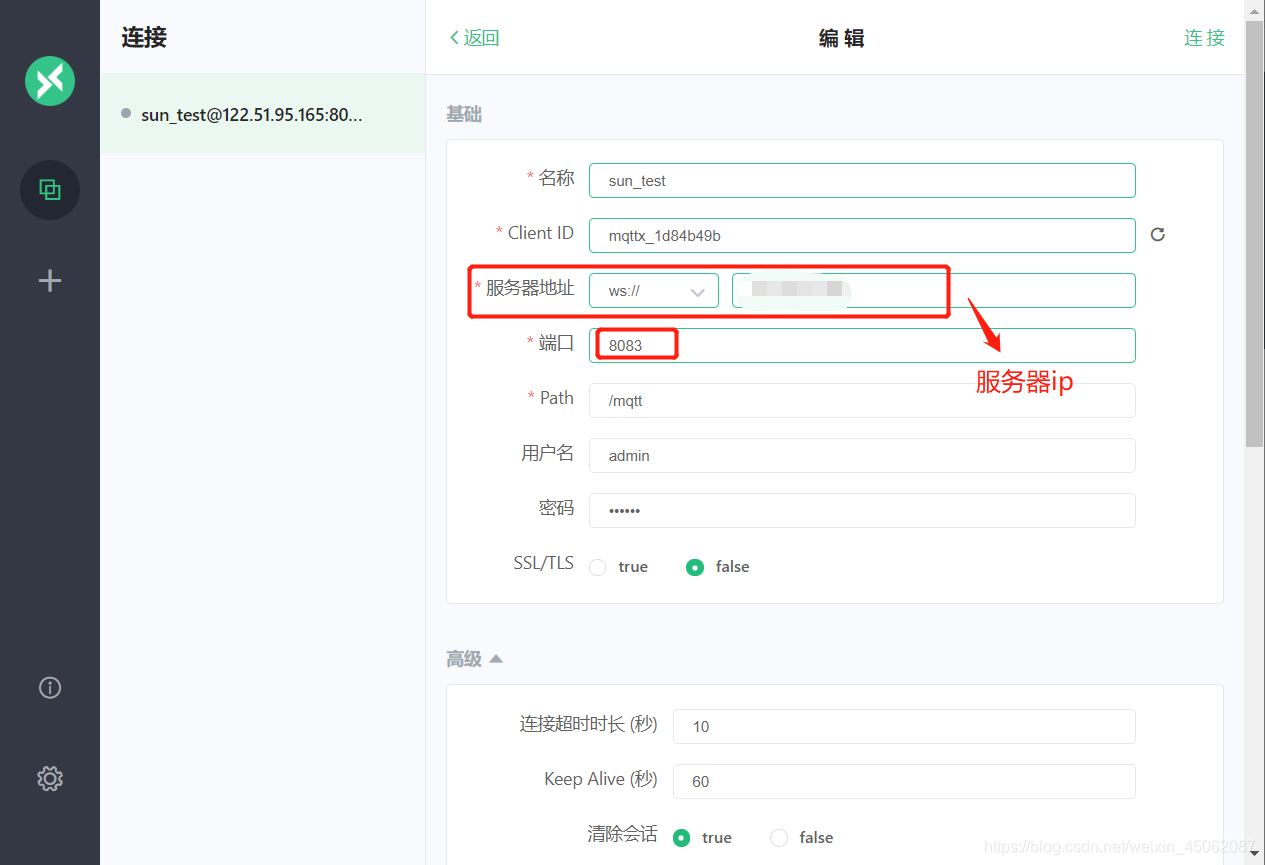
(2)订阅topic(这可用mqtt x进行测试)
3、web部分
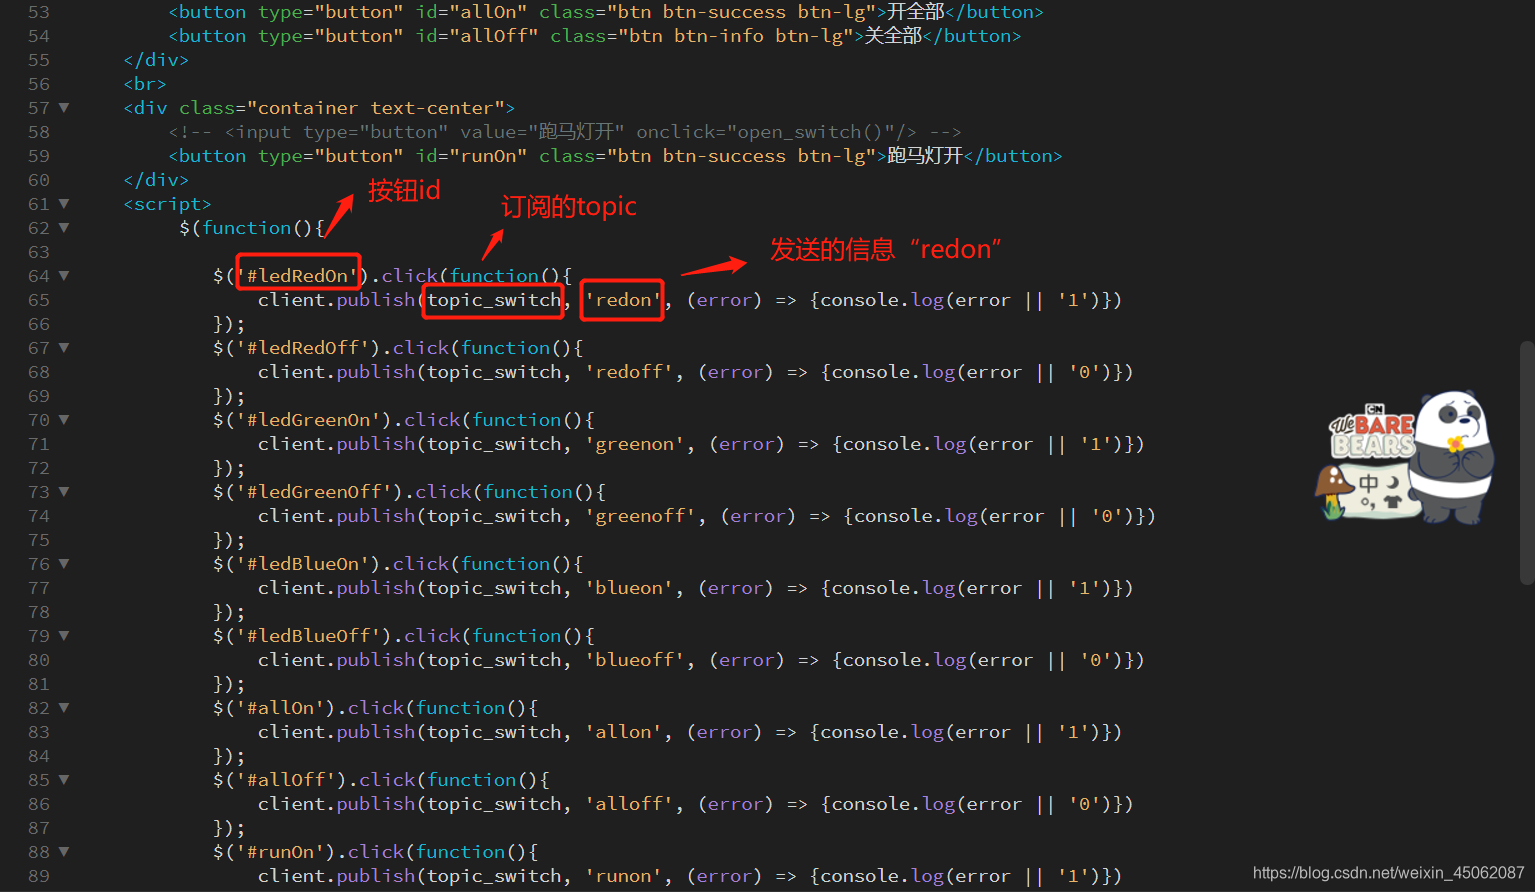
(1)部分重要代码
(2)完整代码
<!DOCTYPE html>
<html lang="en">
<head>
<meta http-equiv="X-UA-Compatible" content="IE=edge,chrome=1" />
<meta charset="utf-8" />
<meta name="viewport" content="width=device-width, initial-scale=1.0, maximum-scale=1.0" />
<!-- 最新版本的 Bootstrap 核心 CSS 文件 -->
<link rel="stylesheet" href="css/bootstrap.min.css">
<script src="js/jquery-2.1.4.min.js"></script>
<script src="js/jquery.cookie.min.js"></script>
<link rel="stylesheet" href="css/style.css" crossorigin="anonymous">
<!-- 最新的 Bootstrap 核心 JavaScript 文件 -->
<script src="js/bootstrap.min.js"></script>
<script src="js/vue.js"></script>
<!-- <script src="js/app.js"></script> -->
<script src="./mqtt.min.js"></script> <!-- 引处MQTT.MINI.JS库文件 -->
<title></title>
<meta name="description" />
</head>
<body>
<div class="container text-center"><img width="300px" src="./assets/siot.png" alt=""></div>
<div class="container text-center">
<!-- <input type="button" value="红灯开" οnclick="open_switch()"/>
<input type="button" value="红灯关" οnclick="close_switch()"/> -->
<button type="button" id="ledRedOn" class="btn btn-success btn-lg">红灯开</button>
<button type="button" id="ledRedOff" class="btn btn-info btn-lg">红灯关</button>
</div>
<br>
<div class="container text-center">
<!-- <input type="button" value="绿灯开" class="btn btn-success btn-lg" οnclick="open_switch()"/>
<input type="button" value="绿灯关" class="btn btn-info btn-lg" οnclick="close_switch()"/> -->
<button type="button" id="ledGreenOn" class="btn btn-success btn-lg">绿灯开</button>
<button type="button" id="ledGreenOff" class="btn btn-info btn-lg">绿灯关</button>
</div>
<br>
<div class="container text-center">
<!-- <input type="button" value="蓝灯开" οnclick="open_switch()"/>
<input type="button" value="蓝灯关" οnclick="close_switch()"/> -->
<button type="button" id="ledBlueOn" class="btn btn-success btn-lg">蓝灯开</button>
<button type="button" id="ledBlueOff" class="btn btn-info btn-lg">蓝灯关</button>
</div>
<br>
<div class="container text-center">
<!-- <input type="button" value="打开开关" οnclick="open_switch()"/>
<input type="button" value="关闭开关" οnclick="close_switch()"/> -->
<button type="button" id="allOn" class="btn btn-success btn-lg">开全部</button>
<button type="button" id="allOff" class="btn btn-info btn-lg">关全部</button>
</div>
<br>
<div class="container text-center">
<!-- <input type="button" value="跑马灯开" οnclick="open_switch()"/> -->
<button type="button" id="runOn" class="btn btn-success btn-lg">跑马灯开</button>
</div>
<script>
$(function(){
$('#ledRedOn').click(function(){
client.publish(topic_switch, 'redon', (error) => {console.log(error || '1')})
});
$('#ledRedOff').click(function(){
client.publish(topic_switch, 'redoff', (error) => {console.log(error || '0')})
});
$('#ledGreenOn').click(function(){
client.publish(topic_switch, 'greenon', (error) => {console.log(error || '1')})
});
$('#ledGreenOff').click(function(){
client.publish(topic_switch, 'greenoff', (error) => {console.log(error || '0')})
});
$('#ledBlueOn').click(function(){
client.publish(topic_switch, 'blueon', (error) => {console.log(error || '1')})
});
$('#ledBlueOff').click(function(){
client.publish(topic_switch, 'blueoff', (error) => {console.log(error || '0')})
});
$('#allOn').click(function(){
client.publish(topic_switch, 'allon', (error) => {console.log(error || '1')})
});
$('#allOff').click(function(){
client.publish(topic_switch, 'alloff', (error) => {console.log(error || '0')})
});
$('#runOn').click(function(){
client.publish(topic_switch, 'runon', (error) => {console.log(error || '1')})
});
});
</script>
<script>
let receiveClear = document.getElementsByClassName('receiveClear')[0];
let receiveArea = document.getElementsByClassName('receiveArea')[0];
//【考试开始】----------------->请参考https://www.jianshu.com/p/4fd95cae1a9c完成以下js脚本实现连接,订阅,发布/接收消息
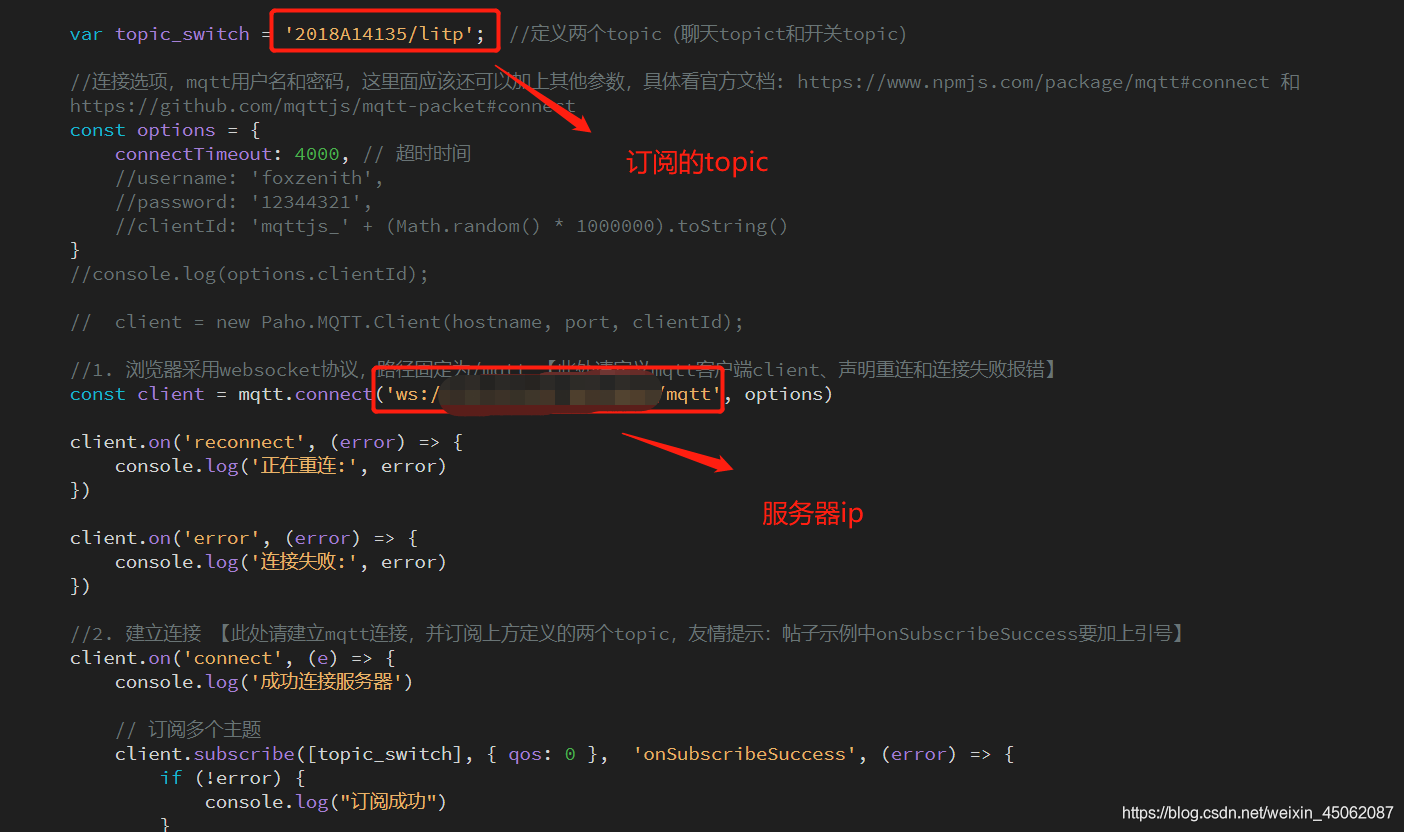
var topic_switch = '2018A14135/litp'; //定义两个topic(聊天topict和开关topic)
//连接选项,mqtt用户名和密码,这里面应该还可以加上其他参数,具体看官方文档: https://www.npmjs.com/package/mqtt#connect 和https://github.com/mqttjs/mqtt-packet#connect
const options = {
connectTimeout: 4000, // 超时时间
//username: 'foxzenith',
//password: '12344321',
//clientId: 'mqttjs_' + (Math.random() * 1000000).toString()
}
//console.log(options.clientId);
// client = new Paho.MQTT.Client(hostname, port, clientId);
//1. 浏览器采用websocket协议,路径固定为/mqtt 【此处请定义mqtt客户端client、声明重连和连接失败报错】
const client = mqtt.connect('ws://122.51.95.165:8083/mqtt', options)
client.on('reconnect', (error) => {
console.log('正在重连:', error)
})
client.on('error', (error) => {
console.log('连接失败:', error)
})
//2. 建立连接 【此处请建立mqtt连接,并订阅上方定义的两个topic,友情提示:帖子示例中onSubscribeSuccess要加上引号】
client.on('connect', (e) => {
console.log('成功连接服务器')
// 订阅多个主题
client.subscribe([topic_switch], { qos: 0 }, 'onSubscribeSuccess', (error) => {
if (!error) {
console.log("订阅成功")
}
})
})
</script>
</body>
</html>
四、效果展示
(1)硬件效果

(2)web页面

五、总结
这次实验主要学习如何利用mqtt协议通过web端发送指令控制相关的硬件,其中包括websocket等方面的应用,欢迎各位大佬批评指正,谢谢!


 被折叠的 条评论
为什么被折叠?
被折叠的 条评论
为什么被折叠?
 到【灌水乐园】发言


