


在上一篇文章中,我们已经创建了第一个Android项目并了解了它的基本结构,接下来上手一个小作业,来掌握Android常用的几种布局管理器及控件进行界面的设计。
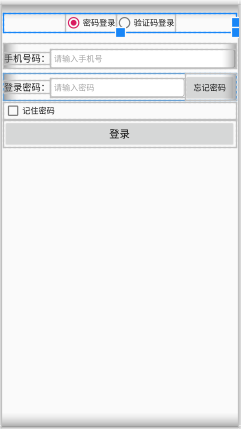
先拿来项目的效果图展示:


可以看到,项目是一个简单的登录界面,有两种方式:
- 账号密码登录
- 验证码登录
在日常生活中,以上两种登录方式是比较常见的。为了简化项目,具体业务逻就不在项目中体现了
在上篇文章中提到,Android项目文件结构较为复杂,但大多数文件都是项目自动生成的,很多地方其实不需要我们书写,我们真正关注的是:
app
其中src文件是我们需要书写的,src目录下的main目录下放的是Java代码;res目录下放的是资源(图片、布局、字符串等)

现在开始分析这个项目的组成:
activity_main.xml
此文件建立在res – layout目录下,用来建立项目的布局
<?xml version="1.0" encoding="utf-8"?>
<LinearLayout xmlns:android="http://schemas.android.com/apk/res/android"
    xmlns:app="http://schemas.android.com/apk/res-auto"
    xmlns:tools="http://schemas.android.com/tools"
    android:layout_width="match_parent"
    android:layout_height="match_parent"
    android:orientation="vertical"
    android:padding="5dp"
    tools:context=".MainActivity">
    <RadioGroup
        android:id="@+id/rg_login"
        android:layout_width="match_parent"
        android:layout_height="wrap_content"
        android:layout_marginTop="10dp"
        android:layout_marginBottom="10dp"
        android:gravity="center_horizontal"
        android:orientation="horizontal">

        <RadioButton
            android:id="@+id/rb_password"
            android:layout_width="wrap_content"
            android:layout_height="wrap_content"
            android:checked="true"
            android:text="密码登录" />

        <RadioButton
            android:id="@+id/rb_verifycode"
            android:layout_width="wrap_content"
            android:layout_height="wrap_content"
            android:text="验证码登录" />
    </RadioGroup>

    <LinearLayout
        android:layout_width="match_parent"
        android:layout_height="wrap_content"
        android:layout_marginTop="10dp"
        android:layout_marginBottom="10dp"
        android:orientation="horizontal"
        android:paddingTop="10dp">

        <TextView
            android:id="@+id/phone"
            android:layout_width="wrap_content"
            android:layout_height="wrap_content"
            android:text="手机号码:"
            android:textColor="@color/black"
            android:textSize="16sp"></TextView>

        <EditText
            android:layout_width="match_parent"
            android:layout_height="wrap_content"
            android:background="@drawable/editext_selector"
            android:hint="请输入手机号"
            android:padding="7dp"
            android:textColor="@color/grey"
            android:textSize="14sp"></EditText>
    </LinearLayout>

    <LinearLayout
        android:layout_width="wrap_content"
        android:layout_height="wrap_content"
        android:orientation="horizontal">

        <TextView
            android:id="@+id/tv_password"
            android:layout_width="match_parent"
            android:layout_height="wrap_content"
            android:text="登录密码:"
            android:textColor="@color/black"
            android:textSize="16sp"></TextView>

        <EditText
            android:id="@+id/et_password"
            android:layout_width="242dp"
            android:layout_height="wrap_content"
            android:layout_weight="1"
            android:background="@drawable/editext_selector"
            android:hint="请输入密码"
            android:padding="7dp"
            android:textColor="@color/grey"
            android:textSize="14sp">

        </EditText>

        <Button
            android:id="@+id/btn_forget"
            android:layout_width="wrap_content"
            android:layout_height="wrap_content"
            android:text="忘记密码"
            android:textColor="@color/black">

        </Button>
    </LinearLayout>

    <CheckBox
        android:id="@+id/ck_remember"
        android:layout_width="match_parent"
        android:layout_height="wrap_content"
        android:text="记住密码"
        android:textColor="@color/black"></CheckBox>

    <Button
        android:layout_width="match_parent"
        android:layout_height="wrap_content"
        android:text="登录"
        android:textColor="@color/black"
        android:textSize="18sp"></Button>


</LinearLayout>
讲解:
LinearLayout 声明的是线性布局
其中 layout_width="match_parent"和layout_height="match_parent"分别说明了布局的宽度和高度是自动匹配父布局,当然这里的属性值可以自定义,但match_parent属性是最常用的,原因就是能够自动匹配父布局大小(当然,在这里也就是终端设备大小)。
orientation="vertical"说明了布局是垂直定位的。倘若不设置为垂直则默认水平,一些内容不能很好地展现出来。左图为垂直,右图为水平

|

|
padding=“5dp” 设置内边距为5dp【左图】,当padding值设置为100dp【右图】
|
|

|
id="@+id/rg_login" button的id号(唯一标识)
layout_width=“match_parent” ButtonGroup的宽度设置为自动匹配父布局宽度
layout_height=“wrap_content” ButtonGroup的高度为自动匹配其内容高度
layout_marginTop=“10dp” 上部边距为10dp,若设置为50dp
layout_marginBottom=“10dp” 底部边距为10dp,若设置为50dp
|
|

|
gravity=“center_horizontal” 水平居中,默认效果为右图
|
|

|
orientation=“horizontal” 指定布局内控件排列方式为 水平排列 ,默认效果为垂直排列
|
|

|
checked="true 这一属性是默认选中,当@+id/rb_password的checked属性为true是效果如下:
|
|

|
当然这里只是一个布局效果,具体的功能实现在 MainActivity.java文件中,所以默认选中是验证码登录但却依旧显示的是密码登录页面。
paddingTop=“10dp” 设置头部内边距,当设置为50dp时见右图(与margin有所不同,padding设置的是内部边框,改变的边框本身的大小)


|

|
TextView 显示文本的基本控件
EditText 可以实现输入文本内容
hint 是提示内容
padding属性值设置为15dp时,可以看到文本框大小发生改变
|
|

|
CheckBox
接下来是Java代码部分
MainActivity.java
package com.example.myapplication;

import androidx.appcompat.app.AppCompatActivity;

import android.annotation.SuppressLint;
import android.os.Bundle;
import android.view.View;
import android.widget.Button;
import android.widget.CheckBox;
import android.widget.EditText;
import android.widget.RadioGroup;
import android.widget.TextView;

public class MainActivity extends AppCompatActivity {

    private TextView tv_password;
    private EditText et_password;
    private Button btn_forget;
    private CheckBox ck_remember;
    private RadioGroup rg_login;

    @SuppressLint("WrongViewCast")
    protected void onCreate(Bundle savedInstanceState) {
        super.onCreate(savedInstanceState);
        //加载布局
        setContentView(R.layout.activity_main);
        //获取控件
        tv_password = findViewById(R.id.tv_password);
        et_password = findViewById(R.id.et_password);
        btn_forget = findViewById(R.id.btn_forget);
        ck_remember = findViewById(R.id.ck_remember);
        rg_login = findViewById(R.id.rg_login);
        //单选按钮组绑定监听器
        rg_login.setOnCheckedChangeListener(new RadioGroup.OnCheckedChangeListener() {
            @Override
            public void onCheckedChanged(RadioGroup group, int checkedId) {
                if (checkedId == R.id.rb_password) {
                    tv_password.setText("登录密码:");
                    et_password.setHint("请输入密码");
                    btn_forget.setText("忘记密码");
                    ck_remember.setVisibility(View.VISIBLE);
                } else if (checkedId == R.id.rb_verifycode) {
                    tv_password.setText("验证码:");
                    et_password.setHint("请输入验证码");
                    btn_forget.setText("获取验证码");
                    ck_remember.setVisibility(View.INVISIBLE);
                }
            }
        });
    }

}
其中我们需要认识几点是:
加载布局、获取控件 以及 为单选按钮组绑定监听器
onCreate方法是在Activity创建时被系统调用,是一个Activity生命周期的开始
setContentView(R.layout.activity_main) 是用来加载布局的语句
tv_password = findViewById(R.id.tv_password) 用来获取控件,需要注意的是,一些常量的引用,是通过R. 进行调用的。
为单选按钮组绑定监听器
rg_login.setOnCheckedChangeListener(//添加一个监听器,下面代码是监听器具体的功能
new RadioGroup.OnCheckedChangeListener() {
            @Override
            public void onCheckedChanged(RadioGroup group, int checkedId) {
                if (checkedId == R.id.rb_password) {//当选中的是密码登录时:
                    tv_password.setText("登录密码:");
                    et_password.setHint("请输入密码");
                    btn_forget.setText("忘记密码");
                    ck_remember.setVisibility(View.VISIBLE);//让控件显示(默认就是显示)
                }
                else if (checkedId == R.id.rb_verifycode) {//当选中的是验证码登录时:
                    tv_password.setText("验证码:");
                    et_password.setHint("请输入验证码");
                    btn_forget.setText("获取验证码");
                    ck_remember.setVisibility(View.INVISIBLE);//让控件隐藏(通过项目效果可以观察到,当选中验证码登录时,CheckBox所占用的空间还在,只是没有外显出来)
                }
            }
        }
        );


 被折叠的 条评论
为什么被折叠?
被折叠的 条评论
为什么被折叠?
 到【灌水乐园】发言


