


 文章详细介绍了SpringBoot中如何监听应用的生命周期事件,包括自定义SpringApplicationRunListener监听器的实现和配置,以及SpringBoot启动过程中的九大事件。此外,还探讨了事件驱动开发,如何发布和订阅事件,以及SpringBoot的自动配置原理,包括SPI机制和功能开关的使用。
1. 事件和监听器
1. 生命周期监听
场景:监听应用的生命周期
1. 监听器-SpringApplicationRunListener
- 自定义
SpringApplicationRunListener来监听事件;
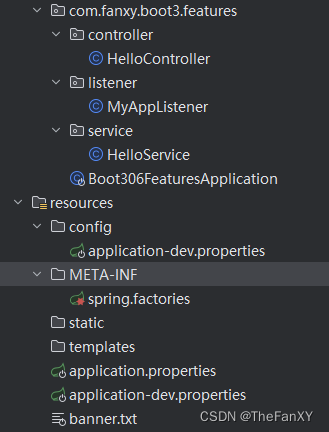
1.1. 编写SpringApplicationRunListener这个接口的实现类
1.2. 在META-INF/spring.factories中配置org.springframework.boot.SpringApplicationRunListener=自己的Listener,还可以指定一个有参构造器,接受两个参数(SpringApplication application, String[] args)
1.3. springboot 在spring-boot.jar中配置了默认的 Listener,如下

补充一下:Springboot老版本其实自动配置类的对应导入的kv键值对其实不在现在的 META-INF/spring/xxxxxx.Imports 下,而是 META-INF/spring.factories里面

雷神源码讲解spring主程序启动
public class MyAppListener implements SpringApplicationRunListener {
@Override
public void starting(ConfigurableBootstrapContext bootstrapContext) {
System.out.println("===========starting=============正在启动=======================");
}
@Override
public void environmentPrepared(ConfigurableBootstrapContext bootstrapContext, ConfigurableEnvironment environment) {
System.out.println("===========environmentPrepared=============环境准备完成=======================");
}
@Override
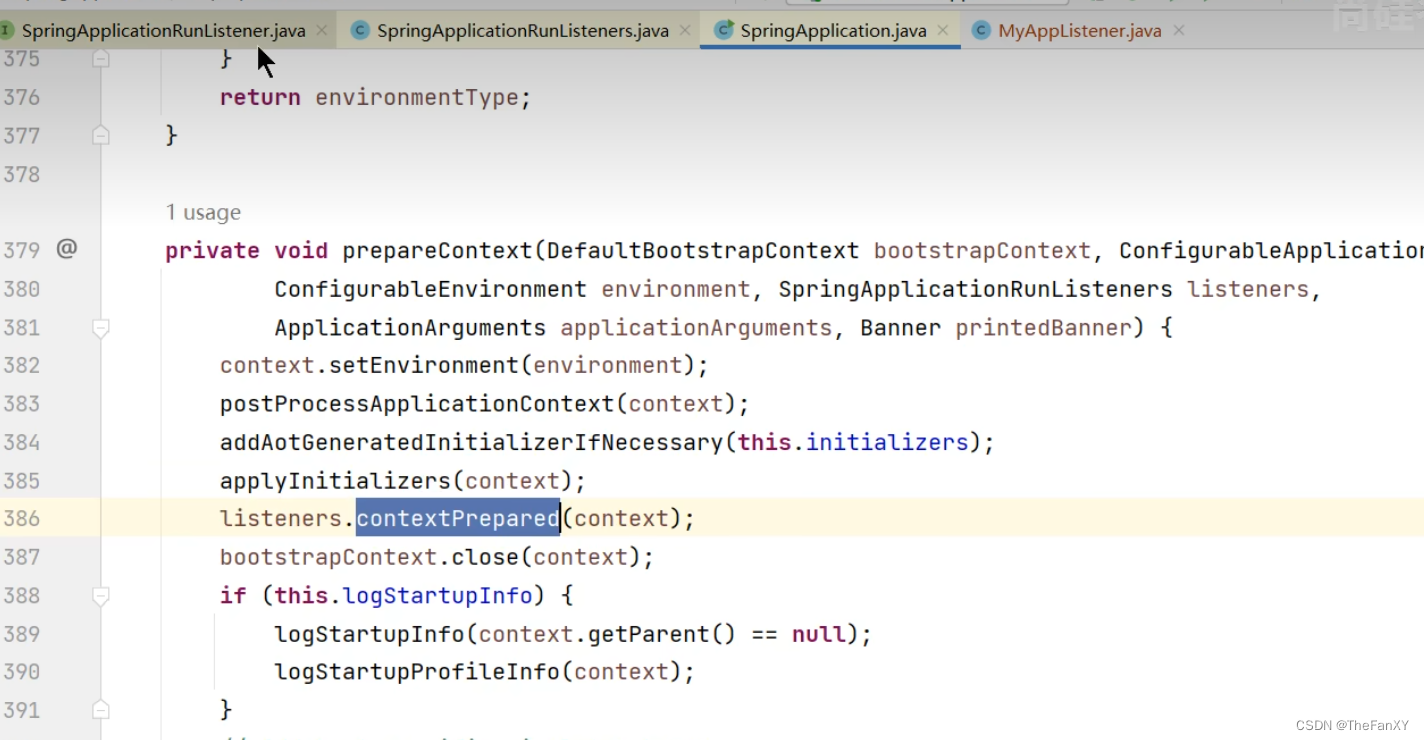
public void contextPrepared(ConfigurableApplicationContext context) {
System.out.println("===========contextPrepared=============ioc容器准备完成=======================");
}
@Override
public void contextLoaded(ConfigurableApplicationContext context) {
System.out.println("===========contextLoaded=============ioc容器加载完成=======================");
}
@Override
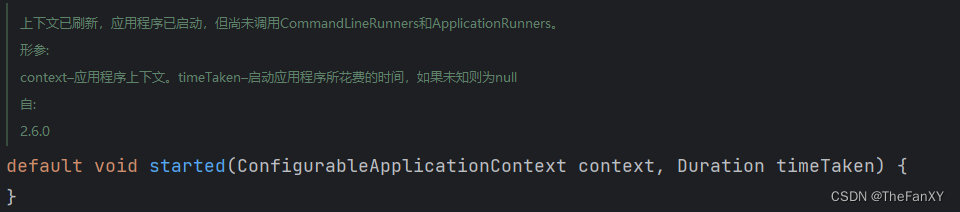
public void started(ConfigurableApplicationContext context, Duration timeTaken) {
System.out.println("===========started=============应用启动完成=======================");
}
@Override
public void ready(ConfigurableApplicationContext context, Duration timeTaken) {
System.out.println("===========ready=============应用准备就绪=======================");
}
@Override
public void failed(ConfigurableApplicationContext context, Throwable exception) {
System.out.println("===========failed=============应用启动失败=======================");
}
}
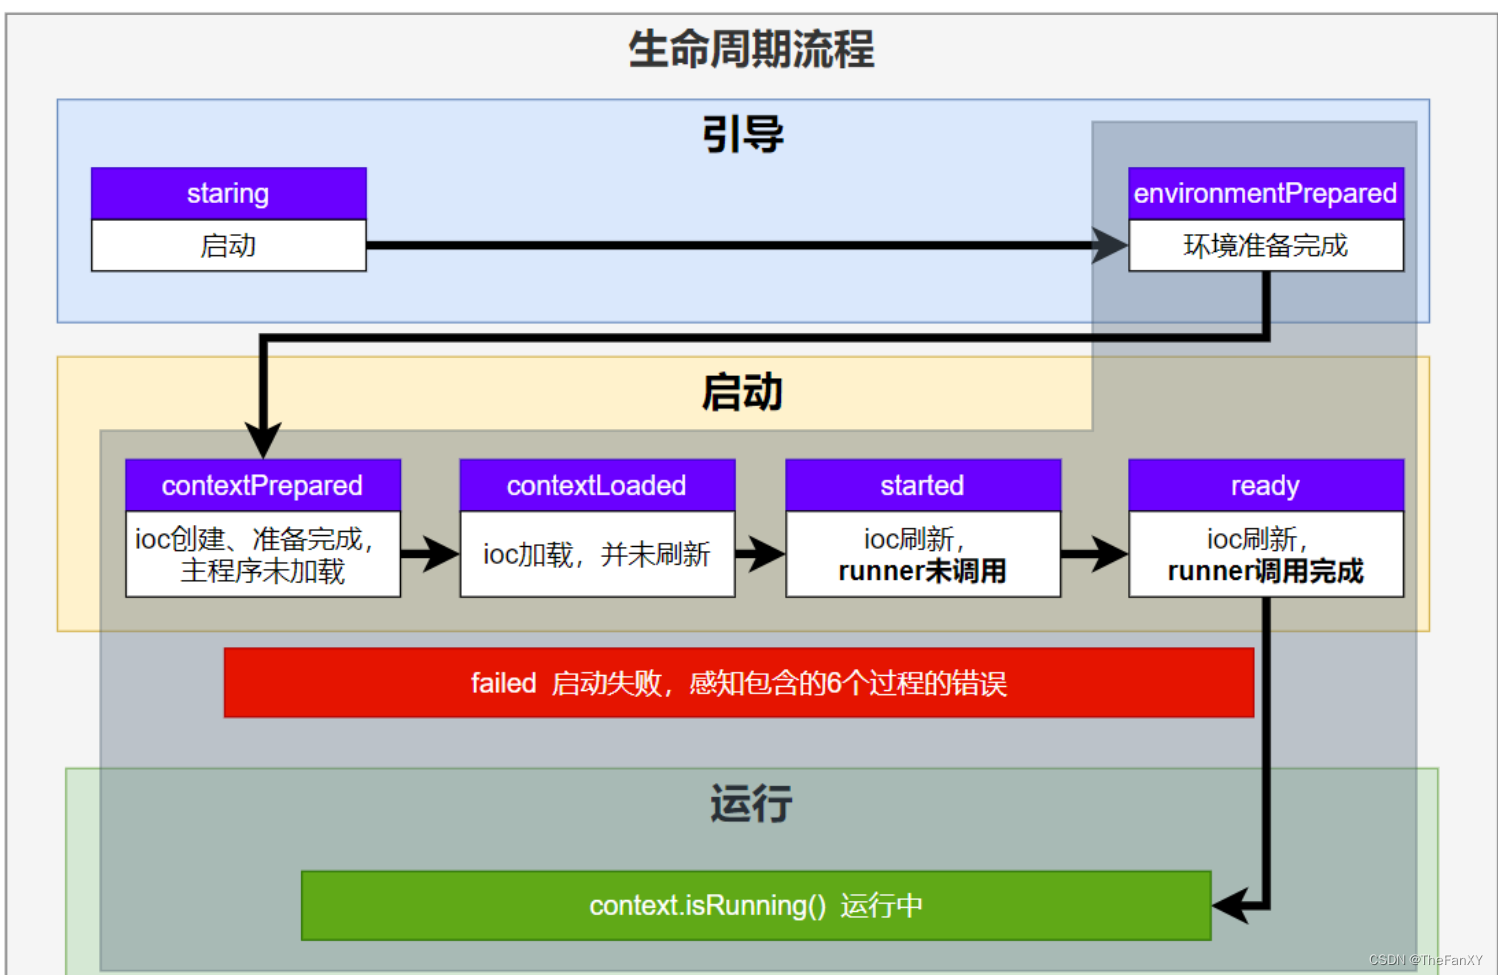
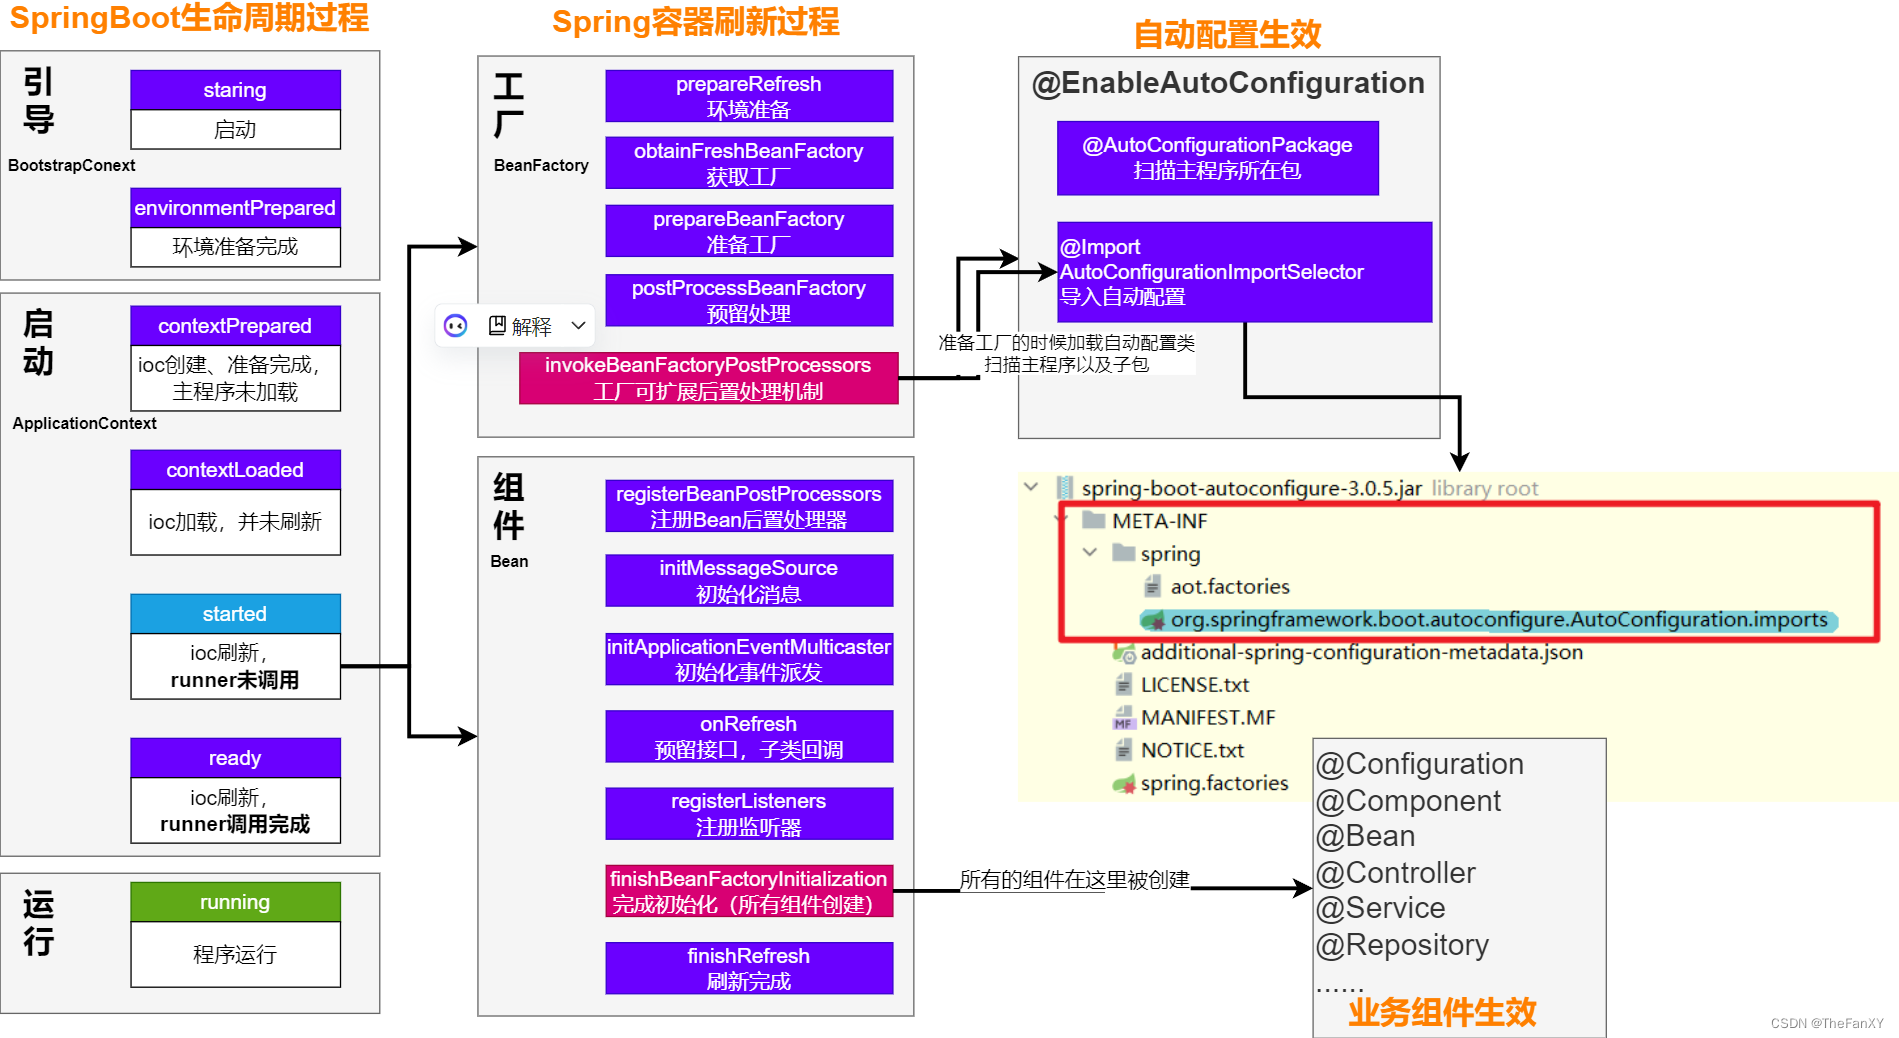
源码的run方法,先进行引导步骤
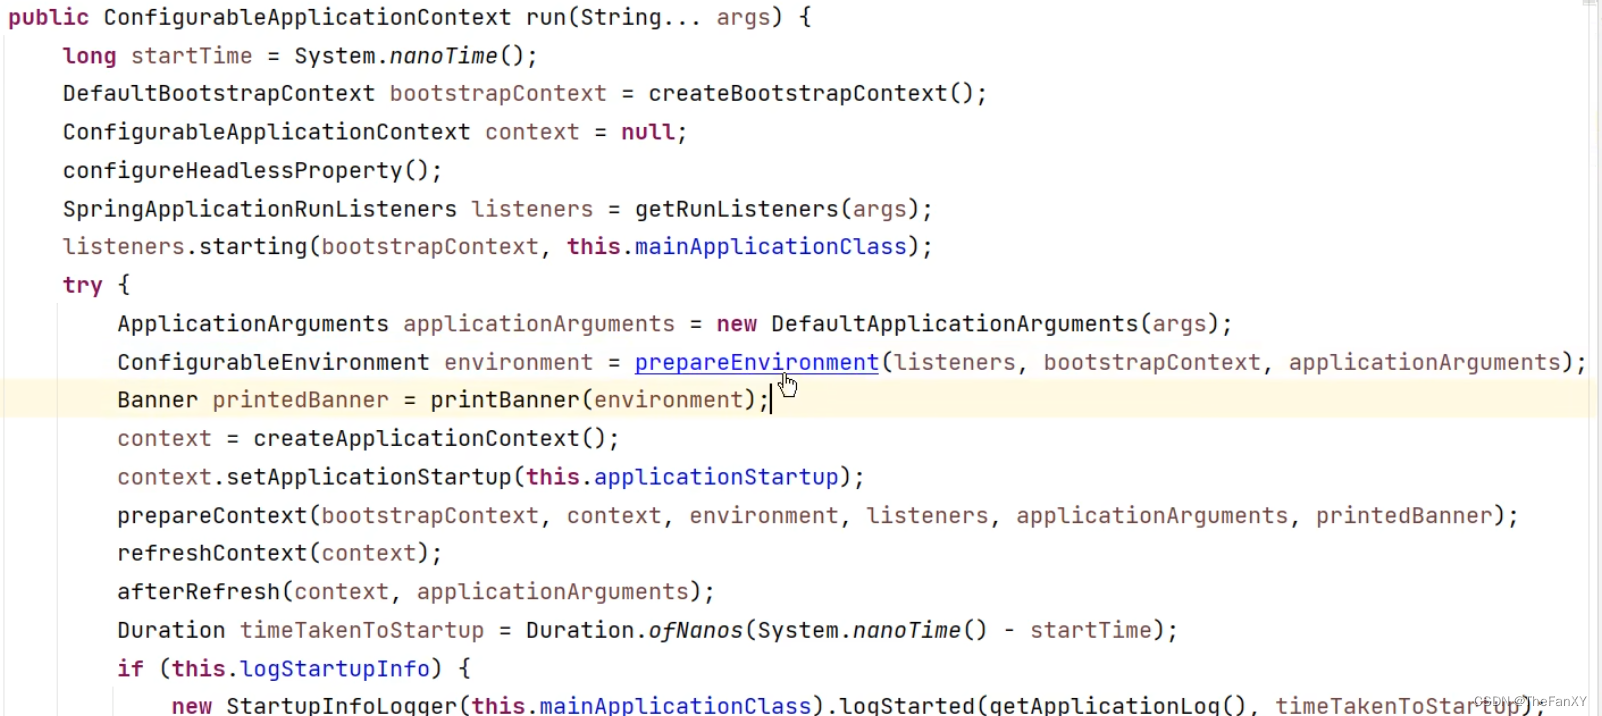
源码可见当contextPrepared进行的时候,正是引导结束的时候,标志着ioc容器创建成功但是sources(主配置类)没加载。并关闭引导上下文;组件都没创建
contextLoaded->主配置类加载但是没有刷新【说明Bean没创建,但是会加载Bean的定义信息,需要刷新才能把组件创建出来】(前几节讲过,可以从主程序的run()方法一路点,找到刷新容器的方法,必须经历spring容器刷新的12大步,才能把各种组件装到spring容器里面)

-----------------------------------------------------截至以前,ioc容器里面还没造bean-----------------------------------------------------
started: ioc容器刷新了(所有bean造好了),但是 runner 没调用。
可以在主程序的run方法里面看到started方法调用完了之后,就会调用callRunners方法,如果没有出现异常,就会依次调用listener的ready方法
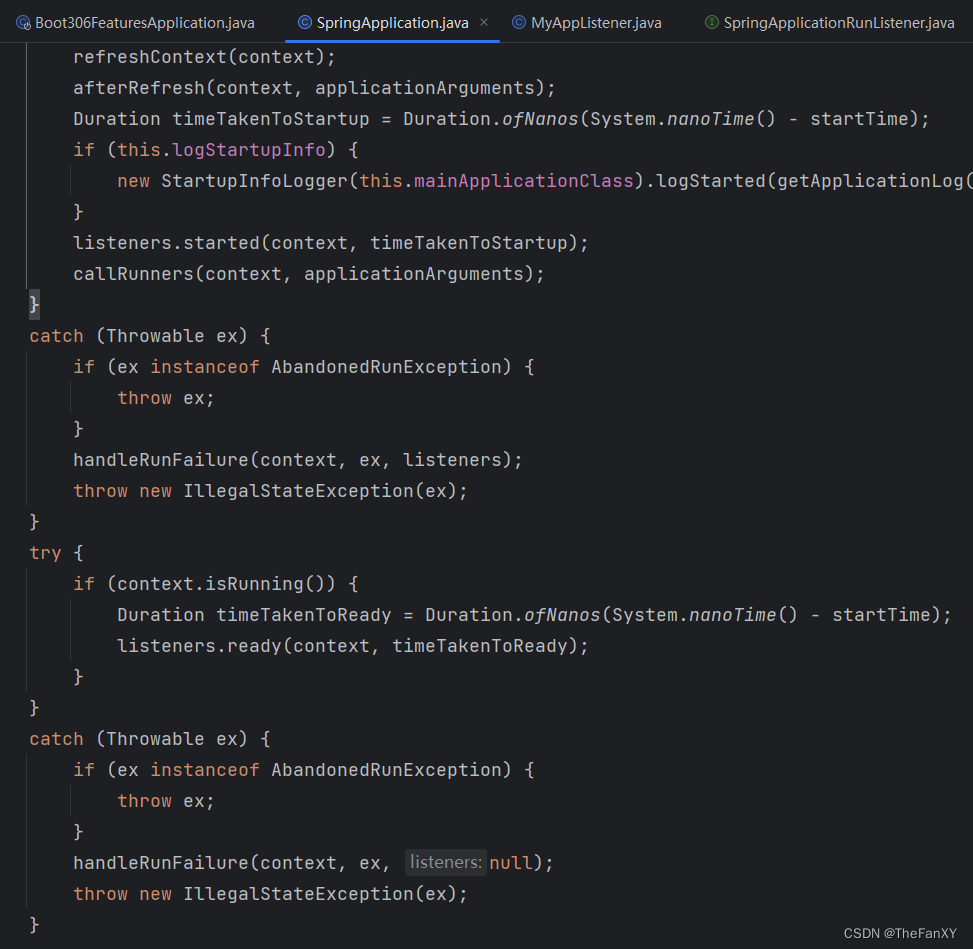
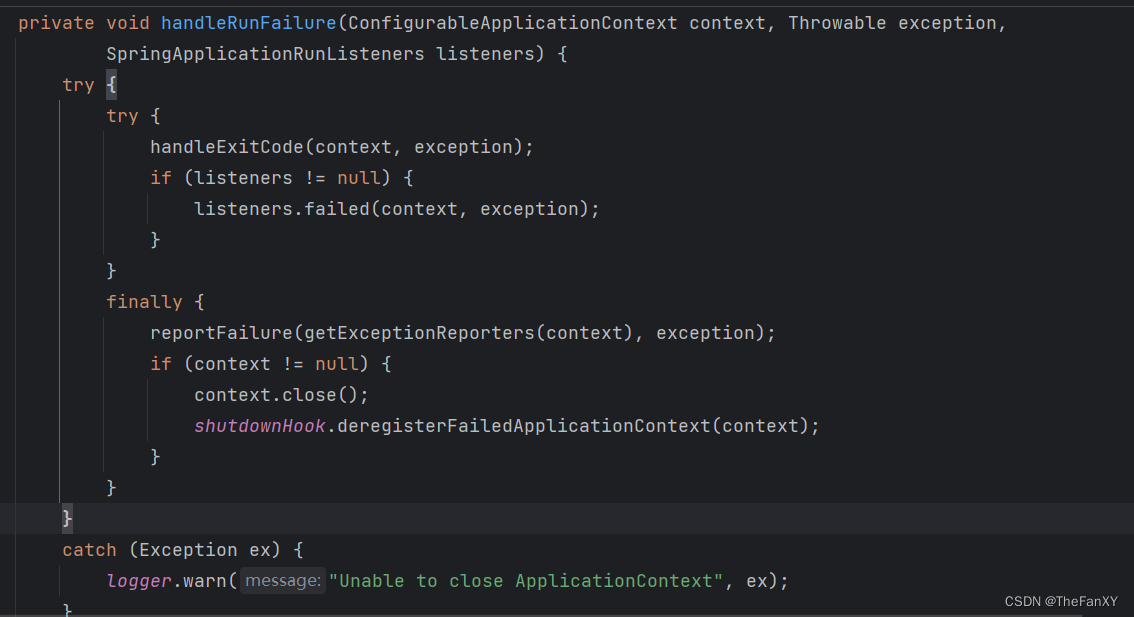
而在主程序run方法中其实可以发现,在starting之后,runner调用之前,出现的异常都被它捕获到,在此期间出现异常会调用handleRunFailue方法处理运行失败
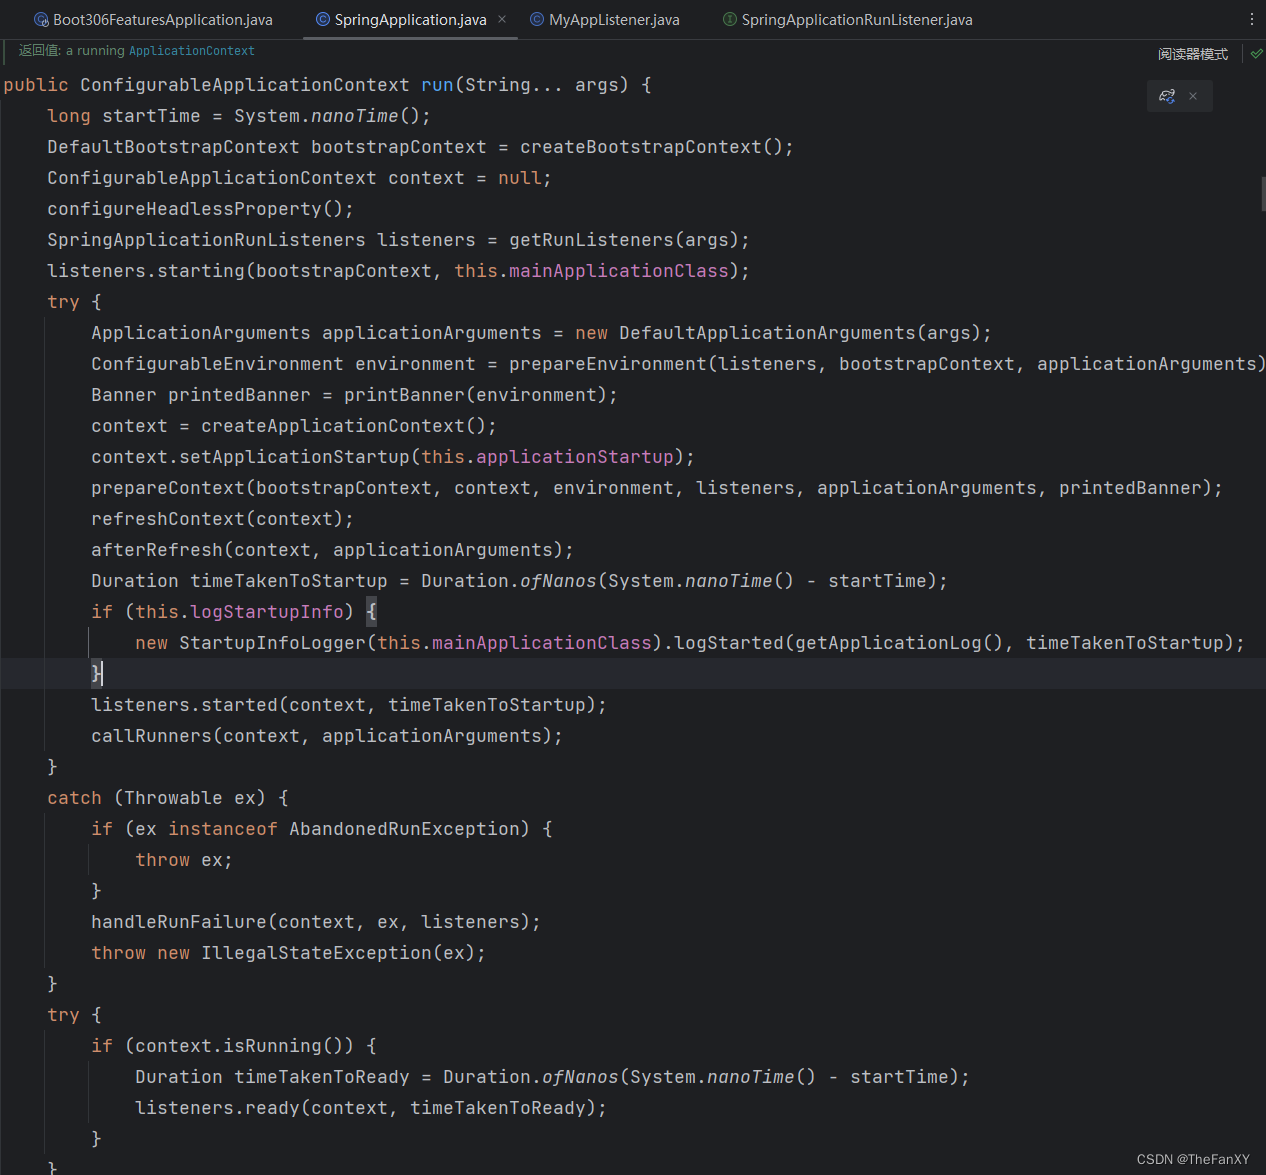
而调用handleRunFailue方法的情况下,第一步就是如果存在listenners,就调用它的failed方法,至此,全部的方法执行位置和大致流程就看完了
原理——>
Listener先要从 META-INF/spring.factories 读到

 1、引导: 利用 BootstrapContext 引导整个项目启动
      starting:              应用开始,SpringApplication的run方法一调用,只要有了 BootstrapContext 就执行
      environmentPrepared:   环境准备好(把启动参数等绑定到环境变量中),但是ioc还没有创建;
      这里的【once】应该被翻译为【一旦】环境准备好,ioc容器还没创建之前 而不是【只会调一次】
 2、启动:
      contextPrepared:       ioc容器创建并准备好,但是sources(主配置类)没加载。并关闭引导上下文;组件都没创建  【调一次】
      contextLoaded:         ioc容器加载。主配置类加载进去了。但是ioc容器还没刷新(我们的bean没创建)。
      =======截止以前,ioc容器里面还没造bean呢=======
      started:               ioc容器刷新了(所有bean造好了),但是 runner 没调用。
      ready:                  ioc容器刷新了(所有bean造好了),所有 runner 调用完了。
 3、运行
     以前步骤都正确执行,代表容器running。
2. 生命周期全流程
2. 事件触发时机
1. 各种回调监听器
一旦看到某个源码的方法,看到 xxxxgetSpringFactoriesxxxxxx(),就知道是读spring.factories 文件的。
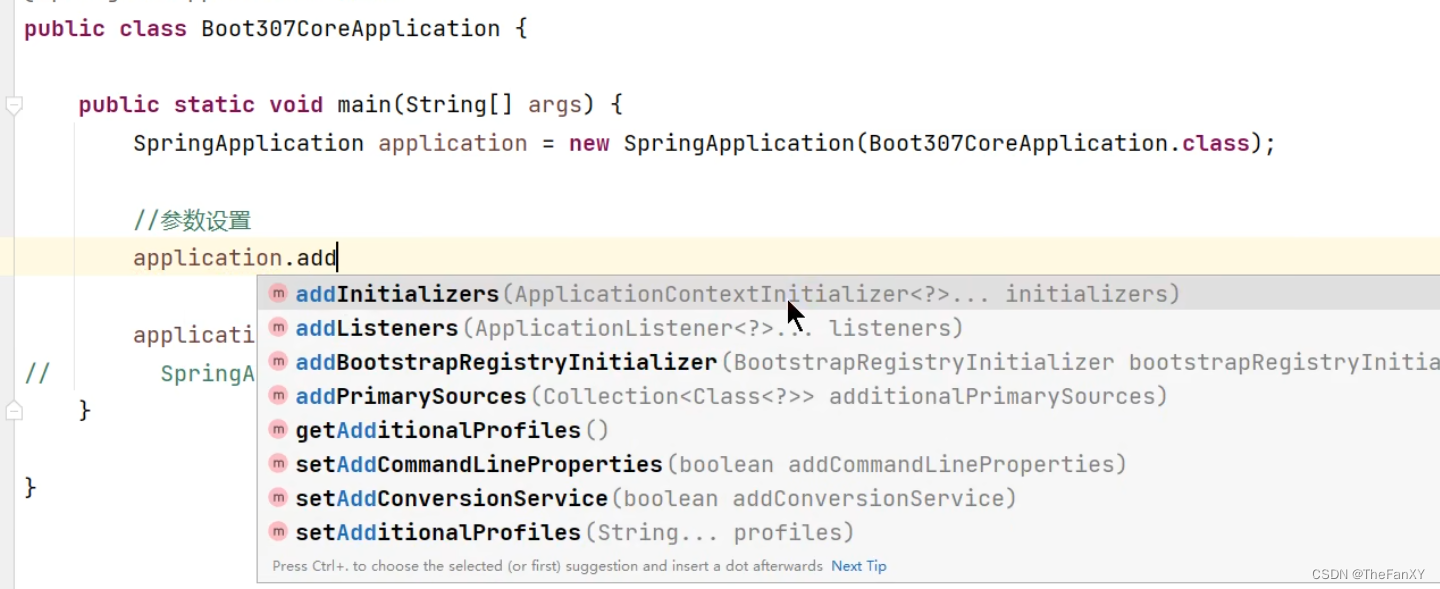
BootstrapRegistryInitializer: 感知特定阶段:感知 引导初始化META-INF/spring.factoriesrun方法启动第一步(严格第一步其实是记录时间戳)就创建引导上下文,创建引导上下文bootstrapContext的时候触发。- application.
addBootstrapRegistryInitializer(); 应用场景:项目启动之初可以利用它,进行密钥校对授权。
ApplicationContextInitializer: 感知特定阶段: 感知ioc容器初始化META-INF/spring.factories- application.
addInitializers();
- ApplicationListener: 感知全阶段:基于事件机制,感知事件(onEvent()方法)。 一旦到了哪个阶段可以做别的事
-
@Bean或@EventListener:事件驱动 -
SpringApplication.addListeners(…)或SpringApplicationBuilder.listeners(…) -
-
META-INF/spring.factories
-
- SpringApplicationRunListener: 感知全阶段生命周期 + 各种阶段都能自定义操作; 功能更完善。
META-INF/spring.factories
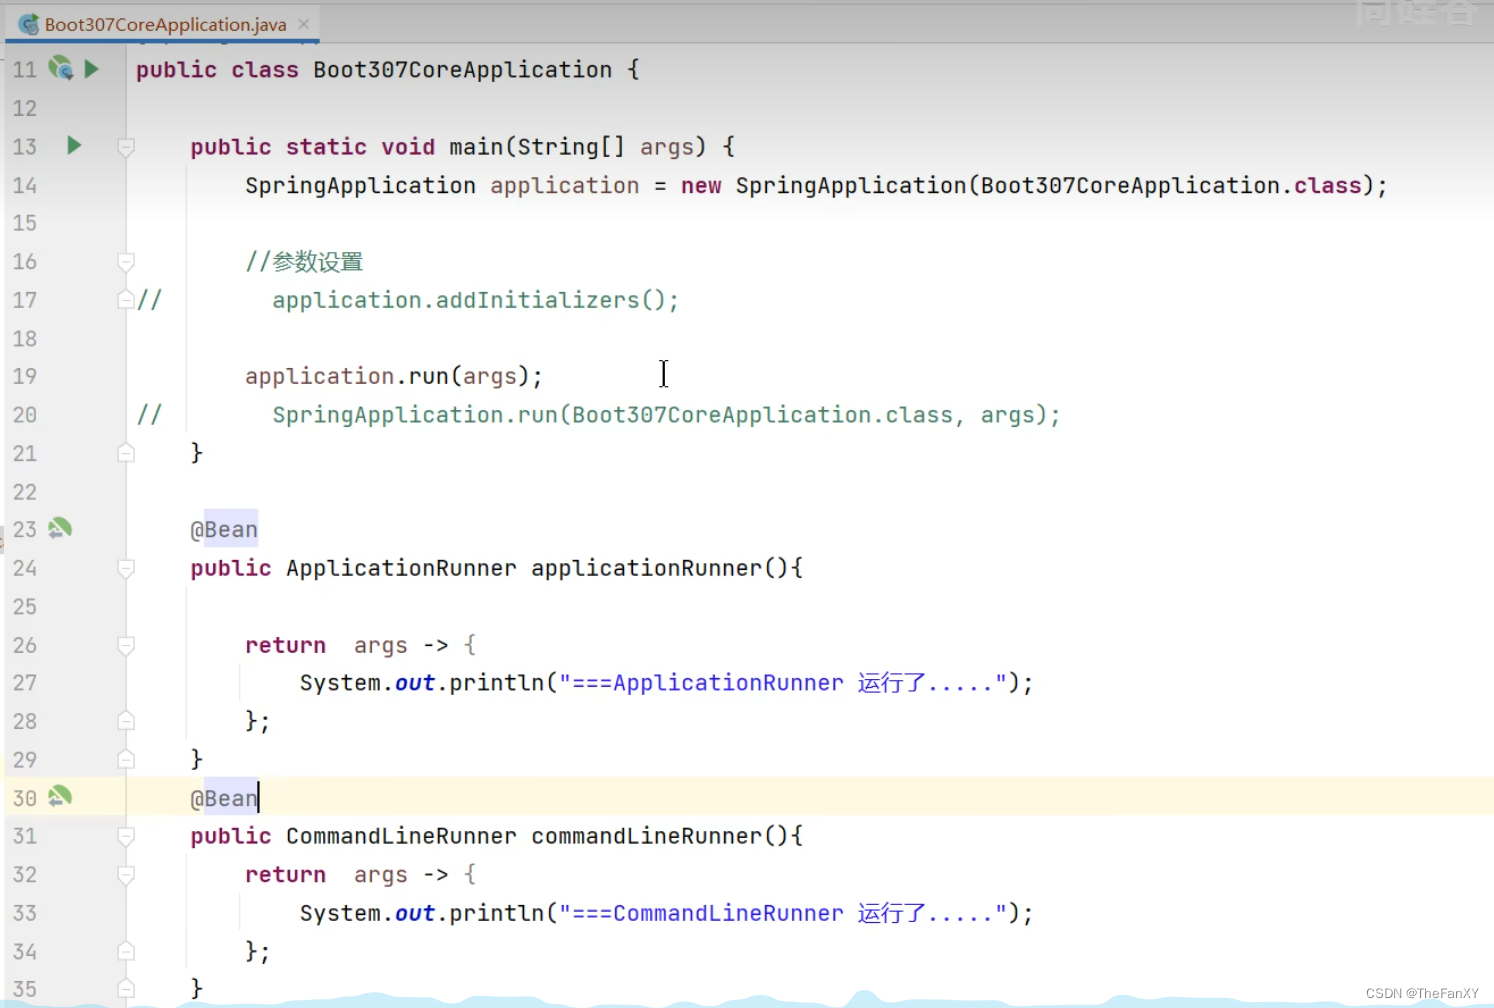
- ApplicationRunner: 感知特定阶段:感知应用就绪Ready。卡死应用,就不会就绪
@Bean
- CommandLineRunner: 感知特定阶段:感知应用就绪Ready。卡死应用,就不会就绪
@Bean
Runner怎么使用(根据源码:需要放入ioc容器)
最佳实战:
- 如果项目启动前做事:
BootstrapRegistryInitializer和ApplicationContextInitializer - 如果想要在项目启动完成后做事:
ApplicationRunner和CommandLineRunner - 如果要干涉生命周期做事:
SpringApplicationRunListener - 如果想要用事件机制:
ApplicationListener
2. 完整触发流程
9大事件触发顺序&时机
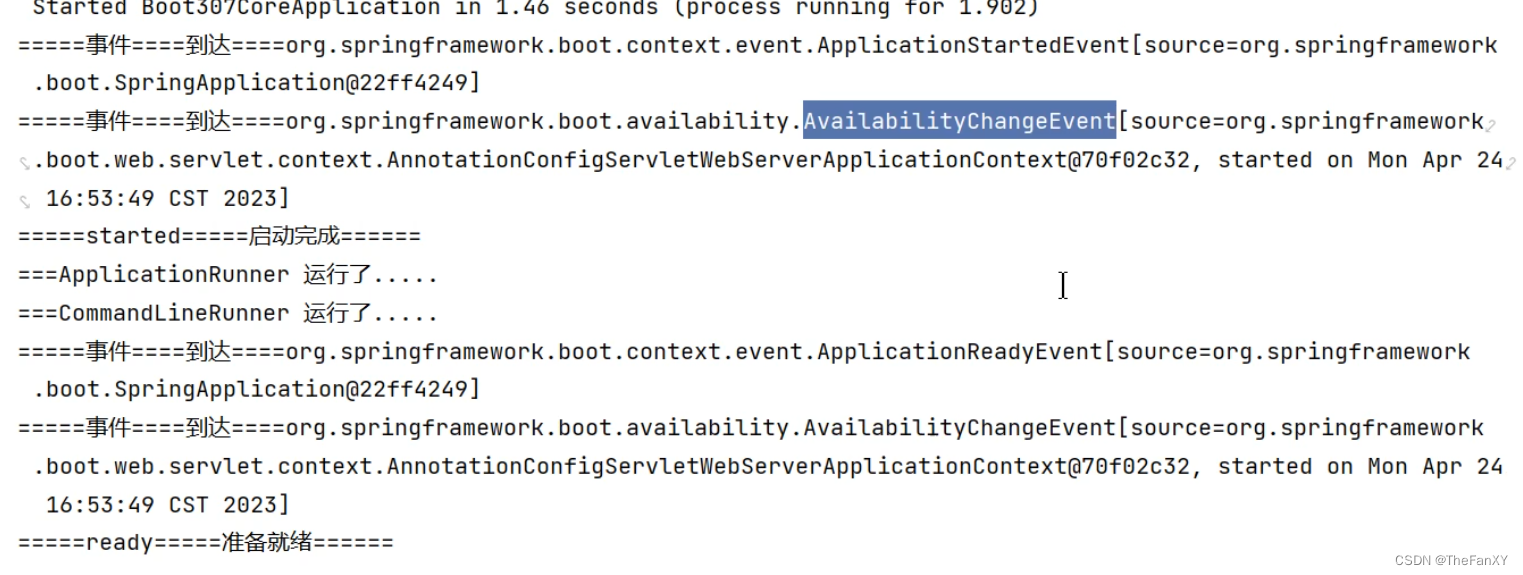
ApplicationStartingEvent:应用启动但未做任何事情, 除过注册listeners and initializers.ApplicationEnvironmentPreparedEvent: Environment 准备好,但context 未创建.ApplicationContextInitializedEvent: ApplicationContext 准备好,ApplicationContextInitializers 调用,但是任何bean未加载ApplicationPreparedEvent: 容器刷新之前,bean定义信息加载ApplicationStartedEvent: 容器刷新完成, runner未调用
=以下就开始插入了探针机制====AvailabilityChangeEvent:LivenessState.CORRECT应用存活; 存活探针ApplicationReadyEvent: 任何runner被调用AvailabilityChangeEvent:ReadinessState.ACCEPTING_TRAFFIC就绪探针,可以接请求ApplicationFailedEvent:启动出错
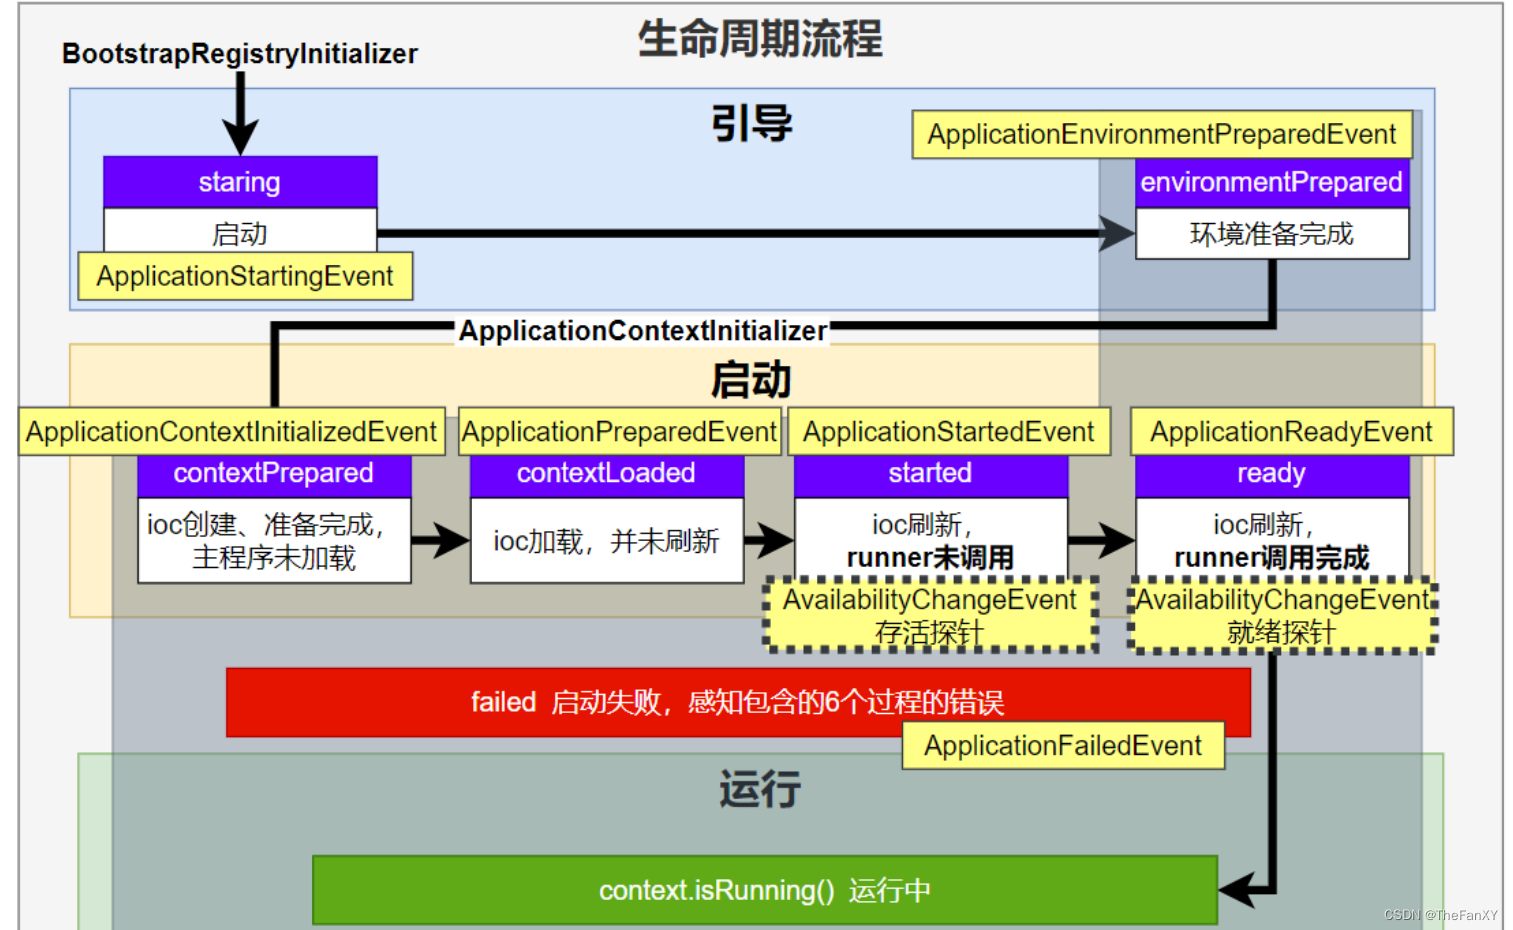
应用事件发送顺序如下:
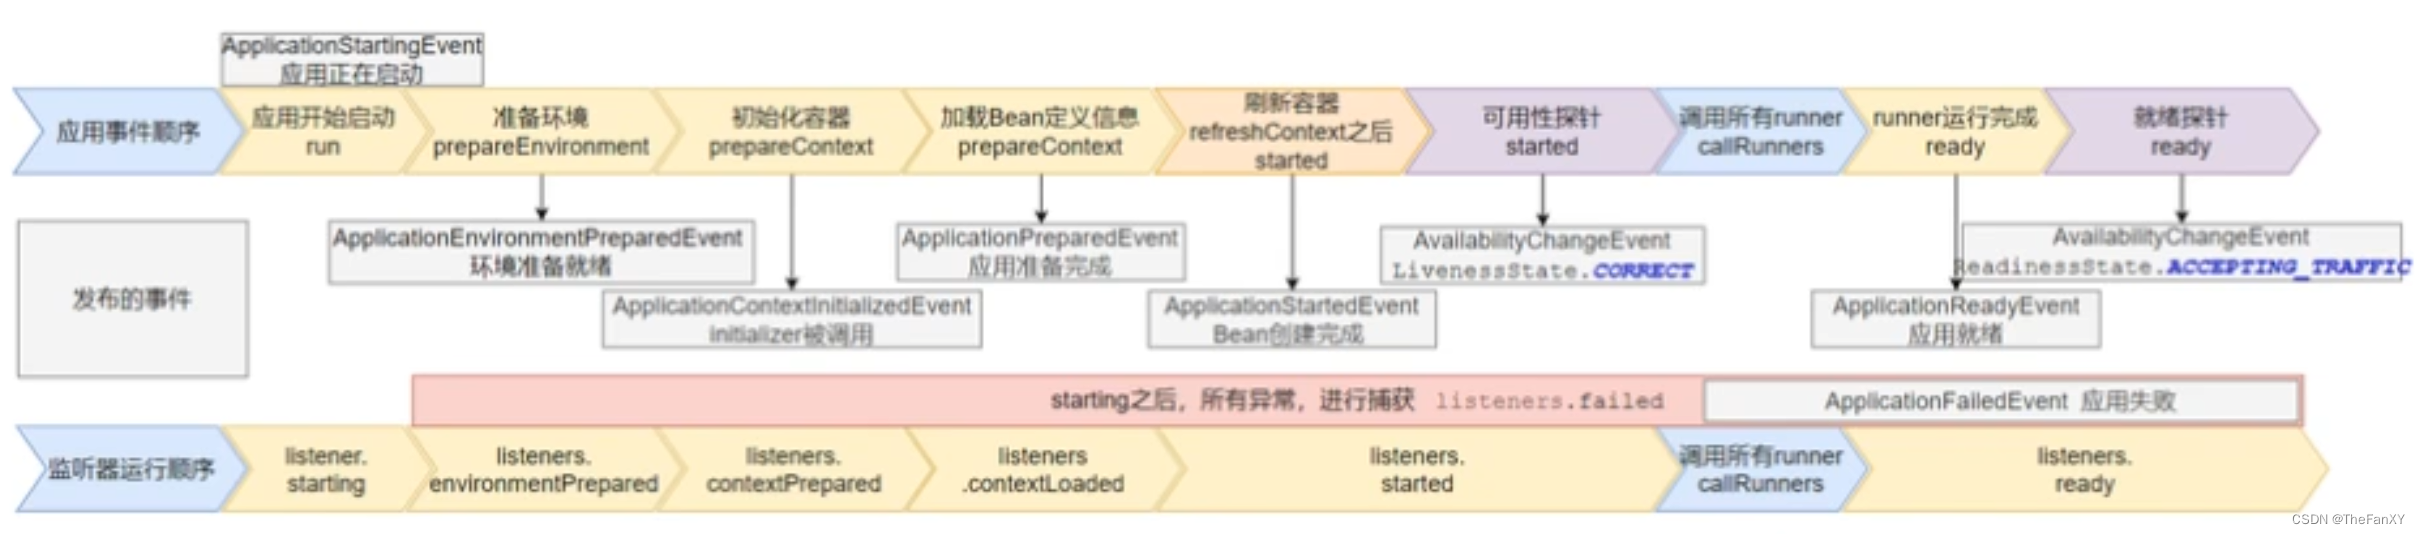
感知应用是否存活了:可能植物状态,虽然活着但是不能处理请求。
应用是否就绪了:能响应请求,说明确实活的比较好。
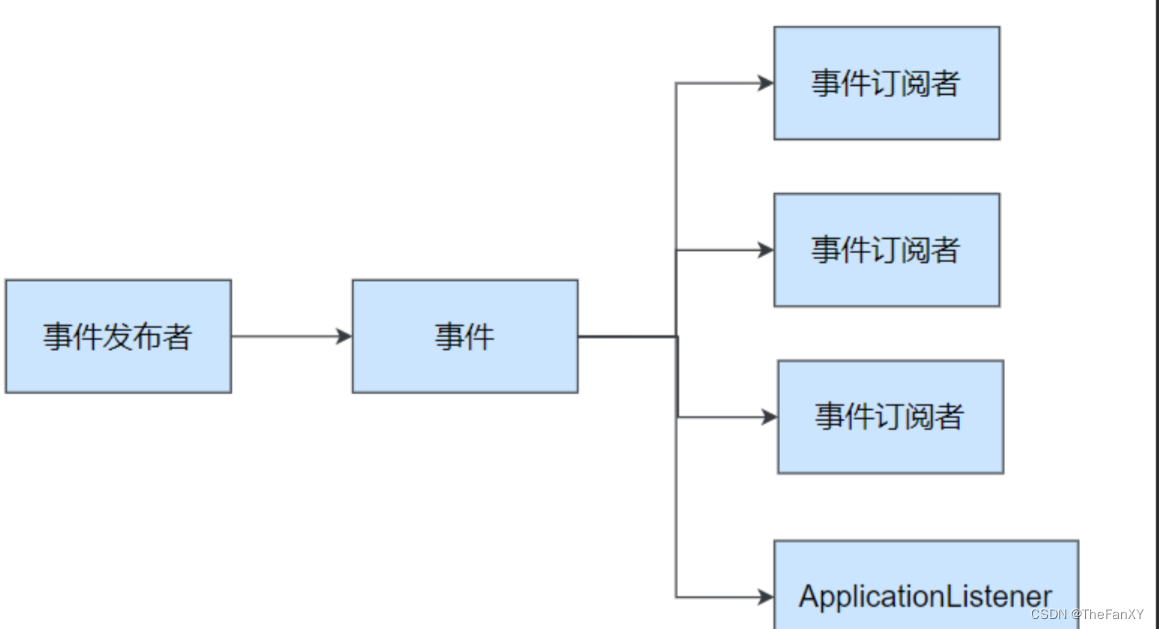
3. SpringBoot 事件驱动开发
应用启动过程生命周期事件感知(9大事件)、应用运行中事件感知(无数种)。
- 事件发布:
ApplicationEventPublisherAware或注入:ApplicationEventMulticaster - 事件监听:
组件 + @EventListener
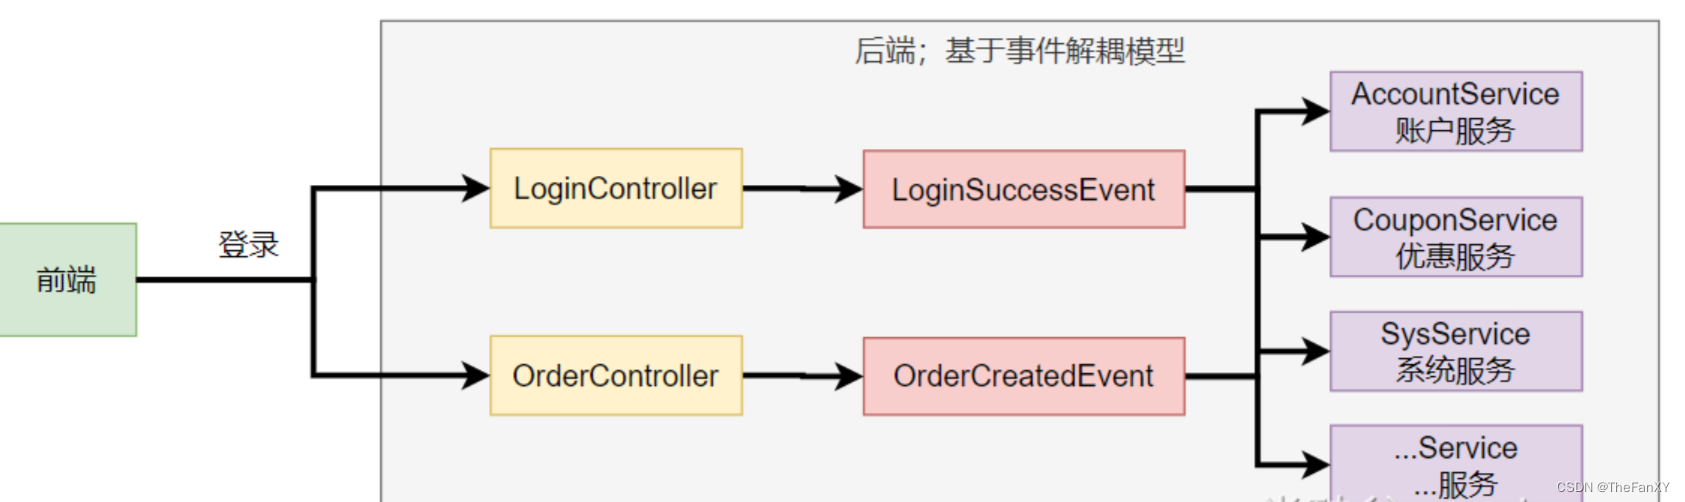
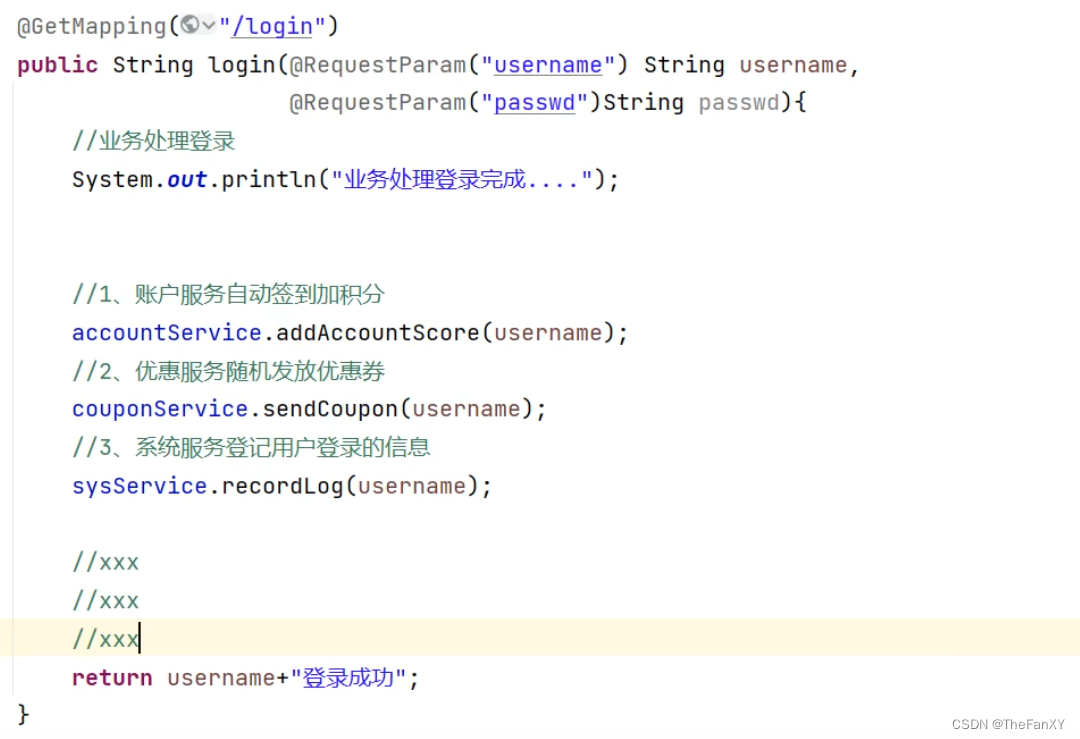
之前只能通过Controller类中注入数个Service然后利用他们的方法进行功能实现
事件发布者
@Service
public class EventPublisher implements ApplicationEventPublisherAware {

    /**
     * 底层发送事件用的组件,SpringBoot会通过ApplicationEventPublisherAware接口自动注入给我们
     * 事件是广播出去的。所有监听这个事件的监听器都可以收到
     */
    ApplicationEventPublisher applicationEventPublisher;

    /**
     * 所有事件都可以发
     * @param event
     */
    public void sendEvent(ApplicationEvent event) {
        //调用底层API发送事件
        applicationEventPublisher.publishEvent(event);
    }

    /**
     * 会被自动调用,把真正发事件的底层组组件给我们注入进来
     * @param applicationEventPublisher event publisher to be used by this object
     */
    @Override
    public void setApplicationEventPublisher(ApplicationEventPublisher applicationEventPublisher) {
        this.applicationEventPublisher = applicationEventPublisher;
    }
}
事件订阅者
实现接口的写法——> 更推荐下面的使用自定义方法和注解的方法
@Service
public class StealService implements ApplicationListener<LoginSuccessEvent> {

    public void steal(UserEntity userEntity){
        System.out.println("-------盗号成功---------");
        System.out.println(userEntity.getUserName() + ":" + userEntity.getPassword());
    }

    @Override
    public void onApplicationEvent(LoginSuccessEvent event) {
        System.out.println("StealService=====  收到事件  =======");
        UserEntity userEntity = (UserEntity) event.getSource();
        steal(userEntity);
    }
}
使用自定义方法和注解的方法
@Service
public class CouponService {

    @Order(1)
    @EventListener
    public void onEvent(LoginSuccessEvent loginSuccessEvent){
        System.out.println("===== CouponService ====感知到事件"+loginSuccessEvent);
        UserEntity source = (UserEntity) loginSuccessEvent.getSource();
        sendCoupon(source.getUsername());
    }

    public void sendCoupon(String username){
        System.out.println(username + " 随机得到了一张优惠券");
    }
}
2. 自动配置原理
1. 入门理解
应用关注的三大核心:场景、配置、组件
1. 自动配置流程
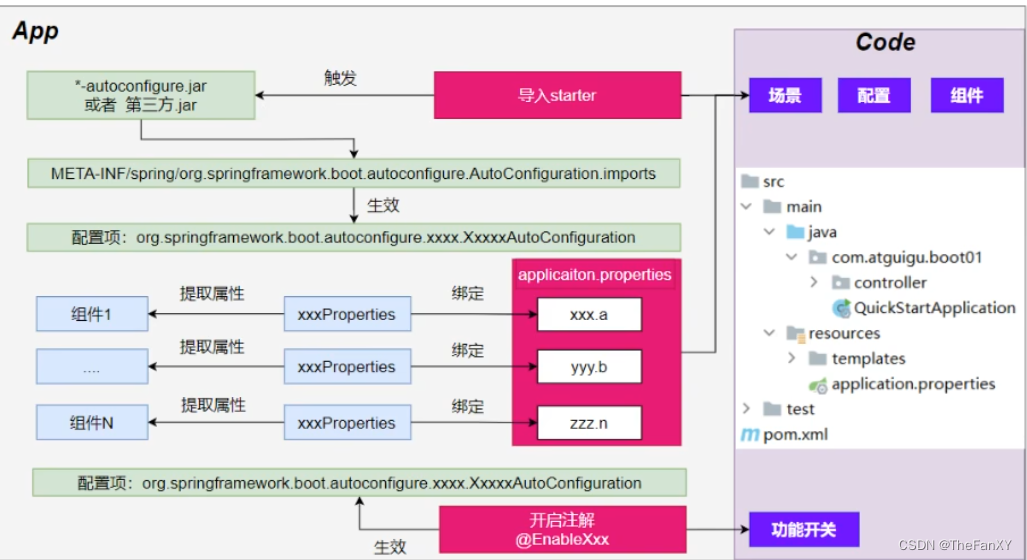
- 导入
starter - 依赖导入
autoconfigure - 寻找类路径下
META-INF/spring/org.springframework.boot.autoconfigure.AutoConfiguration.imports文件 - 启动,加载所有
自动配置类xxxAutoConfiguration
a. 给容器中配置功能组件
b.组件参数绑定到属性类中。xxxProperties
c.属性类和配置文件前缀项绑定
d.@Contional派生的条件注解进行判断是否组件生效 - 效果:
a. 修改配置文件,修改底层参数
b. 所有场景自动配置好直接使用
c. 可以注入SpringBoot配置好的组件随时使用
2. SPI机制
- Java中的SPI(Service Provider Interface)是一种软件设计模式,用于在应用程序中动态地发现和加载组件。 SPI的思想是,定义一个接口或抽象类,然后通过在classpath中定义实现该接口的类来实现对组件的动态发现和加载。
- SPI的主要目的是解决在应用程序中使用可插拔组件的问题。例如,一个应用程序可能需要使用不同的日志框架或数据库连接池,但是这些组件的选择可能取决于运行时的条件。通过使用SPI,应用程序可以在运行时发现并加载适当的组件,而无需在代码中硬编码这些组件的实现类。
- 在Java中,SPI的实现方式是通过在
META-INF/services目录下创建一个以服务接口全限定名为名字的文件,文件中包含实现该服务接口的类的全限定名。当应用程序启动时,Java的SPI机制会自动扫描classpath中的这些文件,并根据文件中指定的类名来加载实现类。- 通过使用SPI,应用程序可以实现更灵活、可扩展的架构,同时也可以避免硬编码依赖关系和增加代码的可维护性。
以上回答来自ChatGPT-3.5
在SpringBoot中,META-INF/spring/org.springframework.boot.autoconfigure.AutoConfiguration.imports
作业:写一段java的spi机制代码
3. 功能开关
- 自动配置:全部都配置好,什么都不用管。 自动批量导入
- 项目一启动,spi文件中指定的所有都加载。
@EnableXxxx:手动控制哪些功能的开启; 手动导入。- 开启xxx功能
- 都是利用 @Import 把此功能要用的组件导入进去
2. 进阶理解
1. @SpringBootApplication
@SpringBootConfiguration
就是: @Configuration ,容器中的组件,配置类。spring ioc启动就会加载创建这个类对象
@EnableAutoConfiguration:开启自动配置
开启自动配置 具体细节分析——>第二节
@AutoConfigurationPackage:扫描主程序包:加载自己的组件
- 利用
@Import(AutoConfigurationPackages.Registrar.class)想要给容器中导入组件(获取主程序的信息,然后通过注册方法批量注册)。 - 把主程序所在的包的所有组件导入进来。
- 为什么SpringBoot默认只扫描主程序所在的包及其子包
@Import(AutoConfigurationImportSelector.class):加载所有自动配置类:加载starter导入的组件
		List<String> configurations = ImportCandidates.load(AutoConfiguration.class, getBeanClassLoader())
			.getCandidates();
扫描SPI文件:
META-INF/spring/org.springframework.boot.autoconfigure.AutoConfiguration.imports
@ComponentScan
组件扫描:排除一些组件(哪些不要)
排除前面已经扫描进来的配置类、和自动配置类。
@ComponentScan(excludeFilters = { @Filter(type = FilterType.CUSTOM, classes = TypeExcludeFilter.class),
      @Filter(type = FilterType.CUSTOM, classes = AutoConfigurationExcludeFilter.class) })
2. 完整启动加载流程
生命周期启动加载流程
3. 自定义starter
场景:抽取聊天机器人场景,它可以打招呼。
效果:任何项目导入此starter都具有打招呼功能,并且问候语中的人名需要可以在配置文件中修改
-
- 创建
自定义starter项目,引入spring-boot-starter基础依赖
- 创建
-
- 编写模块功能,引入模块所有需要的依赖。
-
- 编写
xxxAutoConfiguration自动配置类,帮其他项目导入这个模块需要的所有组件
- 编写
-
- 编写配置文件
META-INF/spring/org.springframework.boot.autoconfigure.AutoConfiguration.imports指定启动需要加载的自动配置
- 编写配置文件
-
- 其他项目引入即可使用
1. 业务代码
自定义配置有提示。导入以下依赖重启项目,再写配置文件就有提示
@ConfigurationProperties(prefix = "robot")  //此属性类和配置文件指定前缀绑定
@Component
@Data
public class RobotProperties {

    private String name;
    private String age;
    private String email;
}
<!--        导入配置处理器,配置文件自定义的properties配置都会有提示-->
        <dependency>
            <groupId>org.springframework.boot</groupId>
            <artifactId>spring-boot-configuration-processor</artifactId>
            <optional>true</optional>
        </dependency>
2. 基本抽取
- 创建starter项目,把公共代码需要的所有依赖导入
- 把公共代码复制进来
- 自己写一个
RobotAutoConfiguration,给容器中导入这个场景需要的所有组件- 为什么这些组件默认不会扫描进去?
- starter所在的包和 引入它的项目的主程序所在的包不是父子层级
- 别人引用这个
starter,直接导入这个RobotAutoConfiguration,就能把这个场景的组件导入进来 - 功能生效。
- 测试编写配置文件
3. 使用@EnableXxx机制
@Retention(RetentionPolicy.RUNTIME)
@Target({ElementType.TYPE})
@Documented
@Import(RobotAutoConfiguration.class)
public @interface EnableRobot {


}
别人引入starter需要使用 @EnableRobot开启功能
4. 完全自动配置
- 依赖SpringBoot的SPI机制
- META-INF/spring/org.springframework.boot.autoconfigure.AutoConfiguration.imports 文件中编写好我们自动配置类的全类名即可
- 项目启动,自动加载我们的自动配置类


 1019
1019

 被折叠的 条评论
为什么被折叠?
被折叠的 条评论
为什么被折叠?
 到【灌水乐园】发言


